使用IdentityServer4 實現OpenID Connect服務端,添加用戶身份驗證。客戶端調用,實現授權。
IdentityServer4 目前已更新至1.0 版,在之前的文章中有所介紹。IdentityServer4 ASP.NET Core的OpenID Connect OAuth 2.0框架學習保護API 。
本文環境:IdentityServer4 1.0 .NET Core 1.0.1
下面正式開始。
服務端也就是提供服務,如QQ Weibo等。
新建一個ASP.NET Core Web Application 項目IdentityServer4OpenID,選擇模板Web 應用程序 不進行身份驗證。
刪除模板創建的Controllers 文件以及Views 文件夾。
添加IdentityServer4 引用:
Install-Package IdentityServer4
然後添加配置類Config.cs:
    public class Config
    {
        //定義系統中的資源
        public static IEnumerable<IdentityResource> GetIdentityResources()
        {
            return new List<IdentityResource>
            {
                new IdentityResources.OpenId(),
                new IdentityResources.Profile(),
            };
        }

        public static IEnumerable<Client> GetClients()
        {
            // 客戶端憑據
            return new List<Client>
            {
                // OpenID Connect implicit 客戶端 (MVC)
                new Client
                {
                    ClientId = "mvc",
                    ClientName = "MVC Client",
                    AllowedGrantTypes = GrantTypes.Implicit,

                    RedirectUris = { "http://localhost:5002/signin-oidc" },
                    PostLogoutRedirectUris = { "http://localhost:5002" },
                    //運行訪問的資源
                    AllowedScopes =
                    {
                        IdentityServerConstants.StandardScopes.OpenId,
                        IdentityServerConstants.StandardScopes.Profile
                    }
                }
            };
        }

        //測試用戶
        public static List<TestUser> GetUsers()
        {
            return new List<TestUser>
            {
                new TestUser
                {
                    SubjectId = "1",
                    Username = "admin",
                    Password = "123456",

                    Claims = new List<Claim>
                    {
                        new Claim("name", "admin"),
                        new Claim("website", "https://www.cnblogs.com/linezero")
                    }
                },
                new TestUser
                {
                    SubjectId = "2",
                    Username = "linezero",
                    Password = "123456",

                    Claims = new List<Claim>
                    {
                        new Claim("name", "linezero"),
                        new Claim("website", "https://github.com/linezero")
                    }
                }
            };
        }
    }
以上使用IdentityServer4測試數據類添加數據,直接存在內存中。IdentityServer4 是支持持久化。
然後打開Startup.cs 加入如下:
        public void ConfigureServices(IServiceCollection services)
        {
            // Add framework services.
            services.AddMvc();
            services.AddIdentityServer()
                .AddTemporarySigningCredential()
                .AddInMemoryIdentityResources(Config.GetIdentityResources())
                .AddInMemoryClients(Config.GetClients())
                .AddTestUsers(Config.GetUsers());
        }

       public void Configure(IApplicationBuilder app, IHostingEnvironment env, ILoggerFactory loggerFactory)
        {
            ...
            app.UseIdentityServer();
            ...
接著安裝UI,UI部分也可以自己編寫,也就是登錄 注銷 允許和錯誤。
可以到 https://github.com/IdentityServer/IdentityServer4.Quickstart.UI/tree/release 下載,然後解壓到項目目錄下。
也可以使用命令提示符快速安裝:
powershell iex ((New-Object System.Net.WebClient).DownloadString('https://raw.githubusercontent.com/IdentityServer/IdentityServer4.Quickstart.UI/release/get.ps1'))
在項目目錄下打開命令提示符,輸入以上命令。
更多信息,可以查看官方readme:https://github.com/IdentityServer/IdentityServer4.Quickstart.UI/blob/release/README.md
接著新建一個MVC客戶端,可以理解為你自己的應用,需要使用第三方提供的服務。
新建一個ASP.NET Core Web Application 項目MvcClient,選擇模板Web 應用程序 不進行身份驗證。
配置Url 綁定5002端口 UseUrls("http://localhost:5002")
然後添加引用:
Install-Package Microsoft.AspNetCore.Authentication.Cookies
Install-Package Microsoft.AspNetCore.Authentication.OpenIdConnect
本文最終所引用的為1.1 。
接著打開Startup類,在Configure方法中添加如下代碼:
            app.UseCookieAuthentication(new CookieAuthenticationOptions
            {
                AuthenticationScheme = "Cookies"
            });

            app.UseOpenIdConnectAuthentication(new OpenIdConnectOptions
            {
                AuthenticationScheme = "oidc",
                SignInScheme = "Cookies",

                Authority = "http://localhost:5000",
                RequireHttpsMetadata = false,

                ClientId = "mvc",
                SaveTokens = true
            });
然後在HomeController 加上[Authorize] 特性,HomeController是VS2015 模板創建的,如沒有可以自行創建。
然後更改Home文件夾下的Index視圖如下:
<dl>
    @foreach (var claim in User.Claims)
    {
        <dt>@claim.Type</dt>
        <dd>@claim.Value</dd>
    }
</dl>
首先運行服務端,定位到項目目錄下dotnet run,運行起服務端以後,訪問http://localhost:5000 ,確認是否正常訪問。
能正常訪問接著運行客戶端,同樣是dotnet run ,然後訪問http://localhost:5002,會默認跳轉至http://localhost:5000 ,這樣也就對了。
最終效果如下:
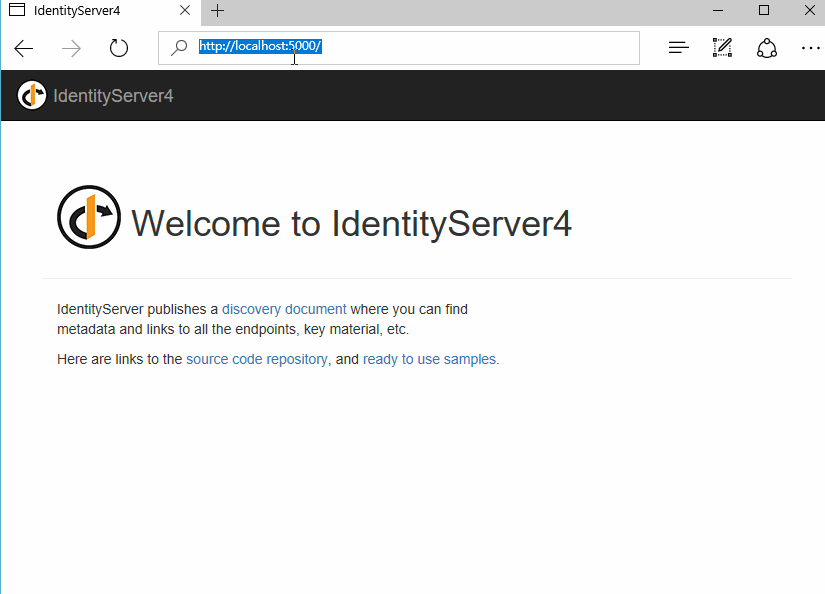
這裡UI部分就是官方UI,我們也可以自行設計應用到自己的系統中。登錄的用戶是配置的測試用戶,授權以後可以看到配置的Claims。
本文所采用的 Grant 為 Implicit,更為詳細的OAuth 2.0 https://tools.ietf.org/html/rfc6749 。
示例GitHub:https://github.com/linezero/Blog/tree/master/IdentityServer4OpenID
參考官方文檔:https://identityserver4.readthedocs.io/en/release/quickstarts/3_interactive_login.html
如果你覺得本文對你有幫助,請點擊“推薦”,謝謝。