Storyboard是動畫的集合。如果你使用了標記,所有的動畫必須要被定義在一個Storyboard中。(在 代碼中創建隔離的動畫對象,這是可能的,參見本章後面部分。)一個動畫的結構通常是不同於設置了動 畫的UI的結構上。例如,你可能想要來兩個單獨的用戶界面元素在同一時間被設置動畫。因為Storyboard 將動畫從有動畫效果的對象中隔離出來,Storyboard是自由地反射這樣的連接,即使這些元素被設置了對 象,可能被定義在完全不同的文件部分中。
示例8-15顯示了包含了兩個橢圓的用戶界面的標記。
示例8-15
<Window Text="Two Animations" Width="420" Height="150"

    xmlns="http://schemas.microsoft.com/winfx/avalon/2005"

    xmlns:x="http://schemas.microsoft.com/winfx/xaml/2005">


    <Window.Storyboards>

        <ParallelTimeline>

            <SetterTimeline TargetName="myEllipse" Path="(Ellipse.Width)">

                <DoubleAnimation From="10" To="300" Duration="0:0:5"

                                 RepeatBehavior="Forever" />

            </SetterTimeline>

            <SetterTimeline TargetName="myOtherEllipse" Path="(Ellipse.Width)">

                <DoubleAnimation From="300" To="10" Duration="0:0:5"

                                 RepeatBehavior="Forever" />

            </SetterTimeline>

        </ParallelTimeline>

    </Window.Storyboards>


    <StackPanel Orientation="Horizontal">

        <Ellipse x:Name="myEllipse" Height="100" Fill="Red" />

        <TextBlock>This is some text</TextBlock>

        <Ellipse x:Name="myOtherEllipse" Height="100" Fill="Blue" />

    </StackPanel>

</Window>
這些橢圓是互不鄰近的,但是它們的寬度都以異步的方式設置了動畫。這種異步被反射在Storyboard 的結構中:這兩個動畫都是內嵌在同樣的ParallelTimeline元素中,指出了這些動畫都在相同的時間運行 。一個從10到300的動畫,另一個是從300到10,因此StackPanel中這三項的總寬度保持為恆定的。
Storyboard必須運行以三種位置中的一種。它們可以放置在Style中、ContentTemplate中、或者頂級 元素中。頂級元素是Window和Page,或者派生於此的類。
所有的用戶界面元素都有一個Storyboard屬性,繼承於基類型FrameworkElement。你可能想這意味著 你可以添加一個Storyboard到任意一個元素。這於當前是不被支持的。Storyboard只會工作於:Style中 、ContentTemplate中、或者頂級元素中。
把動畫放入樣式的Storyboard中的能力,使你通過樣式系統應用動畫。這可是很有用的——如果你想 使用同樣的動畫在很多地方。通過把動畫放入樣式,而不是一個Window或Page,你要避免復制和排除次要 矛盾的可能性。示例8-16顯示了帶有Storyboard的一個樣式。
示例8-16
<Window Text="StyleAnimations" Width="220" Height="200"

    xmlns="http://schemas.microsoft.com/winfx/avalon/2005"

    xmlns:x="http://schemas.microsoft.com/winfx/xaml/2005">


    <Window.Resources>

        <Style TargetType="{x:Type Button}">

            <Setter Property="Height" Value="25" />

            <Setter Property="Background" Value="Green" />


             <Style.Storyboards>

                <SetterTimeline

                        Path="(Button.Background). (SolidColorBrush.Color)">

                    <ColorAnimation To="LimeGreen" Duration="0:0:0.3"

                        AutoReverse="True" RepeatBehavior="Forever" />

                </SetterTimeline>

                <ParallelTimeline RepeatBehavior="Forever" Duration="0:0:2">

                    <SetterTimeline Path="(Button.Width)">

                        <DoubleAnimation From="80" To="90" Duration="0:0:0.1"

                                         AutoReverse="True" />

                    </SetterTimeline>

                    <SetterTimeline Path="(Button.Height)"

                                    BeginTime="0:0:0.4">

                        <DoubleAnimation By="30" Duration="0:0:0.5"

                                         AutoReverse="True"/>

                    </SetterTimeline>

                </ParallelTimeline>

            </Style.Storyboards>

        </Style>

    </Window.Resources>


    <StackPanel Orientation="Vertical">

        <Button HorizontalAlignment="Center">Click me!</Button>

        <Button HorizontalAlignment="Center">No, click me!</Button>

    </StackPanel>


</Window>
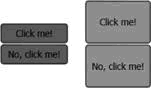
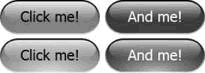
這些動畫並沒有做什麼顯著不尋常的事情。它們只是改變了一對按鈕的大小和顏色,正如圖8-8所示。 可是,注意到SetterTimeline元素並沒有詳細指出TargetName。這是因為使用一個樣式Storyboard,這裡 有一個隱式的目標:該樣式應用到的元素(這種情形下是一個Button)。同樣,如圖8-8所示,因為這是 一個樣式,它定義的動畫應用到所有的按鈕。
圖8-8
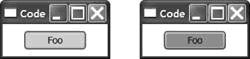
如果你為控件定義了一個模板,它可能包含了——沒有直接響應到元素可你又想設置動畫的屬性—— 的樣式,例如,圖8-9顯示了兩對按鈕。在頂行,這些按鈕顯示為自定義的可視化——帶有圓形的靜態外 觀。底部按鈕是相似的,但是一個放射性的填充被添加到按鈕中,並含有一個內部的光源。我們可能想為 這個光源設置動畫,使這個按鈕逐漸地跳動。
圖8-9
這個按鈕的類型並沒有提供我們用來表示光源顏色的屬性,因此為了給這個光源設置動畫,這個動畫 需要為控件模板中詳細指定的元素設置目標。在這種情形中,我們可以把動畫放入模板的Storyboard中, 而不是樣式的Storyboard中。如果你設置了x:Name屬性在模板中相應的元素上,你可以接著在動畫中用 TargetName引用它。示例8-17顯示了圖8-9的標記。
示例8-17
<Window xmlns="http://schemas.microsoft.com/winfx/avalon/2005"

    xmlns:x="http://schemas.microsoft.com/winfx/xaml/2005"

    Text="Style VisualTree Animation" Width="400" Height="150"

    >


    <Window.Resources>

        <Style TargetType="{x:Type Button}">

            <Setter Property="Background" Value="CornflowerBlue" />

            <Setter Property="Height" Value="26" />

            <Setter Property="Template">

                <Setter.Value>


                     <ControlTemplate TargetType="{x:Type Button}">

                        <Grid Height="{TemplateBinding Height}">

                            <RowDefinition Height="1.8*" />

                            <RowDefinition Height="*" />


                            <Rectangle Grid.RowSpan="2" RadiusX="13" RadiusY="13"

                                       Fill="{TemplateBinding Background}"

                                       Stroke="VerticalGradient Black LightGray" />


                            <!-- Glow -->


                             <Rectangle Grid.RowSpan="2" RadiusX="13" RadiusY="13"

                                       x:Name="glow">

                                <Rectangle.Fill>

                                    <RadialGradientBrush Center="0.5, 1"

                                             RadiusX="0.7" RadiusY="0.8">

                                        <RadialGradientBrush.GradientStops>

                                            <GradientStop Offset="0"

                                                           Color="White" />

                                            <GradientStop Offset="1"

                                                           Color="Transparent" />

                                        </RadialGradientBrush.GradientStops>

                                    </RadialGradientBrush>

                                </Rectangle.Fill>

                            </Rectangle>


                            <Rectangle Margin="3,1.1" RadiusX="11" RadiusY="12"

                                       Fill="VerticalGradient #dfff #0fff" />

                            <ContentPresenter Grid.RowSpan="3" Margin="13,2,13,4"

                                              HorizontalAlignment="Center"

                                              VerticalAlignment="Center" />


                        </Grid>


                        <ControlTemplate.Storyboards>

                            <SetterTimeline TargetName="glow"

Path="(Rectangle.Fill).(LinearGradientBrush.GradientStops)[0]. (GradientStop.Color)">


                                 <ColorAnimation From="#1fff" To="#cfff"

                                    Duration="0:0:1"

                                    AutoReverse="True" RepeatBehavior="Forever"

                                    AccelerationRatio="0.4"

                                    DecelerationRatio="0.6"/>

                            </SetterTimeline>

                        </ControlTemplate.Storyboards>

                    </ControlTemplate>

                </Setter.Value>

            </Setter>


        </Style>

    </Window.Resources>


    <StackPanel VerticalAlignment="Center"

                Orientation="Horizontal">

        <Button Margin="4,0">Click me!</Button>

        <Button Background="DarkRed" Foreground="White">And me! </Button>

    </StackPanel>


</Window>
大多數模板是靜態的,但是光源被設置了動畫。注意到x:Name屬性帶有一個glow值在相關的形狀上。 這個動畫在模板的Storyboard中,正如你希望的,它將包括一個單獨的SetterTimeline,帶有一個被設置 為glow的TargetName。這個Path有點復雜,簡單的因為我們為一個特定的帶有筆刷的GradientStop設定動 畫。記住輕量級對象——如筆刷或者梯度停止,不能被直接設置動畫。替代的,我們不得不生成相應的完 整的UI元素。動畫設置目標同時使用Path屬性來向下導航到我們希望改動的屬性。
這個特定的Path引進了一個我們之前沒有看到過的新樣式:[0]。這個[index]語法用於指出一個項在 集合的一個特定的偏移位置。
正如我們在第五章看到的,樣式和模板都可以定義觸發器以允許屬性被設置為自動依照某一個刺激。 例如,你可以觸發任何Storyboard中的動畫——當一個特定的事件發生時。
示例8-18為一個按鈕顯示了一個樣式,帶有一個簡單的模板——僅繪制了一個矩形在按鈕內容的周圍 。這個模板的Storyboard包含了兩個動畫。第一個退變顏色到PeachPuff,然會再返回來,另一個則在矩 形輪廓的厚度上振蕩。注意到,這兩個按鈕都有一個設置為{x:Null}的BeginTime。這防止了在應用程序 開始的時候這些按鈕會自動運行動畫。
示例8-18
<Style TargetType="{x:Type Button}">

    <Setter Property="Template">

        <Setter.Value>

            <ControlTemplate TargetType="{x:Type Button}">

                <Grid>

                    <Rectangle x:Name="mainRect"  Fill="Aqua" Stroke="Blue" />

                    <ContentPresenter

                        HorizontalAlignment=

                                   "{TemplateBinding HorizontalContentAlignment}"

                        VerticalAlignment=

                                   "{TemplateBinding VerticalContentAlignment}" />

                </Grid>


                <ControlTemplate.Storyboards>


                    <!-- Click animation -->


                    <SetterTimeline x:Name="clickTimeline" BeginTime="{x:Null}"

                                 TargetName="mainRect"

                                 Path="(Rectangle.Fill). (SolidColorBrush.Color)">

                        <ColorAnimation To="PeachPuff" Duration="0:0:0.2"

                                        AutoReverse="True" />

                    </SetterTimeline>


                    <!-- Mouse over animation -->


                     <SetterTimeline x:Name="enterTimeline" BeginTime="{x:Null}"

                                    TargetName="mainRect" Duration="1"

                                    Path="(Rectangle.StrokeThickness)" >

                        <DoubleAnimation To="3" Duration="0:0:0.2"

                                         AutoReverse="True"

                                         RepeatBehavior="Forever" />

                    </SetterTimeline>


                 </ControlTemplate.Storyboards>


                <ControlTemplate.Triggers>

                    <EventTrigger RoutedEvent="ButtonBase.Click">

                        <EventTrigger.Actions>

                            <BeginAction TargetName="clickTimeline" />

                        </EventTrigger.Actions>

                    </EventTrigger>


                     <EventTrigger RoutedEvent="Mouse.MouseEnter">

                        <EventTrigger.Actions>

                            <BeginAction TargetName="enterTimeline" />

                        </EventTrigger.Actions>

                    </EventTrigger>


                     <EventTrigger RoutedEvent="Mouse.MouseLeave">

                        <EventTrigger.Actions>

                            <StopAction TargetName="enterTimeline" />

                        </EventTrigger.Actions>

                    </EventTrigger>

                </ControlTemplate.Triggers>


             </ControlTemplate>

        </Setter.Value>

    </Setter>

</Style>
這個動畫被模板中的triggers部分中的Eventtrigger元素全部觸發。首先會響應到這些按鈕的Click事 件。(這個事件由按鈕的基本類定義,這裡是ButtonBase.Click。)無論何時點擊這個按鈕。這將引起 clickTimeline動畫的運行,使按鈕退變顏色到PeachPuff然後再回到被點擊時的樣子。
另一個動畫有兩個Eventtrigger元素,一個用於當鼠標進入控件的時候,另一個用於當鼠標離開控件 的時候。這是因為線條寬度的動畫會永遠重復,如果這只有一個觸發器,開始動畫在鼠標進入控件的時候 ,這個動畫將會開始而不會停止,由於這是一個頂級的timeline。因此我們需要1秒鐘的Eventtrigger, 響應到MouseLeave事件——使用StopAction來停止這個動畫。
這個示例的鼠標事件命名為Mouse.MouseEnter和Mouse.MouseLeave。這是有一點不尋常的,當事件被 命名為定義它們的元素。這些事件是繼承於UIElement基類,因此你可以希望它們被命名為 UIElement.MouseEnter和UIElement.MouseLeave。可是,這些由UIElement提供的事件只是底層的附屬事 件外面的包裝。底層的事件由System.Windows.Input命名空間的Mouse類定義,這是為什麼事件名以 Mouse.UIElement開始,簡單而便利的包裝了這些附屬事件作為標准.NET事件。
每個Eventtrigger可以有你想要的任何事件,因此你可以一次性開始或廢棄一些動畫。
這通常是非常便利的使WPF自動開始和停止你的動畫——在事件發生時。這就意味著你不需要寫任何代 碼。可是,這並不總是一個適當的事件來用作觸發器,因此在程序上開始一個動畫,有時是很有用的。
8.3.1 使用代碼加載動畫
為了從代碼上開始一個動畫,理解timeline和時鐘之間的不同是必要的。正如我們已經看到的,一個 timeline層次是在一段延伸的時間內發生的一個或更多事情的描述——但這只是一個描述。timeline層次 的存在,帶有一個SetterTimeline和一個DoubleAnimation,並不是足夠引起動畫的發生。表現這個動畫 的工作由一個或多個時鐘完成。
時鐘是一個在運行期創建的對象,對timeline中的當前位置保持跟蹤,執行timeline定義的無論什麼 動作。如果你回想到timeline圖表,如圖8-7,時鐘就是知道我們在時間的那個位置的圖表上端。
timeline和時鐘的關系並不像代碼和多線程的關系。可執行代碼定義了要表現什麼操作,但是一個線 程被要求執行代碼。同樣的,一個timeline描述了在一段特定的時間長度發生了什麼,但是一個時鐘被要 求運行這個timeline。
WPF自動創建時鐘。在創建一個用戶界面的時候,它順便訪問相應的Stroyboard屬性和為每個timeline 創建時鐘。如果一個帶有storyboard的樣式或模板被使用在多個地方,每個實例都有它自己的一組時鐘— —支持動畫獨立地運行。這是無妨的,否則,如果你有一個動畫在鼠標進入按鈕的時候運行,它會為屏幕 上所有的按鈕同時運行,這將不會是十分有用的。
通常,頂級timeline的時鐘是自動開始的,基於他們的BeginTime。可是,如果你詳細指定BeginTime 為{x:Null},這個時鐘將不會開始,因此這個動畫不會運行。我們在前面的章節看到,如何使用觸發器來 加載動畫。觸發器中的BeginAction只是告訴WPF在觸發器發生時,開始相應的timeline的時鐘。你也可以 編寫代碼來開始動畫。
為了親自開始一個動畫,我們需要得到它的時鐘。這些代碼需要找到timeline的時鐘,看上去有點不 同的,取決於你是否處理timeline在一個Style、一個模板、還是一個頂級元素中。
示例8-19
<Window x:Class="StartAnimationWithCode.Window1"

    xmlns="http://schemas.microsoft.com/winfx/avalon/2005"

    xmlns:x="http://schemas.microsoft.com/winfx/xaml/2005"

    Text="Code" Width="150" Height="100">


    <Window.Storyboards>

        <SetterTimeline BeginTime="{x:Null}" TargetName="myButton"

                x:Name="clickTimeline"

                Path="(Button.Background).(SolidColorBrush.Color)">

            <ColorAnimation To="Red" Duration="0:0:0.2" AutoReverse="True" />

        </SetterTimeline>

    </Window.Storyboards>


    <StackPanel HorizontalAlignment="Left" VerticalAlignment="Top">

        <Button x:Name="myButton" Background="Aqua">Foo</Button>

    </StackPanel>

</Window>
這個動畫將按鈕的顏色改變為紅色,而且還要返回。由於這個動畫的BeginTime被設置為{x:Null},並 且沒有任何自動的觸發器,我們需要寫一些代碼來運行它們。我們將這麼做——通過添加一個Click句柄 到示例8-19中的按鈕。示例8-20顯示了包含這個Click句柄的代碼。
示例8-20
using System;

using System.Windows;

using System.Windows.Media.Animation;


namespace StartAnimationWithCode

{

    public partial class Window1 : Window

    {

        public Window1( ) : base( )

        {

            InitializeComponent( );


            myButton.Click += ButtonClick;

        }


        private void ButtonClick(object sender, RoutedEventArgs e)

        {

            Clock clock;

            Timeline clickTimeline = FindName("clickTimeline") as Timeline;

            clock = this.FindStoryboardClock(clickTimeline);


             clock.ClockController.Begin( );

        }

    }

}
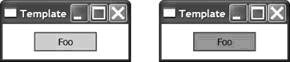
這個句柄獲取了動畫的timeline,接著獲取它的Clock。它使用了時鐘的控制器來運行這個動畫。圖8 -10顯示了這個運行中的動畫。
圖8-10
如果這個動畫存在於一個樣式中,這段代碼工作得有點不同。示例8-21顯示了帶有動畫的一個樣式。 (這個動畫有和前一個示例同樣的效果;它只是以一種不同的方式被應用。)
示例8-21
<Window x:Class="StartAnimationWithCode.StyleAnimationFromCode"

    xmlns="http://schemas.microsoft.com/winfx/avalon/2005"

    xmlns:x="http://schemas.microsoft.com/winfx/xaml/2005"

    Text="Style" Width="150" Height="100">


    <Window.Resources>

        <Style TargetType="{x:Type Button}">

            <Style.Storyboards>

                <SetterTimeline BeginTime="{x:Null}" x:Name="clickTimeline"

                                Path="(Button.Background). (SolidColorBrush.Color)">

                    <ColorAnimation To="Red" Duration="0:0:0.2"

                                    AutoReverse="True" />

                </SetterTimeline>

            </Style.Storyboards>

        </Style>

    </Window.Resources>


    <Button x:Name="myButton" Background="Aqua"

            HorizontalAlignment="Center" VerticalAlignment="Center">

        Foo

    </Button>

</Window>
這個Click句柄必須要修改,因為動畫現在定義在樣式中。示例8-22顯示了新的句柄。
示例8-22
private void ButtonClick(object sender, RoutedEventArgs e)

{

    Clock clock;

    clock = Style.FindStoryboardClock(myButton, "clickTimeline");


    clock.ClockController.Begin( );

}
當然,如果樣式定義了一個模板,我們可能希望直接為模板的一部分定義動畫。在這種情形中,動畫 會存在於模板的Stroyboard中,而不是樣式的Stroyboard中。示例8-23顯示了包含了一個帶Stroyboard的 模板的樣式。
示例8-23
<Style TargetType="{x:Type Button}">

    <Setter Property="Template">

        <Setter.Value>

            <ControlTemplate TargetType="{x:Type Button}">

                <Grid>

                    <Rectangle x:Name="mainRect"  Fill="Aqua" Stroke="Blue" />

                    <ContentPresenter HorizontalAlignment="{TemplateBinding

                                           HorizontalContentAlignment}"

                                      VerticalAlignment="{TemplateBinding

                                           VerticalContentAlignment}" />

                </Grid>


                <ControlTemplate.Storyboards>

                    <SetterTimeline BeginTime="{x:Null}" TargetName="mainRect"

                              x:Name="clickTimeline"

                              Path="(Rectangle.Fill). (SolidColorBrush.Color)">

                        <ColorAnimation To="Red" Duration="0:0:0.2"

                                        AutoReverse="True" />

                    </SetterTimeline>

                </ControlTemplate.Storyboards>

            </ControlTemplate>

        </Setter.Value>

    </Setter>

</Style>
雖然事實上,動畫現在嵌入到樣式模板中,而不是樣式中,我們仍可以和之前同樣的方式加載這個動 畫——使用示例8-22所示的代碼。圖8-11顯示了結果。
圖8-11
在所有的這些示例中,我們使用了時鐘的ClickController。這就為控制操作提供了可編程的接口,如 開始、暫停、停止、倒帶等等。這裡我們使用了Begin——立即開始了動畫。注意到我們只需要為頂級 timeline開始這個時鐘,子時鐘將會被開始於恰當的時間,作為運行父一級的結果。