Windows 7傳感器 & 定位平台可以使你的應用程序更加適應當前的環境,並且能夠改變它們的外觀,體驗或者行為。這有一些例子:
• 陽光明媚的時候,你在戶外使用一個移動PC(比如,筆記本電腦或者平板電腦),那麼應用程序可能會增加亮度,對比度來增加屏幕的易讀性。
• 應用程序可能會提供一些特定的信息,比如附近的餐館。
• 應用程序可能會像游戲控制器一樣使用3D加速計和按鈕。
• 應用程序也可能會使用人體傳感器來改變Messenger的登錄狀態。
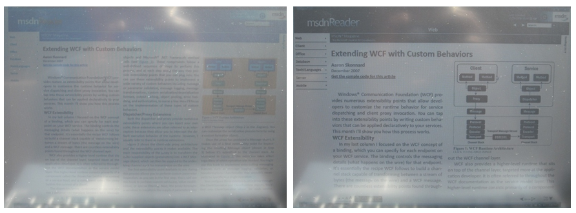
圖例 1
可調MSDN閱讀器,使用了環境光線感應器來調整對比度,尺寸和顏色飽和度
傳感器&定位平台,對所有的解決方案都有很多優點:
• 硬件-獨立:不再需要為一個獨立的提供商的API進行學習和投資;所有的傳感器類型控制起來都非常相似。
• 隱私:Microsoft意識到,傳感器和本地數據都是私人的,個人的驗證信息,所有的傳感器在默認情況下都是關閉的。你可以通過控制面板隨時打開/關閉傳感器。應用程序將會提示你一個安全的允許的UI用戶界面,來打開指定的傳感器。
• 應用程序共享:多個應用程序可以同時使用同一個傳感器的數據。
• 定位簡單化:定位API能夠使你不需要關心獲取信息的特殊結構,就能得到所需要的位置。比如。GPS,發射塔或者WIFI熱點。定位API將自動選擇可用的最正確的傳感器數據。另外,你也不需要去實現類似於NMEA的GPS協議了。
目標
在本次動手實驗中,你將了解到如何將傳感器的API整合到你的WPF應用程序中。與定位API相同,傳感器API也是基於COM的。所以你可以用類型安全和方便的方式使用Windows API。
系統需求
若完成此實驗,你必須需要以下組件:
• Microsoft Visual Studio 2008 SP1
• Windows 7 RC或更新的版本
• 完全支持DirectX 和 PixelShaders的顯示卡。
• 安裝了驅動的Windows 7兼容環境光線傳感器硬件,或者虛擬環境光線傳感器
• 安裝了驅動的Windows 7兼容的3D加速計硬件(可選)
練習: 在WPF 應用程序中整合傳感器API
任務 1 – 准備一個WPF 項目,為整合傳感器做准備
1.啟動Visual Studio 2008,打開包含WPF應用程序的初始解決方案。這個解決方案在你的Starter文件夾中。
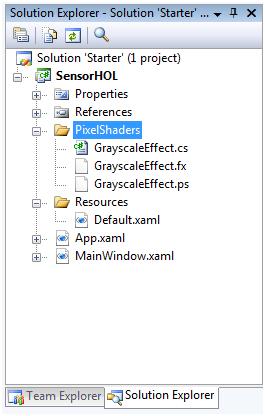
圖例 2
啟動解決方案
WPF項目SensorHOL,已經捆綁了Grayscale PixelShader效果,這個效果我們將在後面的實驗中使用到,並且這個項目也包含了很多在將來的WPF控件中需要使用的資源。
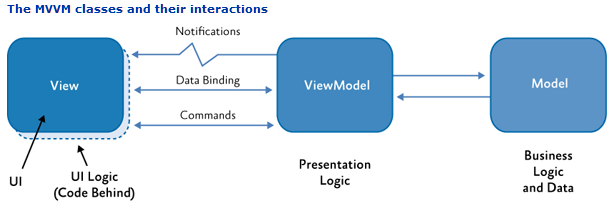
2.向項目添加一個名叫SensorViewModel的新的類。
MainWindow視圖將會對它的屬性進行數據綁定。通過使用這個模式,視圖將監控它的更新,並且用ViewModel被動等待來進行替換。
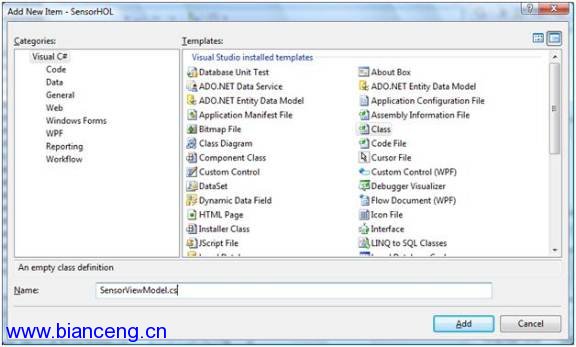
圖例 3
創建 SensorViewModel 類
3.在SensorViewModel類中實現InotifyPropertyChanged接口。
C#
class SensorViewModel : INotifyPropertyChanged

{

#region INotifyPropertyChanged Members


public event PropertyChangedEventHandler PropertyChanged;


#endregion

}
4.添加如下的代碼(當我們需要消息通知的時候,我們將調用這個方法):
C#
#region INotifyPropertyChanged Members


private void NotifyChange(string propertyName)

{

                if (PropertyChanged != null)

                {

                                PropertyChanged(this, newPropertyChangedEventArgs(propertyName));

                }

}
5.為了使ViewModel連接到視圖,在MainWindow.xaml.cs 中的InitializeComponent()後面添加下面的代碼:
C#
public MainWindow()

{

                InitializeComponent();

      DataContext = new SensorViewModel();

}
測試你的代碼以保證它是能夠編譯的。
任務 2 –向WPF 應用程序中添加排版

圖例 4
Sensor HOL 基本排版
在這個任務中,你將設計MainWindow的排版。它將包含3個部分:
• 頂部:“Browse…”按鈕和照片名稱
• 左邊:傳感器的指示器
• 右邊:圖片
一個滑塊將圖片分隔開;圖片的每個部分,將根據傳感器數據獨立的展現出當前的光線強度。
1.打開 MainWindow.xaml 文件。
在WPF中,Grid是一個強大的排版布局。它將是我們在本次實驗中進行排版設計的主要方式。
2.我們從添加行和列的定義開始。
XAML
<Grid>

    <Grid.RowDefinitions>

                    <RowDefinition Height="65"/>

                    <RowDefinition Height="*"/>

   </Grid.RowDefinitions>

   <Grid.ColumnDefinitions>

                    <ColumnDefinition Width="150"/>

                    <ColumnDefinition Width="*"/>

   </Grid.ColumnDefinitions>

</Grid>
3.接著,緊接著列的定義代碼,向Grid中添加屏幕的右邊部分。這個Grid將包含圖片和滑塊。
XAML
<Grid Grid.Column="1" Grid.Row="1" x:Name="OverlayContent"

                HorizontalAlignment="Center" VerticalAlignment="Center">

</Grid>
4.在“OverlayContent” Grid中,添加兩個圖片控件。每一個都將呈現出不同的效果,並且他們都是重疊的。
XAML
<Image Stretch="Uniform" Margin="10">

</Image>

<Image Stretch="Uniform" Margin="10">

</Image>
5.接著,在Grid中添加Slider控件。注意滑塊的高度和寬度都是與grid的樣式進行數據綁定的。
XAML
<Slider x:Name="OverlayAdjustmentSlider"

                Width="{Binding ElementName=OverlayContent, Path=ActualWidth}"

                Height="{Binding ElementName=OverlayContent, Path=ActualHeight}"

                FocusVisualStyle="{x:Null}" Maximum="1" Minimum="0" Value="0.5"

                Template="{DynamicResource Slider_ControlTemplate}">

</Slider>
6.讓我們關注布局左邊的區域:僅在“OverlayContent” Grid之後,添加另外一個Grid
XAML
<Grid Width="150" Height="240" Grid.Row="1"  HorizontalAlignment="Left"  VerticalAlignment="Top">

</Grid>
在這個Grid中,我們需要添加一個傳感器指示控件和其余的傳感器指示器。內部的Grid的標題叫“Sensor Data”。
7.創建一個有標題的邊框。
XAML
<Border Background="{DynamicResource Brush_PopupBackground}">

<Border.Effect>

   <DropShadowEffect BlurRadius="12" Direction="-90" ShadowDepth="3"/>

</Border.Effect>

</Border>

<Border Background="{DynamicResource Brush_PopupBackground}" BorderBrush="{StaticResource Brush_PopupBorder}" BorderThickness="0,1,0,1" CornerRadius="3">

  <Grid TextElement.FontFamily="Segoe UI" TextElement.FontSize="10">

      <TextBlock HorizontalAlignment="Center" Margin="0,10" VerticalAlignment="Top" FontFamily="Segoe UI" FontSize="13" Foreground="White" Text="Sensor Data"/>

  </Grid>


</Border>
8.最後的部分由一個獨立包含按鈕和標題的Grid組成。
XAML
<Grid Grid.ColumnSpan="2" HorizontalAlignment="Stretch">

      <Button HorizontalAlignment="Left"  Width="70" Margin="5" Height="40" Content="Browse..." Click="Button_Click"/>

      <TextBlock Foreground="White" Grid.Column="1" Grid.Row="2" HorizontalAlignment="Center" VerticalAlignment="Center" FontFamily="Segoe UI"/>

</Grid>
9.現在,向MainWindow視圖中添加“Browse…”按鈕的點擊事件代碼。
C#
private void Button_Click(object sender, RoutedEventArgs e)

{

}
你的MainWindow 的XAML看起來應該像下面這樣:
XAML
<Window x:Class="SensorHOL.MainWindow"

                xmlns="http://schemas.microsoft.com/winfx/2006/xaml/presentation"  xmlns:x="http://schemas.microsoft.com/winfx/2006/xaml"                Title="MainWindow" WindowState="Maximized" Background="Black">       <Grid>

                 <Grid.RowDefinitions>

                        <RowDefinition Height="65"/>

                        <RowDefinition Height="*"/>

                </Grid.RowDefinitions>

                      <Grid.ColumnDefinitions>

                        <ColumnDefinition Width="150"/>

                        <ColumnDefinition Width="*"/>

                      </Grid.ColumnDefinitions>

                      <Grid Grid.Column="1" Grid.Row="1" x:Name="OverlayContent"

                                                HorizontalAlignment="Center" VerticalAlignment="Center">

                                      <Image Stretch="Uniform" Margin="10">

                                      </Image>

                                      <Image Stretch="Uniform" Margin="10">

                                      </Image>

                                                <Slider x:Name="OverlayAdjustmentSlider" Width="{Binding

                                                                ElementName=OverlayContent, Path=ActualWidth}"

                                                                Height="{Binding ElementName=OverlayContent,

                                                                Path=ActualHeight}" FocusVisualStyle="{x:Null}"

                                                                Maximum="1" Minimum="0" Value="0.5"

                                                                Template="{DynamicResource Slider_ControlTemplate}">

                                      </Slider>

                                </Grid>

                                <Grid Width="150" Height="240" Grid.Row="1"

                                                HorizontalAlignment="Left"  VerticalAlignment="Top">


                                      <Border Background="{DynamicResource

                                                                Brush_PopupBackground}">


                                                      <Border.Effect>

                                                          <DropShadowEffect BlurRadius="12" Direction="-90"

                                                                                ShadowDepth="3"/>

                                                      </Border.Effect>


                                      </Border>

                                      <Border Background="{DynamicResource

                                                                Brush_PopupBackground}" BorderBrush="{StaticResource

                                                                Brush_PopupBorder}" BorderThickness="0,1,0,1"

                                                                CornerRadius="3">


                                                 <Grid TextElement.FontFamily="Segoe UI"


                                                                                TextElement.FontSize="10">

                                                                          <TextBlock HorizontalAlignment="Center"                                                                                                      Margin="0,10" VerticalAlignment="Top"

                                                                                                FontFamily="Segoe UI" FontSize="13"

                                                                                                Foreground="White" Text="Sensor Data"/>

                                                        </Grid>

                                      </Border>

                    </Grid>

                    <Grid Grid.ColumnSpan="2" HorizontalAlignment="Stretch">

                                      <Button HorizontalAlignment="Left"  Width="70" Margin="5"

                                                Height="40" Content="Browse..." Click="Button_Click"/>

                                      <TextBlock Foreground="White" Grid.Column="1" Grid.Row="2"

                                                HorizontalAlignment="Center" VerticalAlignment="Center"

                                                FontFamily="Segoe UI" />

                    </Grid>

                </Grid>

</Window>
10.測試你的代碼以保證它能夠編譯。
任務 3 –添加圖片指定邏輯
在前面的任務中,我們已經為應用程序設計了布局,現在,是向裡面填充內容的時候了。
1.打開 SensorViewModel 。在你添加了一個新的屬性後,用戶就可以浏覽一個文件,並且這個屬性需要包含它的圖片的選擇范圍。
2.添加 NotifyChange 方法。
每次這個屬性發生了變化,這個視圖將負責它的變化。
C#
private string _imagePath;

public string ImagePath

{

      get { return _imagePath; }

      set {

              _imagePath = value;

                  NotifyChange("ImagePath");

          }

}
3.向SensorViewModel中添加System.IO命名空間。
C#
using System.IO;
4.添加一個只讀屬性,用來從ImagePath屬性中請求文件名稱。
C#
public string ImageName

{

      get

      {

        return Path.GetFileNameWithoutExtension(ImagePath);

      }

}
現在,我們需要來確認當ImagePath發生變化時,UI用戶界面能夠與ImageName的變化很好的進行綁定。
5.添加一個NotifyChange的調用,這次是使用ImageName屬性。
C#
private string _imagePath;

public string ImagePath

{

                get { return _imagePath; }

      set {

                        _imagePath = value;

                                  NotifyChange("ImagePath");

              NotifyChange("ImageName");

                    }

}
6.現在讓我們來實現:返回視圖,並且注冊必要的綁定。
XAML
<Image Source="{Binding ImagePath}" Stretch="Uniform" Margin="10">>

</Image>

<Image Source="{Binding ImagePath}" Stretch="Uniform" Margin="10">>

</Image>
7.現在你可以對文件名稱標簽進行數據綁定(注意:綁定方式是one-way,因為這個屬性是只讀的)。
XAML
<TextBlock Foreground="White" Grid.Column="1" Grid.Row="2" HorizontalAlignment="Center" VerticalAlignment="Center" FontFamily="Segoe UI" Text="{Binding ImageName, Mode=OneWay}"/>
剩下的最後一部分就是為ViewModel設置圖片的路徑。如果要做這個操作,你必須轉到後台代碼中,並且實現Button_Click方法。這段代碼將打開一個標准的Windows文件對話框。如果用戶決定選擇一個圖片,那麼就只需要去根據他的選擇去設置ViewModel的設置。
8.首先,添加一個命名空間來使用OpenFIleDialog。
C#
using Microsoft.Win32;
9.現在你可以實現Button_Click了。
C#
OpenFileDialog openFileDialog = new OpenFileDialog();      openFileDialog.CheckFileExists = true;      openFileDialog.CheckPathExists = true;

openFileDialog.Filter = "Image Files|*.jpg|*.png";      openFileDialog.Multiselect = false;

openFileDialog.ShowReadOnly = true;

openFileDialog.ValidateNames = true;      openFileDialog.RestoreDirectory = true;

openFileDialog.Title = "Find an Image";

bool? result = openFileDialog.ShowDialog();

if ((result.HasValue) && (result.Value))

{

 (DataContext as SensorViewModel).ImagePath = openFileDialog.FileName;

}
10.編譯和測試你的代碼:
a.浏覽一個圖片;你應該能夠在右邊的屏幕中看到它。
b.浏覽更多的圖片,並且注意UI用戶界面的相關變化。
任務 4 – 建立傳感器助手
1.展開SensorHOL項目下的資源。
2.右鍵點擊References,然後點擊Add Reference。
3.點擊Browse 選項卡,並且定位到Microsoft.WindowsAPICodePack.Sensors.dll的目錄。
4.選擇該DLL然後點擊OK。
5.在新文件SensorHelper.cs中,創建一個名叫SensorHelper的新類.
6.按照如下方式定義該類:
這個類中的SensorType類型元素,是傳感器類的派生類(比如,AmbientLightSensor 或者Accelerometer3D)。
C#
using System;

using System.Collections.Generic;

using Microsoft.WindowsAPICodePack.Sensors;

using System.ComponentModel;


public class SensorHelper<SensorType, SensorPropertyType> :

                INotifyPropertyChanged

        where SensorType : Sensor

        where SensorPropertyType : class

                {

                }
7.將下面的代碼粘貼到這個類中:
C#
private SensorPropertyType _value;

private SensorType _sensor;

private Guid _sensorGUID;


public SensorHelper() { }


public void Initialize()

{

    SensorList<SensorType> list =

                                SensorManager.GetSensorsByTypeId<SensorType>();


    if (list != null)

    {

         var permReqSensorList = new SensorList<Sensor>();

         foreach (var sensor in list)

         {

            permReqSensorList.Add(sensor);

         }


         SensorManager.RequestPermission(IntPtr.Zero, true,

                                permReqSensorList);


         foreach (var sensor in list)

         {

            if (HandleNewSensor(sensor) && _sensor != null)

                 break;

         }

      }


            // subscribe to sensor added/removed event

     SensorManager.SensorsChanged += new

                                SensorsChangedHandler(OnSensorsChanged);

}
Initialize()將會向傳感器管理器請求類型為SensorType的傳感器列表。當使用SensorHelper時,SensorType將可能是AmbientLightSensor 或者Acceleroemter3DSensor。
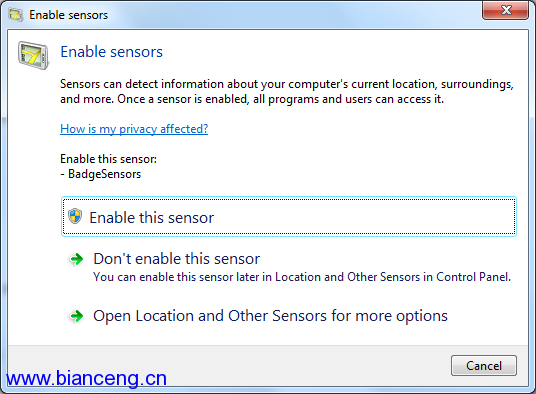
如果當前用戶賬號沒有權限去使用傳感器,我們將調用指定的父窗體SensorManager.RequestPermissions(),是否這個方法是同步的(模式),並且返回一個我們請求訪問的傳感器的列表。它將彈出如下的對話框:
在後台,CodePack API將按照COM API所期望的,把每一個傳感器派生類與傳感器的GUID包裝為地圖。這個地圖信息在類中將以屬性的方式來提供:
C#
 [SensorDescription("97F115C8-599A-4153-8894-D2D12899918A")]

public class AmbientLightSensor : Sensor
Initialize() 將遍歷所有找到的傳感器,然後調用HandleNewSensor()。最後,它將訂閱當新的傳感器連接或者現有的傳感器移除時所激發的SensorsChanged事件。
8.將下面的代碼粘貼到SensorHelper類中:
C#
private void OnSensorsChanged(SensorsChangedEventArgs change)

{

     // if sensor was added

     if (change.Change == SensorAvailabilityChange.Addition)

     {

          // we use the base Sensor class as the type parameter

          // because we're not sure what sensor type was attached

          Sensor sensor =

                                SensorManager.GetSensorBySensorId<Sensor>(change.SensorId);

          // if this is the right sensro type

          if (sensor is SensorType)

                          HandleNewSensor(sensor);

     }


     if (change.Change == SensorAvailabilityChange.Removal &&

                                _sensorGUID.Equals(change.SensorId))

     {

           _sensor = null;

           _sensorGUID = Guid.Empty;

     }

}


private bool HandleNewSensor(Sensor sensor)

{

     // Sensor may become Ready in the future, register for

     // StateChanged event

     sensor.StateChanged += OnSensorStateChanged;

     if (sensor.State == SensorState.Ready)

     {

          // If sensor is already in state Ready, use it

          PrepareSensor(sensor);

          return true;

     }


     return false;

}
OnSensorsChanged方法是我們在Initialize()中訂閱的SensorsChanged事件的事件句柄。如果有新的傳感器連接,我們將從得到的時間參數中的獨立的GUID屬性(SensorId)中,獲取一個傳感器對象基類。傳感器有三個GUID:
• 實例:定義傳感器的唯一標示
• 類別:例如,環境,機械,電氣
• 類型:例如,溫度,濕度,電壓,電流,3D加速
我們接著可以檢查傳感器對象是否有屬性類型。如果有,我們調用HandleNewSensor()。這個方法可以允許應用程序使用之後所連接的傳感器。
OnSensorsChanged()同樣也管理傳感器的移除。它用一個變量清楚的表明哪個傳感器正在使用。這個方法可以讓其他傳感器當其變為可用時,傳感器可以被使用。
傳感器還有許多其他的屬性,比如Manufacturer,Model, SerialNumber等等。
這些都是標准屬性。不同的傳感器可能會有其他的屬性。
HandleNewSensor() 用來檢測傳感器的狀態。即使傳感器是連接著的,它也可能不能被使用。狀態則會告訴你傳感器是否已經准備就緒,如果沒有就緒,原因是什麼。硬件可能正在初始化,或者存在一些錯誤的情況,或者用戶沒有權限使用傳感器。如果傳感器已經准備就緒,我們就需要調用PrepareSensor()。我們將訂閱傳感器的 StateChanged事件,這個事件將在傳感器的狀態發生改變時被觸發。我們可以當傳感器准備就緒並且我們沒有傳感器時來使用。
9.將下面的代碼粘貼到SensorHelper類中:
C#
                private void OnSensorStateChanged(Sensor sender, EventArgs e)

      {

           if (sender.State == SensorState.Ready)

           {

               PrepareSensor(sender);

           }

           else if (!_sensorGUID.Equals(Guid.Empty) &&

                                                _sensor.SensorId.Equals(_sensorGUID))

           {

               _sensor = null;

               _sensorGUID = Guid.Empty;

               sender.DataReportChanged -= OnDataUpdated;

           }

}


private void PrepareSensor(Sensor sensor)

{

     if (_sensor == null)

     {

         _sensorGUID = sensor.SensorId.Value;

         _sensor = (SensorType)sensor;

                   sensor.TryUpdateData();

         sensor.DataReportChanged += OnDataUpdated;

     }

}
當傳感器狀態發生變化的時候,將會觸發OnSensorStateChanged()。如果它已經准備就緒,我們將調用PrepareSensor()。如果它改變除Ready之外的狀態,我們將檢測它是否是我們正在使用的傳感器。如果是,我們將取消訂閱並且清空正在使用的傳感器變量。
PrepareSensor()為使用中的傳感器設置一個明顯的變量,所以如果同類型的其他傳感器在將來連接上,或者變為可用,也不會被覆蓋。
這個方法將訂閱到DataReportChanged事件。
TryUpdateData() 用來強制傳感器生成一個新的數據報告。一些傳感器會定期的生成數據報告,其他的一些可能會在所測量的數據發生了很大的變化的時候才會生成數據報告。通過調用TryUpdateData(),我們可以立刻使用最初的測量值來初始化UI用戶界面。
10.將下面的代碼粘貼到SensorHelper類中:
C#
private void OnDataUpdated(Sensor sender, EventArgs e)

{

    if (sender is AmbientLightSensor)

    {

         _value = ((AmbientLightSensor)sender).CurrentLuminousIntensity

                                                as SensorPropertyType;

    }

    else if (sender is Accelerometer3D)

    {

         _value = ((Accelerometer3D)sender).CurrentAcceleration as

                                                SensorPropertyType;

    }


    if (_value != null)

         OnPropertyChanged("Value");

}
OnDataUpdated()方法用來處理DataUpdated事件。
當傳感器有新的數據報告的時候,將觸發這個事件。
這些數據是通過訪問一個或多個屬性來獲取到的(每個傳感器都不相同)。想要訪問一個屬性,傳感器需要將其置為適當的派生類。
11.將下面的代碼粘貼到SensorHelper類中:
這段代碼支持將SensorHelper與UI用戶界面的代碼整合。
C#
public SensorPropertyType Value

{

     get { return _value; }

}


#region INotifyPropertyChanged Members


public event PropertyChangedEventHandler PropertyChanged;


protected void OnPropertyChanged(string name)

{

     PropertyChangedEventHandler ph = this.PropertyChanged;

     if (ph != null)

         ph(this, new PropertyChangedEventArgs(name));

}


#endregion