在看《Learning hard C#》的時候,看到開發技巧的實現截屏。於是,照著教程做了一遍。
功能有:左鍵截屏,右鍵取消。左鍵雙擊保存到剪貼板上。
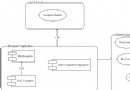
除了界面,還有代碼結構。有時候看看代碼結構,說不定你就有了思路。
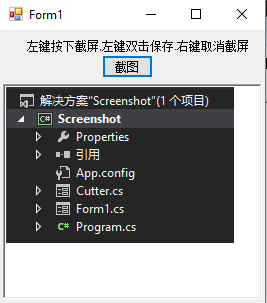
form1為程序主界面,Cutter為截屏是的窗口。還有教程講的不錯:
簡略點就是:FormBorderStyle---none和BackgroundImage設置為全屏。
還有就是Cutter窗體最大化屬性為設置WindowsState--Max;
1.創建兩個窗體應用程序。一個為主界面,一個為截屏界面。

 1 private void btn_Scre_Click(object sender, EventArgs e)
 2         {
 3             // 新建一個和屏幕大小相同的圖片
 4             Bitmap CatchBmp = new Bitmap(Screen.AllScreens[0].Bounds.Width, Screen.AllScreens[0].Bounds.Height);
 5
 6             // 創建一個畫板,讓我們可以在畫板上畫圖
 7             // 這個畫板也就是和屏幕大小一樣大的圖片
 8             // 我們可以通過Graphics這個類在這個空白圖片上畫圖
 9             Graphics g = Graphics.FromImage(CatchBmp);
10
11             // 把屏幕圖片拷貝到我們創建的空白圖片 CatchBmp中
12             g.CopyFromScreen(new Point(0, 0), new Point(0, 0), new Size(Screen.AllScreens[0].Bounds.Width, Screen.AllScreens[0].Bounds.Height));
13
14             // 創建截圖窗體
15             cutter = new Cutter();
16
17             // 指示窗體的背景圖片為屏幕圖片
18             cutter.BackgroundImage = CatchBmp;
19             // 顯示窗體
20             //cutter.Show();
21             // 如果Cutter窗體結束,則從剪切板獲得截取的圖片,並顯示在聊天窗體的發送框中
22             if (cutter.ShowDialog() == DialogResult.OK)
23             {
24                 IDataObject iData = Clipboard.GetDataObject();
25
26                 if (iData.GetDataPresent(DataFormats.Bitmap))
27                 {
28                     richTextBox1.Paste();
29
30                     // 清楚剪貼板的圖片
31                     Clipboard.Clear();
32                 }
33             }
34         }
View Code
這樣就轉到Cutter窗體,也就是我們操作的截屏窗口。
先談一下截圖過程:
當我們點擊QQ窗體中的截圖按鈕時,此時我們將看到一個全屏圖片,然後我們可以在其上截圖,當鼠標左鍵按下時,即代表開始截圖,並我們可以移動鼠標來改變截圖的大小,鼠標彈起時即代表結束截圖,此時我們可以雙擊矩形區域完全截圖,並且可以通過粘貼操作把截取的圖片粘貼到聊天窗口的發送區,鼠標右鍵點擊則是退出截圖。
有按下,彈起,點擊,雙擊事件。
代碼詳解:
  1 using System;
  2 using System.Collections.Generic;
  3 using System.ComponentModel;
  4 using System.Data;
  5 using System.Drawing;
  6 using System.Linq;
  7 using System.Text;
  8 using System.Threading.Tasks;
  9 using System.Windows.Forms;
 10
 11 namespace Screenshot
 12 {
 13     public partial class Cutter : Form
 14     {
 15         public Cutter()
 16         {
 17             InitializeComponent();
 18         }
 19         #region 定義程序變量
 20         // 定義變量
 21
 22         // 用來記錄鼠標按下的坐標,用來確定繪圖起點
 23         private Point DownPoint;
 24
 25         // 用來表示是否截圖完成
 26         private bool CatchFinished = false;
 27
 28         // 用來表示截圖開始
 29         private bool CatchStart = false;
 30
 31         // 用來保存原始圖像
 32         private Bitmap originBmp;
 33
 34         // 用來保存截圖的矩形
 35         private Rectangle CatchRectangle;
 36         #endregion
 37
 38
 39         /// <summary>
 40         /// 窗體初始化操作
 41         /// </summary>
 42         /// <param name="sender"></param>
 43         /// <param name="e"></param>
 44         private void Cutter_Load(object sender, EventArgs e)
 45         {
 46             // 設置控件樣式為雙緩沖,這樣可以有效減少圖片閃爍的問題
 47             // 第二個參數為true表示把第一個參數指定的樣式應用於控件;false 表示不應用。
 48             // '|'表示位邏輯或運算
 49             this.SetStyle(ControlStyles.OptimizedDoubleBuffer | ControlStyles.AllPaintingInWmPaint | ControlStyles.UserPaint, true);
 50             this.UpdateStyles();
 51             // 改變鼠標樣式
 52             this.Cursor = Cursors.Cross;
 53             // 保存全屏圖片
 54             originBmp = new Bitmap(this.BackgroundImage);
 55         }
 56         /// <summary>
 57         /// 右鍵點擊退出
 58         /// </summary>
 59         /// <param name="sender"></param>
 60         /// <param name="e"></param>
 61         private void Cutter_MouseClick(object sender, MouseEventArgs e)
 62         {
 63             if (e.Button == MouseButtons.Right)
 64             {
 65                 this.DialogResult = DialogResult.OK;
 66                 this.Close();
 67             }
 68         }
 69         /// <summary>
 70         /// 左鍵按下開始截屏
 71         /// </summary>
 72         /// <param name="sender"></param>
 73         /// <param name="e"></param>
 74         private void Cutter_MouseDown(object sender, MouseEventArgs e)
 75         {
 76             // 鼠標左鍵按下是開始畫圖,也就是截圖
 77             if (e.Button == MouseButtons.Left)
 78             {
 79                 // 如果捕捉沒有開始
 80                 if (!CatchStart)
 81                 {
 82                     CatchStart = true;
 83                     // 保存此時鼠標按下坐標
 84                     DownPoint = new Point(e.X, e.Y);
 85                 }
 86             }
 87         }
 88         /// <summary>
 89         /// 左鍵雙擊保存到剪貼板
 90         /// </summary>
 91         /// <param name="sender"></param>
 92         /// <param name="e"></param>
 93         private void Cutter_MouseDoubleClick(object sender, MouseEventArgs e)
 94         {
 95             if (e.Button == MouseButtons.Left && CatchFinished)
 96             {
 97                 // 新建一個與矩形一樣大小的空白圖片
 98                 Bitmap CatchedBmp = new Bitmap(CatchRectangle.Width, CatchRectangle.Height);
 99
100                 Graphics g = Graphics.FromImage(CatchedBmp);
101
102                 // 把originBmp中指定部分按照指定大小畫到空白圖片上
103                 // CatchRectangle指定originBmp中指定部分
104                 // 第二個參數指定繪制到空白圖片的位置和大小
105                 // 畫完後CatchedBmp不再是空白圖片了,而是具有與截取的圖片一樣的內容
106                 g.DrawImage(originBmp, new Rectangle(0, 0, CatchRectangle.Width, CatchRectangle.Height), CatchRectangle, GraphicsUnit.Pixel);
107
108                 // 將圖片保存到剪切板中
109                 Clipboard.SetImage(CatchedBmp);
110                 g.Dispose();
111                 CatchFinished = false;
112                 this.BackgroundImage = originBmp;
113                 CatchedBmp.Dispose();
114                 this.DialogResult = DialogResult.OK;
115                 this.Close();
116             }
117         }
118         /// <summary>
119         /// 鼠標移動事件處理程序,即用戶改變截圖大小的處理
120         ///  這個方法是截圖功能的核心方法,也就是繪制截圖
121         /// </summary>
122         /// <param name="sender"></param>
123         /// <param name="e"></param>
124         private void Cutter_MouseMove(object sender, MouseEventArgs e)
125         {
126             // 確保截圖開始
127             if (CatchStart)
128             {
129                 // 新建一個圖片對象,讓它與屏幕圖片相同
130                 Bitmap copyBmp = (Bitmap)originBmp.Clone();
131
132                 // 獲取鼠標按下的坐標
133                 Point newPoint = new Point(DownPoint.X, DownPoint.Y);
134
135                 // 新建畫板和畫筆
136                 Graphics g = Graphics.FromImage(copyBmp);
137                 Pen p = new Pen(Color.Red, 1);
138
139                 // 獲取矩形的長寬
140                 int width = Math.Abs(e.X - DownPoint.X);
141                 int height = Math.Abs(e.Y - DownPoint.Y);
142                 if (e.X < DownPoint.X)
143                 {
144                     newPoint.X = e.X;
145                 }
146                 if (e.Y < DownPoint.Y)
147                 {
148                     newPoint.Y = e.Y;
149                 }
150
151                 CatchRectangle = new Rectangle(newPoint, new Size(width, height));
152
153                 // 將矩形畫在畫板上
154                 g.DrawRectangle(p, CatchRectangle);
155
156                 // 釋放目前的畫板
157                 g.Dispose();
158                 p.Dispose();
159                 // 從當前窗體創建新的畫板
160                 Graphics g1 = this.CreateGraphics();
161
162                 // 將剛才所畫的圖片畫到截圖窗體上
163                 // 為什麼不直接在當前窗體畫圖呢?
164                 // 如果自己解決將矩形畫在窗體上,會造成圖片抖動並且有無數個矩形
165                 // 這樣實現也屬於二次緩沖技術
166                 g1.DrawImage(copyBmp, new Point(0, 0));
167                 g1.Dispose();
168                 // 釋放拷貝圖片,防止內存被大量消耗
169                 copyBmp.Dispose();
170             }
171         }
172         /// <summary>
173         /// 左鍵彈起結束截屏
174         /// </summary>
175         /// <param name="sender"></param>
176         /// <param name="e"></param>
177         private void Cutter_MouseUp(object sender, MouseEventArgs e)
178         {
179             if (e.Button == MouseButtons.Left)
180             {
181                 // 如果截圖已經開始,鼠標左鍵彈起設置截圖完成
182                 if (CatchStart)
183                 {
184                     CatchStart = false;
185                     CatchFinished = true;
186                 }
187             }
188         }
189     }
190 }
View Code
到這裡就已經實現了基本的截圖功能。還有快捷鍵功能,就等後面再寫。>_<!!