原文地址:http://bdn.borland.com/article/0,1410,26401,00.html
概要:這篇文章猶如循序漸進教人做菜的食譜,使Delphi開發者獲得OpenGL 3D 圖形編程的有效知識。
原著:Alex Semichastny
OpenGL最初是由Silicon圖形公司開發的底層圖形庫規范。你的系統中准確實現這個規范的部分,通常被稱為OpenGL驅動,它允許你使用幾何集合(點,線,多邊形,圖像等等)來描述你希望表現的場景。讓肉眼觀察起來較為舒適的中等規模場景,通常在毫秒級的速度上實現,這意味著該庫文件有足夠的能力來支持你創建一個生機勃勃的虛擬世界。
OpenGL驅動一般以二進制庫文件的形式提供。它能夠動態的連接到你的程序中。在Windows平台上,它將是成為DLL的形式(在你的系統目錄下檢查opengl.dll)。自從Delphi能夠使用任何DLL開始,它對OpenGL 3D編程的能力就像其他任何語言一樣容易了。本文將幫助你獲得在Delphi中進行OpenGL開發的有效知識。
數學基礎
OpenGL擁有強大的數學基礎,因此對它功能的限制完全取決於你的想象能力(譯者注:沒有做不到,只有想不到)。對於理解那些公理和引理,更好的是讓我們立刻認識一個簡單的3D坐標系統,它是3D編程中慣用的坐標系統。如下:
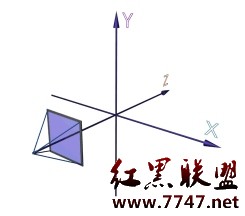
你應該如何理解你的屏幕(藍色的方塊)在場景中的放置位置呢?發出四條射線並形成屏幕的那個點,是該想象空間中的視點(point of view)。OpenGL讓你調用兩個簡單的函數來定義這個場景
glMatrixMode(GL_PROJECTION);
glFrustum(-0.1, 0.1, -0.1, 0.1, 0.3, 25.0);
在這個調用的過程中的-0.1,0.1,-0.1,0.1定義了這個可視屏幕的左上角和右下角坐標;0.3指定視愕狡聊壞木嗬?就好象“近剪貼板”(near clipping plane))同時25.0指定“遠剪貼板”(far clipping plane)。任何近剪貼板前面的物體以及遠剪貼板後面的物體都將不可見。當然,你能夠任意擺弄這些數字,以使他們適合你需要的場景。
從基本元素(primitive)到對象
現在開始最有意思的部分:對象。OpenGL僅僅支持以下幾種基本幾何圖形:點,線和多邊形。沒有表面或者更高級的圖形(比如球狀圖形)能被作為基本圖形元素繪制。但是它們能夠用多邊形完美的模仿出來。隨意看看現代3D游戲,你會發現它們完全由三角形建立。因此,我們不會被此限制所約束。
對象的繪制非常類似Pascal語言編程。每個塊都應該被begin-end包含著,更為確切的說是glBegin()和glEnd()。如同下面的例子:
const S=1.0; D=5.0;
...
glBegin(GL_TRIANGLES);
glVertex3f( -S, 0, D); glVertex3f(S, 0, D); glVertex3f(0, S, D);
glEnd;
這是個簡單的三角形。它距離你的視點有5個單位,自身高1個單位,寬2個單位。
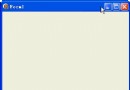
這是屏幕截圖:
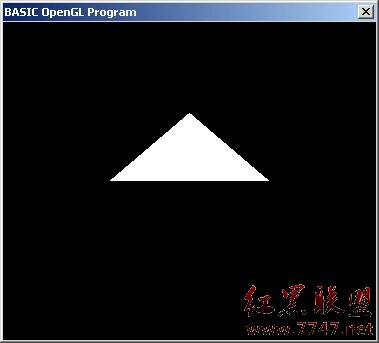
即使它看起來不象3D圖形,但它是我們的初始塊。在下面你可以看到這個例子的源代碼。
在你開始鑽研代碼前,還有些話要說。每次OpenGL編程,都包含一些初始化輸出設備的OS設定(OS-specific)代碼。如果你使用Win32,你將需要設置像素格式以及建立顯示上下文環境脫離windows設備上下文環境。如果windows系統級編程你並不很在行,你可以把如下的代碼作為模版使用。FormCreate中被調用函數的詳細信息可以參考幫助文檔。
FILE: Tri.pas
unit Tri;
interface
uses
OpenGL, Windows, Messages, SysUtils, Classes, Graphics, Controls, Forms, Dialogs,
StdCtrls, ExtCtrls, ComCtrls;
type
TForm1 = class(TForm)
procedure FormCreate(Sender: TObject);
procedure FormPaint(Sender: TObject);
private
procedure Draw; //Draws an OpenGL scene on request
public
end;
var
Form1: TForm1;
implementation
{$R *.DFM}
procedure setupPixelFormat(DC:HDC);
const
pfd:TPIXELFORMATDESCRIPTOR = (
nSize:sizeof(TPIXELFORMATDESCRIPTOR); // size
nVersion:1; // version
dwFlags:PFD_SUPPORT_OPENGL or PFD_DRAW_TO_WINDOW or
PFD_DOUBLEBUFFER; // support double-buffering
iPixelType:PFD_TYPE_RGBA; // color type
cColorBits:24; // preferred color depth
cRedBits:0; cRedShift:0; // color bits (ignored)
cGreenBits:0; cGreenShift:0;
cBlueBits:0; cBlueShift:0;
cAlphaBits:0; cAlphaShift:0; // no alpha buffer
cAccumBits: 0;
cAccumRedBits: 0; // no accumulation buffer,
cAccumGreenBits: 0; // accum bits (ignored)
cAccumBlueBits: 0;
cAccumAlphaBits: 0;
cDepthBits:16; // depth buffer
cStencilBits:0; // no stencil buffer
cAuxBuffers:0; // no auxiliary buffers
iLayerType:PFD_MAIN_PLANE; // main layer
bReserved: 0;
dwLayerMask: 0;
dwVisibleMask: 0;
dwDamageMask: 0; // no layer, visible, damage masks
);
var pixelFormat:integer;
begin
pixelFormat := ChoosePixelFormat(DC, @pfd);
if (pixelFormat = 0) then
exit;
if (SetPixelFormat(DC, pixelFormat, @pfd) <> TRUE) then
exit;
end;
procedure GLInit;
begin
// set viewing projection
glMatrixMode(GL_PROJECTION);
glFrustum(-0.1, 0.1, -0.1, 0.1, 0.3, 25.0);
// position viewer
glMatrixMode(GL_MODELVIEW);
glEnable(GL_DEPTH_TEST);
end;
procedure TForm1.FormCreate(Sender: TObject);
var DC:HDC;
RC:HGLRC;
i:integer;
begin
DC:=GetDC(Handle); //Actually, you can use any windowed control here
SetupPixelFormat(DC);
RC:=wglCreateContext(DC); //makes OpenGL window out of DC
wglMakeCurrent(DC, RC); //makes OpenGL window active
GLInit; //initialize OpenGL
end;
procedure TForm1.Draw;
const S=1.0; D=5.0;
begin
glClear(GL_COLOR_BUFFER_BIT or GL_DEPTH_BUFFER_BIT);
glLoadIdentity;
glTranslatef(0.0, 0.0, -12.0);
glBegin(GL_TRIANGLES);
glVertex3f( -S, 0, D); glVertex3f(S, 0, D); glVertex3f(0, S, D);
glEnd;
SwapBuffers(wglGetCurrentDC);
end;
procedure TForm1.FormPaint(Sender: TObject);
begin
Draw;
end;
end.
FILE: Tri.dfm
object Form1: TForm1
BorderStyle = bsDialog
Caption = BASIC OpenGL Program
ClientHeight = 318
ClientWidth = 373
OnCreate = FormCreate
OnPaint = FormPaint
end
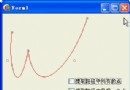
3D歷險
好了,讓我們開始真正的3D吧。將先前的代碼作為框架,我們增加一些畫線的代碼建立一個帶陰影面的四面體。應該如何用基本圖形元素來構建呢?我們使用四個三角形。一個在底部,另外三個作為側面。這裡就是生成他們的代碼:
procedure TForm1.Draw;
const D=1.5;
H1=D/1.732;
H2=D*1.732-H1; // D/H = tg(30) = 1/sqrt(3)
HY=3.0;
const //vertexes
a1:TGLArrayf3=(-D, 0, -H1); //bootom left
a2:TGLArrayf3=( D, 0, -H1); //bootom right
a3:TGLArrayf3=( 0, 0, H2); //bootom back
a4:TGLArrayf3=( 0, HY, 0); //top
begin
glClear(GL_COLOR_BUFFER_BIT or GL_DEPTH_BUFFER_BIT);
glLoadIdentity;
glTranslatef(0.0, 0.0, -12.0);
glBegin(GL_TRIANGLES);
glVertex3fv(@a1); glVertex3fv(@a3); glVertex3fv(@a2);
glVertex3fv(@a1); glVertex3fv(@a2); glVertex3fv(@a4);
glVertex3fv(@a2); glVertex3fv(@a3); glVertex3fv(@a4);
glVertex3fv(@a3)