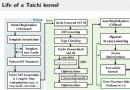
MNNThe documentation is in Chinese
https://www.yuque.com/mnn/cn/about
Except for some details, According to the documentation there is basically no problem,Part of the content of this article is basically a disassembly document
目前windows支持的Python版本:3.5、3.6、3.7,Please check here when you use it
https://www.yuque.com/mnn/cn/usage_in_python
安裝很簡單,直接pip就好
pip install -U pip -i https://mirror.baidu.com/pypi/simple
pip install -U MNN -i https://mirror.baidu.com/pypi/simple
安裝完畢之後,在命令行輸入
> mnn
mnn toolsets has following command line tools
$mnn
list out mnn commands
$mnnconvert
convert other model to mnn model
$mnnquant
quantize mnn model
這就安裝成功了mnnconvert It is used for model transformation,mnnquant 量化工具
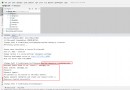
按理說,安裝完畢之後,The command line will have it:
> mnnconvert
Usage:
MNNConvert [OPTION...]
-h, --help Convert Other Model Format To MNN Model
-v, --version show current version
-f, --framework arg model type, ex: [TF,CAFFE,ONNX,TFLITE,MNN]
--modelFile arg tensorflow Pb or caffeModel, ex:
*.pb,*caffemodel
--batch arg if model input's batch is not set, set as the batch size you set --keepInputFormat keep input dimension format or not, default: false --optimizeLevel arg graph optimize option, 0: don't run
optimize(only support for MNN source), 1: use graph
optimize only for every input case is right, 2:
normally right but some case may be wrong,
default 1
--optimizePrefer arg graph optimize option, 0 for normal, 1 for
smalleset, 2 for fastest
--prototxt arg only used for caffe, ex: *.prototxt
--MNNModel arg MNN model, ex: *.mnn
--fp16 save Conv's weight/bias in half_float data type --benchmarkModel Do NOT save big size data, such as Conv's
weight,BN's gamma,beta,mean and variance etc.
Only used to test the cost of the model
--bizCode arg MNN Model Flag, ex: MNN
--debug Enable debugging mode.
--forTraining whether or not to save training ops BN and
Dropout, default: false
--weightQuantBits arg save conv/matmul/LSTM float weights to int8
type, only optimize for model size, 2-8 bits,
default: 0, which means no weight quant
--weightQuantAsymmetric the default weight-quant uses SYMMETRIC quant
method, which is compatible with old MNN
versions. you can try set --weightQuantAsymmetric
to use asymmetric quant method to improve
accuracy of the weight-quant model in some cases,
but asymmetric quant model cannot run on old
MNN versions. You will need to upgrade MNN to
new version to solve this problem. default:
false
--compressionParamsFile arg
The path of the compression parameters that
stores activation, weight scales and zero
points for quantization or information for
sparsity.
--OP print framework supported op
--saveStaticModel save static model with fix shape, default:
false
--targetVersion arg compability for old mnn engine, default: 1.2f
--customOpLibs arg custom op libs ex: libmy_add.so;libmy_sub.so
--authCode arg code for model authentication.
--inputConfigFile arg set input config file for static model, ex:
~/config.txt
--alignDenormalizedValue arg
if 1, converter would align denormalized
float(|x| < 1.18e-38) as zero, because of in
ubuntu/protobuf or android/flatbuf, system
behaviors are different. default: 1, range: {
0, 1}
[10:15:46] @ 192: framework Invalid, use -f CAFFE/MNN/ONNX/TFLITE/TORCH !
If the command line does not work,可以參考這個:
https://www.yuque.com/mnn/cn/usage_in_python
python(3) -m MNN.tools.mnn
python(3) -m MNN.tools.mnnconvert
python(3) -m MNN.tools.mnnquant
Convert it here,將onnx轉換為mnn模型
MNNConvert -f ONNX --modelFile output.onnx --MNNModel output.mnn --bizCode biz
加上 --fp A model that can be converted to half precision,The size of the model is scaled down by almost half:
MNNConvert -f ONNX --modelFile output.onnx --MNNModel output16.mnn --bizCode biz --fp
Half-precision conversion documentation is here:
https://www.yuque.com/mnn/cn/qxtz32
Haven't used this before,直接copyCheck out the official documentation:
convolved in the modelfloatThe weights are quantified as int8存儲,推理時反量化還原為floatweights are calculated.因此,其推理速度和float模型一致,But the model size can be reduced to the original1/4,This can be done with one click through the model conversion tool,比較方便.推薦floatModeling is available,僅需要減少模型大小的場景使用.
使用MNNConvert.exe(c++)或者mnnconvert(python包中自帶)進行轉換,Add the following options to the conversion command line:
--weightQuantBits 8 [--weightQuantAsymmetric](可選)
--weightQuantAsymmetric The option refers to using an asymmetric quantization method,The precision is better than the default symmetric quantization精度好一些.
The above is used directlyPython Converted by command line tool,接下來是,The process of compiling the conversion tool:
注意:實驗證明,Python命令行工具mnnconvert 與 Compiled conversion toolMNNConvert.exe 效果相同,當然,There may be some differences in subsequent major versions
required before compilation ninja, cmake 和 VS2017/2019
cmake安裝:
https://blog.csdn.net/HaoZiHuang/article/details/126015717
ninja 安裝:
https://blog.csdn.net/HaoZiHuang/article/details/126083356
(ninja 是構建工具,比nmake更快)
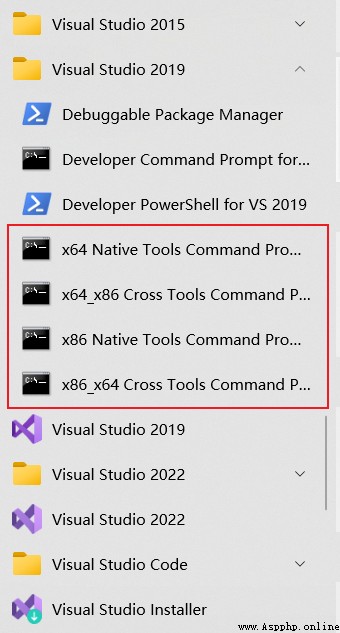
安裝VS之後,在編譯過程中,命令行用x64 Native Tools Command Prompt 就好
Refer to the documentation for the specific process of compiling:
https://www.yuque.com/mnn/cn/cvrt_windows
把 MNN git 下來,然後
cd MNN
mkdir build
cd build
cmake -G "Ninja" -DMNN_BUILD_SHARED_LIBS=OFF -DMNN_BUILD_CONVERTER=ON -DCMAKE_BUILD_TYPE=Release -DMNN_WIN_RUNTIME_MT=ON ..
ninja
It will then be generated in the directory:MNNConvert.exe That tool is the conversion tool
官方文檔在:
https://www.yuque.com/mnn/cn/build_windows
Because the compiled engine is in當前版本無法被Python調用,所以如果不用C++,Skip this part without reading it
下載GPU Caps Viewer,You can use this tool to view the detailed information of the native device(opencl、opengl、vulkan等)
在Github上有個issue:
How to use the compiled enginePython API調用:https://github.com/alibaba/MNN/issues/2010
The official reply is that it needs to be compiled pymnn, Documentation is not out yet,Wait for the official update
It is required when compiling at the same time powershell
At the same time still neededVS的命令行x64 Native Tools Command Prompt
cd /path/to/MNN
powershell # Run the command from cmd 環境進入 powershell 環境,The latter is more powerful
./schema/generate.ps1
如果只需要 CPU 後端
# CPU, 64位編譯
.\package_scripts\win\build_lib.ps1 -path MNN-CPU/lib/x64
# CPU, 32位編譯
.\package_scripts\win\build_lib.ps1 -path MNN-CPU/lib/x86
如果需要 opencl 和 vulkan 後端
# CPU+OpenCL+Vulkan, 64位編譯
.\package_scripts\win\build_lib.ps1 -path MNN-CPU-OPENCL/lib/x64 -backends "opencl,vulkan"
# CPU+OpenCL+Vulkan, 32位編譯
.\package_scripts\win\build_lib.ps1 -path MNN-CPU-OPENCL/lib/x86 -backends "opencl,vulkan"
如果僅需要 opencl 後端
# CPU+OpenCL, 64位編譯
.\package_scripts\win\build_lib.ps1 -path MNN-CPU-OPENCL/lib/x64 -backends opencl
# CPU+OpenCL, 32位編譯
.\package_scripts\win\build_lib.ps1 -path MNN-CPU-OPENCL/lib/x86 -backends opencl
如果僅需要 vulkan 後端
# CPU+Vulkan, 64位編譯
.\package_scripts\win\build_lib.ps1 -path MNN-CPU-OPENCL/lib/x64 -backends vulkan
# CPU+Vulkan, 32位編譯
.\package_scripts\win\build_lib.ps1 -path MNN-CPU-OPENCL/lib/x86 -backends vulkan
You can refer to these for details:
https://www.yuque.com/mnn/cn/build_windows
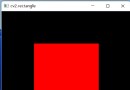
測試圖片shiyuan.jpg:
結果圖片: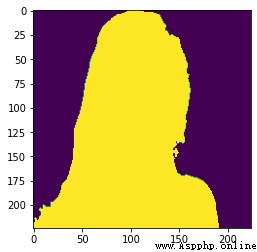
測試的mnnDownload the model here:
https://download.csdn.net/download/HaoZiHuang/86337543
import numpy as np
import MNN
import cv2
import matplotlib.pyplot as plt
def normalize(im,
mean=(0.5, 0.5, 0.5),
std=(0.5, 0.5, 0.5)):
im = im.astype(np.float32, copy=False) / 255.0
im -= mean
im /= std
return im
if __name__ == "__main__":
""" inference PPliteSeg using a specific picture """
img = "shiyuan.jpg"
interpreter = MNN.Interpreter("originalpool/output.mnn") # custompool originalpool
session = interpreter.createSession()
input_tensor = interpreter.getSessionInput(session)
image = cv2.imread(img)
image = cv2.resize(image, (224, 224))
image = normalize(image)
image = image.transpose((2, 0, 1))
image = image.astype(np.float32)
tmp_input = MNN.Tensor((1, 3, 224, 224),
MNN.Halide_Type_Float,
image,
MNN.Tensor_DimensionType_Caffe)
input_tensor.copyFrom(tmp_input)
interpreter.runSession(session)
output_tensor = interpreter.getSessionOutput(session)
tmp_output = MNN.Tensor((1, 2, 224, 224),
MNN.Halide_Type_Float,
np.ones([1, 2, 224, 224]).astype(np.float32),
MNN.Tensor_DimensionType_Caffe)
output_tensor.copyToHostTensor(tmp_output)
res = tmp_output.getNumpyData()[0]
res = res.argmax(axis=0)
plt.imshow(res)
plt.show()
If your own results show up全1或者結果不對,Might be the problem I'm having:
我的mnn模型是onnxexported from the model,All appeared before1的結果,多次嘗試發現,我的onnxModel inputs are dynamic,不是靜態,所以出現這個問題
If also this onnx -> mnn 的情況,Take a look at the script below,Whether it is dynamic input:
https://blog.csdn.net/HaoZiHuang/article/details/126168132
如果是動態輸入,嘗試將onnxTry changing the model to static input,如果四 Paddle模型轉onnx模型,在Paddle2onnxAdd after tool --input_shape_dict "{'x':[1,3,224,224]}"
Paddle2onnxThe tool command usage guide is here:
https://github.com/PaddlePaddle/Paddle2ONNX#命令行轉換
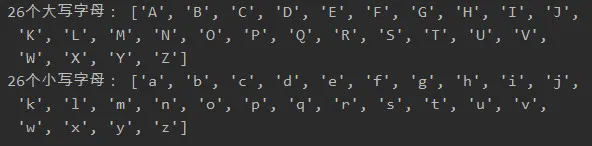
Original result graph: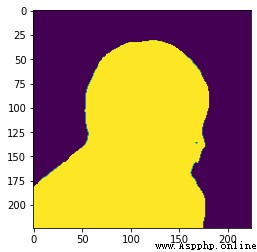
結果是醬紫: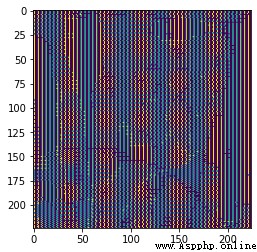
可以參考該文章:
https://blog.csdn.net/HaoZiHuang/article/details/126136436