- 本文是個人快速入門OpenCV-Python的電子筆記,由於水平有限,難免出現錯漏,敬請批評改正.
Scharr 算子
- 在離散的空間上,有很多方法可以用來計算近似導數,在使用 3×3 的 Sobel 算子時,可能計算結果並不太精准.OpenCV 提供了 Scharr 算子,該算子具有和 Sobel 算子同樣的速度,且精度更高.
- Scharr 算子,一般定義為 [ − 3 0 3 − 10 0 10 − 3 0 3 ] \left[ \begin{matrix} -3 & 0 & 3\\ -10 & 0 & 10 \\ -3 & 0 & 3 \end{matrix} \right] ⎣⎡−3−10−30003103⎦⎤ [ − 3 − 10 − 3 0 0 0 − 3 10 3 ] \left[ \begin{matrix} -3 & -10 & -3\\ 0 & 0 & 0 \\ -3 & 10 & 3 \end{matrix} \right] ⎣⎡−30−3−10010−303⎦⎤
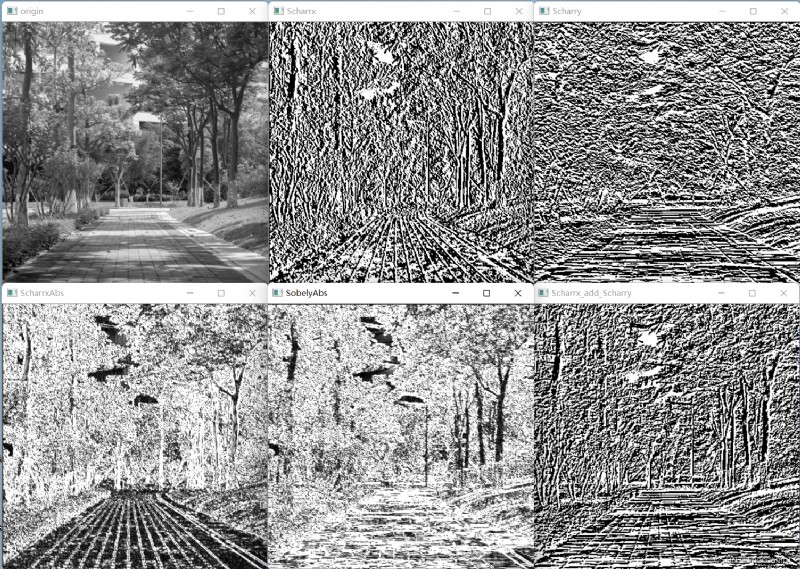
- Scharr The operator is calculated in the same waySobel the same as the operator,Only the operators are different.
import cv2
import numpy as np
img1=cv2.imread("1.jpg",0)
img1_resize=cv2.resize(img1,(400,400))
''' dst = cv2.Scharr( src, ddepth, dx, dy[, scale[, delta[, borderType]]] ) 參數說明: dst 代表輸出圖像. src 代表原始圖像. ddepth 代表輸出圖像深度.該值與函數 cv2.Sobel()中的參數 ddepth 的含義相同 dx 代表 x 方向上的導數階數. dy 代表 y 方向上的導數階數. scale 代表計算導數值時的縮放因子,該項是可選項,默認值是 1,表示沒有縮放. delta 代表加到目標圖像上的亮度值,該項是可選項,默認值為 0. borderType 代表邊界樣式. '''
# Calculate the horizontal edge(梯度):dx=1,dy=0
Scharrx = cv2.Scharr(img1_resize,cv2.CV_64F,1,0)
# Take the absolute value of the calculation result
ScharrxAbs=cv2.convertScaleAbs(Scharrx)
# Calculate the vertical edge(梯度):dx=0,dy=1
Scharry = cv2.Scharr(img1_resize,cv2.CV_64F,0,1)
# Take the absolute value of the calculation result
ScharryAbs=cv2.convertScaleAbs(Scharry)
# 計算x方向和y方向的邊緣疊加
Scharrx_add_Scharry=cv2.addWeighted(Scharrx,0.5,Scharry,0.5,0)
cv2.imshow("origin",img1_resize)
cv2.imshow("Scharrx",Scharrx)
cv2.imshow("ScharrxAbs",ScharrxAbs)
cv2.imshow("Scharry",Scharry)
cv2.imshow("SobelyAbs",ScharryAbs)
cv2.imshow("Scharrx_add_Scharry",Scharrx_add_Scharry)
cv2.waitKey()
cv2.destroyAllWindows()
Laplacian 算子
- Laplacian(拉普拉斯)算子是一種二階導數算子,其具有旋轉不變性,可以滿足不同方向的圖像邊緣銳化(邊緣檢測)的要求.通常情況下,其算子的系數之和需要為零.
- 一個 3×3 大小的 Laplacian 算子為 [ 0 1 0 1 − 4 1 0 1 0 ] \left[ \begin{matrix} 0 & 1 & 0\\ 1 & -4 & 1 \\ 0 & 1 & 0 \end{matrix} \right] ⎣⎡0101−41010⎦⎤
- Laplacian The operator is calculated in the same waySobel 算子、Scharr the same as the operator,Only the operators are different.
import cv2 import numpy as np img1=cv2.imread("1.jpg",0) img1_resize=cv2.resize(img1,(400,400)) ''' dst = cv2.Laplacian( src, ddepth[, ksize[, scale[, delta[, borderType]]]] ) 參數說明: dst 代表目標圖像. src 代表原始圖像. ddepth 代表目標圖像的深度. ksize 代表用於計算二階導數的核尺寸大小.該值必須是正的奇數. scale 代表計算 Laplacian 值的縮放比例因子,該參數是可選的.默認情況下,該值為 1, 表示不進行縮放. delta 代表加到目標圖像上的可選值,默認為 0. borderType 代表邊界樣式. ''' # Calculate the gradient values in both directions Laplacianxy = cv2.Laplacian(img1_resize,cv2.CV_64F) # Take the absolute value of the calculation result LaplacianAbs = cv2.convertScaleAbs(Laplacianxy) cv2.imshow("origin",img1_resize) cv2.imshow("Laplacianxy",Laplacianxy) cv2.imshow("LaplacianAbs",LaplacianAbs) cv2.waitKey() cv2.destroyAllWindows()
Canny 邊緣檢測
- Canny 邊緣檢測是一種使用多級邊緣檢測算法檢測邊緣的方法.
- Canny 邊緣檢測分為如下幾個步驟.
- 去噪.噪聲會影響邊緣檢測的准確性,因此首先要將噪聲過濾掉.(Usually Gaussian filtering is used for denoising,Need to know about Gaussian filtering,可查閱OpenCV-Python快速入門(六):圖像平滑)
- 計算梯度的幅度與方向.
- 非極大值抑制,即適當地讓邊緣“變瘦”.
- 確定邊緣.使用雙阈值算法確定最終的邊緣信息.
- As this article was written to get started quickly,Canny 邊緣檢測步驟,在入門階段,Understand and apply it.
- 擴展知識: n o r m = { ∣ d l d x ∣ + ∣ d l d y ∣ , L 2 g r a d i e n t = F a l s e ( d l d x ) 2 + ( d l d y ) 2 , L 2 g r a d i e n t = T r u e norm= \begin{cases} |\frac{dl}{dx}|+|\frac{dl}{dy}|,\quad L2gradient = False\\ \sqrt{(\frac{dl}{dx})^2 + (\frac{dl}{dy})^2},\quad L2gradient = True \end{cases} norm={ ∣dxdl∣+∣dydl∣,L2gradient=False(dxdl)2+(dydl)2,L2gradient=True其中,L2gradient = False時,表達式是L1范數,L2gradient = True時,表達式是L2范數.
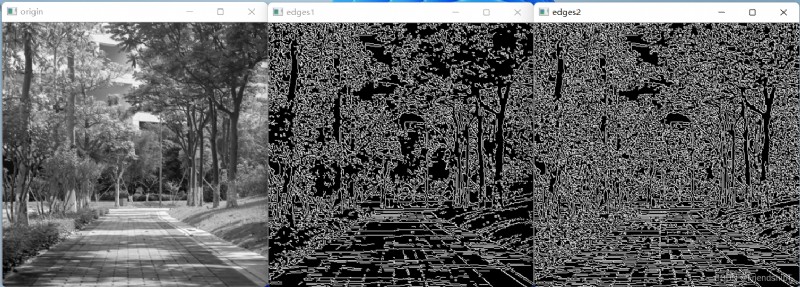
import cv2
import numpy as np
img1=cv2.imread("1.jpg",0)
img1_resize=cv2.resize(img1,(400,400))
''' edges = cv.Canny( image, threshold1, threshold2[, apertureSize[, L2gradient]]) 參數說明: edges 為計算得到的邊緣圖像. image 為 8 位輸入圖像. threshold1 表示處理過程中的第一個阈值. threshold2 表示處理過程中的第二個阈值. apertureSize 表示 Sobel 算子的孔徑大小. L2gradient 為計算圖像梯度幅度(gradient magnitude)的標識. 其默認值為 False.如果為 True,則使用更精確的 L2 范數進行計算 (即兩個方向的導數的平方和再開方),否則使用 L1 范數 (直接將兩個方向導數的絕對值相加). '''
edges1 = cv2.Canny(img1_resize,128,200)
edges2 = cv2.Canny(img1_resize,32,128)
cv2.imshow("origin",img1_resize)
cv2.imshow("edges1",edges1)
cv2.imshow("edges2",edges2)
cv2.waitKey()
cv2.destroyAllWindows()
從輸出結果上看,當函數 cv2.Canny()的參數 threshold1 和 threshold2 的值較小時,能夠捕獲更多的邊緣信息.
參考文獻
[1] https://opencv.org/
[2] 李立宗. OpenCV輕松入門:面向Python. 北京: 電子工業出版社,2019
- 更多精彩內容,可點擊進入
OpenCV-Python快速入門專欄或我的個人主頁查看