def pl_insert(request):
for i in range(10000):
models.user.objects.create(title='第%s行'%i)
data_all = models.user.objects.all()
return render(request,'all.html',locals())
""" The above code execution, nearly time consuming8秒多(很可怕,That's only 10,000 pieces of data) """
def pl_insert(request):
pl_list = []
for i in range(100000):
pl_obj = models.user(title='第%s行'%i)
pl_list.append(pl_obj)
data_all = models.user.bulk_create(pl_list)
return render(request,'all.html',locals())
""" The second code runs only three seconds(效果非常好) """
# 總結:Can be used when inserting data in batchesorm提供的fulk_create()to reduce operating time
class Pagination(object):
def __init__(self, current_page, all_count, per_page_num=10, pager_count=11):
""" 封裝分頁相關數據 :param current_page: 當前頁 :param all_count: 數據庫中的數據總條數 :param per_page_num: 每頁顯示的數據條數 :param pager_count: 最多顯示的頁碼個數 """
try:
current_page = int(current_page)
except Exception as e:
current_page = 1
if current_page < 1:
current_page = 1
self.current_page = current_page
self.all_count = all_count
self.per_page_num = per_page_num
# 總頁碼
all_pager, tmp = divmod(all_count, per_page_num)
if tmp:
all_pager += 1
self.all_pager = all_pager
self.pager_count = pager_count
self.pager_count_half = int((pager_count - 1) / 2)
@property
def start(self):
return (self.current_page - 1) * self.per_page_num
@property
def end(self):
return self.current_page * self.per_page_num
def page_html(self):
# 如果總頁碼 < 11個:
if self.all_pager <= self.pager_count:
pager_start = 1
pager_end = self.all_pager + 1
# 總頁碼 > 11
else:
# 當前頁如果<=頁面上最多顯示11/2個頁碼
if self.current_page <= self.pager_count_half:
pager_start = 1
pager_end = self.pager_count + 1
# 當前頁大於5
else:
# 頁碼翻到最後
if (self.current_page + self.pager_count_half) > self.all_pager:
pager_end = self.all_pager + 1
pager_start = self.all_pager - self.pager_count + 1
else:
pager_start = self.current_page - self.pager_count_half
pager_end = self.current_page + self.pager_count_half + 1
page_html_list = []
# 添加前面的nav和ul標簽
page_html_list.append(''' <nav aria-label='Page navigation>' <ul class='pagination'> ''')
first_page = '<li><a href="?page=%s">首頁</a></li>' % (1)
page_html_list.append(first_page)
if self.current_page <= 1:
prev_page = '<li class="disabled"><a href="#">上一頁</a></li>'
else:
prev_page = '<li><a href="?page=%s">上一頁</a></li>' % (self.current_page - 1,)
page_html_list.append(prev_page)
for i in range(pager_start, pager_end):
if i == self.current_page:
temp = '<li class="active"><a href="?page=%s">%s</a></li>' % (i, i,)
else:
temp = '<li><a href="?page=%s">%s</a></li>' % (i, i,)
page_html_list.append(temp)
if self.current_page >= self.all_pager:
next_page = '<li class="disabled"><a href="#">下一頁</a></li>'
else:
next_page = '<li><a href="?page=%s">下一頁</a></li>' % (self.current_page + 1,)
page_html_list.append(next_page)
last_page = '<li><a href="?page=%s">尾頁</a></li>' % (self.all_pager,)
page_html_list.append(last_page)
# 尾部添加標簽
page_html_list.append(''' </nav> </ul> ''')
return ''.join(page_html_list)
from lib.mypage import Pagination
def booklist(request):
# Calculate the total number of all data
all_count = models.book.objects.count()
# get the current page
current_page = request.GET.get('page',1)
# Call the paging library
obj = Pagination(current_page,all_count)
# 傳給前端html格式
page_html = obj.page_html()
# Take out the beginning and end of the data
all_data = models.book.objects.all()[obj.start:obj.end]
return render(request,'booklist.html',locals())
{% for foo in all_data %}
<p >
{
{ foo.title }}
</p>
{% endfor %}
{
{ page_html|safe }}
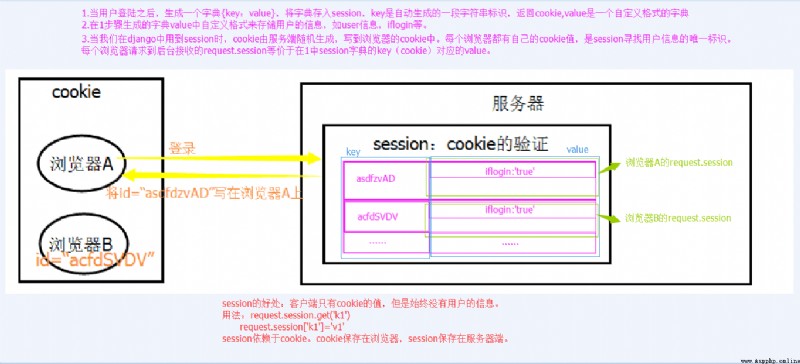
Cookie具體指的是一段小信息,它是服務器發送出來存儲在浏覽器上的一組組鍵值對,下次訪問服務器時浏覽器會自動攜帶這些鍵值對,以便服務器提取有用信息.
cookie的工作原理是:由服務器產生內容,浏覽器收到請求後保存在本地;當浏覽器再次訪問時,浏覽器會自動帶上Cookie,這樣服務器就能通過Cookie的內容來判斷這個是“誰”了.
login_cookie.html
<div  class="center">
<form action="" METHOD="post" >
<p>
username:<input type="text" name="username" >
</p>
<p>
password:<input type="password" name="password">
</p>
<input type="submit" class="btn btn-success" id="button">
</form>
</div>
home_cookie.html
<h1>你好,I am the login page~(cookie)</h1>
<a href="/del_session/" class="btn btn-danger">退出登錄</a>
from django.shortcuts import render,HttpResponse,redirect
# Create your views here.
""" cookieversion verification login """
# 登陸裝飾器
def login_auth_cookie(func):
def inner(request,*args,**kwargs):
path = request.get_full_path()
""" Detect user's current path,For users to click on other pages also require the user to log in """
if request.COOKIES.get('key'): # 這裡使用request.COOKIES.getDetermine if the user is logged in
return func(request,*args,**kwargs)
else:
# 用戶沒有登錄,Its previously clicked path will be spliced to the back of the login page
return redirect('/login/?next=%s'%path)
return inner
def login_cookie(request):
if request.method =='POST':
username = request.POST.get('username')
password = request.POST.get('password')
if username == 'egon' and password == '123':
print(username,password)
next = request.GET.get('next') # 獲取用戶/login/後面的路徑
if next:
# Once the user is logged in, jumps to the URL of the location the user previously opened
res = redirect(next)
res.set_cookie(key='key', value='123')
else:
# Users click on no other web page will jump page
res = redirect('/home_cookie/')
res.set_cookie(key='key', value='123')
return res
# User password is incorrect or not logged in will remain on the login page
return render(request, 'login_cookie.html')
# The method of the page implemented after successful login
@login_auth_cookie
def home_cookie(request):
return render(request, 'home_cookie.html')
# Validation decorator and the method to detect path of the log in page
@login_auth_cookie
def index_cookie(request):
return HttpResponse('這裡是index頁面(cookie)')
# 用戶退出後,清除cookie的方法
def del_cookie(request):
res = redirect('/login_cookie/')
res.delete_cookie('key')
return res
獲取cookie
request.COOKIES['key']
request.get_signed_cookie(key, default=RAISE_ERROR, salt='', max_age=None)
# 參數
default:默認值
salt:加密鹽
max_age:background control time
設置cookie
rep = HttpResponse(...)
rep = render(request, ...)
rep.set_cookie(key,value,...)
rep.set_signed_cookie(key,value,salt='加密鹽', max_age=None, ...)
""" key:鍵 value:值 max_age=None 超時時間 expires=None, 超時時間(IE requires expires, so set it if hasn't been already.) path='/', Cookie生效的路徑,/ 表示根路徑,特殊的:根路徑的cookie可以被任何url的頁面訪問 domain=None, Cookie生效的域名 secure=False, https傳輸 httponly=False 只能http協議傳輸,無法被JavaScript獲取(不是絕對,底層抓包可以獲取到也可以被覆蓋) """
刪除cookie
def logout(request):
rep = redirect("/login/")
rep.delete_cookie("user") # 刪除用戶浏覽器上之前設置的usercookie值
return rep
# 獲取、設置、刪除Session中數據
request.session['k1']
request.session.get('k1',None)
request.session['k1'] = 123
request.session.setdefault('k1',123) # 存在則不設置
del request.session['k1']
# 所有 鍵、值、鍵值對
request.session.keys()
request.session.values()
request.session.items()
request.session.iterkeys()
request.session.itervalues()
request.session.iteritems()
# 會話session的key
request.session.session_key
# 將所有Session失效日期小於當前日期的數據刪除
request.session.clear_expired()
# 檢查會話session的key在數據庫中是否存在
request.session.exists("session_key")
# 刪除當前會話的所有Session數據
request.session.delete()
# 刪除當前的會話數據並刪除會話的Cookie.
request.session.flush()
這用於確保前面的會話數據不可以再次被用戶的浏覽器訪問
例如,django.contrib.auth.logout() 函數中就會調用它.
# 設置會話Session和Cookie的超時時間
request.session.set_expiry(value)
* 如果value是個整數,session會在些秒數後失效.
* 如果value是個datatime或timedelta,session就會在這個時間後失效.
* 如果value是0,用戶關閉浏覽器session就會失效.
* 如果value是None,session會依賴全局session失效策略.
login_session.html
<div >
<form action="" method="post">
<p>
username:<input type="text" name="username">
</p>
<p>
password:<input type="text" name="password">
</p>
<input type="submit" class="btn btn-success">
</form>
</div>
home.html
<h1>你好,I am the login page~(session)</h1>
<a href="/del_session/" class="btn btn-danger">退出登錄</a>
from django.shortcuts import render,HttpResponse,redirect
# Create your views here.
""" sessionversion verification login """
# 登陸裝飾器
def login_auth_session(func):
def inner(request,*args,**kwargs):
path = request.get_full_path()
""" Detect user's current path,For users to click on other pages also require the user to log in """
if request.session.get('name'): # 這裡使用request.session.get('xxx')Determine if the user is logged in
return func(request,*args,**kwargs)
# 用戶沒有登錄,Its previously clicked path will be spliced to the back of the login page
return redirect('/login_session/?next=%s'%path)
return inner
# 登錄頁面
from app01 import models
def login_session(request):
if request.method == 'POST':
username = request.POST.get('username')
password = request.POST.get('password')
login_obj = models.user.objects.filter(username=username).first()
if login_obj:
if login_obj.password == int(password):
request.session['name'] = username
next = request.GET.get('next') # 獲取用戶/login/後面的路徑
if next:
res = redirect(next) # 如果路徑存在,登錄成功後跳轉到該頁面
return res
res = redirect('/home_session/') # If the path does not exist, go to the home page
return res
# User password is incorrect or not logged in will remain on the login page
return render(request,'login_session.html')
# The method of the page implemented after successful login
@login_auth_session
def home_session(request):
return render(request,'home_session.html')
# Validation decorator and the method to detect path of the log in page
@login_auth_session
def index_session(request ):
return HttpResponse('I am logging in the page through the decorator')
# User clicks to log out,清除session的方法
def del_session(request):
request.session.flush() # Clear client and server(推薦)
request.session.delete() # To empty the service side
return redirect('/login_session/')
The above add decorators are all added in the class,那麼在views.pyView function how to add a decorator to class?
CBVversion login authentication
from django.views import View
class login_cbv(View):
def get(self,request):
return render(request,'login_cbv.html')
def post(self,request):
username = request.POST.get('username')
password = request.POST.get('password')
if username == 'egon' and password == '123':
return HttpResponse('POST請求登錄')
return render(request,'login_cbv.html')
<div >
<form action="" METHOD="post" >
<p>
username:<input type="text" name="username" >
</p>
<p>
password:<input type="password" name="password">
</p>
<input type="submit" class="btn btn-success" id="button">
</form>
</div>
CBVAdd a decorator version of the login credentials(三種方式)
# 需要先導入模塊
from django.utils.decorators import method_decorator
from django.views import View
# 裝飾器
def login_decor(func):
def inner(request,*args,**kwargs):
path = request.get_full_path()
""" Detect user's current path,For users to click on other pages also require the user to log in """
if request.session.get('name'): # 這裡使用request.session.get('xxx')Determine if the user is logged in
return func(request, *args, **kwargs)
# 用戶沒有登錄,Its previously clicked path will be spliced to the back of the login page
return redirect('/login_session/?next=%s' % path)
return inner
from django.utils.decorators import method_decorator
""" 直接加在視圖類上,但method_decorator必須傳 name 關鍵字參數 get方法和post方法都需要登錄校驗的話就寫兩個裝飾器 """
# 登錄模塊
@method_decorator(login_decor,name='get')
@method_decorator(login_decor,name='post')
class login_cbv(View):
""" 加在dispatchSaid included in http_method_names = ['get', 'post', 'put', 'patch', 'delete', 'head', 'options', 'trace'] Add decorator to all requests inside 因為CBV中首先執行的就是dispatch方法,所以這麼寫相當於給get和post方法都加上了登錄校驗. """
@method_decorator(login_decor)
def dispatch(self, request, *args, **kwargs):
return super(login_cbv, self).dispatch(request, *args, **kwargs)
""" 單獨加在CBV視圖的get或postThe method represents adding a decorator to a single request """
@method_decorator(login_decor)
def get(self,request):
return render(request,'login_cbv.html')
def post(self,request):
username = request.POST.get('username')
password = request.POST.get('password')
login_obj = models.user.objects.filter(username=username).first()
if login_obj:
if login_obj.password == int(password):
request.session['name'] = username
next = request.GET.get('next') # 獲取用戶/login/後面的路徑
if next:
res = redirect(next) # 如果路徑存在,登錄成功後跳轉到該頁面
return res
res = HttpResponse('POST請求登錄') # If the path does not exist, go to the home page
return res
return render(request,'login_cbv.html')
<div >
<form action="" METHOD="post" >
<p>
username:<input type="text" name="username" >
</p>
<p>
password:<input type="password" name="password">
</p>
<input type="submit" class="btn btn-success" id="button">
</form>
</div>
在學DjangoWhen life cycle diagram,中間件在webGateway service interface and the routing layer,So we can know that when the request comes, the middleware goes first,back walk by layer.Then we can think of,Can the operation of the middleware affect the routing layer and the view layer??
Official documentation on middleware:中間件是一個用來處理Django的請求和響應的框架級別的鉤子.它是一個輕量、低級別的插件系統,用於在全局范圍內改變Django的輸入和輸出.每個中間件組件都負責做一些特定的功能.但是由於其影響的是全局,所以需要謹慎使用,使用不當會影響性能
說的直白一點中間件是幫助我們在視圖函數執行之前和執行之後都可以做一些額外的操作,它本質上就是一個自定義類,類中定義了幾個方法,Django框架會在請求的特定的時間去執行這些方法.
These middleware usually exist withsettings文件下的MIDDLEWARE列表內,Our every request is inseparable from them
MIDDLEWARE = [
'django.middleware.security.SecurityMiddleware',
'django.contrib.sessions.middleware.SessionMiddleware',
'django.middleware.common.CommonMiddleware',
'django.middleware.csrf.CsrfViewMiddleware',
'django.contrib.auth.middleware.AuthenticationMiddleware',
'django.contrib.messages.middleware.MessageMiddleware',
'django.middleware.clickjacking.XFrameOptionsMiddleware',
]
There are five middle can customize method(主要掌握process_request和process_response)
The method above can be returnedNone或者Httpresponse對象,如果返回None那麼Djangowill continue to execute code down to the view layer and so on.But if it returnsHttpresponse對象,那麼DjangoThe code in the routing layer and the view layer below will not continue to be executed.HttpresponseObject first return to the user
自定義中間件示例
""" Under the project to build a firstmiddleware文件夾(名字可以隨便起) 在middleware文件夾內建立一個py文件 Write the following code in the file """
from django.utils.deprecation import MiddlewareMixin
from django.shortcuts import render,HttpResponse,redirect
class Mymiddleware1(MiddlewareMixin):
def process_request(self,request):
print('This is the first custom in the middleprocess_request')
def process_response(self,request,response):
print('This is the first custom in the middleprocess_response')
return HttpResponse('Mymiddleware1')
class Mymiddleware2(MiddlewareMixin):
def process_request(self,request):
print('This is in the second custom middleprocess_request')
def process_response(self,request,response):
print('This is in the second custom middleprocess_response')
return HttpResponse('Mymiddleware1')
""" 將此文件導入settingswithin the file and inMIDDLEWARE內添加以下代碼 """
MIDDLEWARE = [
'django.middleware.security.SecurityMiddleware',
'django.contrib.sessions.middleware.SessionMiddleware',
'django.middleware.common.CommonMiddleware',
# 'django.MyMiddleware.csrf.CsrfViewMiddleware',
'django.contrib.auth.middleware.AuthenticationMiddleware',
'django.contrib.messages.middleware.MessageMiddleware',
'django.middleware.clickjacking.XFrameOptionsMiddleware',
'MyMiddleware.ware.Mymiddleware1', # 自定義中間件1
'MyMiddleware.ware.Mymiddleware2', # 自定義中間件2
]
# The terminal printing results
""" This is the first custom in the middleprocess_request This is in the second custom middleprocess_request This is in the second custom middleprocess_response This is the first custom in the middleprocess_response """
由此可以總結出:
當HttpRequest to the execution order of middleware is executed from top to bottom
When the backend returns the browser response data, the middleware is executed from top to bottom
process_request(self, request)有個參數request,這個request和視圖函數中request是一樣的(在交給DjangoBefore routing on the backend,對這個requestObjects can perform a series of operations)
由於request對象是一樣的,所以我們可以對request對象進行一系列的操作,包括request.變量名=變量值,這樣的操作,我們可以在後續的視圖函數中通過相同的方式即可獲取到我們在中間件中設置的值.
總結:
process_response(self, request, response) ,多個中間件中的process_response方法是按照MIDDLEWARE中的注冊順序倒序執行的,也就是說第一個中間件的process_request方法首先執行,而它的process_response方法最後執行,最後一個中間件的process_request方法最後一個執行,它的process_response方法是最先執行.
定義process_response方法時,必須給方法傳入兩個形參,request和response.request就是上述例子中一樣的對象,response是視圖函數返回的HttpResponse對象(也就是說這是DjangoA background processing after give a specific view).該方法的返回值(必須要有返回值)也必須是HttpResponse對象.如果不返回response而返回其他對象,則浏覽器不會拿到Django後台給他的視圖,instead the object returned in my middleware
process_view(self, request, view_func, view_args, view_kwargs)
該方法有四個參數
request是HttpRequest對象.
view_func是Django即將使用的視圖函數. (它是實際的函數對象,而不是函數的名稱作為字符串.)
view_args是將傳遞給視圖的位置參數的列表.
view_kwargs是將傳遞給視圖的關鍵字參數的字典. view_args和view_kwargs都不包含第一個視圖參數(request).
Django會在調用視圖函數之前調用process_view方法.
它應該返回None或一個HttpResponse對象. 如果返回None,Django將繼續處理這個請求,執行任何其他中間件的process_view方法,然後在執行相應的視圖. 如果它返回一個HttpResponse對象,那麼將不會執行Django的視圖函數,而是直接在中間件中掉頭,倒敘執行一個個process_response方法,最後返回給浏覽器
process_view方法是在Django路由系統之後,View system before execution,執行順序按照MIDDLEWARE中的注冊順序從前到後順序執行
process_exception(self, request, exception)
該方法兩個參數:
一個HttpRequest對象
一個exception是視圖函數異常產生的Exception對象.
這個方法只有在視圖函數中出現異常了才執行,它返回的值可以是一個None也可以是一個HttpResponse對象.如果是HttpResponse對象,Django將調用模板和中間件中的process_response方法,並返回給浏覽器,否則將默認處理異常.如果返回一個None,則交給下一個中間件的process_exception方法來處理異常.它的執行順序也是按照中間件注冊順序的倒序執行
process_template_response(self, request, response)
它的參數,一個HttpRequest對象,response是TemplateResponse對象(由視圖函數或者中間件產生).
process_template_response是在視圖函數執行完成後立即執行,但是它有一個前提條件,那就是視圖函數返回的對象有一個render()方法(或者表明該對象是一個TemplateResponse對象或等價方法)

中間件版的登錄驗證需要依靠session,所以數據庫中要有django_session表.
# Middleware version of login authentication
def login_middle(request):
if request.method == 'POST':
username = request.POST.get('username')
password = request.POST.get('password')
login_obj_middle = models.user.objects.filter(username=username).first()
if login_obj_middle:
if login_obj_middle.password == int(password):
next = request.GET.get('next')
request.session['name'] = username
if next:
return redirect(next)
return redirect('/func_middle/')
return render(request,'login_middle.html')
def func_middle(request):
return HttpResponse('hello i'm home~')
def index_middle(request):
return HttpResponse('這是index_middle頁面,It can only be reached through middleware authentication')
class auth_middleware(MiddlewareMixin):
def process_request(self,request):
path = request.path_info
# 最最重要,If you don't judge whether the path is the login path, it will cause too many redirects.
if not path.startswith('/login_middle/'):
if not request.session.get('name'):
return redirect('/login_middle/?next={}'.format(path))
MIDDLEWARE = [
'django.middleware.security.SecurityMiddleware',
'django.contrib.sessions.middleware.SessionMiddleware',
'django.middleware.common.CommonMiddleware',
# 'django.MyMiddleware.csrf.CsrfViewMiddleware',
'django.contrib.auth.middleware.AuthenticationMiddleware',
'django.contrib.messages.middleware.MessageMiddleware',
'django.middleware.clickjacking.XFrameOptionsMiddleware',
# 'MyMiddleware.ware.Mymiddleware1', # 自定義中間件1
# 'MyMiddleware.ware.Mymiddleware2', # 自定義中間件2
'MyMiddleware.ware.auth_middleware'
]
csrf:跨站請求偽造
csrf攻擊原理:攻擊者盜用了你的身份,以你的名義發送惡意請求,However the request for server is completely legal
要完成一次csrf攻擊,受害者必須依次完成以下兩個步驟
""" To prevent phishing web site The website will give the user accessform表單頁面 偷偷塞一個隨機字符串 該隨機字符串有以下特點 1.同一個浏覽器每一次訪問都不一樣 2.Different browsers will never repeat 請求到來的時候 會先比對隨機字符串是否一致 如果不一致 直接拒絕(403) """
<form action="" method="post">
{
% csrf_token %}
<p>username:<input type="text" name="username"></p>
<p>password:<input type="text" name="password"></p>
<input type="submit">
</form>
<input type="hidden" name="csrfmiddlewaretoken" value="vhTcZWUvUFPq6QaMwMMn7792WX1wJD7zPMjFHybaFbmygFeQUipvtijXeyItthj6">
The next time you submitted to the back-end backend will checkname="csrfmiddlewaretoken"的值(This is the random string,never be the same),If the same, allow the operation,not directly reject(403 Forbidden)
在前端加上{% crsf_token %},後端settings裡的MIDDLEWARE中的關於csrfAfter the middleware need not commented out
MIDDLEWARE = [
'django.middleware.security.SecurityMiddleware',
'django.contrib.sessions.middleware.SessionMiddleware',
'django.middleware.common.CommonMiddleware',
'django.MyMiddleware.csrf.CsrfViewMiddleware',
'django.contrib.auth.middleware.AuthenticationMiddleware',
'django.contrib.messages.middleware.MessageMiddleware',
'django.middleware.clickjacking.XFrameOptionsMiddleware',
# 'MyMiddleware.ware.Mymiddleware1', # 自定義中間件1
# 'MyMiddleware.ware.Mymiddleware2', # 自定義中間件2
'MyMiddleware.ware.auth_middleware'
]
方法一、先在formWrite on the form page{% csrf_token%},利用標簽查找,獲取到該inputkey-value message
data{
'username':'xxxx','csrfmiddlewaretoken':$('[name=csrfmiddlewaretoken]').val()}
方法二、直接書寫’{ {csrf_token}}’
data{
'username':'xxx','csrfmiddlewaretoken':'{
{csrf_token}}'}
新建一個js文件,store the following code
function getCookie(name) {

var cookieValue = null;
if (document.cookie && document.cookie !== '') {

var cookies = document.cookie.split(';');
for (var i = 0; i < cookies.length; i++) {

var cookie = jQuery.trim(cookies[i]);
// Does this cookie string begin with the name we want?
if (cookie.substring(0, name.length + 1) === (name + '=')) {

cookieValue = decodeURIComponent(cookie.substring(name.length + 1));
break;
}
}
}
return cookieValue;
}
var csrftoken = getCookie('csrftoken');
function csrfSafeMethod(method) {

// these HTTP methods do not require CSRF protection
return (/^(GET|HEAD|OPTIONS|TRACE)$/.test(method));
}
$.ajaxSetup({

beforeSend: function (xhr, settings) {

if (!csrfSafeMethod(settings.type) && !this.crossDomain) {

xhr.setRequestHeader("X-CSRFToken", csrftoken);
}
}
});
直接注釋掉settings中MIDDLEWARE的中間件 ‘django.middleware.csrf.CsrfViewMiddleware’,
from django.views.decorators.csrf import csrf_exempt,csrf_protect
#(The premise is that it is used globally,沒有注釋csrf) Let this not check,可以局部使用
#When your website needs to be checked globallycsrf的時候,有幾個不需要校驗該如何處理
@csrf_exempt(global check is exempt)
def login(request):
return HttpResponse('login')
#(Provided that it is disabled globally,注釋csrf,不會進行校驗) The settings will be verified,局部禁用
#When your website does not check globallycsrf的時候,There are several that need to be verified and how to deal with them
@csrf_protect(Global protection without checking)
def lll(request):
return HttpResponse('lll')
from django.views import View
from django.views.decorators.csrf import csrf_exempt,csrf_protect
from django.utils.decorators import method_decorator
# 這兩個裝飾器在給CBV裝飾的時候 有一定的區別
如果是csrf_protect 那麼有三種方式
# 第一種方式
# @method_decorator(csrf_protect,name='post') # 有效的
class MyView(View):
# 第三種方式
# @method_decorator(csrf_protect)
def dispatch(self, request, *args, **kwargs):
res = super().dispatch(request, *args, **kwargs)
return res
def get(self,request):
return HttpResponse('get')
# 第二種方式
# @method_decorator(csrf_protect) # 有效的
def post(self,request):
return HttpResponse('post')
如果是csrf_exempt 只有兩種(只能給dispatch裝) 特例
@method_decorator(csrf_exempt,name='dispatch') # 第二種可以不校驗的方式
class MyView(View):
# @method_decorator(csrf_exempt) # 第一種可以不校驗的方式
def dispatch(self, request, *args, **kwargs):
res = super().dispatch(request, *args, **kwargs)
return res
def get(self,request):
return HttpResponse('get')
def post(self,request):
return HttpResponse('post')
Auth模塊是Django自帶的用戶認證模塊
djangoDirect access after startupadmin路由,但是需要登錄,The reference to the data isauth_user表,And also must is administrator user to enter
創建超級用戶(管理員)
from django.contrib import auth
auth.authenticate() # 去auth_userAutomatically verify data in the table
user_obj = auth.authenticate(request,username=username,password=password)
user_obj.username
user_obj.password
……
""" 返回的是一個對象,auth.authenticate()類裡有__str__方法 1、自動查找auth_user標簽 2、Automatically for the user to enter the password encryption after checked Is must pass the username and password 數據不符合則返回None """
# Save the user login after a user login
auth_login(request,user_obj) # 類似於request.session[key] = user_obj
""" As long as this method is executed, you can pass it anywhere in the whole projectrequest.userGet the currently logged in user object 其原理就是: 自動取django_sessionIn the table lookup and encapsulated into a corresponding user objectrequest.user中 If the object does not existrequest.user返回的是AnonymousUser(匿名用戶) """
# 判斷用戶是否登錄
request.user.is_authenticated()
""" 返回True/False """
# 該函數接受一個HttpRequest對象,無返回值.
def logout_view(request):
auth.logout(request)
# Redirect to a success page.
""" 當調用該函數時,當前請求的session信息會全部清除.該用戶即使沒有登錄,使用該函數也不會報錯. """
# a decorator tool,用來快捷的給某個視圖添加登錄校驗.
from django.contrib.auth.decorators import login_required
@login_required
def my_view(request):
...
""" 若用戶沒有登錄,則會跳轉到django默認的 登錄URL '/accounts/login/ ' 並傳遞當前訪問url的絕對路徑 (登陸成功後,會重定向到該路徑). 如果需要自定義登錄的URL,則需要在settings.py文件中通過LOGIN_URL進行修改. """
@login_required(login_url='/login/') # 局部配置【Improper use will cause the redirection too many times】
LOGIN_URL = '/login/' # 這裡配置成你項目登錄頁面的路由(全局配置)
優先級 The local is bigger than the global
Local and global usage depends on the situation
path = request.get_full_path()
if not path.endswith('/app02/login/'):
next = request.GET.get('next')
return redirect(next)
return HttpResponse('haha')
@login_required
def home(request):
return HttpResponse('OK')
@login_required
def index(request):
return HttpResponse('INDEX')
# auth Provides a method to create a new regular user,需要提供必要參數(username、password)等.
from django.contrib.auth.models import User
user = User.objects.create_user(username='用戶名',password='密碼',email='郵箱',...)
# auth 提供的一個創建新的超級用戶的方法,需要提供必要參數(username、password)等.
from django.contrib.auth.models import User
user = User.objects.create_superuser(username='用戶名',password='密碼',email='郵箱',...)
# auth 提供的一個檢查密碼是否正確的方法,需要提供當前請求用戶的密碼.
ok = user.check_password("老密碼",'新密碼')
""" 密碼正確返回True,否則返回False. """
# auth 提供的一個修改密碼的方法,接收 要設置的新密碼 作為參數.
""" 注意:設置完一定要調用用戶對象的save方法!!! """
user.set_password(password='')
user.save()
""" User對象屬性:username, password is_staff : 用戶是否擁有網站的管理權限. is_active : 是否允許用戶登錄, 設置為 False,可以在不刪除用戶的前提下禁止用戶登錄. """
我們可以通過繼承內置的 AbstractUser 類,來定義一個自己的Model類.
這樣既能根據項目需求靈活的設計用戶表,又能使用Django強大的認證系統了.
from django.contrib.auth.models import AbstractUser
class UserInfo(AbstractUser):
""" 用戶信息表 """
nid = models.AutoField(primary_key=True)
phone = models.CharField(max_length=11, null=True, unique=True)
def __str__(self):
return self.username
""" 如果繼承了AbstractUser,When executing the database migration command auth_userThe table will no longer be created,The created table name is the class name defined by ourselves 而Userinfo表中會出現auth_userAll fields in the table and there areUserinfoown extended fields 前提: 1、Database migration command not executed before inheritance(auth_userThe table has not been created) 2、繼承的類AbstractUserThe field name should not be covered """
注意:
按上面的方式擴展了內置的auth_user表之後,一定要在settings.py中告訴Django,我現在使用我新定義的UserInfo表來做用戶認證.寫法如下:
# 引用Django自帶的User表,繼承使用時需要設置
AUTH_USER_MODEL = "app名.UserInfo"
一旦我們指定了新的認證系統所使用的表,我們就需要重新在數據庫中創建該表,而不能繼續使用原來默認的auth_user表了.
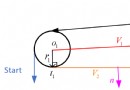 [auto - conduite] planification du chemin - - résumé de la formule de courbe de dubins et mise en oeuvre du Code Python (méthode géométrique)
Catalogue des articlesRéférenc