The first 1 Chapter
install OpenCV
When I pick up this tutorial , You may already be right OpenCV Got to know something . You may
I have seen some of these functions in science fiction , For example, training artificial intelligence models to recognize
Everything it sees through the camera . If this is your interest , Then you won't lose
at !OpenCV Is open source computer vision (Open Source Computer Vision) Contraction of
Write . This is a free computer vision library , Allows you to manipulate images and videos to complete various
Mission , From displaying video frames of webcams to teaching robots to recognize real objects .
Through this tutorial , You will learn to base on Python Programming language to use OpenCV Great potential
force .Python It's an elegant language , The learning curve is relatively shallow , But it's very powerful
Big . This chapter is about how to install Python 3、OpenCV 4 And its dependencies
south . As OpenCV Part of , We will install opencv_contrib modular , These models
The block is provided by OpenCV Community ( Not the core development team ) Additional functions of maintenance . Ann
After installation , We will also browse OpenCV Of Python Sample scripts and documentation .
This chapter will introduce the following related libraries :
·NumPy: This library is OpenCV Of Python A dependency of binding . It provides
Numerical calculation functions including efficient arrays .
·SciPy: This library is a scientific computing library , And NumPy Is closely related to the .
OpenCV You don't need this library , But if you want to operate OpenCV Data in image ,
Then this library is very useful .
·OpenNI 2: This library is OpenCV An optional dependency of . Added a pair of
Some depth cameras ( Such as ASUS Xtion PRO) Support for .
OpenCV 4 Has given up right OpenNI 1 And all OpenNI 1 Module support
a , such as Sensor-Kinect. This change means that in OpenCV 4 May no longer support
Like Microsoft Kinect Of Xbox Some old-fashioned depth cameras such as version .
For the purposes of this tutorial , It can be said that OpenNI 2 It's optional . This content only runs through 4
Chapter , Not used in other chapters or appendices OpenNI 2.
This tutorial focuses on the current OpenCV The latest version of the library OpenCV 4. of
OpenCV More information can be found in http://opencv.org Find , Official documents can be found in
http://docs.opencv.org/master Find .
This chapter will introduce the following topics :
·OpenCV 4 What's new .
· Select and use appropriate installation tools .
· Run the example .
· Search for documents 、 Help and update .
1.1 Technical requirements
This chapter assumes that you are using one of the following operating systems :
·Windows 7 SP1 Or higher .
·macOS 10.7(Lion) Or higher .
·Debian Jessie Or higher , Or similar to the following derivative :
·Ubuntu 14.04 Or higher .
·Linux Mint 17 Or higher .
For the sake of editing Python Scripts or other text files , The author of this tutorial just suggests : you
There should be a good text editor . for example :
·Windows Of Notepad++.
·macOS Of BBEdit( Free version ).
·Linux On GNOME Desktop Environment GEdit.
·Linux On KDE Plasma Desktop Environment Kate.
In addition to the operating system , There are no other prerequisites in this chapter .
1.2 OpenCV 4 What's new
If you are a senior OpenCV Users , Then decide to install OpenCV 4 And
front , You may want to know more about OpenCV 4 The change of . Here are some of them
spot :
· Have already put OpenCV Of C++ Update to C++11.OpenCV Of Python Tying
It must be sealed C++ Realization , So for Python For users , Even if not directly used
C++, You can also get some performance advantages from this update .
· Removed OpenCV Abandoned C Realize and C Implement deprecated Python Tying
set .
· Many new optimizations have been achieved . The existing OpenCV 3 Project except update OpenCV
Out of version , These optimizations can be leveraged without further changes . about OpenCV
C++ project , Available names are G-API New optimized pipeline , however OpenCV Of Python Tying
This optimization pipeline is not currently supported .
·OpenCV Of DNN The module provides many new machine learning models .
· Removed for training Haar Cascade and LBP cascade ( Detect custom objects ) Work of
have . It is proposed that OpenCV 4 Re implement these tools in future updates , And support its
He models .
· Support KinectFusion Algorithm ( Use Microsoft Kinect 2 The camera performs three-dimensional reconstruction
build ).
· Added dense optical flow DIS Algorithm .
· A two-dimensional code detection and decoding module is added .
Whether or not you have used OpenCV Previous version , This tutorial will serve as OpenCV 4 Of
General guidelines , In the following chapters, we will pay special attention to some of these new features .
1.3 Select and use appropriate installation tools
According to the operating system and the desired configuration , We are free to choose various installers
have .
No matter which operating system you choose ,Python Both provide a very useful installation and development environment
Some built-in tools used , Including the name pip Package manager of and named venv Virtual environment for
Manager . Some descriptions in this chapter are mainly aimed at pip, If you want to know venv, Please refer to
https://docs.python.org/3/library/venv.html The official of Python writing
files .
If you plan to maintain multiple that may have conflicting dependencies Python project ,
Then you should consider using venv—— for example , Depend on OpenCV Different versions of the project .
venv Each virtual environment of has its own set of installation libraries , We can in these environments
Switch between , There is no need to reinstall anything . In a given virtual environment , have access to pip
Installation Library , In some cases, you can also use other tools to install libraries .
Let's check what can be used for Windows、macOS、Ubuntu And so on UNIX Systematic
Overview of installation tools .
1.3.1 stay Windows Installation on
Windows Not pre installed Python. however ,Python Provides an installation wizard
And a man named pip Package manager , It allows us to easily install ready-made NumPy、SciPy
and OpenCV. perhaps , We can build from source code OpenCV, In order to enable non-standard features
sex , Such as through OpenNI 2 Support depth camera .OpenCV The build system uses CMake
To configure the system and use Visual Studio Compile .
Before doing anything else , First, install Python. visit
https://www.python.org/getit/ Download and run Python 3.8 Erection sequence . all
tube OpenCV You can also use 32 Bit Python, But you may want 64 Bit Python Ann
Install program .
Once installed Python, You can use pip install NumPy and SciPy 了 . Open life
Command prompt , Run the following command :

Now? , We must make sure that we need a ready-made OpenCV( Depth is not supported
camera ) Still need a custom OpenCV( Support depth camera ). The following will
Introduce these alternatives .
1. Use off-the-shelf OpenCV package
OpenCV contain opencv_contrib modular , As a pip Package to install . this
It is as simple as running the following command :

If you want to OpenCV The installation contains non free content ( Such as patented Algorithm ), Then
To run the following command :

If you plan to release it, it depends on OpenCV Non free content software , You should do it yourself
Investigate patents and licensing issues applicable to specific countries and specific use cases .OpenCV Is not free
The content includes patents SIFT and SURF Implementation of algorithm , These contents will be published on page 6 Chapter
Shao .
You may find one of them pip The package provides all you currently want OpenCV ,
sex . in addition , If you plan to use a depth camera , Or want to know OpenCV Customize
General process of construction , Then you should not install OpenCV Of pip package , Instead, it should be constructed from the source code
build OpenCV.
2. Build from source OpenCV
If you want to support depth cameras , Then you should also install OpenNI 2, It's with
A set of precompiled binaries of the installation wizard . then , We have to use CMake and
Visual Studio Build from source OpenCV.
To get OpenNI 2, Please visit https://structure.io/openni, And according to
Windows And system architecture (x64 perhaps x86) Download the latest version of the compressed file . Solve it
Pressure , Get an installer file , Such as OpenNI-Windows-x64-2.2.msi. function
Erection sequence .
Now? , Let's install Visual Studio. To build OpenCV 4, We need to
Visual Studio 2015 Or higher . If there is no suitable version , Accessible
https://visualstudio.microsoft.com/downloads/, Download and run the following
One of the listed Installers :
· Free of charge Visual Studio 2019 Community Edition .
·Visual Studio 2019 Paid version , The probation period is 30 God .
During installation , Make sure that all optional C++ Components . After installation , again
start-up .
about OpenCV 4, The build configuration process requires CMake 3 Or above . visit
https://cmake.org/download/, Download and install your own architecture (x64
or x86) Of CMake The latest version of the installer , Then run it . During installation ,
choice “Add CMake to the system PATH for all users” perhaps “Add
CMake to the system PATH for current user”.
At this stage , We have done for OpenCV The custom build installs dependencies and establishes
The environment . Now? , We need to get OpenCV Source code , Configure and build it .
This can be done through the following steps :
(1) visit https://opencv.org/releases/, obtain Windows The latest
OpenCV Download program . It is a self extracting compressed file . Run it , When the command appears
Prompt , Enter any destination folder , We named it
<opencv_unzip_destination>. During decompression , Will be in
<opencv_unzip_destination>\opencv Create a subfolder in .
(2) visit
https://github.com/opencv/opencv_contrib/releases, download
opencv_contrib The latest compressed file of the module . Unzip this file into any target file
Clip , We named it <opencv_contrib_unzip_destination>.
(3) Open Command Prompt , Run the following command , Generate another
A folder :
Change the directory to build Folder :

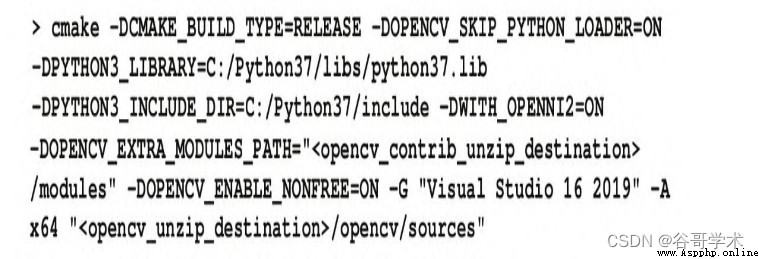
4) Now? , We are ready to use CMake Command line interface to configure the build
了 . Understand all the options , You can read
<opencv_unzip_destination>\opencv\CMakeLists.txt The code in . but
yes , For the purposes of this tutorial , We just need to use some options , These options will give us the belt
Yes Python binding 、opencv_contrib modular 、 Non free content , And pass OpenNI 2
A release build that supports depth cameras . according to Visual Studio Version and target architecture
(x64 or x86), Some options are slightly different . To create a suitable for Visual Studio
2019 Of 64 position (x64) Solution , Run the following command ( But please use the actual path instead
<opencv_contrib_unzip_destination> and
<opencv_unzip_destination>):
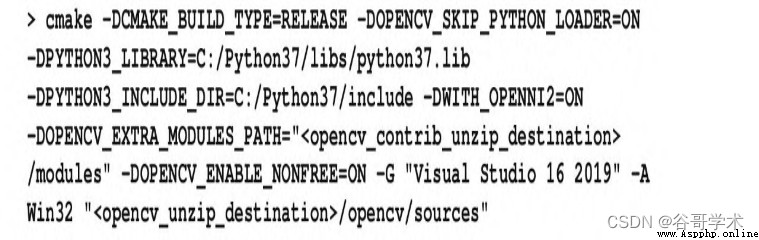
To create a suitable for Visual Studio 2019 Of 32 position (x86) Solution , function
The following command ( But please use the actual path instead
<opencv_contrib_unzip_destination> and
<opencv_unzip_destination>):
When running the above command , It will print a letter about the found or missing dependencies
Rest .OpenCV There are many optional dependencies , So don't panic about losing dependencies . but
yes , If the build does not complete successfully , You can try to install the missing dependencies .( Many depend on
All dependencies can be used as pre built binaries .) then , Repeat this step .
(5)CMake Will be in <opencv_build_folder>/OpenCV.sln Zhongsheng Chengyi
individual Visual Studio Solution file . stay Visual Studio Open it in . Please make sure
stay Visual Studio Check the drop-down list of the toolbar near the top of the window
“Release” To configure ( instead of “Debug” To configure ).( Probably not Debug To configure
Build OpenCV Of Python binding , Because most Python The release version does not contain the key
Test library .) visit “BUILD” menu , choice “Build Solution”. View the bottom of the window
Ministry “Output” Build information in the panel , Wait for build to complete .
(6) At this stage , It's built OpenCV, But I haven't put OpenCV Ann
Install to Python Where to find . Before proceeding to the next step , Please make sure Python Environmental Science
There are no conflicts OpenCV structure . Find and delete Python Of DLL The folder and
site_packages All in folder OpenCV file . for example , These files may match
The following patterns :C:\Python37\DLLs\opencv_*.dll、
C:\Python37\Lib\site-packages\opencv and C:\Python37\Lib\site-
packages\cv2.pyd.
(7) Last , install OpenCV Custom build for .CMake A... Has been generated
INSTALL Project as OpenCV.sln Visual Studio Part of the solution . see
Visual Studio On the right side of the window “Solution Explorer” panel , find
“CMakeTargets | INSTALL” project , Right click , And from “context” menu
choice “Build”. Again , View the bottom of the window “Output” Build messages in the panel ,
And wait for the build to complete . then , sign out Visual Studio. Edit system Path Variable ,
And add ;<build_folder>\install\x64\vc15\bin( about 64 Bit construction ) or
person ;<build_folder>\install\x86\vc15\bin( about 32 Bit construction ). This
The folder is INSTALL Project placement OpenCV DLL file (Python Load dynamically at run time
Library file ) The place of .OpenCV Python Modules are located in places such as
C:\Python37\Lib\site-packages\cv2.pyd Under such a path .Python Will be in
Find it here , So you don't need to add it to Path in . Log out and log back in ( perhaps
Restart ).
The above instructions refer to the editing system Path Variable . It can also be found on the
“Environment Variables” In the window, follow the steps below to complete this task :
(1) single click “ Start ” Menu and start the control panel . Navigate to “System and
Security”→“System”→“Advanced system settings”. single click
“Environment Variables...” Button .
(2) Now? , stay “System Variables” Next , choice “Path”, single click
“Edit…” Button .
(3) Make changes according to the instructions .
(4) To apply these changes , Please click all “OK” Button ( Until I return to control
Make the main window of the panel ).
(5) then , Log out and log back in ( Or restart ).
Now? , We've been Windows I've finished OpenCV The building process of , And have
This tutorial is suitable for all Python A custom build of the project .
In the future , If you want to put the OpenCV Update the source code to the new version , Please download from
OpenCV Start , Repeat all the above steps .
1.3.2 stay macOS Installation on
macOS With pre-installed Python Distribution version ( Customized according to the internal requirements of Apple system ).
To develop our own projects , We should install it independently Python, And make sure it's tied to
Unified Python Requirements do not conflict .
about macOS, There may be some ways to get the Standard Version Python 3、NumPy、
SciPy and OpenCV. All methods ultimately need to be right OpenCV Use Xcode Command line tools
Compile from source code . however , According to different methods , This task can pass the third
Square tools automatically complete in various ways . We can use a self-made package manager
Check this method . Package managers can potentially accomplish CMake Everything you can accomplish ,
Besides , It can also help us solve dependencies , And divide the development library and system library
leave .
MacPorts yes macOS Another popular package manager . however , Writing this
Tutorial time ,MacPorts It does not provide OpenCV 4 perhaps OpenNI 2 My bag , So in this tutorial
I won't use this package manager .
Before moving on to the next step , Make sure that Xcode Command line tools . open
terminal , Run the following command :
 Agree to the license agreement and other tips . The installer should run until it is finished . present
stay , We have the compiler needed for self-made programs .
1. Homemade programs using off the shelf software packages
From has been installed Xcode And its command-line tools , The following steps will lead to
Finished by self-made program OpenCV Installation :
(1) Open the terminal , Run the following command to install the homebrew :

(2) Self made programs will not automatically put executable files PATH in . So , Create or
edit ~/.profile file , Add the following line at the top of the code :

Save the file , Run the following command to refresh PATH:
Please note that , Now? , Executable files installed by self-made programs take precedence over those installed by the system
The executable of .
(3) Self diagnosis report of self-made program , Run the following command :
 Follow all troubleshooting advice it gives .
(4) Now? , Update homebrew :

5) Run the following command , install Python 3.8:

6) Now? , We want to install and own opencv_contrib Modular OpenCV. Same as
when , We want to install something like NumPy Such dependencies . So , Run the following life
Make :

Self made programs do not provide installation with OpenNI 2 Supported by OpenCV The option to . since
System programs are always installed and owned opencv_contrib Modular OpenCV, Including patents SIFT and
SURF Algorithm ( See the first 6 Chapter ) Such non free content . If you plan to release it, it depends on
OpenCV Non free content software , You should do your own research, which is applicable to specific countries and specific uses
Examples of patents and licensing issues .
(7) Again , Run the following command , install SciPy:

Now? , We have in macOS Based on Python Development OpenCV The project needs
All contents .
2. Self made programs using custom packages
If you need to customize a software package , Then self-made programs let you edit existing software packages
Definition becomes easy :

actually , The software package definition uses Ruby Script written in programming language . It can be found on the website
by https://github.com/Homebrew/brew/blob/master/docs/Formula-
Cookbook.md Find tips for editing package definitions on the homebrew wiki page of . Script
You can also specify Make perhaps CMake Configuration flags , wait .
To see which CMake Configure flags and OpenCV relevant , Please refer to
https://github.com/opencv/opencv/blob/master/CMakeLists.txt stay GitHub
On the official OpenCV library .
In the face of Ruby After editing the script , Please save it .
Custom packages can be regarded as regular packages . for example , You can install customization as follows
package :

1.3.3 stay Debian、Ubuntu、Linux Mint And similar systems
Installation on
Debian、Ubuntu、Linux Mint As well as Linux Relevant publishing platforms are used
apt Package manager . On these systems , Install for Python 3 And including NumPy and
SciPy A lot of it Python It is easy to package modules . You can also use
apt obtain OpenCV package , But when writing this tutorial , This package has not been updated to OpenCV
4. however , We can Python Standard package management pip In order to get OpenCV 4( No
Hold the depth camera ). You can also build... From source code OpenCV 4. When building from source code ,
OpenCV Can pass OpenNI 2 Support depth camera ,OpenNI 2 It can be used as a belt
A set of precompiled binaries for loading scripts .
No matter how you get it OpenCV, Should be updated first apt, In this way, you can get
Get the latest bag . Open the terminal , Run the following command :
 to update apt after , Run the following command , by Python 3 install NumPy and
SciPy:
 Again , We can use Ubuntu Software center , It is apt Diagram of package manager
Shaped front end .
Now? , We must decide whether to OpenCV An off the shelf build of ( Depth photography is not supported
Elephant head ), Or a custom build ( Support depth camera ). These will be introduced below
alternative .
1. Use off-the-shelf OpenCV package
OpenCV Include opencv_contrib Module included , As a pip Package installation
loading . This is as simple as running the following command :

If you want to OpenCV Install non free content including proprietary algorithms , Then you can.
Run the following command :
 If you plan to publish based on OpenCV Non free content software , You should adjust it yourself
Study patents and licensing issues applicable to specific countries and specific use cases .OpenCV Is not free
Including patents SIFT and SURF Implementation of algorithm , We will be in the 6 It is introduced in chapter .
You may find one of them pip The package provides all you currently want OpenCV ,
sex . in addition , If you plan to use a depth camera , Or want to know OpenCV Customize
General process of construction , Then you should not install OpenCV Of pip package , Instead, it should be constructed from the source code
build OpenCV.
2. Build from source OpenCV
To build from source code OpenCV, We need a C++ Build environment and CMake structure
Configure the system . say concretely , We need to CMake 3. stay Ubuntu 14.04、Linux
Mint 17 And related systems ,cmake A bag is a bag CMake 2, But there is also a new one
cmake 3 The package is available . On these systems , Run these commands , To ensure installation
What you need CMake Version and other build tools :


in addition , On the latest operating system ,cmake Wrap finger CMake 3, We can make it simple
Run the following command carefully :

except OpenCV Outside the construction process of ,CMake You also need to visit the network to download additional dependencies
term . If the system uses a proxy server , Then please make sure that the proxy server is configured correctly
Environment variables of . say concretely ,CMake Depend on http_proxy and https_proxy Environmental Science
Variable . To define these environment variables , Can edit ~/.bash_profile Script , Add below
Face the contents of these lines ( Please modify them , So that they can communicate with their own proxy server URL And end
Match the slogan ):

If you are not sure whether the system uses a proxy server , This may not work
了 , Then you can ignore this step .
To build OpenCV Of Python binding , We need to install Python 3 Development header
Pieces of . To install these , Run the following command :

From the typical USB Webcam captures frames ,OpenCV Depend on Linux video
(V4L). On most systems ,V4L It is pre installed , But in case there is no installation
word , Please run the following command :
As mentioned earlier , Support depth camera ,OpenCV Depend on OpenNI 2. visit
https://structure.io/openni, Download for Linux And its own system architecture
(x64、x86 perhaps ARM) Of OpenNI 2 Latest compressed file . Unzip it to any destination
Address ( Name it <openni2_unzip_destination>). Run the following command :

The above installation script will configure the system , To support USB Depth cameras like devices .
and , Script create reference <openni2_unzip_destination> The environment of the internal library file changes
The amount . therefore , If removed later <openni2_unzip_destination> Words , You will need
To run again install.sh.
Now? , We have installed build environment variables and dependencies , You can get and build
OpenCV The source code of . So , Please perform the following steps :
(1) visit https://opencv.org/releases/, Download the latest source code package .
Extract it to any destination folder ( Name it
<opencv_unzip_destination>).
(2) visit
https://github.com/opencv/opencv_contrib/releases, download
opencv_contrib The latest source code package of the module . Extract it to any destination folder
( Name it <opencv_contrib_unzip_destination>).
(3) Open the terminal . Run the following command , Create the to be placed OpenCV Build the file
A directory :

Switch to the newly created Directory :

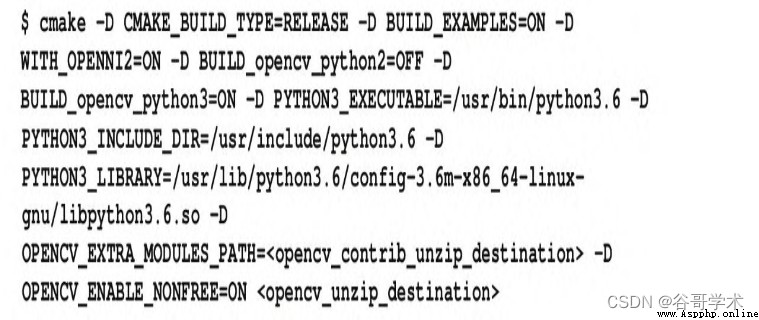
(4) Now? , We can use CMake Generate OpenCV Build configuration for . This goes with
The output of the setup process will be a set Makefile, They can be used to build and install OpenCV
Script for .
<opencv_unzip_destination>/opencv/sources/CMakeLists.txt file
It defines OpenCV A complete set of CMake configuration option . For this tutorial , We only close
Heart and OpenNI 2 Support 、Python binding 、opencv_contrib Modules and non free content
Related options . Configure by running the following command OpenCV:
(5) Last , Run the following command , Parse the newly generated Makefile, To build and
install OpenCV:
 thus , We've been Debian、Ubuntu, Or on a similar system
OpenCV The build process , And we have all the things that are suitable for this tutorial Python A customized project
Semantic construction .
1.3.4 In other classes UNIX Installation on system
In other classes UNIX On the system , Package manager and available packages may be different . Please check the guarantee
Manager documentation , And search for names that contain opencv My bag . please remember ,OpenCV And its
Python The binding may be split into multiple packages .
in addition , Find the provider of the system 、 The maintainer of the library or all published by the community
Installation instructions . because OpenCV Use camera drivers and media codecs , So in
It may be difficult to make all functions work properly on a system with poor multimedia support . In a certain
In some cases , For compatibility , You may need to reconfigure or reinstall the system package .
If OpenCV There are software packages available , Then please check their version numbers . For Ben
course , Recommended OpenCV 4. Besides , Check whether these packages pass OpenNI 2 Provide right
Python Binding and depth camera support . Last , Check whether there is
People report success or failure when using these packages .
contrary , If you want to finish from the source code OpenCV Custom build for , Reference resources 1.3.3 section
About Debian、Ubuntu And similar systems , And according to the package manager and others
The package on the system adjusts these steps , May help .
1.4 Run the example
Run some sample scripts to test whether they are installed correctly OpenCV A good way .
OpenCV The source code archive of contains some examples . If the source generation has not been obtained
code , Please visit https://opencv.org/releases/ And download one of the archives
Pieces of :
· about Windows, Download the latest archive , The label is Windows. This is one
A self extracting compressed file . Run it , When prompted , Enter any destination folder ( life
be known as <opencv_unzip_destination>). stay
<opencv_unzip_destination>/opencv/samples/python Find Python Example .
· For other systems , Download the latest archive , The label is Sources. It's a
Compressed files . Extract it to any destination folder ( Name it
<opencv_unzip_destination>). stay
<opencv_unzip_destination>/samples/python Find Python Example .
Some sample scripts require command line parameters . however , The following script ( And other feet
Ben ) It should work without any parameters :
·hist.py: This script shows a photo . Press down A、B、C、D perhaps E see
Changes in photos , And the corresponding color histogram or gray value histogram .
·opt_flow.py: This script shows a webcam return signal , Provide optical flow
Overlay visualization or direction of motion . Wave slowly to the camera , Look at the effect . Press down 1 or
person 2 Choose visualization .
To exit a script , Please press Esc( No Windows Close button for ).
If you encounter “ImportError:No module named cv2” news , So this is
It means that we are from a pair OpenCV Ignorant Python Run script . Regarding this ,
There are two possible explanations :
·OpenCV Some steps in the installation process may fail or be lost . Return and check
Look at these steps .
· If more than one is installed on the machine Python, Then we may be using the wrong
Python Version to start the script . for example , stay macOS On , May have been self-made Python Ann
installed OpenCV, But we are using Python The system version of runs the script . return
And check the editing system PATH Installation steps of variables . Besides , Try the following command
Start the script manually from the command line :
You can also try the following commands :

As a choice, different Python Another possible way to install , Try editing the example
Script , To delete #! That's ok . These lines may explicitly associate the script with the wrong Python install
( Specific installation ) Connect .
1.5 Search for documents 、 Help and update
Can be in http://docs.opencv.org/ find OpenCV Documents , It can be online
You can also download it and read it offline . If there is no internet access on the plane or other
Ask where to write code , You definitely want to keep an offline copy of the document .
This document includes OpenCV Of C++API And its Python API Combinatorial API quote . Checking
When looking for a class or function , Please be sure to read Python The content under the title .
OpenCV Of Python The module is named cv2. stay cv2 Medium 2 And OpenCV Edition
This number is irrelevant , We use OpenCV 4. In the history of , There is one named cv Of Python
The module encapsulates OpenCV An outdated C edition . stay OpenCV 4 It's gone
In any cv modular . however OpenCV Documents sometimes incorrectly name modules cv( Instead of
yes cv2). please remember , stay OpenCV 4 in , Correct Python The module name is always
cv2.
If there is no answer to your question in the document , Please try to find OpenCV Community help
help . On the following website , You can find someone who can help you :
·OpenCV Forum :https://answers.opencv.org/questions/.
·Adrian Rosebrock Website :http://www.pyimagesearch.com/.
· Joseph · House tutorial and presentation website :
http://nummist.com/opencv/.
Last , If you are an advanced user , Want to try the latest ( Unstable )OpenCV
New features in the source code 、bug Repair and sample script , Please use the website
https://github.com/opencv/opencv/ View the library of this project .
1.6 Summary of this chapter
So far, , We should have installed one OpenCV, It can meet the description in this tutorial
The requirements of various projects mentioned . According to the selected method , We may also have a set of tools and feet
Ben , Can be used for reconfiguration and reinstallation OpenCV, To meet the needs of the future .
Now? , We also know where to find OpenCV Of Python Example . these
The various functions included in the examples are beyond the scope of this tutorial , But these contents are very real
use , It can be used as an additional learning resource .
In the 2 Chapter , We will master OpenCV API The most basic function , That is, display image and view
frequency 、 Capture video via webcam , And handle basic keyboard and mouse input .