stay Web In the process of automated testing , Often get stuck by the login verification code , I don't know how to pass the verification code .
In general, we can find the developer to help solve the verification code , Turn off the verification code , Or give a universal verification code !
So if development doesn't help , Is there any way for us to deal with these verification codes ?
The answer, of course, is yes , Common verification codes are generally divided into two categories , One is graphic verification code , One is sliding verification code !

Generally speaking, the idea of sliding verification code cracking is the following two steps :
1、 Get the sliding distance of the slider
2、 Simulation drag slider , Pass the verification .
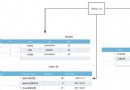
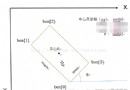
About this sliding verification code , The slider and the notch background are separate pictures , We can put these two pictures ,
Download it with the help of image recognition technology , To identify the position of the gap in the background , Then subtract the current position of the slider , You can get the distance you need to slide .
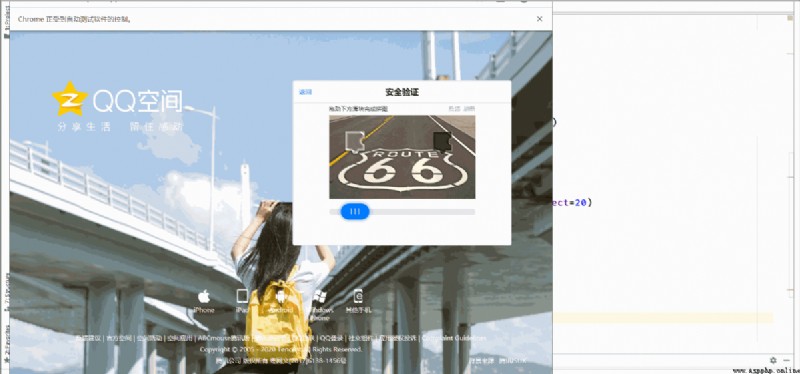
Case onDon't talk much , Let's start with a case study (QQ Space login ),QQ The implementation steps of the space login case are as follows :
1、 Create a driver object , visit qq The login page
2、 Enter the account and password
3、 Click login
4、 Simulated sliding verification
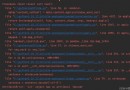
Implementation codeimport timefrom selenium import webdriverfrom slideVerfication import SlideVerificationCode# 1、 Create a driver object , visit qq The login page browser = webdriver.Chrome()browser.get("https://qzone.qq.com/")# 2、 Enter the account and password # 2.0 Click to switch to login iframebrowser.switch_to.frame('login_frame')# 2.1 Click the account and password to log in browser.find_element_by_id('switcher_plogin').click()# 2.2 Locate the account input box , Enter account browser.find_element_by_id("u").send_keys("123456")# 2.3 Locate password input input password browser.find_element_by_id("p").send_keys("PYTHON")# 3、 Click login browser.find_element_by_id('login_button').click()time.sleep(3)# 4、 Simulated sliding verification # 4.1 Switch to... Of sliding verification code iframe in tcaptcha = browser.find_element_by_id("tcaptcha_iframe")browser.switch_to.frame(tcaptcha)# 4.2 Get sliding related elements # Select the node where you want to drag the slider slide_element = browser.find_element_by_id('tcaptcha_drag_thumb')# Get the node of the slider image slideBlock_ele = browser.find_element_by_id('slideBlock')# Get the gap background picture node slideBg = browser.find_element_by_id('slideBg')# 4.3 Calculate the sliding distance sc = SlideVerificationCode(save_image=True)distance = sc.get_element_slide_distance(slideBlock_ele,slideBg)# Error correction of sliding distance , Sliding distance * The zoom ratio of the image displayed on the web page - The relative initial position of the slider distance = distance*(280/680) - 22print(" Corrected sliding distance ",distance)# 4.4、 Slide sc.slide_verification(browser,slide_element,distance=100)Running effect :
In fact, about this module image recognition , It is recognized with the help of a third-party image processing module ,python There are many ready-made libraries for processing pictures , This article USES opencv-python To identify .slideVerfication Some reference codes of the two methods used in the module are as follows :
According to the incoming slider , And background nodes , Calculate the distance of the sliderdef get_element_slide_distance(self, slider_ele, background_ele, correct=0): """ According to the incoming slider , And background nodes , Calculate the distance of the slider This method can only calculate Both the slider and the background image are scenes of a complete picture , If the background image is a background image spliced by multiple small images , This method is not applicable , Please use get_image_slide_distance This method :param slider_ele: Slider picture node :type slider_ele: WebElement :param background_ele: Nodes of the background image :type background_ele:WebElement :param correct: Correction value of slider notch screenshot , The default is 0, Only when the debug screenshot is correct :type: int :return: The position of the notch in the background image X Axis coordinate position ( The left boundary of the notch image ) """ # Get the picture of the verification code slider_url = slider_ele.get_attribute("src") background_url = background_ele.get_attribute("src") # Download the background image of verification code , Slide picture slider = "slider.jpg" background = "background.jpg" self.onload_save_img(slider_url, slider) self.onload_save_img(background_url, background) # Read the chroma picture , Convert to numpy Array type data in , slider_pic = cv2.imread(slider, 0) background_pic = cv2.imread(background, 0) # Get the shape of the notch graph array --> Width and height of notch graph width, height = slider_pic.shape[::-1] # Save the processed picture as slider01 = "slider01.jpg" background_01 = "background01.jpg" cv2.imwrite(background_01, background_pic) cv2.imwrite(slider01, slider_pic) # Read the saved slider graph slider_pic = cv2.imread(slider01) # Color conversion slider_pic = cv2.cvtColor(slider_pic, cv2.COLOR_BGR2GRAY) # Obtain the absolute value of color difference slider_pic = abs(255 - slider_pic) # Save the picture cv2.imwrite(slider01, slider_pic) # Read slider slider_pic = cv2.imread(slider01) # Read the background image background_pic = cv2.imread(background_01) # Compare the overlapping areas of the two figures result = cv2.matchTemplate(slider_pic, background_pic, cv2.TM_CCOEFF_NORMED) # Get the notch position of the picture top, left = np.unravel_index(result.argmax(), result.shape) # The coordinate position of the image notch in the background image print(" The notch position of the current slider :", (left, top, left + width, top + height)) return leftSlide the slider to verify
def slide_verification(self, driver, slide_element, distance): """ Slide the slider to verify :param driver: driver object :type driver:webdriver.Chrome :param slide_element: Tuple of slider :type slider_ele: WebElement :param distance: Sliding distance :type: int :return: """ # Get the page before sliding url Address start_url = driver.current_url print(" The distance to slide is :", distance) # Generate sliding track according to sliding distance locus = self.get_slide_locus(distance) print(" The generated sliding track is :{}, The sum of the distances of the tracks is {}".format(locus, distance)) # Press the left mouse button ActionChains(driver).click_and_hold(slide_element).perform() time.sleep(0.5) # Traverse the track to slide for loc in locus: time.sleep(0.01) ActionChains(driver).move_by_offset(loc, random.randint(-5, 5)).perform() ActionChains(driver).context_click(slide_element) # Release the mouse ActionChains(driver).release(on_element=slide_element).perform()This is about python This is the end of the article to crack the sliding verification code . I hope it will be helpful for your study , I also hope you can support the software development network .