https://blog.csdn.net/Keep_Trying_Go/article/details/125503943
# Get network model
model=cv2.dnn_DetectionModel(net)
# Set the input parameters of the network
model.setInputParams(scale=1/255,size=(416,416))
# To make predictions
class_id,scores,boxes=model.detect(frame,confThreshold=Confidence_thresh,
nmsThreshold=Nms_thresh)
# Returns the category and coordinates of the forecast
return class_id,scores,boxes
There is no need to store the conversion of the prediction frame coordinates , Relevant ( coordinate , Height and width , Degree of confidence , Probability values and categories ) Re traverse and store , Get the output directly .
# Read YOLO-V3 Weight file and network configuration file
net=cv2.dnn.readNet(model='dnn_model/yolov3.weights',config='dnn_model/yolov3.cfg')
# Set the confidence threshold and the threshold of non maximum suppression
Confidence_thresh=0.2
Nms_thresh=0.35
# Read coco.names Categories in files
with open('dnn_model/coco.names','r') as fp:
classes=fp.read().splitlines()
#yolo-v3 testing
def detect(frame):
# Get network model
model=cv2.dnn_DetectionModel(net)
# Set the input parameters of the network
model.setInputParams(scale=1/255,size=(416,416))
# To make predictions
class_id,scores,boxes=model.detect(frame,confThreshold=Confidence_thresh,
nmsThreshold=Nms_thresh)
# Returns the category and coordinates of the forecast
return class_id,scores,boxes
# To make predictions
class_ids,scores,boxes=detect(frame)
# Draw rectangle
for (class_id,box) in enumerate(boxes):
(x,y,w,h)=box
class_name=classes[class_ids[class_id]]
confidence=scores[class_id]
confidence=str(round(confidence,2))
cv2.rectangle(img=frame,pt1=(x,y),pt2=(x+w,y+h),
color=(0,255,0),thickness=2)
text=class_name+' '+confidence
cv2.putText(img=frame,text=text,
org=(x,y-10),fontFace=cv2.FONT_HERSHEY_SIMPLEX,
fontScale=1.0,color=(0,255,0),thickness=2)
import os
import cv2
import numpy as np
# create a window
# cv2.namedWindow(winname='detect',flags=cv2.WINDOW_AUTOSIZE)
# cv2.resizeWindow(winname='detect',width=750,height=600)
# Read YOLO-V3 Weight file and network configuration file
net=cv2.dnn.readNet(model='dnn_model/yolov3.weights',config='dnn_model/yolov3.cfg')
# Set the confidence threshold and the threshold of non maximum suppression
Confidence_thresh=0.2
Nms_thresh=0.35
# Read coco.names Categories in files
with open('dnn_model/coco.names','r') as fp:
classes=fp.read().splitlines()
#yolo-v3 testing
def detect(frame):
# Get network model
model=cv2.dnn_DetectionModel(net)
# Set the input parameters of the network
model.setInputParams(scale=1/255,size=(416,416))
# To make predictions
class_id,scores,boxes=model.detect(frame,confThreshold=Confidence_thresh,
nmsThreshold=Nms_thresh)
# Returns the category and coordinates of the forecast
return class_id,scores,boxes
# Real time detection
def detect_time():
# Turn on camera 'video/los_angeles.mp4' or 'video/soccer.mp4'
cap=cv2.VideoCapture(0)
while cap.isOpened():
OK,frame=cap.read()
if not OK:
break
frame=cv2.flip(src=frame,flipCode=2)
# frame=cv2.resize(src=frame,dsize=(416,416))
# To make predictions
class_ids,scores,boxes=detect(frame)
# Draw rectangle
for (class_id,box) in enumerate(boxes):
(x,y,w,h)=box
class_name = classes[class_ids[class_id]]
confidence = scores[class_id]
confidence=str(round(confidence,2))
cv2.rectangle(img=frame,pt1=(x,y),pt2=(x+w,y+h),
color=(0,255,0),thickness=2)
text=class_name+' '+confidence
cv2.putText(img=frame,text=text,
org=(x,y-10),fontFace=cv2.FONT_HERSHEY_SIMPLEX,
fontScale=1.0,color=(0,255,0),thickness=2)
cv2.imshow('detect',frame)
key=cv2.waitKey(1)
if key==27:
break
cap.release()
# Single picture detection
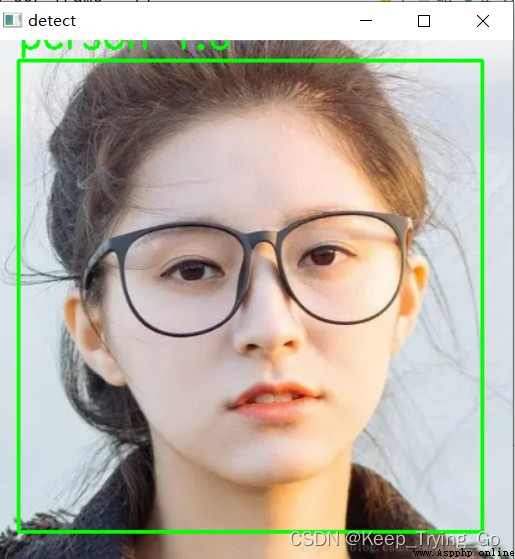
def signal_detect(image_path='images/face1.jpg'):
frame=cv2.imread(image_path)
frame = cv2.resize(src=frame, dsize=(416, 416))
# To make predictions
class_ids, scores, boxes = detect(frame)
# Draw rectangle
for (class_id, box) in enumerate(boxes):
(x, y, w, h) = box
class_name = classes[class_ids[class_id]]
confidence = scores[class_ids[class_id]]
confidence = str(round(confidence, 2))
cv2.rectangle(img=frame, pt1=(x, y), pt2=(x + w, y + h),
color=(0, 255, 0), thickness=2)
text = class_name + ' ' + confidence
cv2.putText(img=frame, text=text,
org=(x, y - 10), fontFace=cv2.FONT_HERSHEY_SIMPLEX,
fontScale=1.0, color=(0, 255, 0), thickness=2)
cv2.imshow('detect', frame)
cv2.waitKey(0)
cv2.destroyAllWindows()
if __name__ == '__main__':
print('Pycharm')
# signal_detect()
detect_time()
yolov3 Video demo 1