https://mydreamambitious.blog.csdn.net/article/details/125459959
For understanding the current article (YOLO-V3 Real time detection implementation ), The reader only needs to understand the knowledge points given below , that will do , Don't care too much about the details in the paper .

Source of table :https://blog.csdn.net/qq_37541097/article/details/81214953
picture source : Picture address
https://pjreddie.com/darknet/yolo/
https://github.com/pjreddie/darknet/blob/master/data/coco.names
https://github.com/pjreddie/darknet
Download as follows :
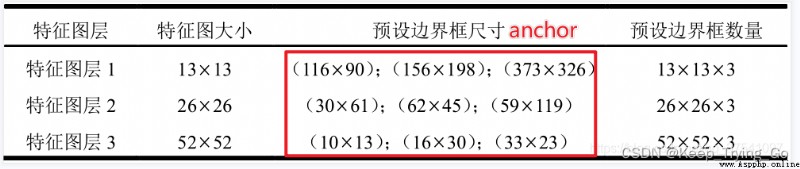
YOLO-V3 The result form of the output ; Know the form of the output result , For the coordinates of the prediction box that obtains the prediction results later (x,y), Height and width (w,h), Degree of confidence (confidence) And the probability of predicting categories is very helpful ( These values are the final output , So you need to map back to the original image ).
# Read network configuration file and weight file
net=cv2.dnn.readNet(model='dnn_model/yolov3.weights',
config='dnn_model/yolov3.cfg')
# from yolo-v3 The structure of , Finally, there are three scales of output
layerName=net.getLayerNames()
# Store the three scale names of the output , Used later for forward inference
ThreeOutput_layers_name=[]
for i in net.getUnconnectedOutLayers():
ThreeOutput_layers_name.append(layerName[i-1])
# because yolo-v3 Contains 80 Categories , So first get the category
with open('dnn_model/coco.names','r') as fp:
classes=fp.read().splitlines()
# Specify the confidence threshold for filtering :confidence
Confidence_thresh=0.2
# Specify a value for non maximum suppression : Filter the candidate boxes
Nms_thresh=0.35
 # Parameters : Images , normalization , Scaled size , Whether the RGB Subtract a constant ,R and B In exchange for ( because R and B It's the opposite , So we need to exchange ), Crop or not
blob = cv2.dnn.blobFromImage(frame, 1 / 255, (416, 416), (0, 0, 0), swapRB=True, crop=False)
# Get the height and width of the image
height,width,channel=frame.shape
# Set up network input
net.setInput(blob)
# Make forward inference : The last three scale output layers are used as forward inference
predict=net.forward(ThreeOutput_layers_name)
 # Store the coordinates of the prediction box
boxes = []
# There is confidence in the predicted object
confid_object=[]
# The category in which the forecast is stored
class_prob=[]
# Storing predicted objects id
class_id=[]
# The name of the forecast category
class_names=[]
# According to the output, there are three scales , So we traverse the three scales respectively
for scale in predict:
for box in scale:
# Get coordinate values and height and width
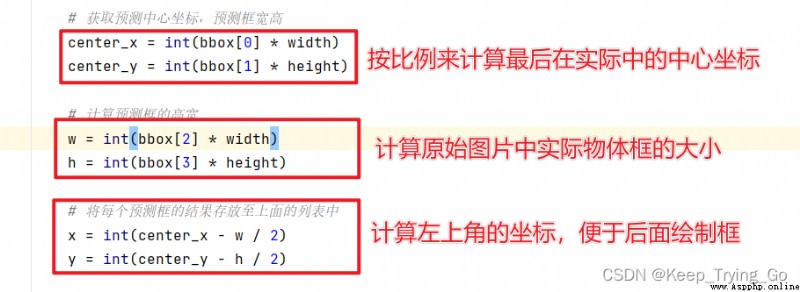
# First, get the coordinates of the center of the rectangle ( Here you need to map back to the original graph )
center_x=int(box[0]*width)
center_y=int(box[1]*height)
# Calculate the height and width of the box
w=int(box[2]*width)
h=int(box[3]*height)
# Get the coordinates of the upper left corner of the rectangle
left_x=int(center_x-w/2)
left_y=int(center_y-h/2)
boxes.append([left_x,left_y,w,h])
# Get the confidence of the detected object
confid_object.append(float(box[4]))
# Get the maximum probability
# First, obtain the subscript of the probability of the highest value
index=np.argmax(box[5:])
class_id.append(index)
class_names.append(classes[index])
class_prob.append(box[index])
confidences=np.array(class_prob)*np.array(confid_object)
 # Calculate the non maximum suppression
all_index=cv2.dnn.NMSBoxes(boxes,confidences,Confidence_thresh,Nms_thresh)
# Traverse , Draw rectangle
for i in all_index.flatten():
x,y,w,h=boxes[i]
# rounding , Retain 2 Decimal place
confidence=str(round(confidences[i],2))
# Draw rectangle
cv2.rectangle(img=frame,pt1=(x,y),pt2=(x+w,y+h),
color=(0,255,0),thickness=2)
text=class_names[i]+' '+confidence
cv2.putText(img=frame,text=text,org=(x,y-10),
fontFace=cv2.FONT_HERSHEY_SIMPLEX,
fontScale=1.0,color=(0,0,255),thickness=2)
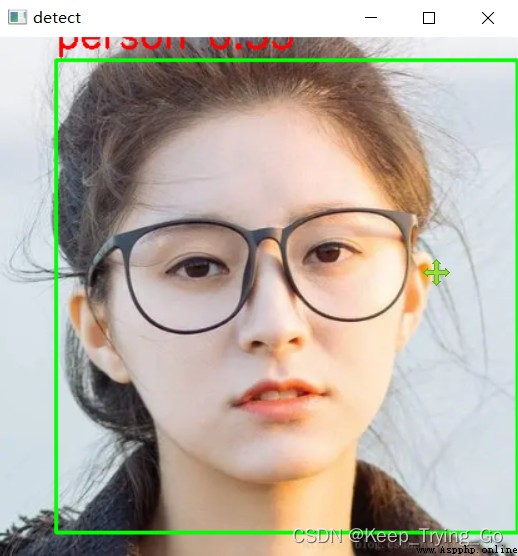
# Single picture detection
def signa_Picture(image_path='images/smile.jpg'):
img=cv2.imread(image_path)
img=cv2.resize(src=img,dsize=(416,416))
dst=Forward_Predict(img)
cv2.imshow('detect',dst)
key=cv2.waitKey(0)
if key==27:
exit()
# Real time detection
def detect_time():
cap=cv2.VideoCapture(0)
while cap.isOpened():
OK,frame=cap.read()
if not OK:
break
# Flip the picture once , because Opencv The picture read is opposite to our normal
frame=cv2.flip(src=frame,flipCode=2)
frame=cv2.resize(src=frame,dsize=(416,416))
dst=Forward_Predict(frame)
cv2.imshow('detect',dst)
key=cv2.waitKey(1)
if key==27:
break
cap.release()
import os
import cv2
import numpy as np
import matplotlib.pyplot as plt
# Read network configuration file and weight file
net=cv2.dnn.readNet(model='dnn_model/yolov3.weights',
config='dnn_model/yolov3.cfg')
# from yolo-v3 The structure of , Finally, there are three scales of output
layerName=net.getLayerNames()
# Store the three scale names of the output , Used later for forward inference
ThreeOutput_layers_name=[]
for i in net.getUnconnectedOutLayers():
ThreeOutput_layers_name.append(layerName[i-1])
# because yolo-v3 Contains 80 Categories , So first get the category
with open('dnn_model/coco.names','r') as fp:
classes=fp.read().splitlines()
# Specify the confidence threshold for filtering :confidence
Confidence_thresh=0.2
# Specify a value for non maximum suppression : Filter the candidate boxes
Nms_thresh=0.35
# The detection process has been graphically drawn
def Forward_Predict(frame):
# Parameters : Images , normalization , Scaled size , Whether the RGB Subtract a constant ,R and B In exchange for ( because R and B It's the opposite , So we need to exchange ), Crop or not
blob = cv2.dnn.blobFromImage(frame, 1 / 255, (416, 416), (0, 0, 0), swapRB=True, crop=False)
# Get the height and width of the image
height,width,channel=frame.shape
# Set up network input
net.setInput(blob)
# Make forward inference : The last three scale output layers are used as forward inference
predict=net.forward(ThreeOutput_layers_name)
# Store the coordinates of the prediction box
boxes = []
# There is confidence in the predicted object
confid_object=[]
# The category in which the forecast is stored
class_prob=[]
# Storing predicted objects id
class_id=[]
# The name of the forecast category
class_names=[]
# According to the output, there are three scales , So we traverse the three scales respectively
for scale in predict:
for box in scale:
# Get coordinate values and height and width
# First, get the coordinates of the center of the rectangle ( Here you need to map back to the original graph )
center_x=int(box[0]*width)
center_y=int(box[1]*height)
# Calculate the height and width of the box
w=int(box[2]*width)
h=int(box[3]*height)
# Get the coordinates of the upper left corner of the rectangle
left_x=int(center_x-w/2)
left_y=int(center_y-h/2)
boxes.append([left_x,left_y,w,h])
# Get the confidence of the detected object
confid_object.append(float(box[4]))
# Get the maximum probability
# First, obtain the subscript of the probability of the highest value
index=np.argmax(box[5:])
class_id.append(index)
class_names.append(classes[index])
class_prob.append(box[index])
confidences=np.array(class_prob)*np.array(confid_object)
# Calculate the non maximum suppression
all_index=cv2.dnn.NMSBoxes(boxes,confidences,Confidence_thresh,Nms_thresh)
# Traverse , Draw rectangle
for i in all_index.flatten():
x,y,w,h=boxes[i]
# rounding , Retain 2 Decimal place
confidence=str(round(confidences[i],2))
# Draw rectangle
cv2.rectangle(img=frame,pt1=(x,y),pt2=(x+w,y+h),
color=(0,255,0),thickness=2)
text=class_names[i]+' '+confidence
cv2.putText(img=frame,text=text,org=(x,y-10),
fontFace=cv2.FONT_HERSHEY_SIMPLEX,
fontScale=1.0,color=(0,0,255),thickness=2)
return frame
# Real time detection
def detect_time():
cap=cv2.VideoCapture(0)
while cap.isOpened():
OK,frame=cap.read()
if not OK:
break
# Flip the picture once , because Opencv The picture read is opposite to our normal
frame=cv2.flip(src=frame,flipCode=2)
frame=cv2.resize(src=frame,dsize=(416,416))
dst=Forward_Predict(frame)
cv2.imshow('detect',dst)
key=cv2.waitKey(1)
if key==27:
break
cap.release()
# Single picture detection
def signa_Picture(image_path='images/smile.jpg'):
img=cv2.imread(image_path)
img=cv2.resize(src=img,dsize=(416,416))
dst=Forward_Predict(img)
cv2.imshow('detect',dst)
key=cv2.waitKey(0)
if key==27:
exit()
cv2.destroyAllWindows()
if __name__ == '__main__':
print('Pycharm')
# signa_Picture()
detect_time()
yolov3 Video demo