solver.prototxt的文件參數設置
生成solver文件
簡便的方法
訓練模型(training)
solver.prototxt的文件參數設置caffe在訓練的時候,需要一些參數設置,我們一般將這些參數設置在一個叫solver.prototxt的文件裡面,如下:
base_lr: 0.001
display: 782
gamma: 0.1
lr_policy: “step”
max_iter: 78200
momentum: 0.9
snapshot: 7820
snapshot_prefix: “snapshot”
solver_mode: GPU
solver_type: SGD
stepsize: 26067
test_interval: 782
test_iter: 313
test_net: “/home/xxx/data/val.prototxt”
train_net: “/home/xxx/data/proto/train.prototxt”
weight_decay: 0.0005
有一些參數需要計算的,也不是亂設置。
假設我們有50000個訓練樣本,batch_size為64,即每批次處理64個樣本,那麼需要迭代50000/64=782次才處理完一次全部的樣本。我們把處理完一次所有的樣本,稱之為一代,即epoch。所以,這裡的test_interval設置為782,即處理完一次所有的訓練數據後,才去進行測試。如果我們想訓練100代,則需要設置max_iter為78200.
同理,如果有10000個測試樣本,batch_size設為32,那麼需要迭代10000/32=313次才完整地測試完一次,所以設置test_iter為313.
學習率變化規律我們設置為隨著迭代次數的增加,慢慢變低。總共迭代78200次,我們將變化lr_rate三次,所以stepsize設置為78200/3=26067,即每迭代26067次,我們就降低一次學習率。
生成solver文件下面是生成solver文件的python代碼,比較簡單:
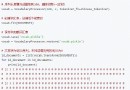
# -*- coding: utf-8 -*-"""Created on Sun Jul 17 18:20:57 [email protected]: root"""path='/home/xxx/data/'solver_file=path+'solver.prototxt' #solver文件保存位置sp={}sp['train_net']=‘“'+path+'train.prototxt”' # 訓練配置文件sp['test_net']=‘“'+path+'val.prototxt”' # 測試配置文件sp['test_iter']='313' # 測試迭代次數sp['test_interval']='782' # 測試間隔sp['base_lr']='0.001' # 基礎學習率sp['display']='782' # 屏幕日志顯示間隔sp['max_iter']='78200' # 最大迭代次數sp['lr_policy']='“step”' # 學習率變化規律sp['gamma']='0.1' # 學習率變化指數sp['momentum']='0.9' # 動量sp['weight_decay']='0.0005' # 權值衰減sp['stepsize']='26067' # 學習率變化頻率sp['snapshot']='7820' # 保存model間隔sp['snapshot_prefix']=‘"snapshot"' # 保存的model前綴sp['solver_mode']='GPU' # 是否使用gpusp['solver_type']='SGD' # 優化算法def write_solver(): #寫入文件 with open(solver_file, 'w') as f: for key, value in sorted(sp.items()): if not(type(value) is str): raise TypeError('All solver parameters must be strings') f.write('%s: %s\n' % (key, value))if __name__ == '__main__': write_solver()執行上面的文件,我們就會得到一個solver.prototxt文件,有了這個文件,我們下一步就可以進行訓練了。
當然,如果你覺得上面這種鍵值對的字典方式,寫起來容易出錯,我們也可以使用另外一種比較簡便的方法,沒有引號,不太容易出錯,如下:
簡便的方法# -*- coding: utf-8 -*-from caffe.proto import caffe_pb2s = caffe_pb2.SolverParameter()path='/home/xxx/data/'solver_file=path+'solver1.prototxt's.train_net = path+'train.prototxt's.test_net.append(path+'val.prototxt')s.test_interval = 782 s.test_iter.append(313) s.max_iter = 78200 s.base_lr = 0.001 s.momentum = 0.9s.weight_decay = 5e-4s.lr_policy = 'step's.stepsize=26067s.gamma = 0.1s.display = 782s.snapshot = 7820s.snapshot_prefix = 'shapshot's.type = “SGD”s.solver_mode = caffe_pb2.SolverParameter.GPUwith open(solver_file, 'w') as f: f.write(str(s))訓練模型(training)如果不進行可視化,只想得到一個最終的訓練model, 那麼代碼非常簡單,如下 :
import caffecaffe.set_device(0)caffe.set_mode_gpu()solver = caffe.SGDSolver('/home/xxx/data/solver.prototxt')solver.solve()以上就是caffe的python接口生成solver文件詳解學習的詳細內容,更多關於caffe python接口生成solver文件的資料請關注軟件開發網其它相關文章!