This project will use python3 To identify whether the picture is pornographic , Will use PIL This image processing library , And write an algorithm to divide the skin region of the image
PIL(Python Image Library) Is a free image processing toolkit , This software package provides basic image processing functions ,
Such as : Change image size , Rotated image , Image format conversion , Color field space conversion ( I don't understand that )
Image enhancement ( Is to improve clarity , Highlight the useful information of the image ), Histogram Processing , interpolation ( The gray values of unknown pixels are generated by using the gray values of known adjacent pixels ) And filtering, etc .
Although this software package is not suitable for complex image processing algorithms , however python Its rapid development ability and object-oriented characteristics make it very suitable for prototype development .
stay PIL in , Any image is made with a Image Objects represent , This class is exported by a module with the same name , therefore , To load an image , The simplest form is like this :
import Image
img = Image.open(“dip.jpg”)
Be careful : First line Image Module name ; Second elements img It's a Image object ; Image Class is in Image Module .
About Image Module and Image class , Remember not to confuse . Now? , We can be right img All kinds of operations have been carried out , All right img Of Operations will eventually be reflected in dip.img On the image
PIL 2009 It hasn't been updated since , Nor does it support Python3 , Hence the Alex Clark Leading public welfare projects Pillow .Pillow It's a right PIL Friendly Branch , Support Python3, So what we have here is Pillow, This is its official document .
By default, there is already python3.0 The above and package management tools pip3. Then execute the following command to upgrade pip3 And install Pillow tool kit :
sudo install -U pip3
sudo install Pillow
According to color ( Skin colour ) Find the area of the skin in the picture , Then judge whether it is pornographic through some conditions .
The key steps of the program are as follows :
1. Traverse every pixel , Check whether the pixel color is skin color
2. Grouping adjacent skin color pixels into a skin area , Get a number of skin areas
3. Remove skin areas with very few pixels
We define non pornographic images as follows ( Satisfy any judgment as true ):
1. The number of skin areas is less than 3 individual
2. The ratio of pixels in the skin area to all pixels in the image is less than 15%
3. The largest skin area is less than... Of the total skin area 45%
4. There are more skin areas than 60 individual
These rules you can try to change , Until the effect of the program is satisfactory . About pixel skin color determination , Formulas can be found on the Internet , But the world is not
It may be correct 100% Formula . You can use the formula you find , After the program is finished, debug it slowly .

•RGB Color mode
 The first one is :==r > 95 and g > 40 and g < 100 and b > 20 and max([r, g, b]) - min([r, g, b]) > 15 and abs(r - g) > 15 and r > g and r > b==
The second kind :==nr = r / (r + g + b), ng = g / (r + g + b), nb = b / (r +g + b) ,nr / ng > 1.185 and r * b / (r + g + b) ** 2 > 0.107 and r * g / (r + g + b) ** 2 > 0.112==
•HSV Color mode
==h > 0 and h < 35 and s > 0.23 and s < 0.68==
•YCbCr Color mode
==97.5 <= cb <= 142.5 and 134 <= cr <= 176==
An image has zero or more skin areas , The program numbers them in the order they are found , The first discovered area is numbered 0, The first n The number of areas found is n-1
Use a type to represent pixels , We call this type Skin, Contains some information about pixels : A unique number id、 yes / No skin color skin、 Skin area number
region、 Abscissa x、 Ordinate y
When traversing all pixels , We create one for each pixel Skin object , And set all the properties of the object , among region Attribute is the skin area number of the pixel , Initialize to meaningless when creating an object None.
About each pixel id value , The upper left corner is the origin , Pixels id Values are arranged in pixel coordinates , So it looks like this :
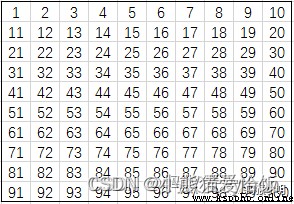
Actually id The order of traversal is the order of traversal . When traversing all pixels , establish Skin After the object , If the current pixel is skin color , And adjacent pixels have skin color , So let's put these skin color pixels into a skin area .
Definition of adjacent pixels : It's usually thought of around the current pixel 8 Pixel , In fact, however, it just needs to be defined 4 Just one , The positions are to the left of the current pixel , upper left , Just above , upper right . Because the other four pixels are behind the current pixel , We haven't given this yet 4 Create the corresponding Skin object :

Directly in python New China nude.py file , Code in this file :
Import the required modules :
import sys
import os
import _io
from collections import namedtuple
from PIL import Image
We will design a Nude class :
class Nude:
In this class, we first use collections.namedtuple() Define a Skin type :
Skin = namedtuple("Skin", "id skin region x y")
collections.namedtuple() The function is actually a return Python A factory method for subclasses of standard tuple types in .
You need to pass a type name and the fields you need to it , Then it returns a class , You can initialize this class , Pass values to the fields you define, etc . See official documents for details .
Then define Nude Class :
def __init__(self, path_or_image):
# if path_or_image by Image.Image Instance of type , Direct assignment
if isinstance(path_or_image, Image.Image):
self.image = path_or_image
# if path_or_image by str Instance of type , Open the picture
elif isinstance(path_or_image, str):
self.image = Image.open(path_or_image)
# Get all the color channels of the picture
bands = self.image.getbands()
# Judge whether it is a single channel picture ( That's grayscale ), Yes, the grayscale image is converted to RGB chart
if len(bands) == 1:
# Create a new one of the same size RGB Images
new_img = Image.new("RGB", self.image.size)
# Copy the grayscale self.image To RGB chart new_img.paste (PIL Automatic color channel conversion )
new_img.paste(self.image)
f = self.image.filename
# Replace self.image
self.image = new_img
self.image.filename = f
# Store all the pixels of the corresponding image Skin object
self.skin_map = []
# Detected skin areas , The index of the element is the skin region number , The elements all contain some Skin List of objects
self.detected_regions = []
# The elements all contain some int object ( Area number ) A list of
# The area number in these elements represents the area to be merged
self.merge_regions = []
# The integrated skin area , The index of the element is the skin region number , The elements all contain some Skin List of objects
self.skin_regions = []
# The region number of the two skin regions that were recently merged , Initialize to -1
self.last_from, self.last_to = -1, -1
# Pornographic image judgment results
self.result = None
# Processing the information
self.message = None
# Image width and height
self.width, self.height = self.image.size
# Total image pixels
self.total_pixels = self.width * self.height
isinstane(object, classinfo) If parameters object Is the parameter classinfo Example , Return to true , Otherwise, false ; Parameters classinfo It can be one that contains a number of type Tuples of objects , If parameters object Is an instance of any of these types , Return to true , Otherwise, false .
When it comes to efficiency , The bigger the picture, the more resources and time it will consume , So sometimes it may be necessary to reduce the image . So there needs to be a way to zoom out :
def resize(self, maxwidth=1000, maxheight=1000):
"""
Resizes the image proportionally based on the maximum width and height ,
Be careful : This may affect the results of the detection algorithm
If there is no change, return to 0
The original width is greater than maxwidth return 1
The original height is greater than maxheight return 2
The original width and height are greater than maxwidth, maxheight return 3
maxwidth - The maximum width of the picture
maxheight - Maximum height of picture
All parameters can be set to False To ignore

"""
# Store the return value
ret = 0
if maxwidth:
if self.width > maxwidth:
wpercent = (maxwidth / self.width)
hsize = int((self.height * wpercent))
fname = self.image.filename
# Image.LANCZOS It's a resampling filter , For anti aliasing
self.image = self.image.resize((maxwidth, hsize), Image.LANCZOS)
self.image.filename = fname
self.width, self.height = self.image.size
self.total_pixels = self.width * self.height
ret += 1
if maxheight:
if self.height > maxheight:
hpercent = (maxheight / float(self.height))
wsize = int((float(self.width) * float(hpercent)))
fname = self.image.filename
self.image = self.image.resize((wsize, maxheight), Image.LANCZOS)
self.image.filename = fname
self.width, self.height = self.image.size
self.total_pixels = self.width * self.height
ret += 2
return ret
Image.resize(size, resample=0)
size – The ancestor of prime numbers with high and wide pixels (width, height) resample – Optional resampling filter
return Image object
And then there is one of the most critical analytical methods :
def parse(self):
# If there are results , Return this object
if self.result is not None:
return self
# Get all the pixel data of the picture
pixels = self.image.load()
next , Traverse every pixel , Create a corresponding... For each pixel Skin object , among self._classify_skin() This method is to detect whether the pixel color is skin color :
for y in range(self.height):
for x in range(self.width):
# Get the pixels of RGB The value of three channels
# [x, y] yes [(x,y)] A simple way to write
r = pixels[x, y][0] # red
g = pixels[x, y][1] # green
b = pixels[x, y][2] # blue
# Judge whether the current pixel is skin color pixel
isSkin = True if self._classify_skin(r, g, b) else False
# Assign each pixel a unique id value (1, 2, 3...height*width)
# Be careful x, y The value of is zero
_id = x + y * self.width + 1
# Create one for each pixel Skin object , To add to self.skin_map in
self.skin_map.append(self.Skin(_id, isSkin, None, x, y))
If the current pixel is not skin color , So skip this loop , Continue traversing :
 # If the current pixel is not a skin color pixel , Skip this cycle
if not isSkin:
continue
If the current pixel is a skin color pixel , Then it needs to be dealt with , First traverse its adjacent pixels .
Be sure to pay attention to the index values of adjacent pixels , Because pixels are id Values from 1 I started making it up , And the index is from 0 Made up . Variable _id It has the current pixel id value ,
So the current pixel is self.skin_map The index value in is _id - 1, And so on , So the adjacent pixels on the left are self.skin_map The index value in is _id - 1 -1 , On the top left is _id - 1 - self.width - 1, For the above _id - 1 - self.width , On the top right is _id - 1 - self.width + 1 :
# Let the upper left corner be the origin , Adjacent pixels are symbols *, The current pixel is the symbol ^, So the mutual position relationship is usually as shown in the figure below
# ***
# *^
# A list of adjacent pixel indexes , The storage order is from large to small , A change in order has an effect
# Be careful _id It's from 1 At the beginning , The corresponding index is _id-1
check_indexes = [_id - 2, # The pixel to the left of the current pixel
_id - self.width - 2, # The pixel at the top left of the current pixel
_id - self.width - 1, # The pixel above the current pixel
_id - self.width] # The pixel at the top right of the current pixel
 ~~~
~~~
 hold id Value from 0 Make up :
# It is used to record the area number of skin color pixels in adjacent pixels , Initialize to -1
region = -1
# Traverse the index of each adjacent pixel
for index in check_indexes:
# Try to index the values of adjacent pixels Skin object , If not, jump out of the loop
try:
self.skin_map[index]
except IndexError:
break
# If adjacent pixels are skin color pixels :
if self.skin_map[index].skin:
# If the adjacent pixel is the same as the current pixel region All are valid values , And the two are different , And the same merge task has not been added
if (self.skin_map[index].region != None and
region != None and region != -1 and
self.skin_map[index].region != region and
self.last_from != region and
self.last_to != self.skin_map[index].region) :
# So this adds the merging task of these two regions
self._add_merge(region, self.skin_map[index].region)
# Record the area number of the adjacent pixel
region = self.skin_map[index].region
self._add_merge() This method receives two area numbers , It will add two area numbers to self.merge_regions Of the elements in ,self.merge_regions Every element of is a list , These lists contain 1 To multiple area numbers , The area represented by the area number is connected , Need merger .
In the detected image , Some of the adjacent pixels in the first few rows don't have 4 individual , So we need to use try “ Trial and error ”.
And then the adjacent pixels are skin color pixels , If the skin region numbers of both pixels are valid and different , Because the pixels in the two regions are adjacent , So actually these two areas are connected , Explain the need to merge these two areas .
Record the area number of this adjacent skin color pixel , Then you can put the current pixel into this skin area .
After traversing all the adjacent pixels , There are two ways to deal with :
All adjacent pixels are not skin color pixels : New skin areas have been found .
There are adjacent skin color pixels with valid area number :region The values stored in are useful , Assign the current pixel to the region where the adjacent pixel is located .
# After traversing all the adjacent pixels , if region Still equal to -1, All adjacent pixels are not skin color pixels
if region == -1:
# Change the property to a new area number , Note that Yuanzu is an immutable type , Properties cannot be changed directly
_skin = self.skin_map[_id - 1]._replace(region=len(self.detected_regions))
self.skin_map[_id - 1] = _skin
# Create the area where this skin color pixel is located as a new area
self.detected_regions.append([self.skin_map[_id - 1]])
# region It's not equal to -1 At the same time, it doesn't mean None, Indicates that there are adjacent skin color pixels with valid area number
elif region != None:
# Change the region number of this pixel to be the same as the adjacent pixel
_skin = self.skin_map[_id - 1]._replace(region=region)
self.skin_map[_id - 1] = _skin
# Add this pixel to the list of pixels in this area
self.detected_regions[region].append(self.skin_map[_id - 1])
somenamedtuple._replace(kwargs) Returns a... That replaces the value of the specified field as a parameter namedtuple example
After traversing all the pixels , The skin area division of the image is preliminarily completed , It's just in variables self.merge_regions There are also some connected skin area numbers , They need to merge , After merging, pornographic images can be determined :
# Complete all regional merging tasks , The consolidated area is stored in self.skin_regions
self._merge(self.detected_regions, self.merge_regions)
# Analyze the skin area , Get the judgment result
self._analyse_regions()
return self
Method self._merge() It's used to merge these connected skin areas . Method self._analyse_regions(), Use the non pornographic image determination rules defined in the section of program principles , So we can get the judgment result . Now write the call that we haven't written yet Nude Class method .
First of all self._classify_skin() Method , This method is to detect whether the pixel color is skin color , Previously, the formula for skin color determination has been listed in the section of program principle , Now it's time to use :
# Pixel based skin color detection technology
def _classify_skin(self, r, g, b):
# according to RGB Value determination
rgb_classifier = r > 95 and \
g > 40 and g < 100 and \
b > 20 and \
max([r, g, b]) - min([r, g, b]) > 15 and \
abs(r - g) > 15 and \
r > g and \
r > b
# According to the results after treatment RGB Value determination
nr, ng, nb = self._to_normalized(r, g, b)
norm_rgb_classifier = nr / ng > 1.185 and \
float(r * b) / ((r + g + b) ** 2) > 0.107 and \
float(r * g) / ((r + g + b) ** 2) > 0.112
# HSV In color mode
h, s, v = self._to_hsv(r, g, b)
hsv_classifier = h > 0 and \
h < 35 and \
s > 0.23 and \
s < 0.68
# YCbCr In color mode
y, cb, cr = self._to_ycbcr(r, g, b)
ycbcr_classifier = 97.5 <= cb <= 142.5 and 134 <= cr <= 176
# The effect is not very good , The formula needs to be changed
# return rgb_classifier or norm_rgb_classifier or hsv_classifier or ycbcr_classifier
return ycbcr_classifier
Color mode conversion is not the focus of this experiment , The conversion formula can be found online , Here we can use it directly :
def _to_normalized(self, r, g, b):
if r == 0:
r = 0.0001
if g == 0:
g = 0.0001
if b == 0:
b = 0.0001
_sum = float(r + g + b)
return [r / _sum, g / _sum, b / _sum]
def _to_ycbcr(self, r, g, b):
# The formula comes from :
# http://stackoverflow.com/questions/19459831/rgb-to-ycbcr-conversion-problems
y = .299*r + .587*g + .114*b
cb = 128 - 0.168736*r - 0.331364*g + 0.5*b
cr = 128 + 0.5*r - 0.418688*g - 0.081312*b
return y, cb, cr
def _to_hsv(self, r, g, b):
h = 0
_sum = float(r + g + b)
_max = float(max([r, g, b]))
_min = float(min([r, g, b]))
diff = float(_max - _min)
if _sum == 0:
_sum = 0.0001
if _max == r:
if diff == 0:
h = sys.maxsize
else:
h = (g - b) / diff
elif _max == g:
h = 2 + ((g - r) / diff)
else:
h = 4 + ((r - g) / diff)
h *= 60
if h < 0:
h += 360
return [h, 1.0 - (3.0 * (_min / _sum)), (1.0 / 3.0) * _max]
self._add_merge() The method is mainly right self.merge_regions operation , and self.merge_regions All of the elements contain some int object ( Area number ) A list of , The areas represented by the area numbers in the list are all areas to be merged .self._add_merge() Method to receive two area numbers , Add it to self.merge_regions in .
How to add these two area numbers , To points 3 To deal with :
1. Both of the passed in area numbers exist in self.merge_regions in
2. One of the two area numbers passed in exists in self.merge_regions in
3. Neither area number passed in exists in self.merge_regions in
Specific treatment methods , See the code :
Welcome to white whoring Q Group :660193417###
def _add_merge(self, _from, _to):
# Two region numbers are assigned to class properties
self.last_from = _from
self.last_to = _to
# Record self.merge_regions Some index value of , Initialize to -1
from_index = -1
# Record self.merge_regions Some index value of , Initialize to -1
to_index = -1
# Through each self.merge_regions The elements of
for index, region in enumerate(self.merge_regions):
# Traverse each area number in the element
for r_index in region:
if r_index == _from:
from_index = index
if r_index == _to:
to_index = index
# If both area numbers exist in self.merge_regions in
if from_index != -1 and to_index != -1:
# If these two area numbers exist in two lists respectively
# So merge these two lists
if from_index != to_index:
self.merge_regions[from_index].extend(self.merge_regions[to_index])
del(self.merge_regions[to_index])
return
# If neither area number exists in self.merge_regions in
if from_index == -1 and to_index == -1:
# Create a new area number list
self.merge_regions.append([_from, _to])
return
# If one of the two area numbers exists in self.merge_regions in
if from_index != -1 and to_index == -1:
# Will not exist in self.merge_regions The area number in
# Add to the list where another area number is located
self.merge_regions[from_index].append(_to)
return
# If one of the two region numbers to be merged exists in self.merge_regions in
if from_index == -1 and to_index != -1:
# Will not exist in self.merge_regions The area number in
# Add to the list where another area number is located
self.merge_regions[to_index].append(_from)
return

When cycling in a sequence , Index location and corresponding value can be used enumerate() Function at the same time , In the code above , The index position is index , The corresponding value is
region.self._merge() The way is to self.merge_regions The regions represented by the region numbers in the elements in are merged , Get a new list of skin areas :
def _merge(self, detected_regions, merge_regions):
# New list new_detected_regions
# Its elements will be those that contain some pixels Skin List of objects
# new_detected_regions The element of the skin represents the skin area , The element index is the area number
new_detected_regions = []
# take merge_regions All regions represented by Region numbers in elements in are merged
for index, region in enumerate(merge_regions):
try:
new_detected_regions[index]
except IndexError:
new_detected_regions.append([])
for r_index in region:
new_detected_regions[index].extend(detected_regions[r_index])
detected_regions[r_index] = []
# Add the rest of the skin area to new_detected_regions
for region in detected_regions:
if len(region) > 0:
new_detected_regions.append(region)
# clear new_detected_regions
self._clear_regions(new_detected_regions)
# Add the rest of the skin area to new_detected_regions
for region in detected_regions:
if len(region) > 0:
new_detected_regions.append(region)
# clear new_detected_regions
self._clear_regions(new_detected_regions)
self._clear_regions() Method only preserves skin areas with more than a specified number of pixels to self.skin_regions :
# Skin area cleaning function
# Save only skin areas with more than a specified number of pixels
def _clear_regions(self, detected_regions):
for region in detected_regions:
if len(region) > 30:
self.skin_regions.append(region)
self._analyse_regions() It's very simple , Its job is just to make a series of judgments , Draw the conclusion whether the picture is pornographic or not :
# Analysis area
def _analyse_regions(self):
# If the skin area is smaller than 3 individual , It's not pornography
if len(self.skin_regions) < 3:
self.message = "Less than 3 skin regions ({_skin_regions_size})".format(
_skin_regions_size=len(self.skin_regions))
self.result = False
return self.result
# Sort the skin areas
self.skin_regions = sorted(self.skin_regions, key=lambda s: len(s),
reverse=True)
# Calculate the total number of skin pixels
total_skin = float(sum([len(skin_region) for skin_region in self.skin_regions]))
# If the ratio of skin area to the whole image is less than 15%, So it's not pornographic
if total_skin / self.total_pixels * 100 < 15:
self.message = "Total skin percentage lower than 15 ({:.2f})".format(total_skin / self.total_pixels * 100)
self.result = False
return self.result
# If the maximum skin area is less than... Of the total skin area 45%, It's not pornographic
if len(self.skin_regions[0]) / total_skin * 100 < 45:
self.message = "The biggest region contains less than 45 ({:.2f})".format(len(self.skin_regions[0]) / total_skin * 100)
self.result = False
return self.result
# There are more skin areas than 60 individual , It's not pornographic
if len(self.skin_regions) > 60:
self.message = "More than 60 skin regions ({})".format(len(self.skin_regions))
self.result = False
return self.result
# Other cases are pornographic pictures
self.message = "Nude!!"
self.result = True
return self.result
Then you can organize the information from the analysis :
def inspect(self):
_image = '{} {} {}×{}'.format(self.image.filename, self.image.format, self.width, self.height)
return "{_image}: result={_result} message='{_message}'".format(_image=_image, _result=self.result, _message=self.message)

Nude If the class is done like this , Finally, you can only get some true or false results when you run the script , We need to feel the analysis effect of the program more intuitively , We can make a copy of the original , But there's only black and white in this copy , White represents the skin area , So we can intuitively feel the effect of program analysis .
In the previous code, we have pixels to get the image RGB The operation of the value , Set the pixel's RGB Value is its inverse operation , It's still very simple , But pay attention to the setting of pixels RGB You can't operate on the original image when the value is :
# The image file will be generated in the source file directory , Visualize the skin area
def showSkinRegions(self):
# When no result is obtained, the method returns
if self.result is None:
return
# Skin pixel's ID Set
skinIdSet = set()
# Make a copy of the original
simage = self.image
# Load data
simageData = simage.load()
# Put the skin pixels on the id Deposit in skinIdSet
for sr in self.skin_regions:
for pixel in sr:
skinIdSet.add(pixel.id)
# Set the skin pixels in the image to white , The rest is set to black
for pixel in self.skin_map:
if pixel.id not in skinIdSet:
simageData[pixel.x, pixel.y] = 0, 0, 0
else:
simageData[pixel.x, pixel.y] = 255, 255, 255
# Source file absolute path
filePath = os.path.abspath(self.image.filename)
# The directory where the source file is located
fileDirectory = os.path.dirname(filePath) + '/'
# The full name of the source file
fileFullName = os.path.basename(filePath)
# Separate the full file name of the source file to get the file name and extension
fileName, fileExtName = os.path.splitext(fileFullName)
# Save the picture
simage.save('{}{}_{}{}'.format(fileDirectory, fileName,'Nude' if self.result else 'Normal', fileExtName))
Variable skinIdSet There are performance considerations in using sets instead of lists ,Python The set in is implemented by a hash table , High query efficiency . Finally, support the command line parameters and you're done !
We use argparse This module implements command line support .argparse Modules make it easy to write user-friendly command-line interfaces . The program only needs to define the parameters it requires , then argparse Will be responsible for how to get from sys.argv These parameters are parsed out in .
argparse The module also automatically generates help usage information and generates error messages when users assign illegal parameters to the program .
Please refer to argparse Of Official documents
if __name__ == "__main__":
import argparse
parser = argparse.ArgumentParser(description='Detect nudity in images.')
parser.add_argument('files', metavar='image', nargs='+',
help='Images you wish to test')
parser.add_argument('-r', '--resize', action='store_true',
help='Reduce image size to increase speed of scanning')
parser.add_argument('-v', '--visualization', action='store_true',
help='Generating areas of skin image')
args = parser.parse_args()
for fname in args.files:
if os.path.isfile(fname):
n = Nude(fname)
if args.resize:
n.resize(maxheight=800, maxwidth=600)
n.parse()
if args.visualization:
n.showSkinRegions()
print(n.result, n.inspect())
else:
print(fname, "is not a file")
Let's start with a very serious test picture :
stay PyCharm Run the following command to execute the script , Note that python3 instead of python:
python3 nude.py -v 1.jpg

This means 1.jpg Not a pornographic picture
This project is to get familiar with PIL Use , Understand the principle of pornographic picture inspection . The main difficulty is the detection and integration of skin areas . The project also has
There are many things that can be improved , For example, skin color detection formula , Pornographic criteria , And performance , I have to learn to use multithreading or multiprocessing to improve performance . About this
An article , Remember to praise your favorite friends , Pay attention to me to see more interesting , If you don't understand something, please leave a comment !!