你好,我是悅創。之前我在 CSDN 編寫了一篇開發 Python 庫的教程,有人加我提問到的一些問題,我來更新一下這篇文章:https://blog.csdn.net/qq_33254766/article/details/119874997
新版文章首發:https://bornforthis.cn/posts/18.html
你好,我是悅創。
Hello, I'm Yue Chuang.
我最近想要去開始開發 Python 第三方庫,但是發現國內這樣的教程太少了,所以就我來寫吧!
I recently wanted to start developing Python third-party libraries, but found that there are too few such tutorials in the country, so I will write them instead!
還有就是曾經想創建一個 Python 庫,無論是為您的工作團隊還是在線的一些開源項目?在此博客中,您將學習如何操作!
Ever wanted to create a Python library, albeit for your team at work or for some open source project online? In this blog you will learn how to!
當您使用相同的開發工具 Pycharm ,你會最容易跟上我的教程,當然您也可以使用不同的工具。
The tutorial is easiest to follow when you are using the same tools, however it is also possible for you to use different ones.
本文章使用的是工具有:
The tools used in this tutorial are:
打開命令提示符並創建一個文件夾,您將在其中創建 Python 庫。
Open your command prompt and create a folder in which you will create your Python library.
請記住:
Remember:
pwd 您可以看到您當前的工作目錄。 「With pwd you can see your present working directory.」ls 您可以列出當前目錄中的文件夾和文件。 「With ls you can list the folders and files in your directory.」cd <path> 您可以更改當前所在的目錄。 「With cd <path> you can change the current present directory you are in.」mkdir <folder> 您可以在當前工作目錄中創建一個新文件夾。 「With mkdir <folder> you can create a new folder in your working directory.」我創建一個文件夾名為:Turingaiyc,這個名稱其實也是我後面發布庫的名稱,注意不要太普遍因為會重復,重復就會導致發布庫失敗。
I created a folder called Turingaiyc, which is actually the name of the library I will publish later. Be careful not to make it too common because it will be repetitive, which will cause the library to fail.
「PS:你如果 Win 系統的話,可以使用下面的命令,如果是 MacOS 的話我其實更喜歡命令行創建。」
I created a folder called Turingaiyc, which is actually the name of the library I will publish later. Be careful not to make it too common because it will be repetitive, which will cause the library to fail.
就我而言,我將使用的文件夾是 Turingaiyc。將當前工作目錄更改為您的文件夾。
In my case, the folder I will be working with is
Turingaiyc. Change the present working directory to be your folder.
在啟動您的項目時,創建一個虛擬環境來封裝您的項目總是一個好主意。虛擬環境由某個 Python 版本和一些庫組成。
When starting your project, it is always a good idea to create a virtual environment to encapsulate your project. A virtual environment consists of a certain Python version and some libraries.
參考:這麼全的 Python 虛擬環境?不看可惜了!
Reference: Such a full Python virtual environment? What a pity!
虛擬環境可防止以後遇到依賴性問題。 例如,在較舊的項目中,您可能使用的是較舊版本的 numpy 庫。一些曾經運行良好的舊代碼可能會在你更新 numpy 版本後不能正常運行了。 創建虛擬環境可以防止這種情況,當你與其他人協作時,虛擬環境也能確保你的程序在其他人的電腦上正常運行。 反之亦然。
Virtual environments prevent the issue of running into dependency issues later on. For example, in older projects you might have worked with older versions of the
numpylibrary. Some old code, that once worked beautifully, might stop working once you update its version. Perhaps parts ofnumpyare no longer compatible with other parts of your program. Creating virtual environments prevents this. They are also useful in cases when you are collaborating with someone else, and you want to make sure that your application is working on their computer, and vice versa.
接下來,你要確保你當前的工作目錄是你剛剛創建的目錄,( cd <path/to/folder> ) 中創建 Python 庫的文件夾。)
(Make sure you changed the present working directory to the folder you are going to create your Python library in (
cd <path/to/folder>).)
繼續並通過鍵入以下內容創建虛擬環境:
Go ahead and create a virtual environment by typing:
python3 -m venv venv外鏈圖片轉存失敗,源站可能有防盜鏈機制,建議將圖片保存下來直接上傳(img-yy0tslPL-1656388442132)(./18.assets/image-20220617224826141.png)
創建後,你現在必須使用以下命令激活環境:
Once it is created, you must now activate the environment by using:
source venv/bin/activate激活虛擬環境會修改 PATH 和 shell 的變量,以指向您創建的特定虛擬環境 Python 的設置。PATH 是 MacOS/Linux 和其他類 Unix 操作系統中的環境變量,它告訴 shell 在響應用戶發出的命令時,去搜索哪些目錄的 Python 執行環境(即准備運行的程序)。命令提示符將更改為通過添加 ( yourenvname) 來指示您當前所在的虛擬環境。
Activating a virtual environment modifies the PATH and shell variables to point to the specific isolated Python set-up you created. PATH is an environmental variable in Linux and other Unix-like operating systems that tells the shell which directories to search for executable files (i.e., ready-to-run programs) in response to commands issued by a user. The command prompt will change to indicate which virtual environment you are currently in by prepending (
yourenvname).
你要確保你的環境已經安裝了 pip、wheel、setuptools、twine。我們稍後將需要它們來構建我們的 Python 庫。
In your environment, make sure you have pip installed
wheel,setuptoolsandtwine. We will need them for later to build our Python library.
pip install wheel
pip install setuptools
pip install twine或者也可以一條命了實現:
Or it can be done with one life:
sudo pip install wheel setuptools twine我用的是 MacOS 所以,Windows 的話,去掉 sudo。
I'm using MacOS so for Windows, get rid of Sudo.
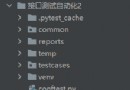
這一步,也就是創建我們開發庫所需要的文件。 在 Pycharm 中,打開您的文件夾 mypythonlibrary(或你自己創建的文件夾名稱)。它應該是這樣的:
In Pycharm, open your folder mypythonlibrary (or any name you have given your folder). It should look something like this:
你現在可以開始向項目添加文件夾和文件。您可以通過命令提示符或在 Pycharm 本身中執行此操作。
You now can start adding folders and files to your project. You can do this either through the command prompt or in Pycharm itself.
setup.py 的空文件,這是創建 Python 庫時最重要的文件之一!「Create an empty file called setup.py. This is one of the most important files when creating a Python library!」README.md 的空文件,你可以在此處編寫 Markdown 以向其他用戶描述我們的庫內容。「Create an empty file called README.md. This is the place where you can write markdown to describe the contents of your library for other users.」TuringRobots ,或者任何您希望在 pip 安裝時調用 Python 庫的文件夾。(如果你想稍後發布它,該名稱在 pip 上應該是唯一的。)「Create a folder called TuringRobots, or whatever you want your Python library to be called when you pip install it. (The name should be unique on pip if you want to publish it later.)」TuringRobots 文件夾裡面,創建名為 __init__.py 的空文件。基本上,任何包含文件的 __init__.py 文件夾,在我們構建它時,都將包含在庫中。大多數情況下,您可以將 __init__.py 文件留空,也就是不用寫代碼。在導入時,其中的 __init__.py 裡面的代碼將被執行,因此它應該只包含能夠運行項目所需的最少量代碼。現在,我們將它保持原樣。「Create an empty file inside mypythonlib that is called __init__.py. Basically, any folder that has an __init__.py file in it, will be included in the library when we build it. Most of the time, you can leave the __init__.py files empty. Upon import, the code within __init__.py gets executed, so it should contain only the minimal amount of code that is needed to be able to run your project. For now, we will leave them as is.」TuringRobots 文件夾中,創建一個名為 TuringRobots.py 「Also, in the same folder, create a file called TuringRobots.py.」__init__.py 文件和一個空的 test_myfunctions.py 「And, finally, create a folder tests in your root folder. Inside, create an empty __init__.py file and an empty test_myfunctions.py.」你所創建的文件夾和代碼文件,現在應如下所示:
Your set-up should now look something like this:
要將函數放入庫中,您可以將它們放入 TuringRobots.py 文件中。例如,復制文件中的 TuringRobots 函數:
To put functions inside your library, you can place them in the
TuringRobots.pyfile. For example, copy the TuringRobots function in your file:
# -*- coding: utf-8 -*-
# @Time : 2022/6/18 11:34
# @Author : AI悅創
# @FileName: TuringRobots.py
# @Software: PyCharm
# @Blog :https://bornforthis.cn/
import json
import urllib.request
import os
from dotenv import load_dotenv
def TuringRobots(text, over_print=True):
load_dotenv()
api_url = "http://openapi.tuling123.com/openapi/api/v2"
req = {
"reqType": 0,
"perception":
{
"inputText":
{
"text": text
},
"selfInfo":
{
"location":
{
"city": "廈門",
"province": "廈門",
"street": "海滄區"
}
}
},
"userInfo":
{
"apiKey": os.getenv("API_KEY"),
"userId": "OnlyUseAlphabet"
}
}
# print(req)
# 將字典格式的req編碼為utf8
req = json.dumps(req).encode('utf8')
# print(req)
http_post = urllib.request.Request(api_url, data=req, headers={'content-type': 'application/json'})
response = urllib.request.urlopen(http_post)
response_str = response.read().decode('utf8')
# print(response_str)
response_dic = json.loads(response_str)
# print(response_dic)
intent_code = response_dic['intent']['code']
results_text = response_dic['results'][0]['values']['text']
if over_print:
print('Turing的回答:')
print('code:' + str(intent_code))
print('text:' + results_text)
else:
return (str(intent_code), results_text)
if __name__ == '__main__':
text = input("請輸入你的對話:")
code, content = TuringRobots(text, over_print=False)
print(code, content)上面實現了一個簡單的機器人對話,對於 Python 測試,可以使用 pytest 和 pytest-runner 庫。在虛擬環境中安裝庫:
A simple robot dialogue is implemented above, For testing with Python you can use the libraries
pytestandpytest-runner. Install the library in your virtual environment:
pip install pytest
pip install pytest-runner
pip install python-dotenv讓我們為項目創建一個小測試,測試如下:
Let's create a small test for the project that looks like this:
TuringRobots_Tests.py
from TuringRobots import TuringRobots
def test_TuringRobots():
assert TuringRobots.TuringRobots("我是天才,那你呢?", over_print=True)最後,讓我們創建一個 setup.py 文件,它將幫助我們構建庫。setup.py 的內容如下所示:
Finally, let’s create a
setup.pyfile, that will help us to build the library. A limited version ofsetup.pywill look something like this:
from setuptools import find_packages, setup
setup(
name='mypythonlib',
packages=find_packages(),
version='0.1.0',
description='My first Python library',
author='Me',
license='MIT',
)我的設置:【你們看簡潔的配置即可】
# -*- coding: utf-8 -*-
# !/usr/bin/env python
# @Time : 2022/6/18 11:51
# @Author : AI悅創
# @FileName: setup.py
# @Software: PyCharm
# @Blog :https://bornforthis.cn/
# Note: To use the 'upload' functionality of this file, you must:
# $ pipenv install twine --dev
import io
import os
import sys
from shutil import rmtree
from setuptools import find_packages, setup, Command
# Package meta-data.
NAME = 'TuringRobots'
DESCRIPTION = 'Simple dialogue test Turing robot.'
URL = 'https://github.com/AndersonHJB/TuringRobots'
EMAIL = '[email protected]'
AUTHOR = 'Bornforthis'
REQUIRES_PYTHON = '>=3.6.0'
VERSION = '1.2.5'
# What packages are required for this module to be executed?
REQUIRED = [
# 'dotenv==0.0.5',
]
# What packages are optional?
EXTRAS = {
# 'fancy feature': ['django'],
}
# The rest you shouldn't have to touch too much :)
# ------------------------------------------------
# Except, perhaps the License and Trove Classifiers!
# If you do change the License, remember to change the Trove Classifier for that!
here = os.path.abspath(os.path.dirname(__file__))
# Import the README and use it as the long-description.
# Note: this will only work if 'README.md' is present in your MANIFEST.in file!
try:
with io.open(os.path.join(here, 'README.md'), encoding='utf-8') as f:
long_description = '\n' + f.read()
except FileNotFoundError:
long_description = DESCRIPTION
# Load the package's __version__.py module as a dictionary.
about = {}
if not VERSION:
project_slug = NAME.lower().replace("-", "_").replace(" ", "_")
with open(os.path.join(here, project_slug, '__version__.py')) as f:
exec(f.read(), about)
else:
about['__version__'] = VERSION
class UploadCommand(Command):
"""Support setup.py upload."""
description = 'Build and publish the package.'
user_options = []
@staticmethod
def status(s):
"""Prints things in bold."""
print('\033[1m{0}\033[0m'.format(s))
def initialize_options(self):
pass
def finalize_options(self):
pass
def run(self):
try:
self.status('Removing previous builds…')
rmtree(os.path.join(here, 'dist'))
except OSError:
pass
self.status('Building Source and Wheel (universal) distribution…')
os.system('python3 -m build')
# os.system('{0} setup.py sdist bdist_wheel --universal'.format(sys.executable))
# os.system('{0} setup.py sdist build --universal'.format(sys.executable))
# os.system('{0} setup.py sdist build --universal'.format(sys.executable))
self.status('Uploading the package to PyPI via Twine…')
os.system('twine upload dist/*')
self.status('Pushing git tags…')
os.system('git tag v{0}'.format(about['__version__']))
os.system('git push --tags')
sys.exit()
# Where the magic happens:
setup(
name=NAME,
version=about['__version__'],
description=DESCRIPTION,
long_description=long_description,
long_description_content_type='text/markdown',
author=AUTHOR,
author_email=EMAIL,
python_requires=REQUIRES_PYTHON,
url=URL,
# packages=find_packages(exclude=["tests", "*.tests", "*.tests.*", "tests.*"]),
# packages=find_packages(exclude=["TuringRobots", ]),
packages=find_packages(include=["TuringRobots",]),
# If your package is a single module, use this instead of 'packages':
# py_modules=['mypackage'],
# entry_points={
# 'console_scripts': ['mycli=mymodule:cli'],
# },
install_requires=REQUIRED,
# setup_requires=['pytest-runner'],
# tests_require=['pytest'],
# tests_require=['pytest', 'dotenv'],
test_suite='tests',
extras_require=EXTRAS,
include_package_data=True,
license='MIT',
classifiers=[
# Trove classifiers
# Full list: https://pypi.python.org/pypi?%3Aaction=list_classifiers
'License :: OSI Approved :: MIT License',
'Programming Language :: Python',
'Programming Language :: Python :: 3',
'Programming Language :: Python :: 3.6',
'Programming Language :: Python :: Implementation :: CPython',
'Programming Language :: Python :: Implementation :: PyPy'
],
# $ setup.py publish support.
cmdclass={
'upload': UploadCommand,
},
)setup 中的 name 變量保存您希望包輪文件具有的任何名稱。為了方便起見,我們將其命名為與文件夾相同的名稱。
The name variable in setup holds whatever name you want your package wheel file to have. To make it easy, we will gave it the same name as the folder.
雖然原則上 find_packages() 可以不帶任何參數使用,但這可能會導致包含不需要的包。 所以,我們可以這麼來寫:
例如,如果您在 tests/ 目錄中包含 __init__.py , 就會發生這種情況。另外,您也可以使用 exclude 參數顯式地阻止在包中包含測試,但是這樣做稍微不那麼健壯。讓我們把它改為如下:
from setuptools import find_packages, setup
setup(
name='mypythonlib',
packages=find_packages(include=['mypythonlib']),
version='0.1.0',
description='My first Python library',
author='Me',
license'MIT',
)注意,當你的項目被其他人作為依賴項安裝時,pip 不會使用requirements.yml/ requirements.txt。 通常,為此,您必須在 setup.py 文件的 install_requires 和 tests_require 參數中指定依賴項。
Note that pip does not use
requirements.yml/requirements.txtwhen your project is installed as a dependency by others. Generally, for that, you will have to specify dependencies in theinstall_requiresandtests_requirearguments in yoursetup.pyfile.
Install_requires 應該僅限於絕對需要的軟件包列表。這是因為您不想讓用戶安裝不必要的軟件包。 另請注意,你不需要列出屬於標准 Python 庫的包。
Install_requiresshould be limited to the list of packages that are absolutely needed. This is because you do not want to make users install unnecessary packages. Also note that you do not need to list packages that are part of the standard Python library.
如果你用的是 Python 自帶的庫,是可以不用寫的,並且保證這個庫是一直到現在的 Python 本版的可以使用的。 也許你還記得我們 pytest 、numpy 之前安裝過這個庫。當然,你不想在其中添加 pytest 依賴項。這個包的用戶不需要它。為了僅在運行測試時自動安裝它,您可以將以下內容添加到您的 setup.py:
from setuptools import find_packages, setup
setup(
name='mypythonlib',
packages=find_packages(include=['mypythonlib']),
version='0.1.0',
description='My first Python library',
author='Me',
license='MIT',
install_requires=[],
setup_requires=['pytest-runner'],
tests_require=['pytest==4.4.1'],
test_suite='tests',
)運行:將執行存儲在 “tests” 文件夾中的所有測試。
python setup.py pytestRunning:
> python setup.py pytest
will execute all tests stored in the ‘tests’ folder.
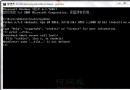
下面是簡單的代碼測試輸出:
(venv) [email protected]:~/Linux_Code/mypythonlibrary$ python setup.py pytest running pytest running egg_info creating mypythonlib.egg-info writing mypythonlib.egg-info/PKG-INFO writing dependency_links to mypythonlib.egg-info/dependency_links.txt writing requirements to mypythonlib.egg-info/requires.txt writing top-level names to mypythonlib.egg-info/top_level.txt writing manifest file 'mypythonlib.egg-info/SOURCES.txt' reading manifest file 'mypythonlib.egg-info/SOURCES.txt' writing manifest file 'mypythonlib.egg-info/SOURCES.txt' running build_ext ================================================================ test session starts ================================================================= platform linux -- Python 3.8.10, pytest-6.2.4, py-1.10.0, pluggy-0.13.1 rootdir: /home/aiyc/Linux_Code/mypythonlibrary collected 1 item tests/test_myfunctions.py .
現在所有內容都已准備就緒,我們要構建我們的庫。確保您當前的工作目錄是 /path/to/mypythonlibrary(因此是項目的根文件夾)。在您的命令提示符中,運行:
Now that all the content is there, we want to build our library. Make sure your present working directory is
/path/to/mypythonlibrary(so the root folder of your project). In your command prompt, run:
python setup.py bdist_wheel您的輪文件存儲在現在創建的 “dist” 文件夾中。您可以使用以下方法安裝您的庫:
Your wheel file is stored in the “dist” folder that is now created. You can install your library by using:
pip install /path/to/wheelfile.whl請注意,您還可以將您的庫發布到您工作場所內聯網上的內部文件系統,或發布到官方 PyPI 存儲庫並從那裡安裝它。 安裝 Python 庫後,您可以使用以下命令導入它:
Note that you could also publish your library to an internal file system on intranet at your workplace, or to the official PyPI repository and install it from there.Once you have installed your Python library, you can import it using:
import mypythonlib
from mypythonlib import myfunctions我自己使用如下官方構建:
python3 -m pip install --upgrade buildpython3 -m build# 測試代碼
python setup.py pytest
# 提交代碼
python setup.py upload歡迎關注我公眾號:AI悅創,有更多更好玩的等你發現!
AI悅創·
 Why is the content set by the SetLable method not automatically centered after the interface is written in wxpython?
After writing the interface wi