Kalman濾波器真的太復雜了,因此整理了這篇文章,來記錄一下對自己有用的一些參考鏈接。
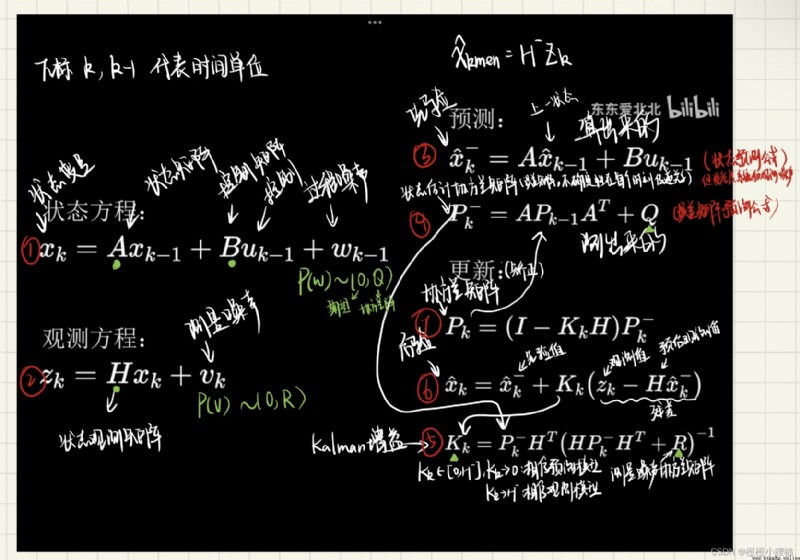
如果用我自己的話來總結kalman濾波器(可能不准確):
Kalman跟蹤直觀感受
Kalman原理
Kalman應用
opencv官方kalman函數說明
cv::KalmanFilter Class Reference
自己寫了個類
輸入值為目標的中心坐標和長寬,輸入預測的坐標位置和速度,可能存在部分錯誤,需後期修正。
import cv2
import numpy as np
# from myUtils.utils import xyxy_to_xywh
class KalmanTrack:
def __init__(self):
# 狀態數和觀測數需要修改
self.kalman = cv2.KalmanFilter(6, 4) # 6:狀態數,包括(xmin,ymin,xmax,ymax, dx,dy)坐標及速度(每次移動的距離);
# 4:觀測量,能看到的是坐標值
# 狀態轉移矩陣
A = np.array([[1, 0, 0, 0, 1, 0],
[0, 1, 0, 0, 0, 1],
[0, 0, 1, 0, 0, 0],
[0, 0, 0, 1, 0, 0],
[0, 0, 0, 0, 1, 0],
[0, 0, 0, 0, 0, 1]], np.float32)
self.kalman.transitionMatrix = A # 狀態轉移矩陣
# 控制矩陣
B = None
self.kalman.controlMatrix = B
# 狀態觀測矩陣
H = np.array([[1, 0, 0, 0, 0, 0],
[0, 1, 0, 0, 0, 0],
[0, 0, 1, 0, 0, 0],
[0, 0, 0, 1, 0, 0]], np.float32)
self.kalman.measurementMatrix = H # 系統測量矩陣
# 觀測噪聲協方差矩陣R,p(v)~N(0,R)
# 觀測噪聲來自於檢測框丟失、重疊等
R = np.array([[1, 0, 0, 0],
[0, 1, 0, 0],
[0, 0, 1, 0],
[0, 0, 0, 1]], np.float32)
self.kalman.measurementNoiseCov = R
# 過程噪聲協方差矩陣Q,p(w)~N(0,Q),噪聲來自真實世界中的不確定性,
# 在跟蹤任務當中,過程噪聲來自於目標移動的不確定性(突然加速、減速、轉彎等)
Q = np.eye(6, dtype=np.float32) * 0.1
self.kalman.processNoiseCov = Q
# 狀態估計協方差矩陣P初始化
P = np.eye(6, dtype=np.float32)
self.kalman.errorCovPre = P
self.cur_measurement = np.nan
self.cur_prediction = np.nan
self.pre_measurement = np.nan
self.pre_prediction = np.nan
def get_cur_state(self, target_box):
"""獲取初始值狀態測量值"""
# target_box = [729, 238, 764, 339]
self.cur_measurement = target_box # 目標初始bouding box
# self.cur_measurement = xyxy_to_xywh(self.cur_measurement)
# [中心x,中心y,寬w,高h]
self.cur_measurement = np.array(
[[np.float32(self.cur_measurement[0]), np.float32(self.cur_measurement[1]),
np.float32(self.cur_measurement[2]), np.float32(self.cur_measurement[3])]]).T
return self.cur_measurement
def get_initial_state(self, target_box):
self.cur_measurement = self.get_cur_state(target_box)
self.pre_measurement = self.cur_measurement
self.cur_prediction = self.cur_measurement
self.pre_prediction = self.cur_measurement
def correct_and_predict(self, target_box):
# 將前線狀態進行存儲
self.pre_measurement = self.cur_measurement
self.pre_prediction = self.cur_prediction
# 用當前測量來校正卡爾曼濾波器
self.cur_measurement = self.get_cur_state(target_box)
self.kalman.correct(self.cur_measurement) # 用當前測量來校正卡爾曼濾波器
self.cur_prediction = self.kalman.predict() # 計算卡爾曼預測值,作為當前預測
return self.cur_prediction
if __name__ == '__main__':
kalman_tracker = KalmanTrack()
kalman_tracker.get_initial_state([729, 288, 35, 101]) # xywh
while True:
# 將先前的預測值作為當前的測量值
data = list([kalman_tracker.pre_prediction[0][0], kalman_tracker.pre_prediction[1][0],
kalman_tracker.pre_prediction[2][0], kalman_tracker.pre_prediction[3][0]])
print(kalman_tracker.correct_and_predict(data))