Python Three steps to Visualization :
Determine the problem , Select graphics
Conversion data , Application function
Parameter setting , Be clear at a glance
Like this article, remember to collect 、 Focus on 、 give the thumbs-up .
notes : Technical communication 、 Data acquisition , See you at the end of the article
matplotlib
Python in The most basic drawing library is matplotlib, It's the most basic Python Visualization Library , Usually from matplotlib Get started Python Data visualization , And then I started to do vertical and horizontal expansion .
Seaborn
It's based on matplotlib Advanced visualization Library of , The main point is the variable feature selection in data mining and machine learning ,seaborn You can use short code to draw visualizations that describe more dimensional data
Other libraries include
Bokeh( Is a library for browser side interactive visualization , Realize the interaction between analysts and data );Mapbox( Processing geographic data engine stronger visualization tool library ) wait
This article mainly uses matplotlib Case study
First step : Determine the problem , Select graphics
The business can be complex , But after splitting , We need to find out what specific problems we want to express graphically . The training of analytical thinking can be learned **《 McKinsey method 》 and 《 Pyramid principle 》** The method in .
This is an online summary of chart type selection .
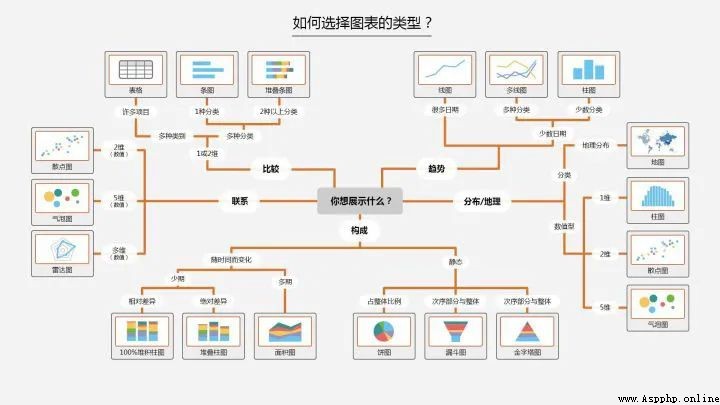
stay Python in , We can summarize the following four basic visual elements to show graphics :
spot :scatter plot Two dimensional data , For simple two-dimensional relationships ;
Line :line plot Two dimensional data , For time series ;
Columnar :bar plot Two dimensional data , For category Statistics ;
Color :heatmap Apply to show the third dimension ;
There is... Between the data Distribution , constitute , Compare , Connections and trends . Corresponding to different relationships , Select the corresponding graphics to display .
A lot of programming work on data analysis and modeling is done on the basis of data preparation :** load 、 clear 、 Transform and reshape .** Our visualization steps also need to organize the data , Convert it to the format we need, and then apply the visualization method to complete the drawing .
Here are some common data conversion methods :
Merge :merge,concat,combine_frist( It is similar to the total external connection in the database )
restore :reshape; Axial rotation :pivot( similar excel PivotTable )
duplicate removal :drop_duplicates
mapping :map
Fill in and replace :fillna,replace
Rename axis index :rename
Convert the categorical variable to ‘ Dummy variable matrix ’ Of get_dummies Function and in df To take the limit value of a column of data and so on .
Function is based on the selected graph in the first step , Look for Python The corresponding function in .
The third step : Parameter setting , Be clear at a glance
After drawing the original figure , We can change the color according to our needs (color), Linetype (linestyle), Mark (maker) Or other chart decoration item titles (Title), Axis labels (xlabel,ylabel), Axis scale (set_xticks), And the legend (legend) etc. , Make graphics more intuitive .
The third step is based on the second step , In order to make the graphics clearer , The grooming work . Specific parameters can be found in the mapping function .
2、 Fundamentals of visualization mapping
Matplotlib Drawing basis
# Import package
import numpy as np
import pandas as pd
import matplotlib.pyplot as plt
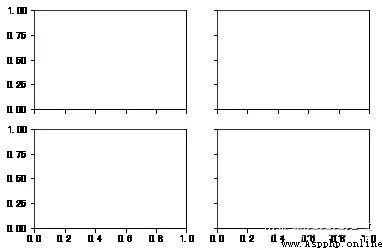
Figure and Subplot
matplotlib All of the figures are located in Figure( canvas ) in ,Subplot Create image space . Cannot pass figure mapping , Must use add_subplot Create one or more subplot.
figsize You can specify the image size .
# Create a canvas
fig = plt.figure()
<Figure size 432x288 with 0 Axes>
# establish subplot,221 It means that this is 2 That's ok 2 In the list lattice 1 Images .
ax1 = fig.add_subplot(221)
# But now I'm more used to creating canvases and images ,2,2 That means this is one 2*2 Canvas of , You can put 4 Images
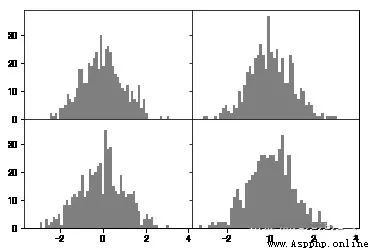
fig , axes = plt.subplots(2,2,sharex=True,sharey=True)
#plt.subplot Of sharex and sharey The parameter can specify all the subplot Use the same x,y Axis scale .
utilize Figure Of subplots_adjust Method can adjust the spacing .
subplots_adjust(left=None,bottom=None,right=None,top=None,wspace=None,hspace=None)
Color color, Mark marker, And line type linestyle
matplotlib Of plot Function takes a set of X and Y coordinate , You can also accept a string abbreviation for color and line type :**‘g–’, It means the color is green green, The line type is ’–' Dotted line .** You can also specify with parameters .
The line diagram can also be marked with some marks (marker), To highlight the location of data points . Tags can also be placed in the format string , But the mark type and line type must be placed after the color .
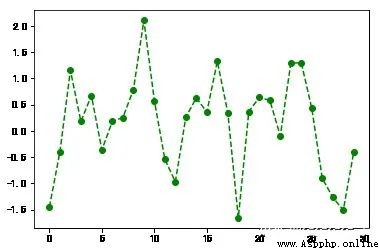
plt.plot(np.random.randn(30),color='g',linestyle='--',marker='o')
[<matplotlib.lines.Line2D at 0x8c919b0>]

scale , Labels and illustrations
plt Of xlim、xticks and xtickslabels Method respectively Control the range, scale position and scale label of the chart .
Call method without parameters , The current parameter value is returned ; Call with parameters , Then set the parameter value .
plt.plot(np.random.randn(30),color='g',linestyle='--',marker='o')
plt.xlim() # Call without parameters , Display current parameters ;
# Can be xlim Try two other ways instead
(-1.4500000000000002, 30.45)
plt.plot(np.random.randn(30),color='g',linestyle='--',marker='o')
plt.xlim() # Call without parameters , Display current parameters ;
# Can be xlim Try two other ways instead
(-1.4500000000000002, 30.45)
Set title , Axis labels , Scale and scale label
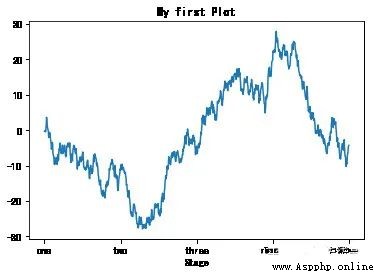
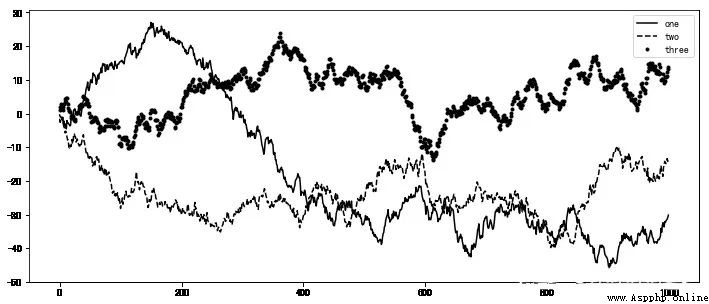
fig = plt.figure();ax = fig.add_subplot(1,1,1)
ax.plot(np.random.randn(1000).cumsum())
ticks = ax.set_xticks([0,250,500,750,1000]) # Set scale value
labels = ax.set_xticklabels(['one','two','three','four','five']) # Set the scale label
ax.set_title('My first Plot') # Set title
ax.set_xlabel('Stage') # Set axis labels
Text(0.5,0,'Stage')
Add legend
** legend legend Is another important tool for identifying icon elements .** You can add subplot When it comes to label Parameters .
fig = plt.figure(figsize=(12,5));ax = fig.add_subplot(111)
ax.plot(np.random.randn(1000).cumsum(),'k',label='one') # Pass in label Parameters , Definition label name
ax.plot(np.random.randn(1000).cumsum(),'k--',label='two')
ax.plot(np.random.randn(1000).cumsum(),'k.',label='three')
# When the graph is created , Just call legend Parameter will label Just tune it out .
ax.legend(loc='best') # If the requirements are not very strict , It is recommended to use loc=‘best’ Parameter to let it choose the best position by itself
<matplotlib.legend.Legend at 0xa8f5a20>
annotation
In addition to standard chart objects , We can also custom add some text annotations or arrows .
Comments can be made by text,arrow and annotate And so on function to add .text Function to draw text in the specified x,y coordinates , You can also customize the format
plt.plot(np.random.randn(1000).cumsum())
plt.text(600,10,'test ',family='monospace',fontsize=10)
# Chinese comments can't be displayed by default , The configuration file needs to be modified , Make it support Chinese Fonts . Please search by yourself for specific steps .
Save the chart to a file
utilize plt.savefig You can save the current chart to a file . for example , To save the chart as png file , It can be executed
The file type is based on the extension name . Other parameters are :
fname: String containing the file path , The extension name specifies the file type
dpi: The resolution of the , Default 100 facecolor,edgcolor Background color of image , Default ‘w’ white
format: Display settings file format (‘png’,‘pdf’,‘svg’,‘ps’,'jpg’ etc. )
bbox_inches: The parts of the chart that need to be kept . If set to “tight”, Will try to cut out the white space around the image
plt.savefig('./plot.jpg') # Save the image as plot Name jpg Format image <Figure size 432x288 with 0 Axes>
Matplotlib Make a picture
**matplotlib Is the most basic drawing function , It's also a relatively low-level tool .** To assemble a diagram, you need to call each basic component separately .Pandas There are many based on matplotlib The advanced drawing method of , A chart that would have taken more than one line of code , Use pandas Just a few lines .
What we use calls pandas Drawing package in .
import matplotlib.pyplot as plt
draught
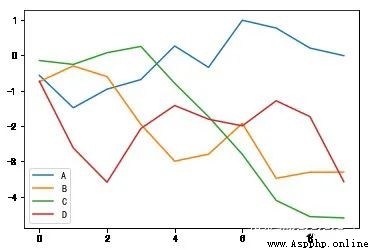
**Series and DataFrame There is a for generating all kinds of charts plot Method .** By default , What they generate is a line graph .
s = pd.Series(np.random.randn(10).cumsum(),index=np.arange(0,100,10))
s.plot() #Series Object index index It will be passed on to matplotlib For drawing x Axis .
<matplotlib.axes._subplots.AxesSubplot at 0xf553128>
df = pd.DataFrame(np.random.randn(10,4).cumsum(0),columns=['A','B','C','D'])df.plot() #plot Will automatically change color for different variables , And add a legend <matplotlib.axes._subplots.AxesSubplot at 0xf4f9eb8>
Series.plot Method parameters
label: Labels for charts
style: Style string ,‘g–’
alpha: Fill opacity of the image (0-1)
kind: Chart type (bar,line,hist,kde etc. )
xticks: Set up x Axis scale value
yticks: Set up y Axis scale value
xlim,ylim: Set axis limits ,[0,10]
grid: Display axis grid lines , Off by default
**rot:** Rotary scale label
use_index: Label the index of an object as a scale
logy: stay Y Use a logarithmic scale on the axis
DataFrame.plot Method parameters
DataFrame except Series In addition to the parameters in , There are also some unique options .
subplots: Will all DataFrame The columns are drawn to separate columns subplot in
sharex**,sharey**: share x,y Axis
figsize: Control image size
title: Image title
legend: Add legend , Default display
sort_columns: Draw the columns in alphabetical order , The current order is used by default
Histogram
Add to the code that generates the linetype diagram kind=‘bar’ perhaps kind=‘barh’, You can generate a histogram or a horizontal histogram .
fig,axes = plt.subplots(2,1)data = pd.Series(np.random.rand(10),index=list('abcdefghij'))data.plot(kind='bar',ax=axes[0],rot=0,alpha=0.3)data.plot(kind='barh',ax=axes[1],grid=True)<matplotlib.axes._subplots.AxesSubplot at 0xfe39898>
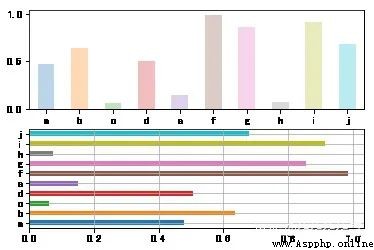
There's a very practical way to use histogram :
utilize value_counts Graphical display Series perhaps DF The frequency of occurrence of each value in .
such as df.value_counts().plot(kind=‘bar’)
Python That's the basic syntax of visualization , Other graphics are drawn in the same way .
The point is to follow a three-step approach reflection 、 choice 、 application . More practice can make you more proficient .
At present, a technical exchange group has been opened , Group friends have exceeded 3000 people , The best way to add notes is : source + Interest direction , Easy to find like-minded friends
The way ①、 Send the following picture to wechat , Long press recognition , The background to reply : Add group ;
The way ②、 Add microsignals :dkl88191, remarks : come from CSDN
The way ③、 WeChat search official account :Python Learning and data mining , The background to reply : Add group

 Python & c++ mixed call programming comprehensive practice -30 start the thread to call the read read view frame function of pyffmpeg extension library
author : Empty bad uncle Blog