我們在整理數據的時候,經常會碰上數據類型出錯的情況,今天小編就來分享一下在Pandas模塊當中的數據類型轉換的相關技巧,干貨滿滿的哦!
那麼我們第一步慣例就是導入Pandas模塊以及創建數據集了,代碼如下
import pandas as pd
import numpy as np
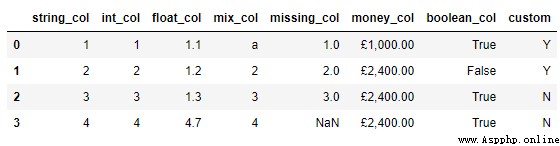
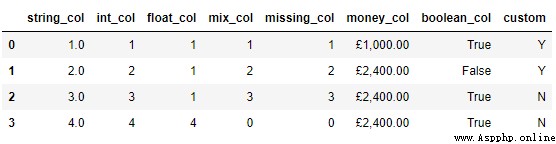
df = pd.DataFrame({
'string_col': ['1','2','3','4'],
'int_col': [1,2,3,4],
'float_col': [1.1,1.2,1.3,4.7],
'mix_col': ['a', 2, 3, 4],
'missing_col': [1.0, 2, 3, np.nan],
'money_col': ['£1,000.00', '£2,400.00', '£2,400.00', '£2,400.00'],
'boolean_col': [True, False, True, True],
'custom': ['Y', 'Y', 'N', 'N']
})
dfoutput
我們先來看一下每一列的數據類型,代碼如下
df.dtypesoutput
string_col      object
int_col          int64
float_col      float64
mix_col         object
missing_col    float64
money_col       object
boolean_col       bool
custom          object
dtype: object
當然了我們也可以調用info()方法來實現上述的目的,代碼如下
df.info()output
<class 'pandas.core.frame.DataFrame'>
RangeIndex: 4 entries, 0 to 3
Data columns (total 8 columns):
 #   Column       Non-Null Count  Dtype
---  ------       --------------  -----
 0   string_col   4 non-null      object
 1   int_col      4 non-null      int64
 2   float_col    4 non-null      float64
 3   mix_col      4 non-null      object
 4   missing_col  3 non-null      float64
 5   money_col    4 non-null      object
 6   boolean_col  4 non-null      bool
 7   custom       4 non-null      object
dtypes: bool(1), float64(2), int64(1), object(4)
memory usage: 356.0+ bytes接下來我們開始數據類型的轉換,最經常用到的是astype()方法,例如我們將浮點型的數據轉換成整型,代碼如下
df['float_col'] = df['float_col'].astype('int')或者我們將其中的“string_col”這一列轉換成整型數據,代碼如下
df['string_col'] = df['string_col'].astype('int')當然我們從節省內存的角度上來考慮,轉換成int32或者int16類型的數據,
df['string_col'] = df['string_col'].astype('int8')
df['string_col'] = df['string_col'].astype('int16')
df['string_col'] = df['string_col'].astype('int32')
然後我們再來看一下轉換過後的各個列的數據類型
df.dtypesoutput
string_col     float32
int_col          int64
float_col        int32
mix_col         object
missing_col    float64
money_col       object
boolean_col       bool
custom          object
dtype: object
但是當某一列的數據類型不止一個的時候,轉換的過程當中則會報錯,例如“mix_col”這一列
df['mix_col'] = df['mix_col'].astype('int')output
ValueError: invalid literal for int() with base 10: 'a'於是乎我們可以調用的to_numeric()方法以及errors參數,代碼如下
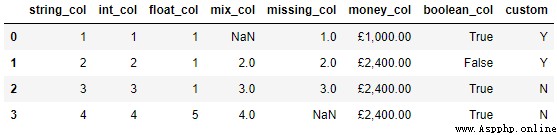
df['mix_col'] = pd.to_numeric(df['mix_col'], errors='coerce')
df
output
而要是遇到缺失值的時候,進行數據類型轉換的過程中也一樣會出現報錯,代碼如下
df['missing_col'].astype('int')output
ValueError: Cannot convert non-finite values (NA or inf) to integer我們可以先通過調用fillna()方法來將缺失值填充成其他數值,然後再進行類型的轉換,代碼如下
df["missing_col"] = df["missing_col"].fillna(0).astype('int')
df
output
最後的則是“money_col”這一列,我們看到當中有貨幣符號,因此第一步我們要做的則是將這些貨幣符號給替換掉,然後再進行數據類型的轉換,代碼如下
df['money_replace'] = df['money_col'].str.replace('£', '').str.replace(',','')
df['money_replace'] = pd.to_numeric(df['money_replace'])
df['money_replace']
output
0    1000.0
1    2400.0
2    2400.0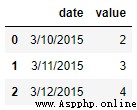
3 2400.0當我們需要給日期格式的數據進行類型轉換的時候,通常需要調用的是to_datetime()方法,代碼如下
df = pd.DataFrame({'date': ['3/10/2015', '3/11/2015', '3/12/2015'],
                   'value': [2, 3, 4]})
df
output
我們先來看一下各個列的數據類型
df.dtypesoutput
date     object
value     int64
dtype: object我們調用to_datetime()方法的代碼如下
pd.to_datetime(df['date'])output
0   2015-03-10
1   2015-03-11
2   2015-03-12
Name: date, dtype: datetime64[ns]當然這並不意味著不能調用astype()方法了,出來的結果與上述的一樣,代碼如下
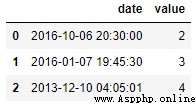
df['date'].astype('datetime64')而當我們遇到自定義格式的日期格式的數據時,同樣也是調用to_datetime()方法,但是需要設置的格式也就是format參數需要保持一致
df = pd.DataFrame({'date': ['2016-6-10 20:30:0',
                            '2016-7-1 19:45:30',
                            '2013-10-12 4:5:1'],
                   'value': [2, 3, 4]})
df['date'] = pd.to_datetime(df['date'], format="%Y-%d-%m %H:%M:%S")
output
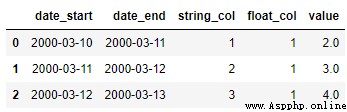
最後,或許有人會問,是不是有什麼辦法可以一步到位實現數據類型的轉換呢?那當然也是可以實現的,代碼如下
df = pd.DataFrame({'date_start': ['3/10/2000', '3/11/2000', '3/12/2000'],
                   'date_end': ['3/11/2000', '3/12/2000', '3/13/2000'],
                   'string_col': ['1','2','3'],
                   'float_col': [1.1,1.2,1.3],
                   'value': [2, 3, 4]})

df = df.astype({
    'date_start': 'datetime64',
    'date_end': 'datetime64',
    'string_col': 'int32',
    'float_col': 'int64',
    'value': 'float32',
})
我們來看一下出來的結果
dfoutput
NO.1
往期推薦
Historical articles
Python實現定時任務的八種方案,干貨滿滿
用Python當中Plotly.Express模塊繪制幾張圖表,真的被驚艷到了!!
20張精美的可視化大屏模板,各行業數據直接套用(含源碼)
用Python制作可視化GUI界面,一鍵實現將頭像轉成動漫風!
分享、收藏、點贊、在看安排一下?