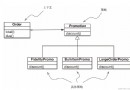
The basic principle of binocular ranging
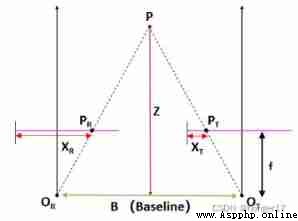
Pictured ,p Is a point on the object to be measured , and
and  They are the wide hearts of the two cameras , spot p The imaging points on the two camera sensors are
  and
and  ,
, It's the camera focus ,B Is the center distance between two cameras ,Z For the depth information we want , set sth. up To The distance to
  , be
, be

According to the principle of similar triangle :

Available :
In the formula , and
and  It's pixel coordinates , You can get it from the picture , The focal length f And the center distance B It can be obtained by calibrating internal parameters , So just know
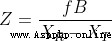
  To find the depth . It is called parallax , It refers to the midpoint of space p Mapping between two camera pixel coordinates and The difference between the pixel coordinates of , So the problem is to find the time difference distance . The key to parallax is the spatial point p The determination of , Binocular stereo vision model , The parameters of two cameras are usually the same , The optical axis is parallel and perpendicular to the baseline , Form a common polarity structure , This is done to reduce the corresponding search space , Only horizontal parallax , The corresponding process is simplified .
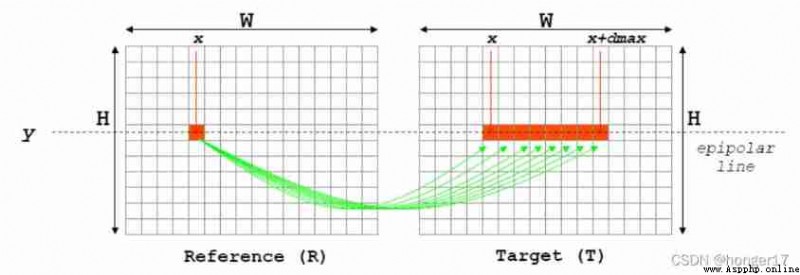
An image including a calibration plate is taken by a binocular camera :
utilize matlab Of Stereo Camara Calibrator Tool box to obtain camera internal and external parameters :
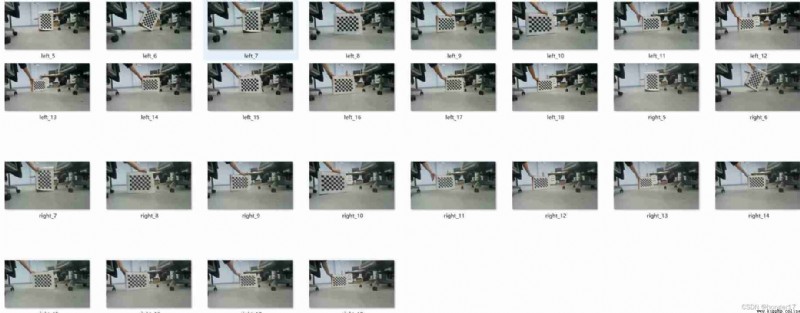
Rotation matrix and translation matrix : Radial and tangential distortion :


Internal parameter matrix and focal length :

Substitute the obtained parameters into Python In the camera configuration file of
import numpy as np
# Binocular camera parameters
class stereoCamera(object):
def __init__(self):
# Left camera internal reference
self.cam_matrix_left = np.array([[8.038759936762742e+02, 0, 0],
[0, 8.048019295969406e+02, 0],
[6.216740421239294e+02, 3.633510598822062e+02, 1]])
self.cam_matrix_left = np.transpose(self.cam_matrix_left)
# Right camera internal reference
self.cam_matrix_right = np.array([[7.975766094960454e+02, 0, 0],
[0, 7.987568305146705e+02, 0],
[6.199261280325460e+02, 3.443775066058079e+02, 1]])
self.cam_matrix_right = np.transpose(self.cam_matrix_right)
# Distortion coefficient of left and right cameras :[k1, k2, p1, p2, k3]
self.distortion_l = np.array([[0.105255646983319,-0.095722895265073, 0,
0, 0]])
self.distortion_r = np.array([[0.104095867619975,-0.110949196293415, 0,
0, 0]])
# Rotation matrix
self.R = np.array([[0.999999821895833, 5.342943164783758e-04, 2.659659503760748e-04],
[-5.328652043124366e-04, 0.999985575179899, -0.005344669007613],
[-2.688177401393155e-04, 0.005344526331705, 0.999985681785151]])
self.R = np.transpose(self.R)
# Translation matrix
self.T = np.array([[-60.334731573524834], [-0.018099458833455], [0.936013732708266]])
# The focal length
self.focal_length = 7.975766094960454e+02 # The default value is , Generally, the re projection matrix after stereo correction is taken Q Medium Q[2,3]
# Baseline distance
self.baseline = 60.607508376407125 # Company :mm, Is the first parameter of the translation vector ( Take the absolute value )
It should be noted that the internal parameter matrix can only be used after transposing ,matlab The rotation matrix of is the rotation from the right camera to the left camera , and OpenCV Of “stereoRectify” It is the rotation correction from the left camera to the right camera , So the rotation matrix needs to be transposed ( The rotation matrix is a unitary matrix , ).
).
# Obtain the mapping transformation matrix of distortion correction and stereo correction 、 Re projection matrix
# @param:config Is a class , Store the parameters of double target :config = stereoconfig.stereoCamera()
def getRectifyTransform(height, width, config):
# Read internal and external parameters
left_K = config.cam_matrix_left
right_K = config.cam_matrix_right
left_distortion = config.distortion_l
right_distortion = config.distortion_r
R = config.R
T = config.T
# Calculate the correction transformation
R1, R2, P1, P2, Q, roi1, roi2 = cv2.stereoRectify(left_K, left_distortion, right_K, right_distortion,
(width, height), R, T, alpha=0)
map1x, map1y = cv2.initUndistortRectifyMap(left_K, left_distortion, R1, P1, (width, height), cv2.CV_32FC1)
map2x, map2y = cv2.initUndistortRectifyMap(right_K, right_distortion, R2, P2, (width, height), cv2.CV_32FC1)
return map1x, map1y, map2x, map2y, Q
# Distortion correction and stereo correction
def rectifyImage(image1, image2, map1x, map1y, map2x, map2y):
rectifyed_img1 = cv2.remap(image1, map1x, map1y, cv2.INTER_LINEAR)
rectifyed_img2 = cv2.remap(image2, map2x, map2y, cv2.INTER_LINEAR)
return rectifyed_img1, rectifyed_img2
# Stereo calibration inspection ---- Draw line
def draw_line(image1, image2):
# Create output image
height = max(image1.shape[0], image2.shape[0])
width = image1.shape[1] + image2.shape[1]
output = np.zeros((height, width, 3), dtype=np.uint8)
output[0:image1.shape[0], 0:image1.shape[1]] = image1
output[0:image2.shape[0], image1.shape[1]:] = image2
# Draw equally spaced parallel lines
line_interval = 50 # Straight line spacing :50
for k in range(height // line_interval):
cv2.line(output, (0, line_interval * (k + 1)), (2 * width, line_interval * (k + 1)), (0, 255, 0), thickness=2,
lineType=cv2.LINE_AA)
return output
After correction , The same point is on the same horizontal line of two pixel planes , Facilitate subsequent feature point search .
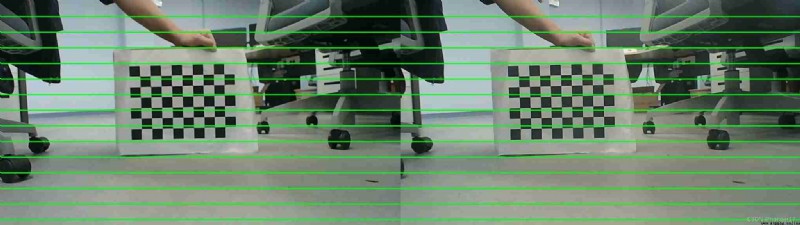
Then use SGBM Stereo matching ,BM、GBM、SGBM、SAD etc. ,SGBM(Stereo Processing by Semiglobal Matching and Mutual Information) Is a global matching algorithm , Stereo matching is better than local matching , The complexity is also much greater than the local matching algorithm . A parallax map is constructed by selecting the parallax of each point , Set a global energy function , Minimize this energy function , To achieve the most parallax .SAD(Sum of absolute differences) Is an image matching algorithm . The basic idea : The sum of the absolute values of the difference . This algorithm is often used for image block matching , Sum the absolute value of the difference between the corresponding values of each pixel , The similarity of the two image blocks is evaluated . The algorithm is fast 、 But not exactly , It is usually used for preliminary screening of multi-level processing . But both algorithms are affected by brightness 、 tonal 、 saturation 、 Object texture 、 highlights 、 Repeated texture interference , Therefore, most of them cannot be used for dense mapping , Only for sparse mapping .
# Stereo matching
def SGBM(imgL, imgR):
# Convert to grayscale
imgL = cv.cvtColor(imgL, cv.COLOR_BGR2GRAY)
imgR = cv.cvtColor(imgR, cv.COLOR_BGR2GRAY)
window_size = 7
min_disp = -3
num_disp = 16 * 7
stereo = cv.StereoSGBM_create(minDisparity=min_disp,
numDisparities=num_disp,
blockSize=8,
P1=8 * 3 * window_size ** 2,
P2=32 * 3 * window_size ** 2,
disp12MaxDiff=1,
uniquenessRatio=25,
speckleWindowSize=100,
speckleRange=32
)
disp = stereo.compute(imgL, imgR).astype(np.float32) / 16.0
# cv2.imwrite("./1.jpg", disp)
new_disp = (disp - min_disp) / num_disp
new_disp_pp = cv.medianBlur(new_disp, 5)
new_disp_pp = new_disp_pp * num_disp
# print(new_disp_pp)
# cv2.imwrite("./2.jpg", new_disp_pp)
return new_disp_pp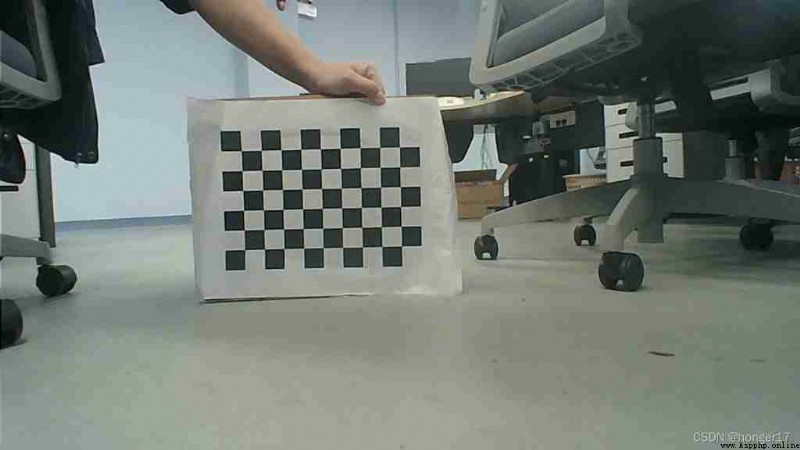
By parallax map , utilize OpenCV Of reprojectImageTo3D Function and the previous re projection matrix , You can get the three-dimensional coordinates of the pixels .
The operation method is as follows :


After getting the space coordinates , You can calculate the Euclidean distance :
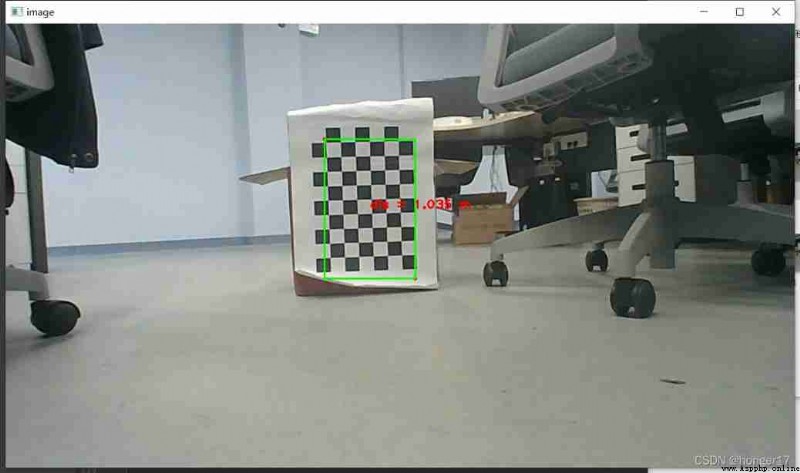
# Click twice to get a rectangle , Get the distance of the object in the rectangle
def on_EVENT_LBUTTONDOWN(event, x, y, flags, param):
if event == cv2.EVENT_LBUTTONDOWN:
cv2.circle(img, (x, y), 3, (0, 0, 255), thickness=-1)
aaa.append(x)
aaa.append(y)
z = points_3d
temp = np.sqrt(
np.multiply(z, z)[:, :, 0] + np.multiply(z, z)[:, :, 1] + np.multiply(z, z)[:, :, 2]) # Calculate the corresponding spatial distance of all pixels
# print(x,y)
if len(aaa) == 4:
rectangle(aaa[0], aaa[1], aaa[2], aaa[3])
xxx = (aaa[0] + aaa[2]) / 2
yyy = (aaa[1] + aaa[3]) / 2
sub_temp = temp[aaa[1]:aaa[3], aaa[0]: aaa[2]]
height, width = sub_temp.shape[0:2]
sub_temp_1 = sub_temp.reshape(height * width, 1)
sub_temp_2 = np.unique(sub_temp_1[:, 0]) # According to the first '1' Column sorting
# print(sub_temp_2.shape)
b = []
contro = 0 # Whether to delete data beyond the threshold , Is for 1, Otherwise 0
for i in range(0, len(sub_temp_2)):
if sub_temp_2[i] > 10000: # Delete greater than 10000 Part of
b.append(sub_temp_2[0:i - 1])
b = np.array(b)
contro = 1
break
if contro == 0: # When there is no need to delete data
b.append(sub_temp_2)
b = np.array(b)
if b.shape[1] < 1: # All values are greater than the threshold , There is an empty matrix
print("error")
xy = "error"
cv2.putText(img, xy, (int(xxx), int(yyy)), cv2.FONT_HERSHEY_PLAIN, 1.4, (0, 0, 255), thickness=2)
else:
median_loc = b.shape[1] / 2
median = b[0, (int(median_loc))]
median = median / 1000
if median > 10: # Experience sets the threshold
xy = "error"
cv2.putText(img, xy, (int(xxx), int(yyy)), cv2.FONT_HERSHEY_PLAIN, 1.4, (0, 0, 255), thickness=2)
else:
xy = "dis = %.3f m" % median
cv2.putText(img, xy, (int(xxx), int(yyy)), cv2.FONT_HERSHEY_PLAIN, 1.4, (0, 0, 255), thickness=2)
# print(points_3d[y, x, 0], points_3d[y, x, 1], points_3d[y, x, 2])
print(" The distance from this point to the right camera is :", median, " rice ")
for i in range(0, 4):
del aaa[0]
cv2.imshow("image", img)
def rectangle(x1, y1, x2, y2):
ptLeftTop = (x1, y1)
ptRightBottom = (x2, y2)
point_color = (0, 255, 0) # BGR
thickness = 2
lineType = 4
cv.rectangle(img, ptLeftTop, ptRightBottom, point_color, thickness, lineType)
The main function :
if __name__ == '__main__':
# Read MiddleBurry Pictures of the dataset
iml = cv2.imread('left/11.jpg') # On the left
imr = cv2.imread('right/11.jpg') # Right picture
# Read camera internal and external parameters
config = stereoconfig.stereoCamera()
height, width = iml.shape[0:2]
print(height)
print(width)
# Stereo correction
map1x, map1y, map2x, map2y, Q = getRectifyTransform(height, width,
config) # A mapping matrix for distortion correction and stereo correction and a re projection matrix for calculating pixel spatial coordinates are obtained
iml_rectified, imr_rectified = rectifyImage(iml, imr, map1x, map1y, map2x, map2y)
# Draw equally spaced parallel lines , Check the effect of stereo correction
line = draw_line(iml_rectified, imr_rectified)
cv2.imwrite('./4.jpg', line)
# Stereo matching
iml_, imr_ = preprocess(iml_rectified, imr_rectified) # Preprocessing
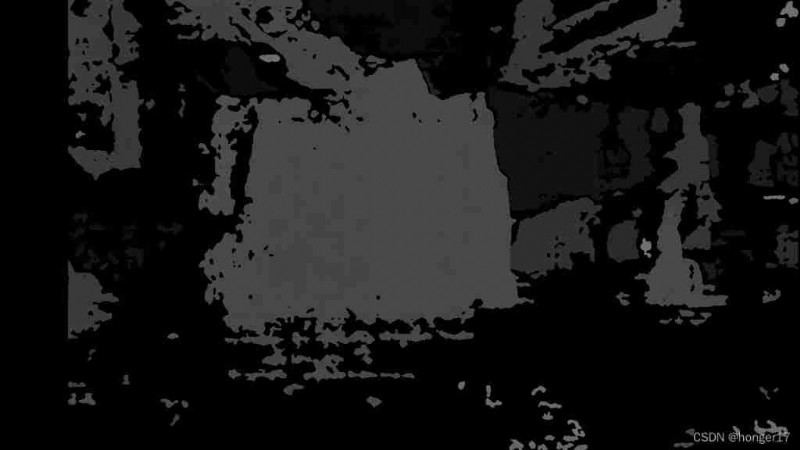
disp = SGBM(iml_rectified, imr_rectified)
# disp = BM(iml_rectified, imr_rectified)
cv2.imwrite("./Parallax.jpg", disp)
# cv2.imshow('disp',disp)
# cv2.waitKey(0)
# Calculate the number of pixels 3D coordinate ( Left camera coordinate system )
points_3d = (cv2.reprojectImageTo3D(disp, Q)) # You can use the above stereo_config.py Given parameters
# Click on the picture to show
img = imr_rectified
# Picture path
a = []
b = []
cv2.namedWindow("image")
cv2.setMouseCallback("image", on_EVENT_LBUTTONDOWN)
cv2.imshow("image", img)
cv2.waitKey(0)
# print(a[0], b[0])
Distance test :
True value (mm) Measured value (mm) error (mm) error ( percentage %)800826263.25%800814141.75%10001039393.90%10001038383.80%15001463372.47%16001550503.13%18001731693.83% Average 393.16%In stereo matching , Some filtering methods can be used for image preprocessing , The parallax map can also be filtered ,WLS Filtering has a good effect .
SGBM The algorithm needs about... To process a frame 220ms,BM The algorithm will be faster , But the parallax effect is much worse .
It can detect small objects , USB disk is waiting 40cm Outside 、80cm Can be measured inside ( error 3cm).
The measuring range is mainly limited by the choice of lens , In actual use, the lenses with three focal lengths are 2.1mm、3mm and 6mm, The starting distance of measurement is 50cm、80cm and 120cm. Choose different shots according to your needs .
error analysis :
The focal length of the camera refers to the distance from the center of the camera lens to the image formed by the camera ( image sensor ) Distance between . If other parameters remain unchanged , Just change the focal length , As the focal length increases , The camera's field of view will narrow .
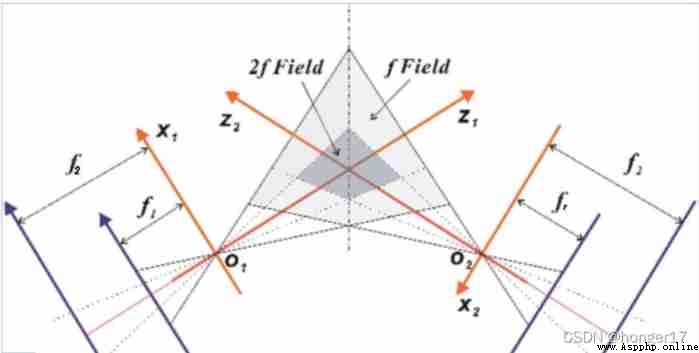
The angle between the optical axis and the baseline α Will cause systematic error :
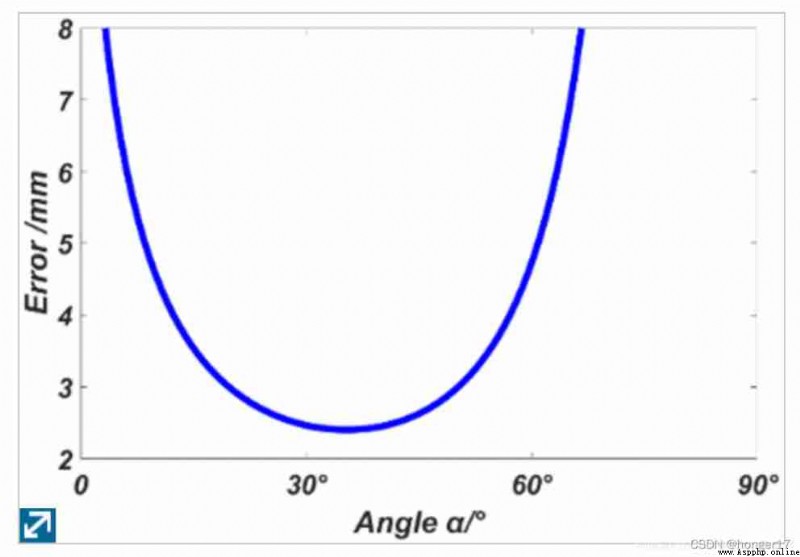
But in practice , Because the measurement is made with a meter ruler , Therefore, the measurement error is 2cm about , Change the angle α The accuracy improvement is covered up by the measurement error .