I learned it for a while python, It still needs some practical links to deeply understand , After all, he is a novice Xiaobai , Just do some simple games to give yourself some encouragement , Ha ha ha , Don't say the , Serve .
main_color.py
# The import module sys and pygame
import sys
import pygame
def run_game():
pygame.init()# Initialize background settings
screen = pygame.display.set_mode((800,600))
pygame.display.set_caption('blue shy')
bg_color = (135,206,235)# Set background color , Azure blue
while True:
for event in pygame.event.get():
if event.type == pygame.QUIT:# Detect that the player clicks the game window close button
sys.exit()# Quit the game
# Redraw the screen every time you cycle
screen.fill(bg_color)
# Make the most recently drawn screen visible
pygame.display.flip()
run_game()
Method pygame.event.get() Is used to detect user events , Determine what the user is doing .
Method screen.fill() Fill the screen with background color .
The code contains the following procedures :
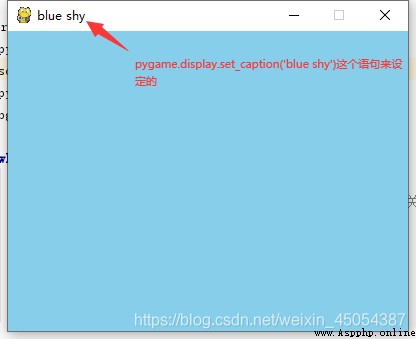
The result is shown in the figure , The size of the window can be set according to your own needs .
If there are many functions to be added later , You can consider creating some classes , Store different functions separately , In this way, it will not appear cluttered when a large number of function changes are required , The code is also more readable . There is no need to implement a large number of functions here , You don't have to create a separate class to hold the code .
import pygame
class Ship():
def __init__(self, screen):
''' Initialize the image and set its initial position '''
self.screen = screen
# notes : Define methods __init__().( Contains two formal parameters :self, screen . Method __init__() Accept the values of these parameters , And store them in the instance properties created from this class )
# Load the image and get the bounding rectangle of the image and screen
self.image = pygame.image.load("C:\python Project documents \ practice 001\images\Bee.bmp")
self.image_rect = self.image.get_rect()
self.screen_rect = screen.get_rect()
# Place the spaceship at the designated position
self.image_rect.centerx = self.screen_rect.centerx
self.image_rect.centery = self.screen_rect.centery
def blitme(self):
''' Draw the image at the specified position '''
self.screen.blit(self.image, self.image_rect)# Define methods blitme(), according to self.image_rect Draw the image to the screen at the specified position
notes : Define methods __init__().( Contains two formal parameters :self, screen . Method __init__() Accept the values of these parameters , And store them in the instance properties created from this class ),__ It's two underscores , At first, I only typed one , I have been looking for a long time .
pygame in , origin (0,0) Located in the upper left corner of the screen .
Above , By means of ship Class code settings , The basic position of the image has been set , The next step is just to main_color.py The function can be realized by updating the code in .
Here is the updated code file : The updated location is followed by #***
import sys
import pygame
from ship import Ship#***
def run_game():
pygame.init()
screen = pygame.display.set_mode((400,300))
pygame.display.set_caption('blue shy')
# Create an image
ship = Ship(screen)#***
bg_color = (135,206,235)# Set background color , Azure blue
while True:
for event in pygame.event.get():
if event.type == pygame.QUIT:# Detect that the player clicks the game window close button
sys.exit()# Quit the game
# Redraw the screen every time you cycle
screen.fill(bg_color)
ship.blitme() #***
# Make the most recently drawn screen visible
pygame.display.flip()
run_game()
From these two small functional implementations , We use a lot of pygame Method in module , Directly call the methods already set in the module to realize the functions , It does provide a lot of convenience , So when you want to write a complicated game by yourself , It is essential to understand the function of each module and each method , Of course , It's written too much , Of course .
Take a look at the renderings :
Center Image , Background color is out of tune , When selecting a picture, the effect will be better if the background is transparent , The image format should be bitmap ( That is, the suffix is .bmp). Of course , The picture can also be moved up, down, left and right , It's not going to be written here , The blog to be updated later will say , In fact, these blogs have no technical level , Just take it as a note and add some of your own understanding , For future reference , By the way, you can deepen your impression .
Solo , Not as happy as others : Writing is fun , Comment is music , It's fun to see , Music is the most important .