remarks : precondition :QtDesigner、pycharm、PyQt5、 Configured cloud functions ( Baidu's call function calculation CFC, Used to act as a crude server , Mainly free )
General train of thought :
When you click the login box , hold username and password The data of the box is packaged into json Send to the... Provided by the cloud function url in ( Cloud functions html Trigger )
Determine the user name and password in the cloud function , When the judgment is correct , Then return to 1, If it is judged as false, it returns 0
Determine the return value locally , The return value is 1 It's in textbrowser Text appears in “ Login successful ”, Otherwise the text appears “ Login failed ”
Problems that need to be dealt with :
Solution : Create a child thread when you click the login box , Run the slot function of the button in the sub thread
Solution : Use a custom signal to emit Return the return value to the main thread
This function is used to simulate server login
# use request Send a json Data package to the cloud function url,json The data will be stored in event In parameters , Here is the user name 、 The code is dead ,# In fact, you can connect to the database , Query in the database
import json
def handler(event, context):
username = json.loads(event.get("body")).get("username")
password = json.loads(event.get("body")).get("password")
if(username == "admin")&(password == "wdnmd"):
ret = 1
else:
ret = 0
return ret
import sys
import time
import json
import requests
from PyQt5.QtCore import QThread, pyqtSignal
from PyQt5.QtWidgets import *
from PyQt5 import uic
class login_thread(QThread):
start_login_signal = pyqtSignal(str) # Used to handle url The returned value is submitted from the child thread to the main thread
def __init__(self,signal):
super().__init__()
self.signal1 = signal
def login_request(self,json_data):
num="0"
json_data1 = json.loads(json_data)
resp = requests.post(url="https://2729mj3a1p6k3.cfc-execute.bj.baidubce.com/loginfunc",json=json_data1)
resp.close()
num = resp.text
self.signal1.emit(num) # Activate custom model , The ginseng , The parameter is the login return value
def run(self): # Inherit QThread, rewrite run function , Write an infinite loop to prevent the thread from dying
while(1):
time.sleep(1)
class my_window(QWidget):
login_status=pyqtSignal(str)
def __init__(self):
super().__init__()
self.init()
def init(self):
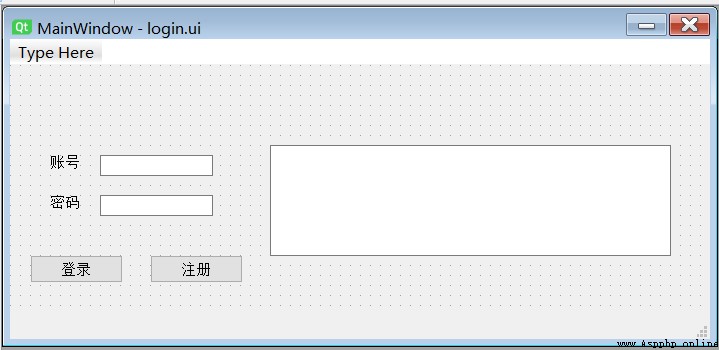
self.ui = uic.loadUi("login.ui")# Load the written interface
# Put each ui The buttons in the file are bound
self.account_edit = self.ui.lineEdit
self.password_edit = self.ui.lineEdit_2
self.login_button = self.ui.pushButton
self.register_button = self.ui.pushButton_2
self.textb = self.ui.textBrowser
self.login_button.clicked.connect(self.login)
self.login_status.connect(self.status) # Bind slot function
self.thread = login_thread(self.login_status)
self.thread.start_login_signal.connect(self.thread.login_request) # Bind slot function
self.thread.start()
def login(self):
username = self.account_edit.text()
password = self.password_edit.text()
self.thread.start_login_signal.emit(json.dumps({"username":username,"password":password}))
def status(self,status): # Judge the login status by the return value , Set up textbrowser Words in
if status=='1':
self.textb.setText(" Login successful ")
self.textb.repaint() # Redraw the text every time you update it , Otherwise, it will not show
else:
self.textb.setText(" Login failed ")
self.textb.repaint()
app = QApplication(sys.argv)
w = my_window()
w.ui.show()
app.exec()