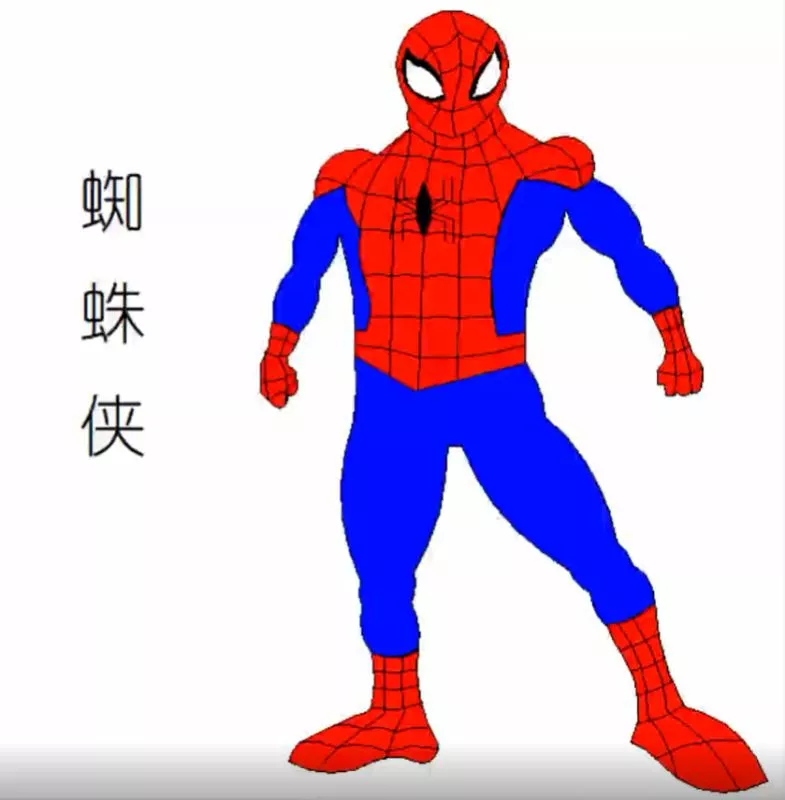
一、效果展示
二、代碼詳解
1.導入庫
2.播放音樂
3.定義畫蜘蛛俠上半身的函數
4.定義畫左手和右手的函數
5.定義畫蜘蛛的函數
6.調用函數繪制圖形
蜘蛛俠(Spider-Man)即彼得·帕克(Peter Parker),是美國漫威漫畫旗下超級英雄。
由編劇斯坦·李和畫家史蒂夫·迪特科聯合創造,初次登場於《驚奇幻想》(Amazing Fantasy)第15期(1962年8月).
因為廣受歡迎,幾個月後,便開始擁有以自己為主角的單行本漫畫。
網易雲中關於蜘蛛俠主題曲熱評過萬的評論說到。
蜘蛛俠之所以成為最受歡迎的超級英雄之一,是因為這面具下的人,不分膚色、種族、性別。。。
他/她可能是你,是我,是和你一起生活的人。
任何人都能帶上這個面具,你也可以做到,如果你以前沒有想過,希望現在可以了~
本文主要介紹運用python中的turtle庫控制函數繪制蜘蛛俠。
一、效果展示在介紹代碼之前,先來看下本文的實現效果。
可以參考下面步驟把Python文件轉化成exe,發給未安裝Python的他/她。
Pinstaller(Python打包為exe文件)
之前自己把 Python 文件打包成 exe 的時候,折騰了很久,本文將詳細地講述如何快速生成在不安裝 Python 的電腦上也能執行的文件
1. 在 prompt 中運行 pip install pyinstaller , 安裝 pyinstaller 庫
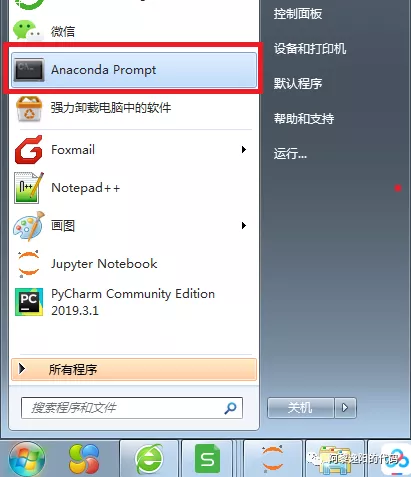
2. 在 prompt 中運行 where pyinstaller

3. 找到待打包文件存放的路徑
把要打包的文件放到找到的路徑
C:\Users\Administrator\Anaconda3\Scripts 中 (我的路徑是這個,你就按照第二步的路徑)
4. 調用 cmd 窗口
把待打包文件放在
C:\Users\Administrator\Anaconda3 \Scripts 目錄下,在該文件夾中按shift+鼠標右鍵 , 點擊 在此處打開命令窗口 調用 cmd
5. 在 cmd 中輸入 pyinstaller -F 文件名
例子:打包 Python 繪制皮卡丘的視頻,在cmd中輸入 pyinstaller -F pkq_1.py
即可生成普通圖標的exe可執行文件。
6. 生成 exe 文件
可以在路徑
C:\Users\Administrator\Anaconda3\Scripts 下的 dist 文件夾中找到打包好的exe文件(即不用安裝 Python 也可以運行的文件)。
這樣生成的文件圖標是標准固定格式,如果想生成特定特定形狀的圖標需要用第7點中的語句。
7. 生成自定義形狀的圖標,在cmd中輸入:pyinstaller -i ico路徑 -F xxxxx.py
例子: 打包 Python 繪制皮卡丘視頻的py文件,在cmd中輸入 (注: 我把ico圖標和待打包文件放到一個文件夾下了, 所以直接輸入了ico的名字)
pyinstaller -i pikaqiu2.ico -F pkq_1.py生成圖標是皮卡丘形狀的exe文件。
二、代碼詳解Python繪制蜘蛛俠的原理是:應用turtle庫繪制身體的不同部位。
1.導入庫首先導入本文需要加載的庫,如果你有些庫還沒有安裝,導致運行代碼時報錯,可以在Anaconda Prompt中用pip方法安裝。
# -*- coding: UTF-8 -*-'''代碼用途 :畫蜘蛛俠作者 :阿黎逸陽博客 : https://blog.csdn.net/qq_32532663/article/details/106176609'''import osimport pygameimport turtle as t 本文應用到的庫較少,只應用了os、pygame和turtle三個庫。
os庫可以設置文件讀取的位置。
pygame庫是為了繪制過程更有趣,在繪圖過程中添加了背景音樂。
turtle庫是繪圖庫,相當於給你一支畫筆,你可以在畫布上用數學邏輯控制的代碼完成繪圖。
2.播放音樂接著應用pygame庫播放背景音樂,本文的音樂是《Sunflower》。
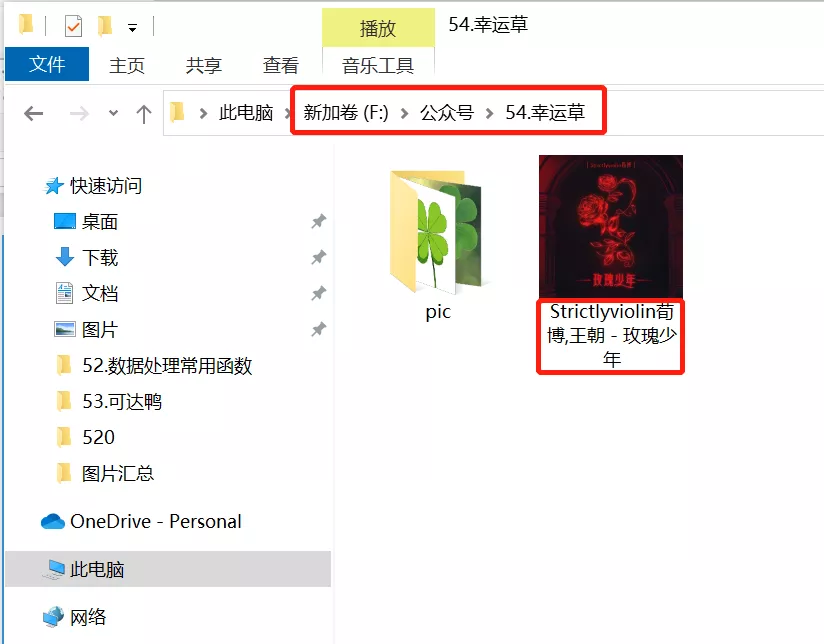
os.chdir(r'F:\公眾號\56.蜘蛛俠')#播放音樂print('播放音樂')pygame.mixer.init()pygame.mixer.music.load("Cope - Sunflower (Original Version).mp3") pygame.mixer.music.set_volume(0.5) pygame.mixer.music.play(1, 10)這一部分的代碼和整體代碼是剝離的,可以選澤在最開始放上該代碼,也可以直接刪除。
如果選擇播放音樂,需要在代碼music.load函數中把你想放音樂的電腦本地存放地址填進去。
有部分朋友對這一塊有疑問,填充格式可參考如下圖片:
然後設置畫板的大小,並定義繪制蜘蛛俠上半身的函數。
t.title('阿黎逸陽的代碼公眾號')t.speed(10)#t.screensize(1000, 800)t.setup(startx=0, starty = 0, width=800, height = 600)def up_body(): #畫頭 t.penup() t.goto(60, 200) t.pendown() t.pensize(1) t.color('black', 'red') t.begin_fill() t.setheading(60) t.circle(60, 30) t.left(4) t.circle(40, 173) t.left(4) t.circle(60, 30) #畫脖子 t.setheading(260) t.circle(30, 29) #畫肩膀 t.setheading(220) t.forward(30) #畫手上肌肉 t.setheading(150) t.circle(30, 130) #畫胸部的內部線 t.setheading(30) t.circle(-100, 13) t.setheading(270) t.circle(50, 40) t.setheading(255) t.circle(55, 40) t.circle(-40, 50) #畫腰部的外橫線 t.setheading(0) t.forward(-7) t.setheading(270) t.forward(18) #畫腰線 t.setheading(-30) t.forward(50) t.setheading(15) t.forward(80) t.setheading(90) t.forward(22) #重復的地方 #畫衣服內輪廓 t.setheading(190) t.forward(20) t.setheading(103) t.circle(-160, 41) #畫手內輪廓 t.setheading(5) t.circle(-80, 30) t.setheading(20) t.circle(30, 30) #重復的地方 #手臂上肌肉 t.setheading(70) t.circle(22, 150) t.setheading(150) t.forward(30) t.setheading(120) t.forward(15) t.end_fill()關鍵代碼詳解:
t.pensize(width):設置畫筆的尺寸。
t.color(color):設置畫筆的顏色。
t.penup():抬起畫筆,一般用於另起一個地方繪圖使用。
t.goto(x,y):畫筆去到某個位置,參數為(x,y),對應去到的橫坐標和縱坐標。
t.pendown():放下畫筆,一般和penup組合使用。
t.left(degree):畫筆向左轉多少度,括號裡表示度數。
t.right(degree):畫筆向右轉多少度,括號裡表示度數。
t.circle(radius,extent,steps):radius指半徑,若為正,半徑在小烏龜左側radius遠的地方,若為負,半徑在小烏龜右側radius遠的地方;extent指弧度;steps指階數。
畫外輪廓的關鍵是:通過調節circle函數中的半徑和弧度來調節曲線的弧度,從而使得蜘蛛俠的輪廓比較流暢。
4.定義畫左手和右手的函數接著定義畫左手和右手的函數。
def left_hand(): #畫左手臂 #畫胸部的內部線 t.penup() t.goto(-69, 134) t.color('black', 'blue') t.pendown() t.begin_fill() t.setheading(30) t.circle(-100, 13) t.setheading(270) t.circle(50, 40) t.setheading(255) t.circle(55, 40) t.circle(-40, 50) #畫腰部的外橫線 t.setheading(0) t.forward(-8) t.setheading(90) t.circle(220, 18) t.setheading(-90) t.circle(-40, 50) t.setheading(-85) t.circle(-50, 50) t.setheading(135) t.circle(30, 40) t.setheading(95) t.circle(-50, 50) t.setheading(98) t.circle(-60, 51) t.end_fill()def right_hand(): #畫右手臂 #畫衣服內輪廓 t.penup() t.goto(80, 39) t.color('black', 'blue') t.pendown() t.begin_fill() t.setheading(190) t.forward(20) t.setheading(103) t.circle(-160, 41) #畫手內輪廓 t.setheading(5) t.circle(-80, 30) t.setheading(20) t.circle(30, 30) t.setheading(-20) t.circle(-55, 65) t.setheading(-30) t.circle(-50, 60) t.setheading(180) t.circle(30, 40) t.setheading(154) t.circle(-48, 60) t.setheading(164) t.circle(-50, 60) t.setheading(-90) t.circle(-40, 60) t.left(40) t.circle(150, 23) t.end_fill()def left_wrist(): #畫左手腕 t.penup() t.goto(-81, 37) t.color('black', 'red') t.pendown() t.begin_fill() t.setheading(135) t.circle(30, 40) t.setheading(-90) t.circle(-60, 30) t.setheading(-90) t.forward(20) t.setheading(-45) t.forward(12) t.circle(6, 180) t.setheading(-50) t.circle(5, 160) t.setheading(95) t.forward(10) t.setheading(135) t.forward(8) t.setheading(95) t.forward(6) t.setheading(35) t.circle(30, 10) t.left(10) t.circle(30, 27) t.end_fill() #畫手腕上的線 #橫線 #第一條橫線 t.penup() t.goto(-84, 30) t.color('black') t.pendown() t.setheading(145) t.circle(30, 36) #第二條橫線 t.penup() t.goto(-90, 22) t.color('black') t.pendown() t.setheading(185) t.circle(-30, 31) #第三條橫線 t.penup() t.goto(-83, 10) t.color('black') t.pendown() t.setheading(210) t.circle(-50, 31) #第四條橫線 t.penup() t.goto(-102, -10) t.color('black') t.pendown() t.setheading(50) t.circle(-20, 41) t.setheading(55) t.circle(-90, 8) #第一條豎線 t.penup() t.goto(-105, 24) t.color('black') t.pendown() t.setheading(-95) t.circle(100, 20) #第二條豎線 t.penup() t.goto(-87, 42) t.color('black') t.pendown() t.setheading(-110) t.forward(22) t.setheading(-63) t.circle(-50, 40)def right_wrist(): #畫右手腕 t.penup() t.goto(189, 57) t.color('black', 'red') t.pendown() t.begin_fill() t.setheading(180) t.circle(30, 40) t.setheading(-55) t.circle(-100, 10) t.circle(-20, 70) t.setheading(-90) t.forward(10) t.setheading(-0) t.forward(5) t.setheading(-85) t.forward(8) t.setheading(-20) t.circle(8, 60) t.setheading(-35) t.circle(8, 70) t.setheading(-15) t.circle(6, 70) t.setheading(60) t.circle(20, 80) t.setheading(115) t.circle(-100, 20) t.end_fill() #畫第一條橫線 t.goto(191, 45) t.color('black') t.pendown() t.setheading(215) t.circle(-30, 34) #畫第二條橫線 t.penup() t.goto(197, 29) t.color('black') t.pendown() t.setheading(215) t.circle(-30, 37) #畫第三條橫線 t.penup() t.goto(174, 11) t.color('black') t.pendown() t.setheading(-0) t.circle(-30, 27) t.setheading(20) t.circle(-20, 27) t.setheading(40) t.circle(-30, 23) #畫第一條豎線 t.penup() t.goto(178, 55) t.color('black') t.pendown() t.setheading(-70) t.circle(-200, 9) t.setheading(-82) t.circle(-100, 18) #畫第二條豎線 t.penup() t.goto(185, 55) t.color('black') t.pendown() t.setheading(-70) t.circle(-200, 8) t.setheading(-68) t.circle(-80, 25)5.定義畫蜘蛛的函數接著定義畫蜘蛛的函數。
def spider(): #畫蜘蛛 t.penup() t.goto(8, 146) t.color('black') t.pendown() t.begin_fill() t.setheading(-120) t.circle(40, 60) t.setheading(60) t.circle(40,60) t.end_fill() #畫蜘蛛的腳 #右邊的腳1 t.penup() t.goto(13, 129) t.color('black') t.pendown() t.setheading(30) t.forward(10) t.setheading(90) t.forward(15) #右邊的腳2 t.penup() t.goto(14, 125) t.color('black') t.pendown() t.setheading(30) t.forward(16) t.setheading(90) t.forward(17) #右邊的腳3 t.penup() t.goto(14, 124) t.color('black') t.pendown() t.setheading(-20) t.forward(16) t.setheading(-90) t.forward(17) #右邊的腳4 t.penup() t.goto(14, 120) t.color('black') t.pendown() t.setheading(-20) t.forward(10) t.setheading(-90) t.forward(15) #畫蜘蛛的腳 #左邊的腳1 t.penup() t.goto(3, 129) t.color('black') t.pendown() t.setheading(150) t.forward(10) t.setheading(90) t.forward(15) #右邊的腳2 t.penup() t.goto(2, 125) t.color('black') t.pendown() t.setheading(150) t.forward(16) t.setheading(90) t.forward(17) #右邊的腳3 t.penup() t.goto(2, 124) t.color('black') t.pendown() t.setheading(-170) t.forward(16) t.setheading(-99) t.forward(17) #右邊的腳4 t.penup() t.goto(3, 120) t.color('black') t.pendown() t.setheading(-170) t.forward(10) t.setheading(-90) t.forward(15)6.調用函數繪制圖形最後調用函數繪制圖形。
print('繪制上半身外輪廓')up_body()print('繪制右手')right_hand()print('繪制左手')left_hand()print('繪制左拳頭')left_wrist()print('繪制右拳頭')right_wrist()print('繪制蜘蛛')spider()至此,在Python中實現蜘蛛俠的繪制邏輯已大致講解完畢。
以上就是Python+Turtle繪制蜘蛛俠的示例代碼的詳細內容,更多關於Python Turtle繪制蜘蛛俠的資料請關注軟件開發網其它相關文章!
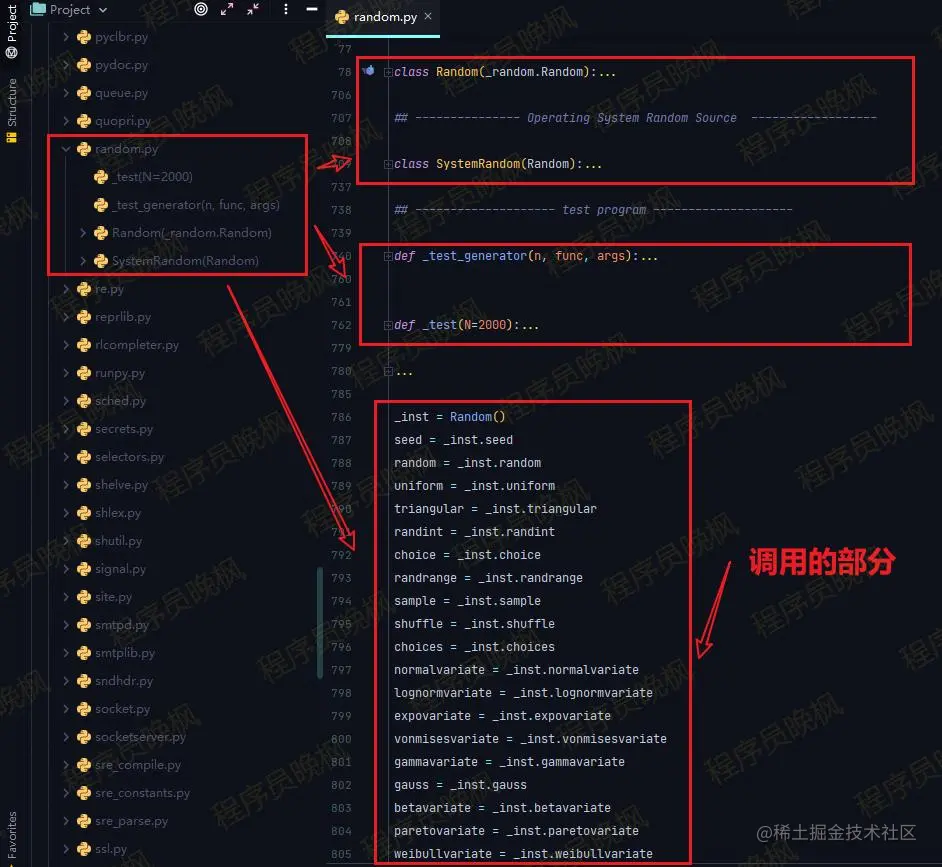 How to generate 100million mobile phone numbers? Python has 22 methods to generate random numbers, and the random function is too strong~
code{font-size:12px;padding:15
 Opencv and python realize multi-target tracking (I) - paddedetection target detection
Pre mainstream Tracking By Det