本文介紹在IBM i 操作系統上如何快速安裝WebSphere Application Server不同版本。 由於WebSphere Application Server產品不斷快速更新,與之相應的安裝方法也有所不同。本文介紹了在i 7.1上安裝 WebSphere Application Server V8.5/8.0/7版本的不同方法。

通過IBM Web Administration for i 安裝WebSphere Application Server
通過IBM Web Administration for i 安裝WebSphere Application Server V8.5和WebSphere Application Server V8的過程相似,以下步驟以WebSphere Application Server V8.5安裝為例,與安裝WebSphere Application Server V8不同之處也會以符號提示。
在IBM i系統上也可以通過IM(Installation Manager)來安裝WebSphere Applicatoin Server V8.5/8產品 。對於WebSphere Application Server V8.5, 需要使用IM1.5.2或者更高的版本。對於WebSphere Application Server V8,需要使用IM1.4.4或者更高的版本。
環境准備:
1. 確保i上已安裝許可程序和相應的補丁:
許可程序:
IBM J2SE 6.0 32-bit JVM (5761-JV1 option 11)
IBM i Qshell (5770-SS1 option 30)
IBM i Extended Base Directory Support ( 5770-SS1 option 3)
IBM i Portable Application Solutions Environment (5770-SS1 option 33)
IBM i Host Servers (5770-SS1 option 12)
IBM i Digital Certificate Manager (5770-SS1 option 34)
補丁:
PTF Group SF99710 Level 11116 or higher (Cum)
PTF Group SF99701 Level 12 or higher (DB2)
PTF Group SF99572 Level 7 or higher (Java)
PTF Group SF99368 Level 12 or higher (HTTP)
2. 准備IM1.5.2安裝介質和WebSphere Application Server V8.5安裝介質,存至i文件系統中。本步驟使用以下路徑來存放IM1.5.2和WebSphere Application Server V8.5安裝介質。
IM安裝介質 /home/IM152
WebSphere Application Server 8.5安裝介質 /home/WAS85
安裝WebSphere Application Server 8.5,所需要IM的版本是1.4.2或者更高,如果是安裝WebSphere Application Server 8,所需要的IM的版本是1.4.4或更高。
安裝步驟:
1. 啟動IBM Web Administration for i:
STRTCPSVR SERVER(*HTTP) HTTPSVR(*ADMIN)
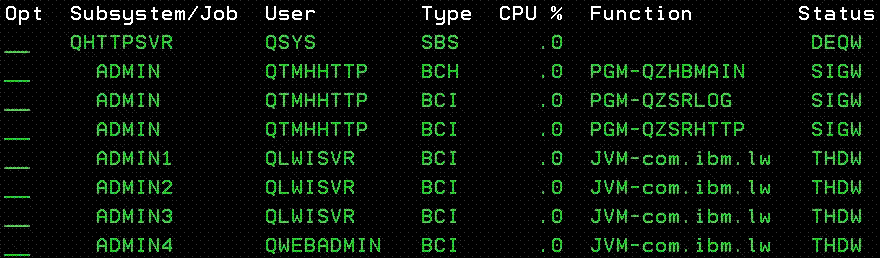
通過命令WRKACTJOB SBS(QHTTPSVR),確保以下的作業都已經啟動。
2. 用戶登陸IBM Web Administration for i:
http://system_name:2001/HTTPAdmin
在綠屏上輸入命令dspusrprf usrprf(用戶名),進入display user profile頁面,通過PgUp/PgDn翻頁,查 看用戶是否具有*ALLOBJ和*IOSYSCFG特殊權限。
備注:用戶名為ibm i系統的有效登陸用戶,可以用來登陸IBM Web Administration for i。
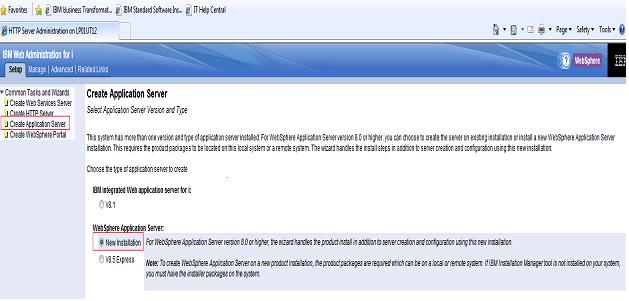
3. 進入IBM Web Administration for i,點擊左邊導航中的創建應用程序 ,然後選中右邊New installation安裝一個新的WebSphere Application Server 8.5,點擊next按鈕。
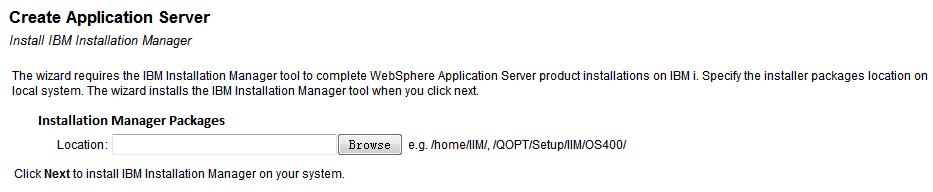
4. IM的安裝或者升級
如果系統沒有安裝IM產品,界面將會提示安裝IM。輸入/home/IM152,點擊next按鈕安裝IM1.5.2。

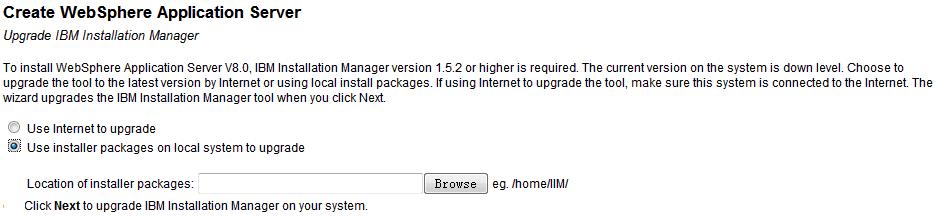
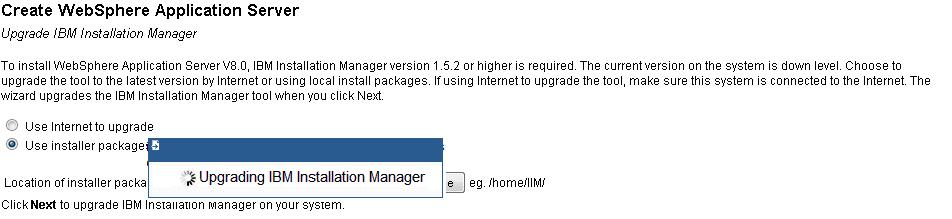
如果系統檢測到IM已經安裝, 但是版本低於1.5.2,需要更新IM的版本來安裝 WebSphere Application Server8.5。
IM升級有兩種方式, 使用網絡升級和本地安裝包升級。本文通過使用本地安裝包升級。
輸入/home/IM152, 點擊next升級IM版本。

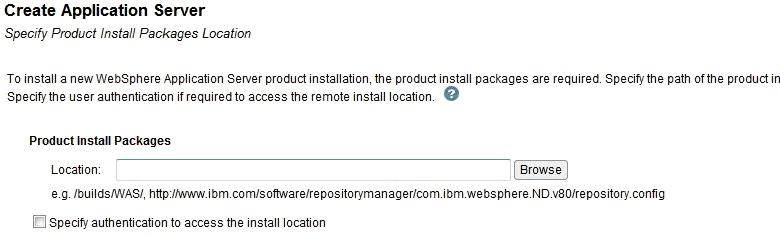
5. 指定WebSphere Application Server 8.5安裝介質 的路徑。
指定WebSphere Application Server 8.5安裝介質有多種方法, 比如http, https, ftp等等。 本文使用 本地安裝路徑方式來安裝。輸入/home/WAS85, 點擊next按鈕。
備注:對於網絡安裝, 用戶可以使用IBM網站提供的live repository進行安裝。
(http://www.ibm.com/software/repositorymanager/com.ibm.websphere.ND.v80/repository.config)
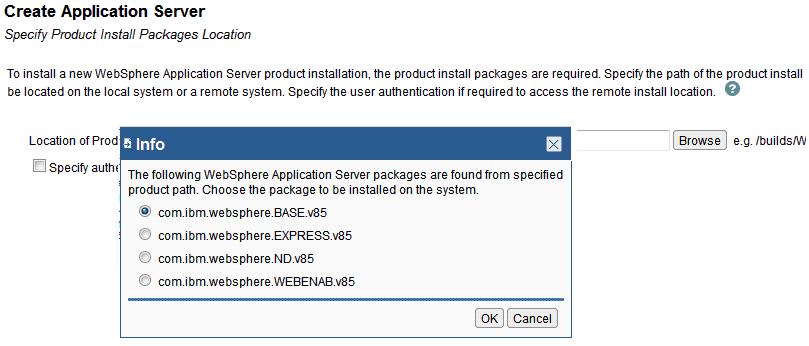
6. WebSphere Application Server 8.5安裝介質中包含了下列產品安裝, 選擇所需 要安裝的版本。本文選擇"com.ibm.websphere.BASE.v85", 點擊確定按鈕。
7. 通過IBM Web Administrator for i安裝WebSphere Application Server8.5時, 默認需要創建一個WebSphere Application Server profile才能完成產品的安裝。接下來描述了創建默認 WebSphere Application Server profile的相關步驟。
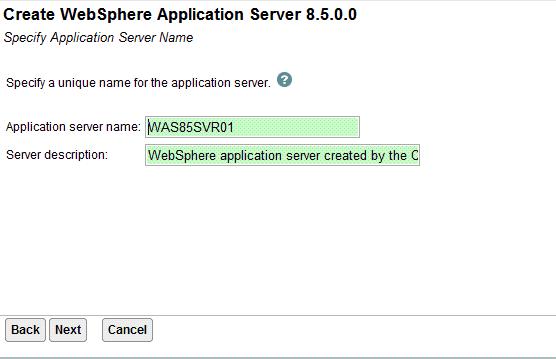
a). Specify Application Server Name
輸入一個WebSphere Application Server profile name, 然後點擊next。如果沒有特殊需求, 使用默認 名字即可。點擊next按鈕。
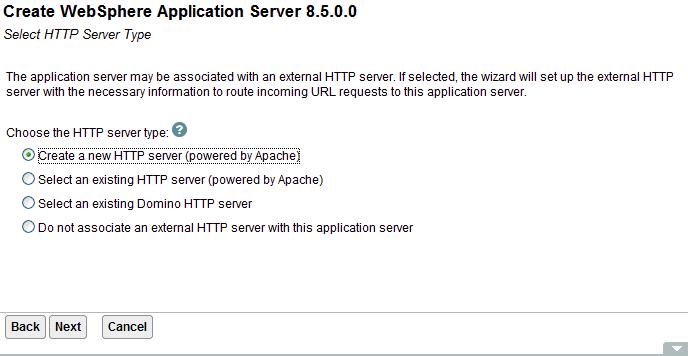
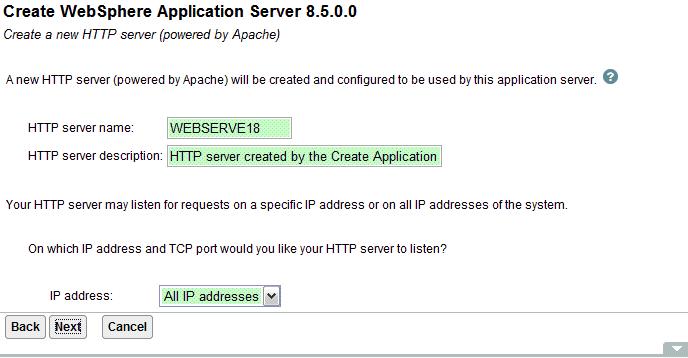
b).Select HTTP Server Type----Create a new HTTP server (powered by Apache)
選擇是否創建HTTP Server與當前WebSphere Application Server profile相關聯。 如果沒有特殊需求, 使用默認選項即可,點擊next按鈕。

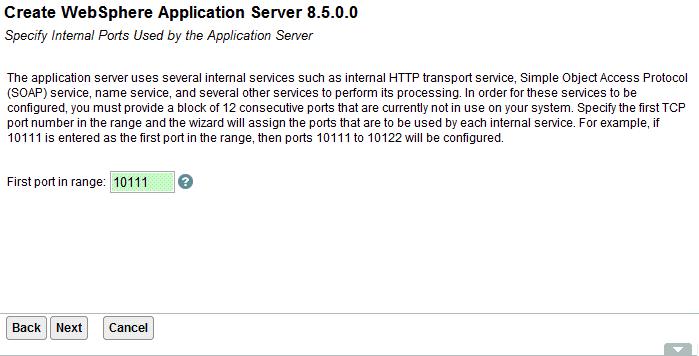
c). Specify Internal Ports Used by the Application Server
輸入WebSphere Application Server內部端口的一個起始端口號。如果沒有特殊需求, 使用默認端口即可 。


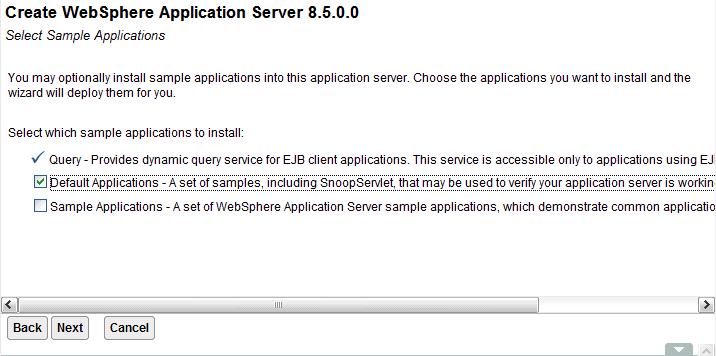
d). Select Sample Applications
選擇是否默認部署例子應用程序如果沒有特殊需求,如果沒有特殊需求,請使用默認設置, 點擊下一步。
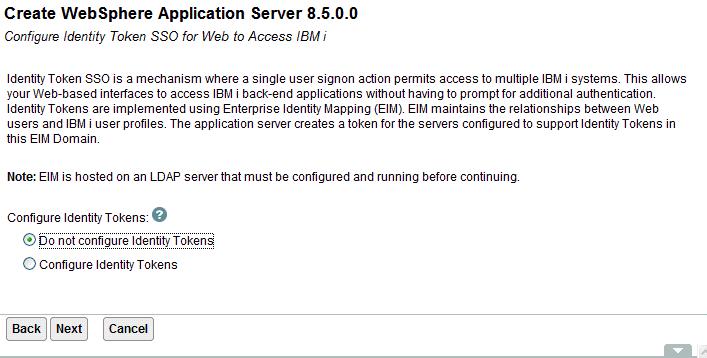
e). Configure Identity Token SSO for Web to Access IBM i
選擇是否配置。如果沒有特殊需求,請使用默認設置,點擊下一步。
如果系統檢測到IM已經安裝, 但是版本低於1.5.2,需要更新IM的版本來安裝 WebSphere Application Server8.5。
IM升級有兩種方式, 使用網絡升級和本地安裝包升級。本文通過使用本地安裝包升級。
輸入/home/IM152, 點擊next升級IM版本。

5. 指定WebSphere Application Server 8.5安裝介質 的路徑。
指定WebSphere Application Server 8.5安裝介質有多種方法, 比如http, https, ftp等等。 本文使用 本地安裝路徑方式來安裝。輸入/home/WAS85, 點擊next按鈕。
備注:對於網絡安裝, 用戶可以使用IBM網站提供的live repository進行安裝。
(http://www.ibm.com/software/repositorymanager/com.ibm.websphere.ND.v80/repository.config)

6. WebSphere Application Server 8.5安裝介質中包含了下列產品安裝, 選擇所需 要安裝的版本。本文選擇"com.ibm.websphere.BASE.v85", 點擊確定按鈕。

7. 通過IBM Web Administrator for i安裝WebSphere Application Server8.5時, 默認需要創建一個WebSphere Application Server profile才能完成產品的安裝。接下來描述了創建默認 WebSphere Application Server profile的相關步驟。
a). Specify Application Server Name
輸入一個WebSphere Application Server profile name, 然後點擊next。如果沒有特殊需求, 使用默認 名字即可。點擊next按鈕。

b).Select HTTP Server Type----Create a new HTTP server (powered by Apache)
選擇是否創建HTTP Server與當前WebSphere Application Server profile相關聯。 如果沒有特殊需求, 使用默認選項即可,點擊next按鈕。

c). Specify Internal Ports Used by the Application Server
輸入WebSphere Application Server內部端口的一個起始端口號。如果沒有特殊需求, 使用默認端口即可 。
d). Select Sample Applications
選擇是否默認部署例子應用程序如果沒有特殊需求,如果沒有特殊需求,請使用默認設置, 點擊下一步。
e). Configure Identity Token SSO for Web to Access IBM i
選擇是否配置。如果沒有特殊需求,請使用默認設置,點擊下一步。


f). Summary
總結頁面。點擊finish按鈕,開始安裝WebSphere Application Server 8.5產品和創建默認的WebSphere Application Server profile。
8. 檢驗安裝是否成功。
驗證產品是否安裝成功,在綠屏中qsh系統中鍵入 installPath/bin/versioninfo命令,查看安裝產品的版本信息。installPath表示安裝的產品路徑。此例 為/QIBM/ProdData/WebSphere/AppServer/V85/BASE/bin/versioninfo, 出現安裝產品的版本信息則說明安裝 成功。
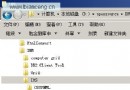
WebSphere Application Server8.5產品的默認安裝路徑 在/qibm/proddata/websphere/appserver/V85/BASE (BASE_1, BASE_2...) (BASE, ND, Express),WebSphere Application Server8的默認安裝路徑在/qibm/proddata/websphere/appserver/V8/ BASE (BASE _1, BASE _2...) (ND, Base, Express)。
通過silent install的方式安裝WebSphere Application Server 7或者老的版本
環境准備:
1. 確保i 7.1上安裝以下SDK的任一種。
32 位 IBM Technology for JDK 6
64 位 IBM Technology for JDK 6
IBM Developer Kit for Java 1.6
以32/64位IBM Technology for JDK 6為例,在綠屏上使用go licpgm命令,選擇10進入 Display installed licensed programs頁面,通過PgUp/PgDn翻頁,查看Java SE 6 32 bit/64bit是否已經安裝成功。

2. 確保登陸IBM i系統的用戶具有*ALLOBJ和*SECADM特權。
在綠屏上輸入命令dspusrprf usrprf(用戶名),進入display user profile頁面,通過PgUp/PgDn翻頁,查看 用戶是否具有*ALLOBJ和*SECADM特權。

備注:用戶名為IBM i系統的有效登陸用戶,可以用來登陸IBM Web Administration for i。
3. 啟動主機服務器作業:strhostsvr server(*all)
安裝步驟:
1. 准備安裝介質
將安裝介質上傳至i系統上,通過命令jar -xvf zipbuild解壓build.zip文件。此例將build上傳 至/was7/路徑下,在此路徑下鍵入jar -xvf 7000nd.zip, 將zip文件解壓。
2. 修改響應文件相應的屬性值。此例使用以下響應文件安裝WebSphere Application Server 7:
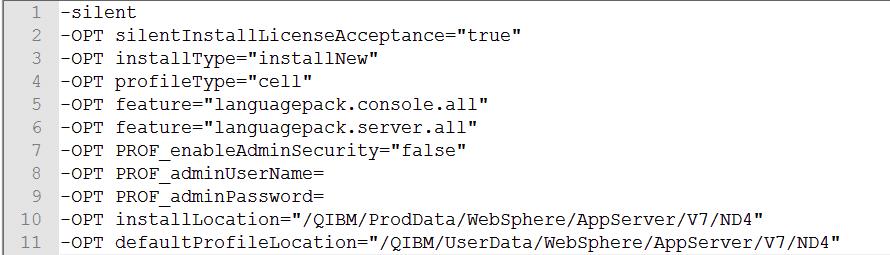
a. 采用silent方式安裝WebSphere Application Server 7,response file中有- silent字樣。
b. -OPT silentInstallLicenseAcceptance 的值設置為 true。值為 true 表示您已經閱讀並且接受許可 協議中的條款。必須進行此更改才能運行安裝。
c. installType用來指定安裝類型,分為installNew, addFeature和upgrade三種,分別對應安裝產品的新 副本、向現有安裝版本添加功能部件以及升級的功能。
d. 通過指定 -OPT profileType="profile_type" 選項來創建概要文件。概要文件類型包括單 元、管理、獨立、定制、secureProxy或者無,若安裝期間不創建概要文件,安裝之後必須創建相應的概要文 件才可以運行產品。
c. 缺省情況下,PROF_enableAdminSecurity 選項設置為 true。如果要在安裝期間啟用管理安全性,必須 指定 PROF_adminUserName 和 PROF_adminPassword 選項的值。否則將 PROF_enableAdminSecurity 選項的值 從 true 更改為 false。
e. 設置產品安裝路徑為/QIBM/ProdData/WebSphere/AppServer/V7/ND4,profile路徑相應設置 為/QIBM/UserData/WebSphere/AppServer/V7/ND4。
備注:
a. 可以對響應文件中的 i5osjdklocation 選項強制使用特定SDK。取消注釋相應的選項以選擇用來配置 產品的 SDK。

若未指定任何SDK,缺省情況下選擇32 位 IBM Technology for JDK 6。若此SDK未 安裝,將選擇64 位 IBM Technology for JDK 6。若以上兩種SDK都未安裝,將選擇 IBM Developer Kit for Java 1.6。若未安裝有效SDK,安裝將失敗。
b. 無論是安裝新的應用程序服務器產品還是僅向現有安裝版本添加功能部件,都必須對要安裝的每個功能 部件指定 -OPT feature="feature_name" 選項。有效值為noFeature、samplesSelected、 languagepack.console.all、languagepack.server.all四種,即使不安裝任何其他功能部件,也必須制定 noFeature值,否則安裝將失敗。
3. 執行安裝。
上傳響應文件,執行命令:buildpath/was/install -options path/responsefile
a. 上傳響應文件至ibm i系統指定路徑(/was7/was/)
b. 執行buildpath/was/install -options path/responsefile 命令,進行安裝操作。
buildpath表示安裝介質解壓後的路徑,path/responsefile 表示已編輯的響應文件的路徑,此例命令 為/was7/was/install -options /was7/was/responsefile.nd.txt。
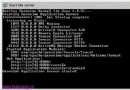
在執行安裝命令後,會顯示一些指示安裝過程進度的消息。當安裝程序完成時,綠屏顯示有INSTCONFSUCCESS 字樣。如下圖所示。

4. 驗證安裝:
執行installPath/bin/versioninfo
在綠屏中qsh系統中鍵入installPath/bin/versioninfo命令,查看安裝產品 的版本信息。installPath表示安裝的產品路徑。此例 為/QIBM/ProdData/WebSphere/AppServer/V7/ND4/bin/versioninfo, 出現安裝產品的版本信息則說明安裝成 功。