應用程序 4. 搜索存儲的數據
先從 ApacheDS 上的一個簡單搜索開始。假設在 ApacheDS 中有許多用戶。而您想要找到用戶 Alice 的所有詳細信息。下面列出了關於 Alice 的所有已知事項:
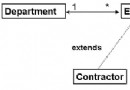
Alice 是一名用戶,所以在用戶的數據組織單元中應當可以查找她的數據條目。(在第 1 部分已經介 紹了組織單元或 “ou” 的概念。)
Alice 的用戶名是 “alice”(不區分大小寫)。
Alice 是一個人,所以她的數據條目使用的對象類必須直接或間接地擴展 person 對象類。
現在請參見清單 6,它顯示了名為 SearchForAlice 的應用程序。SearchForAlice 演示了一個非常簡 單的搜索場景;後面我將擴展這個應用程序,使其適合更高級的搜索場景。
清單 6. SearchForAlice
public class SearchForAlice {

   public SearchForAlice() {

     try

     {

       //------------------------------------------

       //Step1: Setting up JNDI properties for ApacheDS

       //------------------------------------------

       InputStream inputStream = new FileInputStream ( "ApacheDS.properties");

       Properties properties = new Properties();

       properties.load(inputStream);

       properties.setProperty("java.naming.security.credentials",  "secret");


       //------------------------------------------

       // Step2: Fetching a DirContext object

       //------------------------------------------

       DirContext ctx = new InitialDirContext(properties);


       //---------------------------------------------

       //Step3: Setting search context

       //---------------------------------------------

       String searchContext = "ou=users";


       //--------------------------------------------

       //Step4: Creating search attributes for Alice

       //--------------------------------------------

       Attribute uid = new BasicAttribute("uid");

       Attribute objclass = new BasicAttribute("objectClass");


       //adding attribute values

       uid.add("Alice");

       objclass.add("person");


       //Instantiate Attributes object and put search attributes in it.

       Attributes attrs = new BasicAttributes(true);

       attrs.put(uid);

       attrs.put(objclass);


       //------------------------------------------

       //Step5: Executing search

       //------------------------------------------

       NamingEnumeration ne = ctx.search(searchContext, attrs);


       if (ne != null)

       {

         //Step 6: Iterating through SearchResults

         while (ne.hasMore()) {

           //Step 7: Getting individual SearchResult object

           SearchResult sr = (SearchResult) ne.next();


           //Step 8:

           String entryRDN = sr.getName();

           System.out.println("RDN of the Searched entry:  "+entryRDN);


           //Step 9:

           Attributes srAttrs = sr.getAttributes();


           if (srAttrs != null) {

              //Step 10:

              for (Enumeration e = attrs.getAll() ; e.hasMoreElements()  ;)

              {

                Attribute attr = (Attribute) e.nextElement();


                //Step 11:

                String attrID = attr.getID();

                System.out.println("Attribute Name: "+attrID);

                System.out.println("Attribute Value(s):");


                NamingEnumeration e1 = attr.getAll();

                while (e1.hasMore())

                  System.out.println("\t\t"+e1.nextElement());

              }//for()

           }//if (srAttrs)

         }

       }//if (ne != null)


     } catch (Exception e) {

       System.out.println("Operation failed: " + e);

     }

   }


   public static void main(String[] args) {

    SearchForAlice searchAlice = new SearchForAlice();

   }

  }
清單 6 中的搜索應用程序包含 11 個步驟。前兩個步驟您應該可以從 清單 1 中回想起來,即裝入 JNDI 屬性並實例化一個 DirContext 對象。
可以回想一下,在討論 清單 1 的步驟 1 中名為 java.naming.provider.url 的 JNDI 屬性時,我提 到過供應者的 URL 包含兩個組件,其中一個是要操作的目錄上下文。您可能已經注意到 清單 4 中 java.naming.provider.url 的值是 ou=system。ou=system 字符串可在其中進行工作的目錄上下文。所 以,所有搜索操作實際上都是在這個目錄上下文中執行的。
因為要在這個示例中執行搜索操作,所以可以把 ou=system 目錄上下文叫做搜索上下文。現在來看一 下搜索應用程序的剩余步驟:
步驟 3. 縮小搜索上下文:已知 Alice 是一個用戶,所以不必在整個 ou=system 搜索上下文中搜索 Alice,只需在用戶的組織單元(即 ou=users)中搜索即可。
步驟 4. 創建搜索屬性:將關 於 Alice 的已知信息作為搜索屬性。因為知道 Alice 的 uid 和對象類,所以可以創建一個只有兩個屬 性的集合:uid 和 objectClass。可以在 清單 6 的步驟 4 看到這些。(從 第 1 部分 的討論您應該可 以想起 uid 是 RDN 的組件,而不是屬性。但在指定搜索參數時,JNDI 要求指定 uid 值,就像它是屬性 一樣。)
步驟 5. 執行搜索:在這裡調用 清單 6 的步驟 2 得到的 DirContext 對象的 search() 方法。 search() 方法采用了兩個參數:第一個參數是在練習的第 3 步創建的搜索上下文,第二個參數是第 4 步的兩個屬性的集合。search() 方法返回 NamingEnumeration 對象,其中包含搜索結果。
步驟 1 到 5 設置搜索操作。其余的步驟處理 NamingEnumeration 對象並提取搜索結果。
步驟 6. 提取搜索結果:清單 6 的步驟 6 中的 NamingEnumeration 對象包含搜索結果集合。集合中 的每個搜索結果都由一個 SearchResult 對象表示。要提取單個的搜索結果,只需在 NamingEnumeration 對象上進行迭代即可。
步驟 7. 處理單個搜索結果:注意,每個搜索結果都包含關於單一數據條目的信息。可以從 SearchResult 對象得到數據條目的兩部分信息(即 RDN 和它的所有屬性)。
步驟 8. 調用 getName():SearchResult 對象的 getName() 方法返回所搜索條目的 RDN。Alice 的 RDN 是 uid=alice。
步驟 9. 調用 getAttributes():SearchResult 對象的 getAttributes() 方法返回 Attributes 對 象,它包含與所搜索條目相關的所有屬性值。Attributes 對象表示的屬性集合與 清單 6 的步驟 4 中創 建的屬性集合類似。
步驟 10. 調用 getAll():Attributes 對象的 getAll() 方法返回一個枚舉,其中包含集合中的所有 屬性。
步驟 11. 處理屬性:最後,從集合中取出一個屬性,並調用其 getID() 和 getAll() 方法。getID() 方法以字符串形式返回屬性的名稱。getAll() 方法以枚舉的形式返回所有屬性值。
應用程序 5. 按名稱搜索
在前面的搜索示例中,我們已查看了如何在知道用戶 uid 時搜索用戶。在這個示例中,將學習如何修 改應用程序,用 Alice 的用戶名而不是 uid 來搜索她。
回憶一下 第 1 部分的圖 18,在該圖中,用戶名存儲為用戶數據條目的 cn 屬性的值。所以,在這個 應用程序中,您將搜索 cn 屬性,如清單 7 所示:
清單 7. SearchForAliceByCN
public class SearchForAliceByCN {

   public SearchForAliceByCN() {

     try

     {

       //------------------------------------------

       //Step1: Setting up JNDI properties for ApacheDS

       //------------------------------------------

       InputStream inputStream = new FileInputStream ( "ApacheDS.properties");

       Properties properties = new Properties();

       properties.load(inputStream);

       properties.setProperty("java.naming.security.credentials",  "secret");


       //------------------------------------------

       // Step2: Fetching a DirContext object

       //------------------------------------------

       DirContext ctx = new InitialDirContext(properties);


       //---------------------------------------------

       //Step3: Setting search context

       //---------------------------------------------

       String searchContext = "ou=users";


       //--------------------------------------------

       //Step4: Creating search attributes for Alice

       //--------------------------------------------

       Attribute cn = new BasicAttribute("cn");

       Attribute objclass = new BasicAttribute("objectClass");


       //putting attribute values

       cn.add("Alice");

       objclass.add("person");


       //Instantiate an Attributes object and put search attributes in  it

       Attributes attrs = new BasicAttributes(true);

       attrs.put(cn);

       attrs.put(objclass);


       //------------------------------------------

       //Step5: Executing search

       //------------------------------------------

       NamingEnumeration ne = ctx.search(searchContext, attrs);


       if (ne != null)

       {

         //Step 6: Iterating through SearchResults

         while (ne.hasMore()) {

           //Step 7: Getting individual SearchResult object

           SearchResult sr = (SearchResult) ne.next();


           //Step 8:

           String entryRDN = sr.getName();


           //Step 9:

           Attributes srAttrs = sr.getAttributes();


           if (srAttrs != null) {

              //Step 10:

              for (Enumeration e = attrs.getAll() ; e.hasMoreElements()  ;)

              {

                Attribute attr = (Attribute) e.nextElement();


                //Step 11:

                String attrID = attr.getID();

                System.out.println("Attribute Name: "+attrID);

                System.out.println("Attribute Value(s):");


                NamingEnumeration e1 = attr.getAll();

                 while (e1.hasMore())

                   System.out.println("\t\t"+e1.nextElement());

              }//for()

           }//if (srAttrs)

         }

       }//if (ne != null)


     } catch (Exception e) {

       System.out.println("Operation failed: " + e);

     }

   }


   public static void main(String[] args) {

     SearchForAliceByCN searchAlice = new SearchForAliceByCN();

   }

  }
SearchForAliceByCN 應用程序顯示了用 Alice 的用戶名搜索她的步驟。應用程序與前面的 SearchForAlice 應用程序非常相似,只有一個區別。在 清單 6 的步驟 4 中,我們為便於搜索創建了一 個由 uid 和 objectClass 屬性組成的集合。而在這個 應用程序的步驟 4 中,創建的是 cn 和 objectClass 屬性的集合。
關於匹配規則
搜索 cn 有一個要點需要注意。在 第 1 部分的圖 13 可以看到,cn 屬性類型有一個叫做 SUBSTR 的 字段,它定義了子字符串匹配的匹配規則。
在 cn 屬性的示例中,SUBSTR 字段的值是 caseIgnoreMatch,所以在搜索 cn 屬性的特定值時,即使 搜索的名稱只與 cn 屬性值的子字符串匹配,也認為匹配成功。而且,子字符串匹配是不區分大小寫的。
所以,如果搜索 “alice”,那麼所有名字、中間名或姓為 “Alice” 的用戶都會包含在搜索結果中 。
應用程序 6. 反序列化 Java 對象
前面已經看到了如何在 ApacheDS 中存儲 Java 對象並搜索與存儲的對象有關的屬性。現在將學習如 何搜索和反序列化 Java 對象。反序列化是序列化的反向操作,在這裡將根據 Java 對象的序列化形式創 建一個 Java 對象。
清單 8 所示的應用程序搜索並反序列化 Alice 的 MessagingPreferences 對象。請回想一下 清單 1 中存儲在 ApacheDS 中的 MessagingPreferences 對象。
FetchAliceMessagingPreferences 應用程序是 清單 7 中看到的 SearchForAliceByCN 應用程序的增 強版。實際上,清單 8 與 清單 7 在步驟 8 之前都相同,在步驟 8 中,將提取 Alice 數據條目的 RDN 。從清單 8 中的步驟 8 中,將開始查找 Alice 的 Preferences 對象:
清單 8. FetchAliceMessagingPreferences
public class FetchAliceMessagingPreferences {

   public FetchAliceMessagingPreferences() {

     try

     {


       //------------------------------------------

       //Step1: Setting up JNDI properties for ApacheDS

       //------------------------------------------

       InputStream inputStream = new FileInputStream ( "ApacheDS.properties");

       Properties properties = new Properties();

       properties.load(inputStream);

       properties.setProperty("java.naming.security.credentials",  "secret");


       //------------------------------------------

       // Step2: Fetching a DirContext object

       //------------------------------------------

       DirContext ctx = new InitialDirContext(properties);


       //---------------------------------------------

       //Step3: Setting search context

       //---------------------------------------------

       String searchContext = "ou=users";


       //--------------------------------------------

       //Step4: Creating search attributes for Alice

       //--------------------------------------------

       Attribute cn = new BasicAttribute("cn");

       Attribute objclass = new BasicAttribute("objectClass");


       //putting attribute values

       cn.add("Alice");

       objclass.add("person");


       //Instantiate an Attributes object and put search attributes in  it

       Attributes attrs = new BasicAttributes(true);

       attrs.put(cn);

       attrs.put(objclass);


       //------------------------------------------

       //Step5: Executing search

       //------------------------------------------

       NamingEnumeration ne = ctx.search(searchContext, attrs);


       if (ne != null)

       {

         //Step 6: Iterating through SearchResults

         while (ne.hasMore()) {

           //Step 7: Getting individual SearchResult object

           SearchResult sr = (SearchResult) ne.next();


           //Step 8:

           String entryRDN = sr.getName();


           //---------------------------------------------

           //Step9: Setting a new search context

           //---------------------------------------------

           searchContext = entryRDN + "," + searchContext;


           //---------------------------------------------

           //Step10: Creating search controls

           //---------------------------------------------

           SearchControls ctls = new SearchControls();

           ctls.setReturningObjFlag(true);

           ctls.setSearchScope(SearchControls.SUBTREE_SCOPE);


           //---------------------------------------------

           //Step11: Creating filter

           //---------------------------------------------

           String filter = "(|(javaClassName=MessagingPreferences)

                     (javaClassName=ShippingPreferences))";


           //------------------------------------------

           //Step12: Executing search

           //------------------------------------------

           NamingEnumeration ne1 = ctx.search(searchContext, filter,  ctls);


           if (ne != null)

           {

             //Step13: Iterating through SearchResults

             while (ne1.hasMore()) {

               //Step14: Getting individual SearchResult object

               SearchResult sr1 = (SearchResult) ne1.next();


               //Step15: Getting preferences object

               Object obj = sr1.getObject();


               if (obj != null) {

                 if (obj instanceof MessagingPreferences){

                   MessagingPreferences pref =

                    (MessagingPreferences) obj;

                 }

                 else if (obj instanceof ShippingPreferences) {

                  ShippingPreferences pref = (ShippingPreferences)  obj;

                 }

               }

             }//while(

           }//if

         }//while

       }//if (ne != null)

     } catch (Exception e) {

       System.out.println("Operation failed: " + e);

     }

   }


   public static void main(String[] args) {

     FetchAliceMessagingPreferences searchAlicePreferences =

        new FetchAliceMessagingPreferences();

   }

  }
搜索已訪問過的上下文
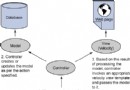
在進入搜索和反序列化 Alice 的 MessagingPreferences 對象的步驟之前,您可能想回顧一下 圖 1 ,該圖顯示了位於 Alice 數據條目中的 Alice 的 MessagingPreferences 對象。所以,需要在 Alice 的數據條目中查找 MessagingPreferences 對象。
如何在數據條目 “內部進行查找” 呢?針對這一目的,我們將明確使用搜索上下文 的概念。在這個 示例中,需要縮小在第一個應用程序(清單 6 所示的 SearchForAlice)中介紹的搜索上下文。
這項工作在 清單 8 的步驟 9 進行,在這一步驟中將把 Alice 的 RDN(uid=alice)與原來用於搜索 Alice 數據條目的上下文(ou=users,ou=system)合並在一起。生成的上下文 (uid=alice,ou=users,ou=system)就可以用來查看 Alice 數據條目內部。
現在來看一下 FetchAliceMessagingPreferences 應用程序剩下的步驟。
構建和使用搜索控件
在 清單 8 的步驟 10 中,實例化了一個 SearchControls 對象,可以用它構建一些搜索控件。搜索 控件有兩個主要用途:
指定搜索結果中包含的數據類型。在這個示例中,因為您想要檢索 Java 對象,所以將調用 SearchControls 對象的 setReturningObjFlag() 方法。這個方法在搜索控件中設置標志,以指定將要執 行的獲得某一對象的搜索操作。
指定搜索范圍。“搜索范圍” 意味著您想在特定數據條目中搜索,還是還想在比該條目更低的級別上 進行搜索。通過調用 SearchControls 對象的 setSearchScope() 方法,可以設置搜索范圍。
過濾搜索結果
在 清單 8 的步驟 11 中,制作了名為 “filter” 的字符串。可以看到 filter 字符串的值是 (| (javaClassName=MessagingPreferences) (javaClassName=ShippingPreferences))。括號中的這兩個屬 性-值對為一個名為 javaClassName 的屬性指定了不同的值。還請注意這兩個屬性-值對之前的 “OR”。 這意味著要查詢的是 MessagingPreferences 或 ShippingPreferences 對象。
這個 filter 字符串充當搜索結果的過濾器。這意味著搜索操作之後返回的搜索結果將只包含符合搜 索過濾器指定標准的結果。
在尋找大量屬性值時要使用這類搜索過濾器。
提取和處理搜索結果
在 清單 8 的步驟 12 中,您可以調用 search() 方法,並隨該方法調用一起傳遞搜索上下文、搜索 過濾器和搜索控件。
請注意 清單 6 的步驟 5 和 清單 8 中使用的搜索方法調用之間的區別:在清單 6 中,使用的是帶 兩個參數的 search() 方法,而在 清單 8 中,使用的是該方法的帶三個參數的形式。
清單 8 中的步驟 13 和 14 分別與 清單 7 中的步驟 6 和 7 相同。在這些步驟中,處理 NamingEnumeration 對象,並以 SearchResult 對象的形式提取單個的搜索結果。
最後,在步驟 15,調用 SearchResult 對象的 getObject() 方法。getObject() 方法返回一個 Java 對象。
對於 getObject() 方法返回的實例屬於哪個類,沒法確定,因為在搜索請求中指定了兩個類 (MessagingPreferences 或 ShippingPreferences)。返回的結果可能是其中一個類的實例。所以,首 先必須檢查對象屬於哪個實例,並進行相應的類型轉換。檢查並轉換之後,Java 對象就處於控制之下, 然後就可以調用它的方法了。
應用程序 7. 將 Java 對象解編
在前面的應用程序中,學習了如何反序列化已經序列化的 Java 對象。接下來,將通過應用程序 FetchAliceMarshalledPreferences 學習如何解編一個已編組的 Java 對象。
清單 9. FetchAliceMarshalledPreferences
public class FetchAliceMarshalledPreferences {

   public FetchAliceMarshalledPreferences() {

     try

     {

       //------------------------------------------

       //Step1: Setting up JNDI properties for ApacheDS

       //------------------------------------------

       InputStream inputStream = new FileInputStream ( "ApacheDS.properties");

       Properties properties = new Properties();

       properties.load(inputStream);

       properties.setProperty("java.naming.security.credentials",  "secret");


       //------------------------------------------

       // Step2: Fetching a DirContext object

       //------------------------------------------

       DirContext ctx = new InitialDirContext(properties);


       //---------------------------------------------

       //Step3: Setting search context

       //---------------------------------------------

       String searchContext = "ou=users";


       //--------------------------------------------

       //Step4: Creating search attributes for Alice

       //--------------------------------------------

       Attribute cn = new BasicAttribute("cn");

       Attribute objclass = new BasicAttribute("objectClass");


       //putting attribute values

       cn.add("Alice");

       objclass.add("person");


       //Instantiate an Attributes object and put search attributes in  it

       Attributes attrs = new BasicAttributes(true);

       attrs.put(cn);

       attrs.put(objclass);


       //------------------------------------------

       //Step5: Executing search

       //------------------------------------------

       NamingEnumeration ne = ctx.search(searchContext, attrs);


       if (ne != null)

       {

         //Step 6: Iterating through SearchResults

         while (ne.hasMore()) {

           //Step 7: Getting individual SearchResult object

           SearchResult sr = (SearchResult) ne.next();


           //Step 8:

           String entryRDN = sr.getName();

           System.out.println("RDN of the Searched entry:  "+entryRDN);


           //---------------------------------------------

           //Step9: Setting a new search context

           //---------------------------------------------

           searchContext = entryRDN + "," + searchContext;


           System.out.println("new SearchContext: "+searchContext);


           //---------------------------------------------

           //Step10: Creating search controls

           //---------------------------------------------

           SearchControls ctls = new SearchControls();

           ctls.setReturningObjFlag(true);

           ctls.setSearchScope(SearchControls.SUBTREE_SCOPE);


           //---------------------------------------------

           //Step11: Creating filter

           //---------------------------------------------

           String filter =  "(javaClassName=java.rmi.MarshalledObject)";


           //------------------------------------------

           //Step12: Executing searchl

           //------------------------------------------

           NamingEnumeration ne1 = ctx.search(searchContext, filter,  ctls);


           if (ne != null)

           {

             //Step13: Iterating through SearchResults

             while (ne1.hasMore()) {

               //Step14: Getting individual SearchResult object

               SearchResult sr1 = (SearchResult) ne1.next();


               //Step15: Getting preferences object

               Object obj = sr1.getObject();


               if (obj instanceof MarshalledObject) {

                 MarshalledObject mObj= (MarshalledObject) obj;

                 Object obj1 = mObj.get();


                 if (obj1 instanceof MarshalledObject) {

                   MessagingPreferences pref =

                    (MessagingPreferences) obj;

                 }

                 else if (obj1 instanceof ShippingPreferences) {

                   ShippingPreferences pref =

                    (ShippingPreferences) obj;

                 }

               }//if(obj)


             }//while

           }//if

          }//while

       }//if (ne != null)


     } catch (Exception e) {

       System.out.println("Operation failed: " + e);

     }

   }


   public static void main(String[] args) {

     FetchAliceMarshalledPreferences fetchAlicePref =

       new FetchAliceMarshalledPreferences();

   }

  }
清單 9 包含 15 個步驟,前 14 個步驟完全與 清單 8 中的前 14 個步驟相同。兩個應用程序的惟一 區別是 清單 9 的步驟 15,在這一步驟中,SearchResult.getObject() 返回一個已編組的對象。您自己 可以檢查返回對象的名稱,對這一點進行驗證。在完成檢查之後,要將對象類型轉換為 MarshalledObject。
Java 對象的序列化形式位於這個編組對象的內部,所以現在要調用 MarshalledObject 類的 get() 方法獲得 Java 對象,然後可以在確定對象的類之後進行類型轉換。
應用程序 8. 編輯和更新存儲的對象
在目前為止的示例中,我的重點都放在存儲和搜索 Java 對象上。下一個應用程序將顯示如何編輯和 更新已經存儲在 ApacheDS 中的 Java 對象。
清單 10 中的 UpdateAlicePreferences 應用程序更新的 Java 對象是在 清單 4 中與 person 對象 類混合的對象:
清單 10. UpdateAlicePreferences
public class UpdateAlicePreferences {

   public UpdateAlicePreferences() {

     try

     {

       //------------------------------------------

       //Step1: Setting up JNDI properties for ApacheDS

       //------------------------------------------

       InputStream inputStream = new FileInputStream ( "ApacheDS.properties");

       Properties properties = new Properties();

       properties.load(inputStream);

       properties.setProperty("java.naming.security.credentials",  "secret");


       //------------------------------------------

       // Step2: Fetching a DirContext object

       //------------------------------------------

       DirContext ctx = new InitialDirContext(properties);


       //---------------------------------------------

       //Step3: Setting search context

       //---------------------------------------------

       String searchContext = "ou=users";


       //--------------------------------------------

       //Step4: Creating search attributes for Alice

       //--------------------------------------------

       Attribute cn = new BasicAttribute("cn");

       Attribute objclass = new BasicAttribute("objectClass");


       //putting attribute values

       cn.add("Alice");

       objclass.add("person");


       //Instantiate an Attributes object and put search attributes in  it

       Attributes attrs = new BasicAttributes(true);

       attrs.put(cn);

       attrs.put(objclass);


       //------------------------------------------

       //Step5: Executing search

       //------------------------------------------

       NamingEnumeration ne = ctx.search(searchContext, attrs);


       if (ne != null)

       {

         //Step 6: Iterating through SearchResults

         while (ne.hasMore()) {

           //Step 7: Getting individual SearchResult object

           SearchResult sr = (SearchResult) ne.next();


           //Step 8:

           String entryRDN = sr.getName();


           //---------------------------------------------

           //Step9: Setting a new search context

           //---------------------------------------------

           searchContext = entryRDN + "," + searchContext;


           //---------------------------------------------

           //Step10: Creating search controls

           //---------------------------------------------

           SearchControls ctls = new SearchControls();

           ctls.setReturningObjFlag(true);

           ctls.setSearchScope(SearchControls.SUBTREE_SCOPE);


           //---------------------------------------------

           //Step11: Creating filter

           //---------------------------------------------

           String filter =  "(javaClassName=java.rmi.MarshalledObject)";


           //------------------------------------------

           //Step12: Executing search

           //------------------------------------------

           NamingEnumeration ne1 = ctx.search(searchContext, filter,  ctls);


           if (ne != null)

           {

             //Step13: Iterating through SearchResults

             while (ne1.hasMore()) {


               //Step14: Getting individual SearchResult object

               SearchResult sr1 = (SearchResult) ne1.next();


               //Step15: Getting preferences object

               Object obj = sr1.getObject();

               entryRDN = sr1.getName();


               if (obj != null && obj instanceof  MarshalledObject)

               {

                 MarshalledObject mObj= (MarshalledObject) obj;

                 MessagingPreferences pref =

                  (MessagingPreferences) mObj.get();


                 //Step16: Updating your java object

                 pref.setStyles ("http://www.mystyles.com/preferences");


                 //Step17: Setting a new context for data updation

                 String bindContext = entryRDN + "," +  searchContext;


                 //Step18: Reading attributes in a new collection

                 Attributes attrs1 = sr1.getAttributes();


                 //Step19:Updating data

                 ctx.rebind(bindContext, pref, attrs);

                 System.out.println("Updating

                  the MessagingPreferences succeed");

               }

             }//while

           }//if

         }//while

       }//if (ne != null)


     } catch (Exception e) {

       System.out.println("Operation failed: " + e);

     }

   }


   public static void main(String[] args) {

     UpdateAlicePreferences updateAlicePreferences =

       new UpdateAlicePreferences();

   }

  }
清單 10 的前 15 個步驟與前面的示例類似。在這些步驟中,只是搜索並提取要更新的 Java 對象。 在後面的步驟中,將更新和存儲對象。
更新和存儲 Java 對象
在步驟 16 中,通過調用 Java 對象上的方法,更新 Java 對象中包含的數據。數據更新之後,需要 存儲 Java 對象編輯過的版本。在執行這個操作之前,需要做兩件事:
獲得命名上下文:更新現有條目,這意味著您想把已更新的數據寫入它以前所在的命名上下文中。要 做到這一點,則需要知道已更新條目的命名上下文。將搜索上下文(用來搜索對象的上下文)與對象的 RDN 結合,就可以形成 Java 對象的命名上下文。在 清單 10 的步驟 17 中可以看到這點。
將所有屬性寫入已更新的 Java 對象:在將更新的 Java 對象寫回 ApacheDS 時,是在同一命名上下 文上寫入新的數據條目。所有與數據條目有關的屬性都將丟失。所以,需要將數據條目的所有屬性寫回已 更新的 Java 對象。在清單 10 的步驟 18 中,我的處理是從搜索結果讀取所有屬性,並將它們包裝在屬 性集合中。
最後,在步驟 19 中調用 DirContext.rebind() 方法。rebind() 方法接收的參數就是在 StoreBobPreferences 應用程序的 清單 4 的步驟 4 中傳遞給帶有三個參數的 bind() 方法的參數。
bind() 和 rebind() 方法之間惟一的區別是 rebind() 方法將數據條目存儲在現有數據條目已經占據 的命名上下文中,從而有效地用新數據更新現有條目。
應用程序 9. 綜合在一起
總結這篇文章時,我將用最後一個應用程序把迄今為止學到的所有概念都組合到一個簡單的、可重用 的對象中,這個對象可以在 ApacheDS 中存儲、搜索、刪除和更新 Java 對象。LDAP4JavaObjects 類如 清單 11 所示:
清單 11. LDAP4JavaObjects
public class LDAP4JavaObjects {


   protected String commonName = null;

   protected String surName = null;

   protected String userID = null;

   protected String javaObjectCN = null;

   protected String userName = null;

   protected String password = null;

   protected String initialContext = null;

   private String workingContext = null;

   protected DirContext dirContext = null;

   protected Properties properties = null;

   protected Object javaObject = null;

   protected Attributes attributes = null;


   public LDAP4JavaObjects() {

     properties = new Properties();

     attributes = new BasicAttributes(true);


     workingContext = "ou=users";

     initialContext = workingContext;


     try {

       InputStream inputStream = new FileInputStream ( "ApacheDS.properties");

       properties.load(inputStream);

     } catch (Exception e) {

       e.printStackTrace();

     }

   }//LDAPJavaObjects


   public void setUserName(String userName){

     properties.setProperty("java.naming.security.principal", userName);

     this.userName = userName;

   }


   public void setPassword(String password) {

     properties.setProperty("java.naming.security.credentials", password);

     this.password = password;

   }


   protected void connect() {

     try {

       // Fetch the directory context.

       dirContext= new InitialDirContext(properties);

     } catch (NamingException e) {

       System.out.println("Getting initial context operation failed: " +  e);

     }

   }


   protected void close() {

     try {

       // Close the directory context.

       dirContext.close();

     } catch (NamingException e) {

       System.out.println("Closing initial context operation failed: " +  e);

     }

   }


   public void setJavaObject(Object obj) throws  java.io.NotSerializableException {

     if (obj instanceof java.io.Serializable)

       javaObject = obj;

   }


   protected boolean isObjectPresent(String uid, String cn, String  workContext) {

     NamingEnumeration ne = search(uid, cn, workContext);

     if (ne != null)

       return true;

     else

       return false;

   }//isObjectPresent


   protected NamingEnumeration search(String user, String object, String  workContext) {


     NamingEnumeration ne = null;

     String filter = new String();

     SearchControls ctls = new SearchControls();

     ctls.setSearchScope(SearchControls.SUBTREE_SCOPE);


     try {

       if (user != null && object == null) {

         addUserAttribute ("uid", user);

         addUserAttribute ("objectClass", "person");

         ne = dirContext.search(workContext, attributes);

         if (ne != null && ne.hasMore())

           return ne;

         else

           return null;

       }else if (user == null && object != null)

       {

         filter = "(cn="+object+")";

         ctls.setReturningObjFlag(true);

         ne = dirContext.search(workContext, filter, ctls);


         if (ne != null && ne.hasMore())

           return ne;

         else

           return null;

       }

     } catch (NamingException e) {

       e.printStackTrace();

     }

     return null;

   }//search


   protected void update(String uid, String cn, String workContext) {

     if (uid != null && cn == null)

     {

       String[] objClassValues = {"top","person"};

       addUserAttribute ("uid", uid);


       if (commonName != null)

         addUserAttribute ("cn", commonName);


       addUserAttributes ("objectClass", objClassValues);


       try {

         dirContext.rebind(workContext, null, attributes);

       } catch (NamingException e) {

         System.out.println("Storing operation failed: " + e);

       }

     } else if (uid == null && cn != null) {

       addUserAttribute ("cn", cn);


       try {

         dirContext.rebind(workContext, javaObject, attributes);

       } catch (NamingException e) {

         e.printStackTrace();

       }

     }

   }//update


   protected void store(String uid, String cn, String workContext) {

     if (uid != null && cn == null)

     {

       String[] objClassValues = {"top","person"};

       addUserAttribute ("uid", uid);


       if (commonName != null)

         addUserAttribute ("cn", commonName);


       addUserAttributes ("objectClass", objClassValues);

       try

       {

         dirContext.bind(workContext, null, attributes);

       } catch (NamingException e) {

         e.printStackTrace();

       }

     } else if (uid == null && cn != null) {

       addUserAttribute ("cn", cn);

       try {

         dirContext.bind(workContext, javaObject, attributes);

       } catch (NamingException e) {

         e.printStackTrace();

       }

     }

   }//store


   public void addUserAttribute (String name, String value){

     Attribute attr = new BasicAttribute(name);

     attr.add(value);

     attributes.put(attr);

   }//addUserAttribute


   public void addUserAttributes(String name, String[] value) {

     Attribute attr = new BasicAttribute (name);

     if (value != null) {

       for (int i =0; i < value.length; i++)

         attr.add(value[i]);

     }

     attributes.put(attr);

   }//addUserAttribute


   public void writeToServer () {

     connect();


     if (userID == null && commonName != null)

       userID = commonName;


     //Check if the cn of the Java object is set.

     //If not, use commonName as object cn.

     if (javaObject != null)

     {

       if (javaObjectCN == null && commonName != null)

         javaObjectCN = commonName;

     }


     if (!(isObjectPresent(userID, null, initialContext)))

     {

      workingContext = "uid="+userID+","+initialContext;

      store(userID, null, workingContext);

      workingContext = "cn="+javaObjectCN  +",uid="+userID+","+initialContext;

      store( null, javaObjectCN, workingContext);

     } else if (isObjectPresent(null, javaObjectCN,

      "uid="+userID+","+initialContext)) {

      workingContext = "cn="+javaObjectCN +",uid="+userID +","+  initialContext;

      update(null, javaObjectCN, workingContext);

     } else {

      workingContext = "cn="+javaObjectCN +",uid="+userID +","+  initialContext;

      store(null, javaObjectCN, workingContext);

     }

     close();

   }//writeToServer()


   public void searchFromServer(String user, String object) {

     connect();

     NamingEnumeration ne = search(user, object, initialContext);


     if (ne != null)

       processSearchResult(ne);

     else

       System.out.println ("searchFromServer... failed");

     close();

   }//searchFromServer


   private void processSearchResult (NamingEnumeration ne){

     try {

       if (ne!=null)

       {

         while (ne.hasMore()) {

           SearchResult sr = (SearchResult) ne.next();

           Object obj = sr.getObject();


           if (obj != null) {

             javaObject = obj;

             javaObjectCN = sr.getName();

           } else {

             userID = sr.getName();

             processAttributes(sr.getAttributes());

           }

         }//while

       }//if (ne != null)

     } catch (javax.naming.NamingException e) {

       e.printStackTrace();

     }

   }//processSearchResult


   private void processAttributes(Attributes attrs){

     try {

       for (Enumeration e = attrs.getAll() ; e.hasMoreElements() ;)  {

         Attribute attr = (Attribute) e.nextElement();

         if (attr.getID().equals("cn"))

           commonName = (String)attr.get();

         else if (attr.getID().equals("sn"))

           surName = (String)attr.get();

       }

     } catch (javax.naming.NamingException ne){

       ne.printStackTrace();

     }

   }//processAttributes


   public void setUserID(String userID) {

     this.userID = userID;

   }


   public String getUserID() {

     return userID;

   }


   public void setJavaObjectCN(String objectCN) {

     this.javaObjectCN = objectCN;

   }


   public String getJavaObjectCN() {

     return javaObjectCN;

   }


   public void setCommonName (String cn) {

     commonName = cn;

   }


   public void setSurName (String sn) {

     surName = sn;

   }


   public String getCommonName() {

     return commonName;

   }


   public String getSurName() {

     return surName;

   }


   public static void main(String[] args) {

     LDAP4JavaObjects javaLdapClient = new LDAP4JavaObjects();

     javaLdapClient.setPassword("secret");

     javaLdapClient.setUserID("Alice");


     //Instantiating a Java object.

     MessagingPreferences msgPreferences =

       new MessagingPreferences ();


     //Setting a Java object.

     try {

       javaLdapClient.setJavaObject (msgPreferences);

     } catch (Exception e) {

       e.printStackTrace();

     }


     javaLdapClient.setJavaObjectCN ("preferences");

     javaLdapClient.writeToServer();

     System.out.println ("Entry stored in ApacheDS..");

   }//main

  }
應用程序說明
關於 LDAP4Java 類您會注意到的第一件事是:對於屬於 person 對象類的用戶,它擁有管理用戶數據 條目的方法。setUserName() 和 setPassword() 方法設置應用程序的用戶名和口令。
在設置服務器地址之後,可以使用諸如 setCommonName() 和 setSurName() 之類的 setter 方法。這 些 setter 方法用於設置用戶的屬性值。除了 setCommonName() 和 setSurName() 方法之外, LDAP4JavaObjects 還包含 addUserAttribute() 方法。可以用 addUserAttribute() 方法指定額外的用 戶屬性。
在設置屬性值之後,可以調用 setJavaObject() 方法在 LDAP4JavaObjects 中設置 Java 對象。還可 以用 setContext() 方法設置想在其中編寫或搜索 Java 對象的服務器上下文。
為 LDAP4JavaObjects 提供所有需要的數據後,可以調用 writeToServer() 方法。這個方法是智能的 。它首先查看用戶條目在遠程服務器上是否存在。如果不能找到該條目,則編寫一個新條目。如果條目已 經存在於服務器上,則更新該條目。
LDAP4JavaObjects 還有一個方法叫做 searchFromServer(),可以用它在 ApacheDS 中搜索用戶數據 或 Java 對象。searchFromServer() 方法在完成搜索操作之後更新 LDAP4JavaObjects 數據成員。
可以擴展 LDAP4JavaObjects 應用程序來適應您自己的應用程序的業務邏輯。所有底層 JNDI 邏輯都 使用 LDAP4JavaObjects 的 protected 方法進行編寫就是出於這個原因。可以在擴展您自己的 LDAP4JavaObjects 的類中使用 protected 方法。
如果想查看使用這些 LDAP4JavaObjects 方法的演示,可以運行清單 11 中的 main()。
第 2 部分結束語
在這個由兩部分組成的系列中,我們了解了 ApacheDS 如何提供服務器端功能。除了關於 ApacheDS 的目錄服務架構以及如何將它用作 LDAP 服務器的背景討論之外,我還提供了 9 個示例應用程序,演示 了在 ApacheDS 中如何存儲、搜索、檢索和更新 Java 對象。
本文的 完整源代碼 中包括 JNDI 代碼示例,可以用它來處理 ApacheDS 中的 Java 對象,源代碼中 還包含一個可重用類,該類包含已討論的所有功能。您可以使用這個類來練習操作 ApacheDS 中的 Java 對象,也可以在自己的 Java 應用程序中擴展它。