1.模塊
Axis2為模塊提供一個延伸的支持。我們現在自定義一個模塊並將其部署到我 們先前創建的MyService。為一個給定的Web Service部署一個自定義的模塊,其 步驟如下:
1)建立Module Implementation。
2)創建Handlers。
3)修改"axis2.xml"。
4)修改"services.xml",使你的模塊在部署期生效。
5)將其打包為一個".mar"(Module Archive)。
6)在Axis2上部署這個模塊。
2.為MyService增加一個日志模塊
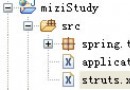
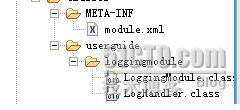
現在我們在我們的例子程序中增加一個日志模塊。這個模塊包含一個handle ,用來記錄所有傳遞給它的信息。Axis2使用". mar" (Module Archive)來部署 模塊。下圖給出了需要被打包為".mar"文檔的文件結構。
步驟一:日志模塊類
日志模塊是Axis2模塊的實現類。Axis2模塊應該實 現"org.apache.axis2.modules.Module"接口中的如下方法。
public void init(ConfigurationContext configContext, AxisModule module)

throws AxisFault;//Initialize the module

public void shutdown(AxisConfiguration axisSystem)

throws AxisFault;//End of module processing

public void engageNotify(AxisDescription axisDescription) throws AxisFault;
這些方法可以用來控制模塊的初始化和終止。通過參數AxisConfiguration, 可提供給用戶完整的配置層次。模塊設計者可以使用它來很好的控制模塊的所有 可能的操作。就這個簡單的日志服務的例子而言,我們可以空實現這些類。
LoggingModule.java
package userguide.loggingmodule;

import org.apache.axis2.AxisFault;

import org.apache.axis2.context.ConfigurationContext;

import org.apache.axis2.description.AxisDescription;

import org.apache.axis2.description.AxisModule;

import org.apache.axis2.modules.Module;

public class LoggingModule implements Module {

   // initialize the module

   public void init(ConfigurationContext configContext, AxisModule module) throws AxisFault {}

   public void engageNotify(AxisDescription axisDescription) throws AxisFault {}

   // shutdown the module

   public void shutdown(ConfigurationContext configurationContext) throws AxisFault {}

   public String[] getPolicyNamespaces() {

      return null;

   }

}
步驟二:LogHandler
Axis2中的模塊可以包含一個或多個handlers用來在不同的階段執行不同的 SOAP頭處理。創建一個handler,應該實現org.apache.axis2.engine.Handler。 但是為簡單起見,org.apache.axis2.handlers.AbstractHandler提供了一個對 Handler接口的抽象的實現。針對本例日志模塊,我們將創建一個handler包含以 下方法:
1)"public void invoke(MessageContext ctx);"//當控制權轉到handler時 ,由Axis2引擎調用。
2)"public void revoke(MessageContext ctx);"//當handlers被Axis2引擎 撤銷時調用。
package userguide.loggingmodule;
import org.apache.axis2.AxisFault;

import org.apache.axis2.context.MessageContext;

import org.apache.axis2.engine.Handler;

import org.apache.axis2.handlers.AbstractHandler;

import org.apache.commons.logging.Log;

import org.apache.commons.logging.LogFactory;

import javax.xml.namespace.QName;

@SuppressWarnings("serial")

public class LogHandler extends AbstractHandler implements Handler {

    private static final Log log = LogFactory.getLog (LogHandler.class);

   private QName name;

   public QName getName() {

     return name;

   }

   public void invoke(MessageContext msgContext) throws AxisFault {

     log.info(msgContext.getEnvelope().toString());

   }

   public void revoke(MessageContext msgContext) {

     log.info(msgContext.getEnvelope().toString());

   }

   public void setName(QName name) {

     this.name = name;

   }

}
步驟三:module.xml
"module.xml"包含了每一個特定的模塊的部署配置信息。它應該包含的細節 有一個實現模塊的類(本例中是"LoggingModule"和各種各樣的將在不同階段運 行的handlers)。本例中配置日志模塊的"module.xml"如下:
<module name="logging" class="userguide.loggingmodule.LoggingModule ">

  <inflow>

     <handler name="InFlowLogHandler" class="userguide.loggingmodule.LogHandler">

     <order phase="loggingPhase" />

     </handler>

  </inflow>

  <outflow>

     <handler name="OutFlowLogHandler" class="userguide.loggingmodule.LogHandler">

     <order phase="loggingPhase"/>

     </handler>

  </outflow>

  <Outfaultflow>

     <handler name="FaultOutFlowLogHandler"

          class="userguide.loggingmodule.LogHandler">

     <order phase="loggingPhase"/>

     </handler>

  </Outfaultflow>

  <INfaultflow>

     <handler name="FaultInFlowLogHandler"

class="userguide.loggingmodule.LogHandler">

     <order phase="loggingPhase"/>

     </handler>

  </INfaultflow>

</module>
從這個文件中,我們可以看到"module.xml"定義了4個階段:
1)inflow-表示當一個消息到來時,這個handler鏈將運行。
2)outflow-表示當一個消息發出時,這個handler鏈將運行。
3)Outfaultflow-表示當有一個錯誤並且這個錯誤將發出時,這個handler鏈 將運行。
4)INfalutflow-表示當有一個錯誤並且這個錯誤將到來時,這個handler鏈 將運行。
下面的標簽設置描述了handler的名字,handler類和該handler將運行的階段 。
<handler name="InFlowLogHandler" class="userguide.loggingmodule.LogHandler">

<order phase="loggingPhase" />

</handler>
步驟四:修改"axis2.xml"
在這個handler中,階段"loggingPhase"是由這個模塊的設計者定義的。這不 是一個預定義的handler階段,因此該模塊的設計者應該將它在"axis2.xml"中聲 明。只有這樣,Axis2引擎才能知道將這個handler放置在哪些“流”中 (InFlow, OutFlow,等)。下面的xml定義展示了需要將日志模塊部署到Axis2引 擎而對axis2.xml作的修改。(This is an extract of the phase section of the "axis2.xml".)
<!-- ================================================= -- >

<!-- Phases -->

<!-- ================================================= -->

<phaseOrder type="inflow">

     <!-- System pre defined phases    -->

     <phase name="TransportIn"/>

     <phase name="PreDispatch"/>

     <phase name="Dispatch" class="org.apache.axis2.engine.DispatchPhase">

       <handler name="AddressingBasedDispatcher"

           class="org.apache.axis2.engine.AddressingBasedDispatcher">

         <order phase="Dispatch"/>

       </handler>

       <handler name="RequestURIBasedDispatcher"

           class="org.apache.axis2.engine.RequestURIBasedDispatcher">

         <order phase="Dispatch"/>

       </handler>

       <handler name="SOAPActionBasedDispatcher"

           class="org.apache.axis2.engine.SOAPActionBasedDispatcher">

         <order phase="Dispatch"/>

       </handler>

       <handler name="SOAPMessageBodyBasedDispatcher"

           class="org.apache.axis2.engine.SOAPMessageBodyBasedDispatcher">

         <order phase="Dispatch"/>

       </handler>

       <handler name="InstanceDispatcher"

           class="org.apache.axis2.engine.InstanceDispatcher">

         <order phase="PostDispatch"/>

       </handler>

     </phase>

     <!-- System pre defined phases    -->

     <!--  After Postdispatch phase module author or or service author can add any phase he want   -->

     <phase name="OperationInPhase"/>

     <phase name="loggingPhase"/>

   </phaseOrder>

   <phaseOrder type="outflow">

     <!--   user can add his own phases to this area -->

     <phase name="OperationOutPhase"/>

     <phase name="loggingPhase"/>

     <!--system predefined phase-->

     <!--these phase will run irrespective of the service-->

     <phase name="PolicyDetermination"/>

     <phase name="MessageOut"/>

   </phaseOrder/>

   <phaseOrder type="INfaultflow">

     <!--   user can add his own phases to this area -->

     <phase name="OperationInFaultPhase"/>

     <phase name="loggingPhase"/>

   </phaseOrder>

   <phaseOrder type="Outfaultflow">

     <!--   user can add his own phases to this area -->

     <phase name="OperationOutFaultPhase"/>

     <phase name="loggingPhase"/>

     <phase name="PolicyDetermination"/>

     <phase name="MessageOut"/>

   </phaseOrder>
自定義的階段"loggingPhase"在所有的流中都放置了,因此這個狀態將會被 所有的消息流調用。既然我們的模塊與這個狀態相聯系,在這個模塊中的 LogHandler將會在這個狀態被執行。
步驟五:修改"services.xml"
到目前為止,我們已經為這個日志模塊創建了所需的類和配置文件。下一步 就是在我們的services中使用這個模塊。我們就在MyService中使用此模塊作演 示。因此,我們需要修改MyService的"services.xml",以使得該模塊起作用。 對"services.xml"的修改如下
<service name="MyServiceWithModule">

<description>

This is a sample Web Service with a logging module engaged.

</description>

<module ref="logging"/>

<parameter name="ServiceClass" locked="false">

userguide.example1.MyService

</parameter>

<operation name="echo">

<messageReceiver class="org.apache.axis2.receivers.RawXMLINOutMessageReceiver"/>

</operation>

<operation name="ping">

<messageReceiver class="org.apache.axis2.receivers.RawXMLINOutMessageReceiver"/>

</operation>
</service>我們在"services.xml"加入了一行"<module ref="logging"/>"。這行將告知Axis2引擎,這個日志模塊可以被這個 service使用。在這個模塊中的handler將在各自的狀態被執行(依 據"module.xml"中的描述)。並將服務重新打包為MyServiceWithModule.aar。
步驟六:打包
在部署這個模塊之前,我們需要將這個模塊打包為一個".mar"文件。使用jar 命令可以完成,將其打包為"logging.mar"。
步驟七:在Axis2上部署這個模塊
為了在Axis2上部署模塊,用戶必須自己新建一個目錄,取名為"modules", 它的父目錄為servlet容器中的"webapps/axis2/WEB-INF",再將".mar"文件復制 到此目錄下。本例中,為"logging.mar"。
注:為了看到日志,用戶必須將"log4j.properties"設置為log INFO。該配 置文件在servlet容器下的"webapps\axis2\WEB-INF\classes"目錄。 將"log4j.rootCategory= ERROR, LOGFILE"替換為"log4j.rootCategory=INFO, ERROR, LOGFILE"。
本文出自 “子 孑” 博客,請務必保留此出處 http://zhangjunhd.blog.51cto.com/113473/25593