商品已經有列表了,接下來就要增加把商品放入購物車的功能,在本示例中用 subflow 來實現這一功能,操作步驟如下:
實現 Cart 和 CartItem 兩個業務類
在 shopping.xml 中添加配置
在 /WEB-INF/flows 目錄下添加 addToCart.xml
在 webflow-config.xml 中添加 addToCart.xml 的位置
修改 viewCart.jsp 頁面
實現 Cart 和 CartItem 兩個業務類
CartItem 表示存放於購物車中的條目,主要記錄相應商品及商品數量,同時不要忘記實現 java.io.Serializable 接口,見清單 29:
清單 29 CartItem 類
package samples.webflow;

import java.io.Serializable;

public class CartItem implements Serializable {

   private static final long serialVersionUID = 8388627124326126637L;

   private Product product;

   private int quantity;

   public CartItem(Product product, int quantity) {

     this.product = product;

     this.quantity = quantity;

   }

   public int getTotalPrice() {

     return this.quantity * this.product.getPrice();

   }

   public void increaseQuantity() {

     this.quantity++;

   }

   /*省略getter和setter*/

}
除去相應的屬性外, CartItem 可根據商品的數量算出該商品的總價格( getTotalPrice ),也可通過 increaseQuantity 增加商品數量。
Cart 是購物車的實現類,其同樣要實現 java.io.Serializable 接口,但它沒有像 ProductService 一樣成為由 Spring IoC 容器管理的 Bean ,每個客戶的購物車是不同的,因此不能使用 Spring IoC 容器默認的 Singleton 模式。見清單 30:
清單 30 Cart 類
package samples.webflow;

/* 省略 import 語句 */

public class Cart implements Serializable {

   private static final long serialVersionUID = 7901330827203016310L;

   private Map<Integer, CartItem> map = new HashMap<Integer, CartItem>();

   public List<CartItem> getItems() {

     return new ArrayList<CartItem>(map.values());

   }

   public void addItem(Product product) {

     int id = product.getId();

     CartItem item = map.get(id);

     if (item != null)

       item.increaseQuantity();

     else

       map.put(id, new CartItem(product, 1));

   }

   public int getTotalPrice() {

     int total = 0;

     for (CartItem item : map.values())

       total += item.getProduct().getPrice() * item.getQuantity();

     return total;

   }

}
Cart 主要實現三個業務函數, getItems 用於獲取當前購物車裡的物品, addItem 用於向購物車添加商品, getTotalPrice 用於獲取購物車裡所有商品的總價格。
在 shopping.xml 中添加配置
在 shopping flow 開始時必須分配一個 Cart 對象,由於要調用 subflow ,這個 Cart 對象應存放於 conversationScope 中。同時要添加一個 subflow-state 用於執行添加商品到購物車的任務。
清單 31 shopping.xml 中添加的配置
<var name="mycart" class="samples.webflow.Cart"/>

<on-start>

  <set name="conversationScope.cart" value="mycart"></set>

</on-start>

<view-state id="viewCart" view="viewCart" >

  <on-render>

   <evaluate expression="productService.getProducts()" result="viewScope.products"/>

  </on-render>

  <transition on="submit" to="viewOrder"/>

  <transition on="addToCart" to="addProductToCart"/>

</view-state>

<subflow-state id="addProductToCart" subflow="addToCart">

  <transition on="productAdded" to="viewCart" />

</subflow-state>
在 /WEB-INF/flows 目錄下添加 addToCart.xml
清單 31 中 subflow-state 元素的 subflow 屬性即指明了這個被調用的 flow 的 id 為“ addToCart ”,現在就要添加addToCart flow的定義。
清單 32 addToCart.xml
<?xml version="1.0" encoding="UTF-8"?>

<flow xmlns="http://www.springframework.org/schema/webflow"

  xmlns:xsi="http://www.w3.org/2001/XMLSchema-instance"

  xsi:schemaLocation="http://www.springframework.org/schema/webflow

   http://www.springframework.org/schema/webflow/spring-webflow-2.0.xsd">

  <on-start>

   <set name="requestScope.productId" value="requestParameters.productId"/>

  </on-start>

  <action-state id="addToCart">

   <evaluate expression="cart.addItem(productService.getProduct(productId))"/>

   <transition to="productAdded"/>

  </action-state>

  <end-state id="productAdded"/>

</flow>
addToCart flow 主要由一個 action-state 構成,完成添加商品到購物車的功能, addToCart flow 的實現需要有輸入參數,即 productId 。在本示例中是通過請求參數來傳遞,通過 requestParameters 來獲取該數值。這裡還要注意到清單 32 中的 end-state 的 id 為“ productAdded ”,與清單 31 中 subflow-state 中的 transition元素的on屬性的名稱是對應的。
在 webflow-config.xml 中添加 addToCart.xml 的位置
新增加的 flow 不要忘記在 flow-registry 中注冊。
清單 33 flow-registry 中注冊 addToCart
<webflow:flow-registry id="flowRegistry" flow-builder-services="flowBuilderServices">

  <webflow:flow-location path="/WEB-INF/flows/shopping.xml" id="shopping"/>

  <webflow:flow-location path="/WEB-INF/flows/addToCart.xml" id="addToCart"/>

</webflow:flow-registry>
修改 viewCart.jsp 頁面
最後就可以來看在視圖中如何顯示相關的信息,並觸發相應的 webflow 事件,見清單 34:
清單 34 完整的 viewCart.jsp 的代碼
<h1>View Cart</h1>

<h2>Items in Your Cart</h2>

<c:choose>

<c:when test="${empty cart.items}">

<p>Your cart is empty.</p>

</c:when>

<c:otherwise>

<table border="1" cellspacing="0">

<tr>

<th>Item</th>

<th>Quantity</th>

<th>Unit Price</th>

<th>Total</th>

</tr>

<c:forEach var="item" items="${cart.items}">

<tr>

<td>${item.product.description}</td>

<td>${item.quantity}</td>

<td>${item.product.price}</td>

<td>${item.totalPrice}</td>

</tr>

</c:forEach>

<tr>

<td>TOTAL:</td>

<td></td>

<td></td>

<td>${cart.totalPrice}</td>

</tr>

</table>

</c:otherwise>

</c:choose>

<a href="${flowExecutionUrl}&_eventId=submit">Submit</a>

<h2>Products for Your Choice</h2>

<table>

<c:forEach var="product" items="${products}">

<tr>

<td>${product.description}</td>

<td>${product.price}</td>

<td>

<a href="${flowExecutionUrl}&_eventId=addToCart&productId=${product.id}">[add to cart]</a>

</td>

</tr>

</c:forEach>

</table>
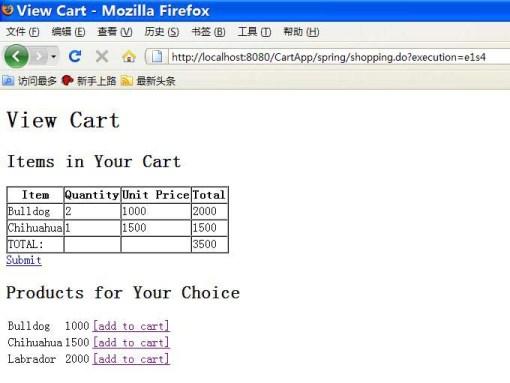
運行效果
圖 6 添加購物車後的效果