一、環境的建立
1、Weblogic6.0與ejb相關的環境配置
與數據庫發生關系的EJB,所以需要建立一個ConnectionPool和DataSource。
●創建ConnectionPool
(1)我使用的是ORACLE8I數據庫。將classes12.zip(oracle的type4類型jdbc驅動程序)拷貝到bea的相關目錄(我這兒放在了mydomain下的lib目錄下)。然後在setenv.cmd中的"set CLASSPATH="後面加上%WL_HOME%\config\mydomain\lib\classes12.zip;將驅動程序加入到classpath中。
(2)啟動weblogic並打開控制台(http://127.0.0.1:7001/console),選擇左面數型結構的功能欄中的Services-----JDBC----Connection Pools---Create a new JDBC Connection Pool。
(3)Name欄中輸入自己為該Pool定義的名稱。例如:TestConnectionPool
在URL中輸入:jdbc:oracle:thin:@127.0.0.1:1521:oracle (IP、端口號、服務名按照自己的修改);
在Driver Classname欄中輸入:oracle.jdbc.driver.OracleDriver;
在Properties(key=value)欄中輸入:
user=scott
password=tiger
dll=ocijdbc8
protocol=thin
分別是數據庫連接用戶名、密碼、動態連接庫以及協議(其中用戶名和密碼按自己的修改)。
在Target頁簽中選擇服務器名,並Apply。
(4)、其他的參數設置例如Intial Capacity等可以自己按照字面意思進行配置。
●創建Data Source
(1)、在左面樹型結構的Services---JDBC---Data Sources下Create a new JDBC Data Source
(2)、在Name中輸入自己定義的名稱
例如:TestDataSourc,在JNDI Name欄中輸入:自己定義的名稱;
例如:CRMDBSource,在Pool Name中輸入剛才創建的JDBC Connection Pool的Name, 上面的TestConnectionPool,在Targets頁中選擇服務器名稱並Apply即可。
這樣就在Weblogic6.0中建立了ORACLE的數據庫連接池和數據源。
●配置Weblogic的classpath
由於我的ejb運行時需要調用別的類,所以必須在classpath中指定路徑,例如:我要使用mydomain\applications\testfile這個目錄下的文件。那麼在setenv.cmd文件中進行如下修改
set APPLICATIONS=.\applications
set CLIENT_CLASSES=.\applications\testfile
set EX_WEBAPP_CLASSES=%WL_HOME%\config\mydomain\applications\testfile
然後在set CLASSPATH中加入%CLIENT_CLASSES%;%EX_WEBAPP_CLASSES%;
在startWeblogic.cmd文件的set CLASSPATH中加入%classpath%;.;
2、Jbuilder6.0的環境建立
要想在Jbuilder中使用weblogic,就要先安裝Borland App Server,然後才能使用weblogic。(我也不知到為什麼,誰能告訴我)我安裝了Borland App Server4.5。
●在jbuilder6.0的Tools菜單下選擇Enterprise Setup----Application Servers----BAS4.5的BAS4.5 installation directory下選擇你的BAS4.5安裝的路徑,我這兒是D:/Borland/AppServer
● 還是在Application Servers頁下選擇Weblogic6.x,在Weblogic 6.x installation directory下
選擇weblogic6.0的安裝路徑,我這兒是E:/bea/wlserver6.0,在BEA home directory:下選擇BEA的home路徑,我這兒是E:/bea,在Password for "system" user:下輸入weblogic中system用戶的密碼,Domain name中輸入weblogic6.0的主域名稱我這兒是mydomain,在Server name下輸入weblogic6.0中的應用服務器名,我這兒是myserver。
● 在建立Project文件後還要在Project菜單下選擇Project Properties---Paths設置你程序運行所需資源文件,一定要添加Weblogic 6.x Client和j2ee.jar。
● 還是在上面的界面中選擇Servers頁,在Application server:下一定要選擇Weblogic
Application Server 6.x,因為我這篇文章就是講的利用jbuilder和weblogic聯合開發ejb。
●修改Weblogic6.0的一個Bug,在使用Jbuilder和weblogic聯合使用時,最好在計算機系統中設置環境變量。步驟是從我的電腦---屬性---高級---環境變量---Administrator的用戶變量---新建:變量名:TEMP,變量值:d:\temp;新建:變量名:TMP,變量值:d:\temp。
我這兒就假設d:\temp是臨時目錄。如果不這樣做,那麼在生成jar文件的時候會報奇怪的錯誤,雖然這好像不影響什麼。
這樣所需要的開發環境都已經建好了,下面就可以將全身心都投入到ejb的開發中了!
二、SessionBean的開發
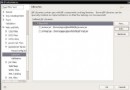
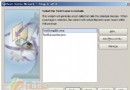
1、通過File菜單的new Project創建一個新的Project,然後再new----選擇Enterprise頁下的Enterprise JavaBean 1.x,我這兒開發的是ejb1.1。就出現了Enterprise JavaBean Wizard-Step 1 of 3向導窗口(如圖1), 因為我們還沒有現存的EJB module,所以New一個(如圖2),輸入你的EJB module名,自定義,ok後繼續,出現Wizard-Step 2 of 3(如圖3)。這兒定義包名和Bean類名稱以及Bean類的基類,還有Bean的屬性,是stateless session bean還是Stateful session bean還是….,繼續就到了Wizard-Step 3 of 3(如圖4),Finish後。你會發現在IDE中已經有了遠程接口,Home接口,Bean類以及ejb-jar.xml和weblogic-ejb-jar.xml,全都有了,只要你將它們充實了就行了。特別是xml文件都可以實現可視化的定義操作了。
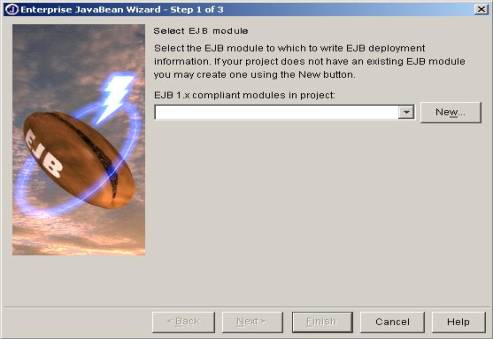
圖1
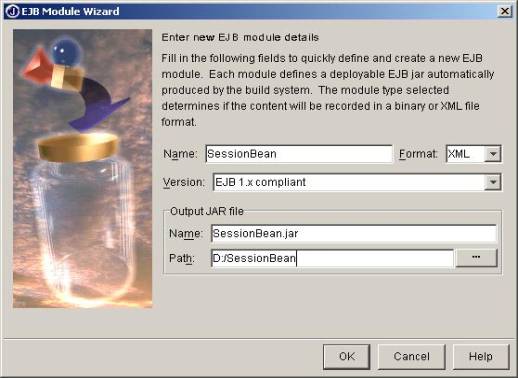
圖2

圖3
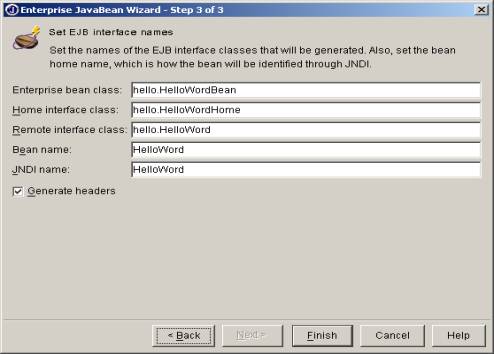
圖4
2、我的這個SessionBean要實現客戶端程序和數據庫的接口。也就是說所有的SQL語句可以通過這個SessionBean來執行並返回處理結果。
首先定義了一個SQL語句類的接口
package hello;

public interface DefaultSQLContext {

public String getSQL();

public String[] getParameterType();

public int getType();

}
所有的封裝了SQL語句的類都必須要實現該接口。
例如:hello.TestSQL.java
package hello;

public class TestSQL implements DefaultSQLContext{

static String[] paraValue;

public String getSQL(){

return "select baseitemid,datasource,baseitemname,maxlength,description from ctm_baseitem where businesstypeid=?";

}

public String[] getParameterType(){

return new String[]{"varchar"};

}

//執行SQL的動作類型,是查詢還是更新語句;

//0是查詢語句,1表示更新語句;

public int getType(){

return 0;

}

}
EJB的程序如下所示:
hello.HelloWord.java文件如下所示:
package hello;

import java.rmi.*;

import javax.ejb.*;

import java.sql.*;

import java.util.Vector;

public interface HelloWorld extends EJBObject {

public void execute() throws RemoteException;

public Vector getQueryResult() throws RemoteException;

}
提供了執行SQL語句的execute()方法,getQueryResult()方法獲得查詢獲得值。
Hello. HelloWorldBean文件如下所示,真正的執行程序:
package hello;

import java.rmi.*;

import javax.ejb.*;

import javax.sql.*;

import javax.naming.*;

import java.util.*;

import java.sql.*;

public class HelloWorldBean implements SessionBean {

private SessionContext sessionContext;

private defaultSQLContext sql;

private String sqlContext = "";

private Connection con = null;

private Context initCtx = null;

private Vector vResult,vColumnName;

private int iReturn = 1;

String[] paraValue;

public void init(){

try{

initCtx= new InitialContext();

DataSource ds = (javax.sql.DataSource) initCtx.lookup("DBSource");

con= ds.getConnection();

System.out.println("connection = "+con);

}catch(Exception e){System.out.println(e);}

}

/*

//設置SQLContext的類名;

public void setSqlContext(String str){

sqlContext = str;

}

*/

private void initSQLContext(){

init();

try{

Class aclass= Class.forName(sqlContext);

sql = (defaultSQLContext)aclass.newInstance();

}catch (Exception e){

System.out.println("cannot initialize instance"+sqlContext);

System.out.println(e);

}

}

/*

public void setParaValue(String[] str){

this.paraValue = str;

}

*/

public void execute(){

String[] paraType;

int iColumnCount = 0;

ResultSet rs = null;

ResultSetMetaData rsm= null;

Vector vInnerValue;

//首先獲得SQLContext;

initSQLContext();

try{

PreparedStatement ps = con.prepareStatement(sql.getSQL());

System.out.println("SQL = "+sql.getSQL());

if(sql.getParameterType()!=null&¶Value!=null)

{

paraType = sql.getParameterType();

for(int i=0;i {

if(paraType[i].equalsIgnoreCase("varchar")||paraType[i].equalsIgnoreCase("varchar2"))

ps.setString(i+1,paraValue[i].trim());

else if(paraType[i].equalsIgnoreCase("integer")||paraType[i].equalsIgnoreCase("int"))

ps.setInt(i+1,Integer.parseInt(paraValue[i].trim()));

else if(paraType[i].equalsIgnoreCase("long"))

ps.setLong(i+1,Long.parseLong(paraValue[i].trim()));

else if(paraType[i].equalsIgnoreCase("date"))

ps.setDate(i+1,java.sql.Date.valueOf(paraValue[i].trim()));

else if(paraType[i].equalsIgnoreCase("boolean"))

ps.setBoolean(i+1,Boolean.getBoolean(paraValue[i].trim()));

else if(paraType[i].equalsIgnoreCase("double"))

ps.setDouble(i+1,Double.parseDouble(paraValue[i].trim()));

else

ps.setString(i+1,paraValue[i].trim());

System.out.print("ParameterType["+i+"] = "+paraType[i]);

System.out.println(" ParameterValue["+i+"] = "+paraValue[i]);

}//end for

}//end if

if(sql.getType()==0) //查詢;

{

vResult = new Vector();

System.out.println("execute Query!");

rs = ps.executeQuery();

rsm= rs.getMetaData();

iColumnCount= rsm.getColumnCount();

while(rs.next()){

vInnerValue= new Vector();

for(int j=1;j<=iColumnCount;j++)

{

Object o = rs.getObject(j);

if(o==null)

vInnerValue.addElement("");

else

vInnerValue.addElement(o.toString());

}//end for

vResult.addElement(vInnerValue);

}//end while

vColumnName = new Vector(); //獲得字段名;

for(int i=1;i<=iColumnCount;i++)

vColumnName.addElement(rsm.getColumnName(i));

}//end if 查詢;

else if(sql.getType()==1) //更新語句;

{

try{

System.out.println("execute Update!");

iReturn = ps.executeUpdate();

con.commit();

}catch(Exception ex)

{

iReturn=0;

con.rollback();

System.out.println("update ejb error!"+ex);

}

}

ps.close();

}catch (Exception ne){

System.out.println(ne);

}

}

public Vector getQueryResult(){

return vResult;

}

public Vector getColumnName(){

return vColumnName;

}

public int getUpdateResult(){

return iReturn;

}

/*

public void ejbCreate(){

System.out.println("ejbCreate()");

}

public void ejbCreate(String sqlContext){

ejbCreate(sqlContext,null);

System.out.println("ejbCreate()");

}

*/

public void ejbCreate(String sqlContext,String[] paraValue) {

this.sqlContext = sqlContext;

this.paraValue = paraValue;

System.out.println("ejbCreate()");

}

public void ejbRemove() {

}

public void ejbActivate() {

}

public void ejbPassivate() {

}

public void setSessionContext(SessionContext context) {

sessionContext = context;

}

}

hello. HelloWorldHome文件(定義Home接口)如下所示:

package hello;

import java.rmi.*;

import javax.ejb.*;

public interface HelloWorldHome extends EJBHome{

public HelloWorld create(String sqlContext,String[] paraValue) throws RemoteException, CreateException;

}
客戶端測試程序:
package hello;

import javax.naming.*;

import javax.rmi.PortableRemoteObject;

import java.util.*;

import java.sql.*;

public class HelloWorldBeanClient1 {

private static HelloWorldHome helloWorldHome = null;

private static HelloWorld hello = null;

static{

Context ctx = null;

Hashtable ht = new Hashtable();

System.out.println("Initializing bean access.");

try{

ht.put(Context.INITIAL_CONTEXT_FACTORY,"weblogic.jndi.WLInitialContextFactory");

ht.put(Context.PROVIDER_URL,"t3://localhost:7001");

ctx = new InitialContext(ht);

//look up jndi name

Object ref = ctx.lookup("testBean");

//cast to Home interface

helloWorldHome = (HelloWorldHome) PortableRemoteObject.narrow(ref, HelloWorldHome.class);

System.out.println("Get the ejbHome.");

String[] paraValue = new String[]{"16"};

hello=helloWorldHome.create("hello.testSQL",paraValue);

}catch(Exception e){System.out.println("cannot get the ejbBean!"+e);}

}

public HelloWorldBeanClient1() {

Vector vInnerValue;

try {

//hello.setParaValue(value);

//hello.setSqlContext("hello.testSQL");

hello.execute();

Vector columnName = hello.getColumnName();

Vector result = hello.getQueryResult();

for(int i=0;i {

vInnerValue = (Vector)result.elementAt(i);

for(int j=0;j {

System.out.print(columnName.elementAt(j)+" = ");

System.out.println(vInnerValue.elementAt(j));

}

}

//System.out.println("execute Result = "+hello.getUpdateResult());

}catch(Exception e) {

System.out.println("Failed initializing bean access.");

e.printStackTrace();

}

}

/**Main method*/

public static void main(String[] args) {

HelloWorldBeanClient1 client = new HelloWorldBeanClient1();

}

}

}