Java™ Enterprise Edition (Java EE) 6 包含了很多像 JSF 2 這樣功能強大的技術。Contexts and Dependency Injection(CDI)是這些技術中的一個,它在很大程度上標准化了在其他框架醞釀多年的一些概念。
在本文中,我向您展示如何綜合使用 JSF 2 和 CDI 來實現一個在線小測驗向導。CDI 為我帶來了依賴注入、producer 方法和一個 conversation 作用域。我使用了這三者來實現一個向導,您可以輕松地將其用於任何一個多選的在線測試。
本系列並非只關注於 CDI。我將介紹如何:
使用 facelets 模板來最小化代碼並最大化重用
Ajax 化向導以便獲得更為順暢的用戶體驗
使用 CDI 的依賴注入來簡化代碼
實現並使用 CDI producer 方法來在視圖中無縫地使用 beans
利用 CDI 的 conversation 作用域來實現多請求用戶用例
本文中的全部示例源代碼均可下載得到。請參見 運行示例代碼 側欄獲得下載鏈接以及指向部署指導的一個指針。
測驗向導
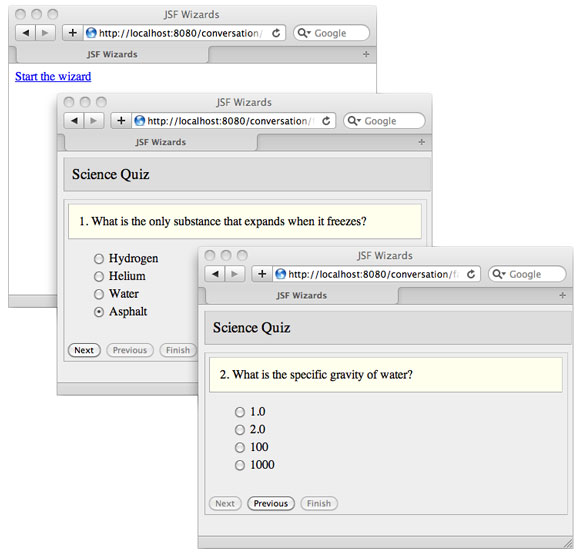
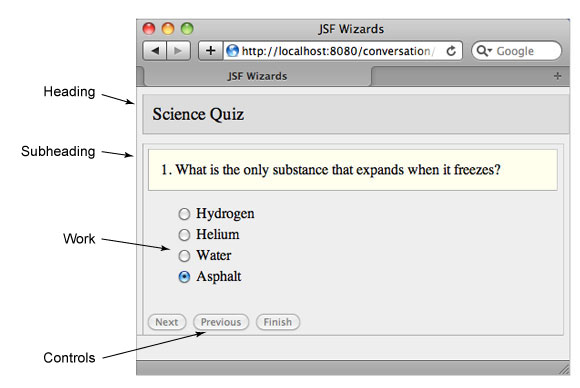
圖 1 顯示了運行中的這個測驗向導:
圖 1. 測驗向導
最初,這個應用程序只包含一個可開啟向導的單獨鏈接:<h:commandLink value="#{msgs.startWizard}" action="#{wizard.start}"/>。這個鏈接的文本(Start the wizard)來自一個屬性文件並由該鏈接值內的 msgs.startWizard 表達式代表。國際化是 JSF 101 circa 2004,所以我在這裡就不再過多涉及這些細節了。只需注意到整個應用程序都是本地化了的就足夠了,並且所有字符串均從 messages.properties 文件拉出。
Start the wizard 鏈接會將用戶帶到這個測驗向導頁面,在這裡,用戶會被提問,一次一個問題,如 圖 1 底部的兩個圖片所示。我通過一些簡單的 Ajax 和一個服務器端 bean 控制此向導按鈕的啟用狀態,我在本文的 Ajax 部分將向您詳示。
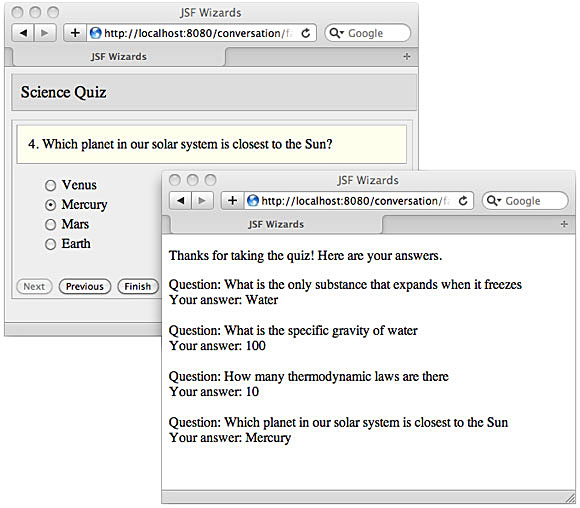
圖 2 顯示了最後的一個問題,後跟用戶答案的一個總結。當用戶處於最後一個問題時,只有 Finish 按鈕是啟用的;單擊該按鈕會將用戶帶到總結頁面。
圖 2. 總結頁面
了解了這個測驗向導如何工作後,我將向您展示它是如何實現的。
測驗應用程序
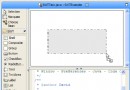
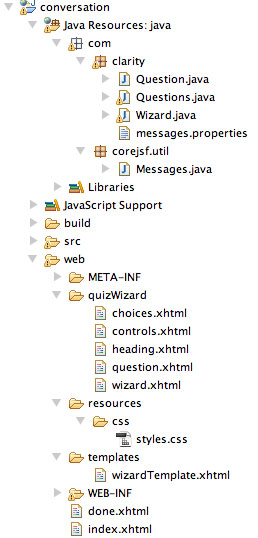
這個測驗應用程序的文件如圖 3 所示:
圖 3. 此應用程序的文件
我用一個 JSF 2 模板(/templates/wizardTemplate.xhtml)實現此測驗向導,向導視圖(/quizWizard/wizard.xhtml)使用了這個模板。
除了上述模板和視圖外,我還有針對向導的每個組成塊的 facelets — 全部處於 quizWizard 目錄:
頭部(/quizWizard/heading.xhtml)
問題(/quizWizard/question.xhtml)
單選按鈕(quizWizard/choices.xhtml)
Next、Previous 以及 Finish 按鈕(quizWizard/controls.xhtml)
index.xhtml facelet 用 Start the wizard 鏈接啟動這個應用程序,而 done.xhtml facelet 則顯示了問題和答案的總結。
對於客戶機,就介紹這麼多。在服務器上,應用程序有三個 bean,我們接下來將討論其中的兩個。
此應用程序的兩個 question bean
Question bean,如清單 1 所示,實際上是一個問題、一組答案選項以及一個答案:
清單 1. Question bean
package com.clarity;


import java.io.Serializable;


public class Question implements Serializable {

  private static final long serialVersionUID = 1284490087332362658L;


  private String question, answer;

  private String[] choices;

  private boolean answered = false; // next button is enabled when answered is true


  public Question(String question, String[] choices) {

   this.question = question;

   this.choices = choices;

  }


  public void setAnswer(String answer) {

   this.answer = answer;

   answered = true;

  }


  public String getAnswer()  { return answer;  }

  public String getQuestion() { return question; }

  public String[] getChoices() { return choices; }

  public boolean isAnswered() { return answered; }


  public void setAnswered(boolean answered) { this.answered = answered; }

}
此應用程序在 Questions 類內還包含了一個問題數組,如清單 2 所示:
清單 2. Questions bean
package com.clarity;


import java.io.Serializable;


import com.corejsf.util.Messages;


public class Questions implements Serializable {

  private static final long serialVersionUID = -7148843668107920897L;


  private String question;

  private Question[] questions = {

   new Question(

     Messages.getString("com.clarity.messages", "expandQuestion", null),

     new String[] {

      Messages.getString("com.clarity.messages", "hydrogen", null),

      Messages.getString("com.clarity.messages", "helium", null),

      Messages.getString("com.clarity.messages", "water", null),

      Messages.getString("com.clarity.messages", "asphalt", null)

     }),


   new Question(

     Messages.getString("com.clarity.messages", "waterSGQuestion", null),

     new String[] {

      Messages.getString("com.clarity.messages", "onedotoh", null),

      Messages.getString("com.clarity.messages", "twodotoh", null),

      Messages.getString("com.clarity.messages", "onehundred", null),

      Messages.getString("com.clarity.messages", "onethousand", null)

     }),


   new Question(

     Messages.getString("com.clarity.messages", "numThermoLawsQuestion", null),

     new String[] {

      Messages.getString("com.clarity.messages", "one", null),

      Messages.getString("com.clarity.messages", "three", null),

      Messages.getString("com.clarity.messages", "five", null),

      Messages.getString("com.clarity.messages", "ten", null)

     }),


   new Question(

     Messages.getString("com.clarity.messages", "closestSunQuestion", null),

     new String[] {

      Messages.getString("com.clarity.messages", "venus", null),

      Messages.getString("com.clarity.messages", "mercury", null),

      Messages.getString("com.clarity.messages", "mars", null),

      Messages.getString("com.clarity.messages", "earth", null)

     })

  };


  public int size()            { return questions.length; }

  public String getQuestion()       { return question; }

  public void setQuestion(String question) { this.question = question; }

  public Question[] getQuestions()     { return questions; }

}
清單 1 和 清單 2 均沒有什麼特別之處 — 它們只是提供給我服務器上的一列問題 — 不過其中有一點值得一提,即我借助編程的方式用 helper 方法從一個資源包拉出字符串。您可以通過 下載此代碼 來了解這個方法是如何工作的,而在 Core JavaServer Faces 則可以更深入地閱讀到相關信息。
以上就是對此應用程序的 bean 的全部介紹了,只有一點需要補充,即 Wizard bean,它充當了此向導的控制器 。它裡面的代碼是此應用程序內惟一真正有趣的 Java 代碼。我在 CDI: Dependency injection and conversations 部分,還會討論這個 Wizard bean。
您對應用程序內的文件和這些 question bean 有所了解後,我接下來將向您顯示我是如何實現這個向導的視圖的。
模板和視圖
對於大多數的向導,您可以放心地歸納出向導的結構,如圖 4 所示:
圖 4. 向導的結構
清單 3 顯示了封裝該結構的一個模板:
清單 3. 向導模板 (templates/wizardTemplate.xhtml)
<!DOCTYPE html PUBLIC "-//W3C//DTD XHTML 1.0 Transitional//EN"

     "http://www.w3.org/TR/xhtml1/DTD/xhtml1-transitional.dtd">


<html xmlns="http://www.w3.org/1999/xhtml"

    xmlns:h="http://java.sun.com/jsf/html"

   xmlns:ui="http://java.sun.com/jsf/facelets">


  <h:head>

   <title>

    <ui:insert name="windowTitle">

     #{msgs.windowTitle}

    </ui:insert>

   </title>

  </h:head>


  <h:body>

   <h:outputStylesheet library="css" name="styles.css" target="head"/>


   <ui:insert name="heading"/>


   <div class="wizardPanel">


    <div class="subheading">

     <ui:insert name="subheading"/>

    </div>


     <div class="work">

      <ui:insert name="work"/>

     </div>


    <div class="controls">

     <ui:insert name="controls"/>

    </div>


   </div>


  </h:body>

</html>
這個測驗向導的實現則如清單 4 所示:
清單 4. 向導 facelet (quizWizard/wizard.xhtml)
<!DOCTYPE html PUBLIC "-//W3C//DTD XHTML 1.0 Transitional//EN"

     "http://www.w3.org/TR/xhtml1/DTD/xhtml1-transitional.dtd">


<ui:composition xmlns="http://www.w3.org/1999/xhtml"

    xmlns:h="http://java.sun.com/jsf/html"

   xmlns:ui="http://java.sun.com/jsf/facelets"

   template="/templates/wizardTemplate.xhtml">


  <ui:define name="heading">

   <ui:include src="heading.xhtml"/>

  </ui:define>


  <ui:define name="subheading">

   <ui:include src="question.xhtml"/>

  </ui:define>


  <ui:define name="work">

   <ui:include src="choices.xhtml"/>

  </ui:define>


  <ui:define name="controls">

   <ui:include src="controls.xhtml"/>

  </ui:define>


</ui:composition>
模板都相當簡單。它們插入由視圖定義的頁面的某些部分。在本例中,清單 3 內所示的模板插入的是由 清單 4 內的視圖所定義的 heading、subheading、work 和 controls 節。在模板內封裝視圖的常見特性會讓創建新視圖更為簡便 — 在本例中,就是新類型的向導。
清單 5 顯示了這個測驗向導的 heading 節:
清單 5. heading (quizWizard/heading.xhtml)
<!DOCTYPE html PUBLIC "-//W3C//DTD XHTML 1.0 Transitional//EN"

     "http://www.w3.org/TR/xhtml1/DTD/xhtml1-transitional.dtd">


<ui:composition xmlns="http://www.w3.org/1999/xhtml"

    xmlns:h="http://java.sun.com/jsf/html"

   xmlns:ui="http://java.sun.com/jsf/facelets">


    <div class="heading">

     #{msgs.quizTitle}

    </div>


</ui:composition>
清單 6 顯示了 subheading 節:
清單 6. subheading (quizWizard/question.xhtml)
<!DOCTYPE html PUBLIC "-//W3C//DTD XHTML 1.0 Transitional//EN"

     "http://www.w3.org/TR/xhtml1/DTD/xhtml1-transitional.dtd">


<ui:composition xmlns="http://www.w3.or g/1999/xhtml"

    xmlns:f="http://java.sun.com/jsf/core"

    xmlns:h="http://java.sun.com/jsf/html"

   xmlns:ui="http://java.sun.com/jsf/facelets">


  <h:panelGrid columns="1" id="question">

   #{wizard.cursor+1}. #{questions[wizard.cursor].question}?

  </h:panelGrid>


</ui:composition>
視圖抽象
模板讓您能夠封裝視圖的一些共有特性,讓您得以重點關注於視圖之間的變化。比如,這個向導模板就提供了窗口標題、樣式表以及 — 通過 <div> 元素 — 每個視圖的整體結構。正是由於對共有特性的封裝,您才可以通過簡單地插入頁面的各個部分來輕松實現新的視圖。
這個向導模板定義了視圖的結構,卻沒有定義外觀。外觀被進一步封裝在 CSS 內,為您提供了另一個層次的修改視圖的基本模板的自由。
清單 5 內的 heading 顯示了這次測驗的標題,在本例中標題是 Science Quiz,而 清單 6 內的 subheading 則顯示了問題。清單 6 內引用的 wizard.cursor 是一個指向當前問題的游標(如果您願意,也可稱之為索引)。該游標的基數為零,所以 #{wizard.cursor+1} 顯示的將是題號,而 #{questions[wizard.cursor].question} 顯示的是問題。
完成了這些需要提前進行的准備(比如服務器端 bean 和模板)後,我接下來將向您展示一些真正有趣的東西了:此向導的 Ajax 是如何實現的,以及此向導是如何使用 CDI 的。先從 Ajax 開始。
Ajax
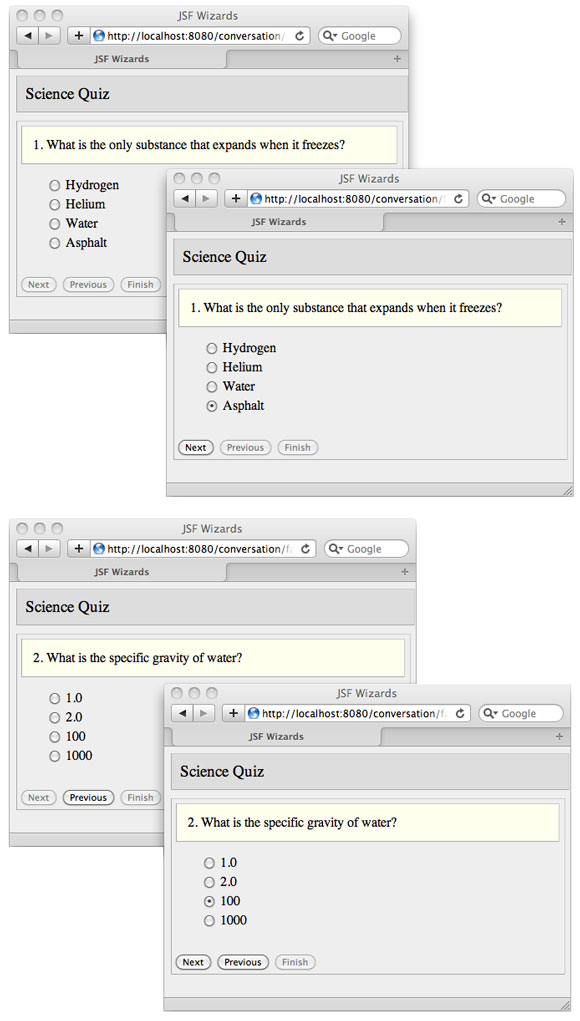
此測驗向導內的所有用戶交互都會導致 Ajax 調用,當這些調用返回時,只呈現頁面的適當部分。Ajax 調用所做的一件事情就是控制此向導按鈕的啟用狀態。圖 5 顯示了在第一個問題和第二個問題期間,此向導按鈕的啟用狀態:
圖 5. 測驗向導的按鈕
這個向導的 Ajax 被整齊地封裝在兩個 facelet 文件內。清單 7 顯示了 choices.xhtml:
清單 7. 選項
<!DOCTYPE html PUBLIC "-//W3C//DTD XHTML 1.0 Transitional//EN"

     "http://www.w3.org/TR/xhtml1/DTD/xhtml1-transitional.dtd">


<ui:composition xmlns="http://www.w3.org/1999/xhtml"

    xmlns:f="http://java.sun.com/jsf/core"

    xmlns:h="http://java.sun.com/jsf/html"

   xmlns:ui="http://java.sun.com/jsf/facelets">


  <h:form id="choices">

   <h:panelGrid columns="2">

     <h:selectOneRadio value="#{questions[wizard.cursor].answer}"

              layout="pageDirection">

      <f:selectItems value="#{questions[wizard.cursor].choices}"/>

      <f:ajax render=":buttons"/>

     </h:selectOneRadio>

    </h:panelGrid>

  </h:form>


</ui:composition>
當用戶選擇一個單選按鈕時,JSF 就會向服務器進行一次 Ajax 調用並會在一個 backing-bean 屬性內記錄這次單選按鈕的選擇(問題的答案)。當調用返回時,JSF 就會更新向導的按鈕。
清單 8 顯示了 controls.xhtml:
清單 8. 控件
<!DOCTYPE html PUBLIC "-//W3C//DTD XHTML 1.0 Transitional//EN"

     "http://www.w3.org/TR/xhtml1/DTD/xhtml1-transitional.dtd">


<ui:composition xmlns="http://www.w3.org/1999/xhtml"

    xmlns:f="http://java.sun.com/jsf/core"

    xmlns:h="http://java.sun.com/jsf/html"

   xmlns:ui="http://java.sun.com/jsf/facelets">


   <h:form id="buttons">


     <h:panelGrid columns="4" styleClass="wizardControls">

     <f:ajax render=":question :choices buttons">


       <h:commandButton id="next"

             styleClass="wizardButton"

                value="#{msgs.nextButtonText}"

              disabled="#{not wizard.nextButtonEnabled}"/>

           actionListener="#{wizard.nextButtonClicked}"/>


       <h:commandButton id="previous"

             styleClass="wizardButton"

                value="#{msgs.previousButtonText}"

              disabled="#{not wizard.previousButtonEnabled}"

           actionListener="#{wizard.previousButtonClicked}"/>

     </f:ajax>


     <h:commandButton id="finish"

           styleClass="wizardButton"

              value="#{msgs.finishButtonText}"

            disabled="#{not wizard.finishButtonEnabled}"

             action="#{wizard.end}"/>


     </h:panelGrid>


   </h:form>

</ui:composition>
當用戶單擊 Next 或 Previous 按鈕時,JSF 就會向服務器進行一次 Ajax 調用,並且當此 Ajax 調用返回時,JSF 就會更新問題、問題的選擇(單選按鈕)以及按鈕本身。
Finish 按鈕不是一個 Ajax 按鈕,因為單擊它會導航到 done 頁面。
請注意清單 7 和 8 中對 wizard bean 有很多引用。該 bean 實際上是這個測驗向導的一個控制器。我在本文結束之前來介紹一下這個 bean。
CDI: Dependency injection and conversations
CDI 可被描述為打了激素的 JSF 托管 beans。作為 Java EE 6 的一個組件,CDI 可以說是在 Spring 內醞釀許久的一些概念的標准化,比如依賴注入和攔截器。實際上,CDI 和 Spring 3 有很多類似的特性。
CDI 讓您能夠通過松散耦合(loose coupling)和強類型化(strong typing)為關注點解除耦合。這樣一來,您就得以從日常的 Java 編程的辛勞中解放出來,比如實例化對象和控制對象的生命期。
從 JSF 的角度,CDI 的一個特別吸引人之處是 conversation 作用域。conversation 作用域是 Seam 最早提出來的,指的是一個生命期可通過編程方式控制的作用域,它讓您能夠從請求和會話之間的全有或沒有的兩難中逃離出來。
此向導對 CDI 的所有使用都位於 Wizard bean 內,如清單 9 所示:
清單 9. Wizard bean
package com.clarity;


import java.io.Serializable;


import javax.enterprise.context.Conversation;

import javax.enterprise.context.ConversationScoped;

import javax.enterprise.inject.Produces;

import javax.faces.event.ActionEvent;

import javax.inject.Inject;

import javax.inject.Named;


@Named()

@ConversationScoped()

public class Wizard implements Serializable {

  private static final long serialVersionUID = 1L;

  private Questions questions = new Questions();

  private int cursor = 0;


  @Inject

  private Conversation conversation;

   @Produces @Named

  public Question[] getQuestions() {

   return questions.getQuestions();

  }


  public void nextButtonClicked(ActionEvent e) {

   incrementCursor();

  }


  public void previousButtonClicked(ActionEvent e) {

   decrementCursor();

  }


  public void incrementCursor() { ++cursor; }

  public void decrementCursor() { --cursor; }

  public int getCursor()    { return cursor; }

  public void resetCursor()   { cursor = 0; }


  public boolean getNextButtonEnabled() {

   return cursor != questions.size() - 1 &&

   (questions.getQuestions())[cursor].isAnswered();

  }


  public boolean getPreviousButtonEnabled() {

   return cursor > 0;

  }


  public boolean getFinishButtonEnabled() {

   return cursor == questions.size() - 1 &&

   (questions.getQuestions())[cursor].isAnswered();

  }


  public String start() {

   conversation.begin();

   return "quizWizard/wizard";

  }


  public String end() {

   conversation.end();

   return "/done";

  }


  private void setCurrentQuestionUnanswered() {

   Question currentQuestion = (questions.getQuestions())[cursor];

   currentQuestion.setAnswered(false);

  }

}
此測驗向導應用程序幾乎所有的有趣代碼都位於 清單 9 內。首先,Wizard bean 具有一些方法,能控制向導按鈕啟用狀態,正如我在前一章節中所討論的。它還具有另外一些方法,當用戶單擊 Next 或 Previous 按鈕時,JSF 就會調用這些方法,分別前進到下一個問題,或移回至前一個問題。
但表面上,Wizard bean 最有趣的一點是其對 CDI 的使用。首先,本系列從始至終都使用了 @Named 注釋的 CDI 實現(它實際由 JSR 330, Dependency Injection for Java 定義)來代替 @ManagedBean。兩個注釋都創建一個可從 JSF 表達式語言訪問的設置了作用域的 bean。但 CDI 的受管 bean 的情形則更為復雜,所以如果您使用的是一個 Java EE 6 兼容的服務器,那麼應該優先選用 @Named 而非 @ManagedBean。
如果仔細研究 清單 6 和 清單 7,就會發現我用 JSF 表達式語言訪問了一個名為 questions 的 bean。您可能還記得我在 清單 2 中實現了一個 Questions 類。不過,在 清單 2 中並未出現過 @Named 注釋。在通常情況下,注釋的缺少會導致一個錯誤,但在本例中,questions bean 來自別處 — 它由 Wizard.getQuestions() 方法生成。該方法由一個 @Produces 注釋,這意味著如果您在表達式語言中引用這個 bean,那麼 JSF 就會調用該方法來獲得這個 Questions bean。
之後是 Wizard bean 對 conversation 作用域的使用。應用程序歡迎頁面內的 Start the wizard start Wizard bean 的 start() 方法,此方法通過調用 conversation 的 begin() 方法開始一次對話。該方法會將當前請求(實際上是一次持續單個請求的對話)提升成一個長時間運行的對話,此對話直到超時或有人調用 conversation 的 end() 方法才會結束。由於我已經為 Wizard 指定了 Conversation 作用域,所以它的生命期會隨著對話的結束而結束。
當然,您可以避開 conversation 作用域並在用戶會話中實現您自己的虛擬對話。實際上,在 conversation 作用域出現之前,很多開發人員正是用這種做法來保持其應用程序內的多請求用例的狀態。CDI 讓您可以避免手動記賬(bookkeeping)。
最後,注意到我使用了 CDI 注入來將一個對話注入到這個受管 bean,所以我可以用編程的方法來啟動和終止一次對話。資源注入讓我可以專注於進行對象本身的事情,而不是忙於創建對象並控制其生命周期的乏味工作。
結束語
在本文中,我用很少的代碼闡釋了很多重要概念 — Ajax 向導、模板、依賴注入、conversation 作用域。借助於 JSF 2 和 CDI,您就可以通過最少的努力和最大程度的靈活性和可重用性實現健壯的可重用 web 應用程序。
JSF 2 簡介 系列在這個夏季將告一段落。我在秋天還會帶來更多內容,繼續幫您增強您的 JSF 技巧。
本文配套源碼