一、 配置eclipes開發環境
首先,下載需要的插件:
eclipse-SDK-
Eclipse IDE
官方下載地址:
http://download.eclipse.org/downloads/drops/R-
XMLbuddy_2.0.62
用於xml開發,可以用來編輯web.xml文件
官方下載地址:http://www.xmlbuddy.com/
org.objectweb.lomboz_
用於web開發,支持jsp,servlet等等的高亮顯示和編輯
官方下載地址:http://forge.objectweb.org/projects/lomboz/
ajdt_1.2_for_eclipse_3.0
用於ASPectJ開發,專為eclipse開發的AspectJ插件
官方下載地址:http://www.xmlbuddy.com/
VE-runtime-
安裝以上兩個插件時必備,一個相關的類包含在此插件中。The Eclipse Visual Editor project is a vendor-neutral, open development platform supplying frameworks for creating GUI builders, and exemplary, extensible tool implementations for Swing/JFC and SWT/RCP. These tools are exemplary in that they verify the utility of the Eclipse Visual Editor frameworks, illustrate the appropriate use of those frameworks, and support the development and maintenance of the Eclipse Visual Editor Platform itself.
官方下載地址:http://www.xmlbuddy.com/
GEF-runtime-
安裝VE時必備,The Graphical Editing Framework (GEF) allows developers to take an existing application model and quickly create a rich graphical editor.
官方下載地址:
http://download.eclipse.org/tools/gef/downloads/drops/R-
emf-sdo-runtime-
安裝VE時必備,EMF is a modeling framework and code generation facility for building tools and other applications based on a strUCtured data model. From a model specification described in XMI, EMF provides tools and runtime support to produce a set of Java classes for the model, a set of adapter classes that enable viewing and command-based editing of the model, and a basic editor. Models can be specified using annotated Java, XML documents, or modeling tools like Rational Rose, then imported into EMF. Most important of all, EMF provides the foundation for interoperability with other EMF-based tools and applications.
官方下載地址:
http://download.eclipse.org/tools/emf/downloads/drops/
[說明] 現在最高版本的ajdt支持到eclipse
2、下載完成後解壓進行安裝:help -> softwareupdate -> find and install -> …from local….
3、進行配置window -> perspective
配置aspectj:
不需要非凡配置
配置lomboz:
A、設置jdk tools.jar位置,為安裝的j2sdk目錄
B、配置server definition:選擇Apache Tomcat : tomcat5.0.x,設置其Server lib和project lib,可以把%tomcat_home%/common/lib一些相關的包都放進去,有可能是必須放,注重,某些版本據說可能是
servers,tomcat5.0.x配置文件tomcat50x.server文件,將兩處-Djava.endorsed.dirs=,
修改為如下:
-Djava.endorsed.dirs="${serverRootDirectory}/common/endorsed"
4、配置window -> customize perspective,將aspectj和lomboz相關的項目都給添加到new中,這樣就可以通過“新建“來建立相應的工程文件。
二、 集成AspectJ到Web工程中
5、新建一個AspectJ工程
6、在此工程中新建一個Lomboz J2EE Module
7、新建一個Servlet,並設置其url-mapping
/*
* Created on
*
* @Author:Jonathan Q. Bo from tju.MSNrl
* MyBlog:http://blog.csdn.net/jonathan_q_bo
*
*/
package org.tju.msnrl.jonathan.aspectj;
import java.io.IOException;
import javax.servlet.ServletException;
import javax.servlet.http.HttpServlet;
import javax.servlet.ServletOutputStream;
import javax.servlet.http.HttpServletRequest;
import javax.servlet.http.HttpServletResponse;
/**
* @author Administrator
* 2005-8-3 14:46:22
*/
public class HelloWorld extends HttpServlet {
public void doGet(HttpServletRequest request,
HttpServletResponse response) throws ServletException, IOException {
//TODO Method stub generated by Lomboz
ServletOutputStream out = response.getOutputStream( );
out.println("<h1>Hello World from an aspect-oriented Servlet!</h1>");
}
}
8、新建一個Aspect,攔截其doGet(..),在其執行之前和之後作相應的advice
/*
* Created on
*
* @Author:Jonathan Q. Bo from tju.msnrl
* MyBlog:http://blog.csdn.net/jonathan_q_bo
*
*/
package org.tju.msnrl.jonathan.aspectj;
import java.io.IOException;
import javax.servlet.ServletOutputStream;
import javax.servlet.http.HttpServletRequest;
import javax.servlet.http.HttpServletResponse;
/**
* @author Administrator
* 2005-8-3 15:43:54
*/
public aspect HelloWorldAspect {
public pointcut captureHttpRequest(HttpServletRequest request,
HttpServletResponse response) :
execution(public void HelloWorld.doGet(HttpServletRequest,
HttpServletResponse)) &&
args(request, response);
before(HttpServletRequest request, HttpServletResponse response)
throws IOException :
captureHttpRequest(request, response)
{
response.setContentType("text/Html");
ServletOutputStream out = response.getOutputStream( );
out.println("<html>");
out.println("<head><title>Adding a title using AspectJ!</title></head>");
out.println("<body>");
}
after(HttpServletRequest request, HttpServletResponse response)
throws IOException :
captureHttpRequest(request, response)
{
ServletOutputStream out = response.getOutputStream( );
out.println("</body>");
out.println("</html>");
}
}
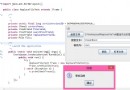
9、部署工程,默認會將工程打包成war文件部署,試驗發現,war文件執行時會報錯,所以,需要改寫build.xml文件,原build.xml文件將編譯好的文件統一放到dist文件夾中,然後對其打包war,簡單修改,只需要將打包過程去掉,將dist文件夾直接拷貝到tomcat_home/webapps/下就可以了
<project name="webmodulebuilder" default="deploy" basedir=".">
<!-- set global properties for this build -->
<property file="build.properties"/>
<property name="dist" value="../../dist" />
<property name="deploy.dir" value="C:/Program Files/Apache Software Foundation/Tomcat 5.0/webapps/rbac" />
<property name="web" value="../" />
<target name="init">
<!-- Create the dist directory structure used by compile
and copy the deployment descriptors into it-->
<mkdir dir="${dist}"/>