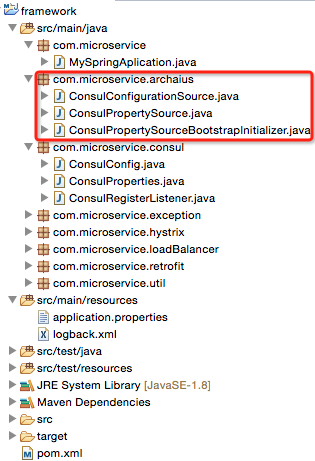
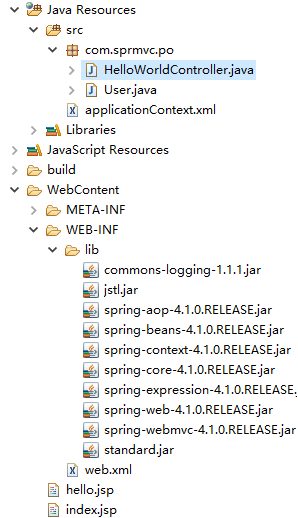
首先導入所需的jar包,項目目錄結構如下:
之後需要配置一下web.xml文件,內容如下:
 1 <?xml version="1.0" encoding="UTF-8"?>
 2 <web-app xmlns:xsi="http://www.w3.org/2001/XMLSchema-instance" xmlns="http://java.sun.com/xml/ns/javaee" xsi:schemaLocation="http://java.sun.com/xml/ns/javaee http://java.sun.com/xml/ns/javaee/web-app_2_5.xsd" version="2.5">
 3   <servlet>
 4     <servlet-name>springDispatcherServlet</servlet-name>
 5     <servlet-class>org.springframework.web.servlet.DispatcherServlet</servlet-class>
 6     <init-param>
 7       <param-name>contextConfigLocation</param-name>
 8       <param-value>classpath:applicationContext.xml</param-value>
 9     </init-param>
10     <load-on-startup>1</load-on-startup>
11   </servlet>
12   <servlet-mapping>
13     <servlet-name>springDispatcherServlet</servlet-name>
14     <url-pattern>/</url-pattern>
15   </servlet-mapping>
16 </web-app>
然後配置applicationContext.xml:
 1 <beans xmlns="http://www.springframework.org/schema/beans"
 2     xmlns:context="http://www.springframework.org/schema/context"
 3     xmlns:xsi="http://www.w3.org/2001/XMLSchema-instance"
 4     xsi:schemaLocation="
 5         http://www.springframework.org/schema/beans
 6         http://www.springframework.org/schema/beans/spring-beans-3.0.xsd
 7         http://www.springframework.org/schema/context
 8         http://www.springframework.org/schema/context/spring-context-3.0.xsd">
 9
10     <!-- 配置自動掃描的包 -->
11     <context:component-scan base-package="com.sprmvc.po"></context:component-scan>
12     <!-- 配置視圖解析器 將HelloWorldController中的返回值解析為實際的物理視圖 -->
13     <bean
14         class="org.springframework.web.servlet.view.InternalResourceViewResolver">
15         <!-- prefix為前綴,suffix為後綴 -->
16         <property name="prefix" value="/"></property>
17         <property name="suffix" value=".jsp"></property>
18     </bean>
19 </beans>
下面開始建立實體類User.java:
 1 package com.sprmvc.po;
 2
 3 public class User {
 4     private String userName;
 5     private String password;
 6     public String getUserName() {
 7         return userName;
 8     }
 9     public void setUserName(String userName) {
10         this.userName = userName;
11     }
12     public String getPassword() {
13         return password;
14     }
15     public void setPassword(String password) {
16         this.password = password;
17     }
18 }
然後是控制層代碼:
 1 package com.sprmvc.po;
 2
 3 import javax.servlet.http.HttpServletRequest;
 4
 5 import org.springframework.stereotype.Controller;
 6 import org.springframework.web.bind.annotation.RequestMapping;
 7 import org.springframework.web.bind.annotation.RequestMethod;
 8
 9 @Controller
10 public class HelloWorldController {
11     @RequestMapping(value="/hello",method = RequestMethod.GET)
12     public String printHelloWorld(HttpServletRequest request,User user) {
13         request.setAttribute("userName", user.getUserName());
14         request.setAttribute("password", user.getPassword());
15         return "hello";
16     }
17 }
這裡的value即訪問路徑,而return的"hello"通過applicationContext.xml中配置的視圖解析器會返回到hello.jsp中
接下來我們建立兩個.jsp頁面,首先是index.jsp:
1 <body>
2     <form method="get" action="hello">
3     用戶名:<input type="text" name="userName">
4     密碼:<input type="password" name="password"><br>
5         <input type="submit" value="提交">
6     </form>
7   </body>
這裡的method和action分別與控制層中的method和value的值相對應,即HelloWorldController.java中的第11行。
然後是hello.jsp:
1 <body>
2 <h1>操作成功了</h1>
3 您的用戶名為:${userName}<br>
4 您的密碼為:${password }
5 </body>
這樣只需要將項目加載到tomcat下就可以進行訪問了,趕快試試把。