個人自工作以來斷斷續續做的一些筆記,斷斷續續筆記
前言:本來從實習開始,自己從來不會養成記筆記的習慣,但後來看見自己老大都工作8年了,還一直在記了很多的筆記,突然發現自己托大了,以下是我改變以後記錄的筆記,希望對大家有所幫助.
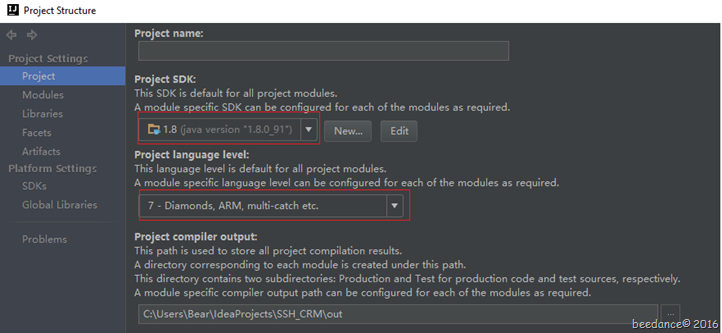
0. 就本人來說:不論是IntelliJ IDEA 還是 eclipse, 字體 用 Consolas, 字形是常規, 大小: 小五 ( IDEA 13 size)
1. Implicit super constructor Object() is undefined for default constructor. Must define an explicit constructor
解決方案:把java的類庫加載進去,在工程上右鍵選擇屬性->Java Build Path的Libraries->Add Library選擇JRE System Library->點擊Next->選擇Execution environment並選擇版本或workspace default jre->點擊Finish。
2. Clone failed: Could not read from remote repository.
用IEDA 克隆失敗, 一般是本地沒有安裝git
3. eclipse 打開 git
window - show view - other - 搜索git - 點擊 git repository - 然後點擊克隆就行
4. IntelliJ IDEA 列編輯
File - setting - key Map - 搜索 column selection mode - 改成 alt+shift+a (純屬個人習慣).
5. eclipse console log 無限制
window - preference - run/debug - console - 把limit console output 前面的鉤去掉
6. eclipse console 列編輯的文字大小和當前編輯框的文字大小不一樣
window - preference - General - Appearance - color and fonts - 搜索 Text Editor Block Selection Font - 編輯
7. IDEA 行寬
File->settings->Code Style->General中,修改“Right margin (columns)”的值即可改變代碼行寬度的限制。
8. eclipse 行寬
Window->Preferences->Java->Code Style->Formatter 在右邊窗口中找到Edit .找到Line Wrapping . 在Maximum line width 中設置寬度(我設置200,感覺比較合適, 哈哈哈哈 ~ )
9. eclipse
D:\tools\eclipse\dropins 本地的eclipse 插件路徑 (暫時理解 dropins 就是插件的文件夾)
com.essiembre.eclipse.i18n.resourcebundle_0.8.0 ResourceBundle Editor插件 :選中一個文件 - 右鍵編輯 - open with - other - 資源文件編輯器 就是 ResourceBundle Editor插件
com.sysdeo.eclipse.tomcat_3.3.0 外置tomcat : alt+t 可以直接啟動tomcat
subclipse svn
openexplorer_100.jar 在項目中,可以選中當前文件/文件夾,可以直接打開本地的目錄
10. maven
安裝
help - install new software- 右上角 點擊add - name: m2e / location: http://download.eclipse.org/technology/m2e/releases
注 :如果 安裝maven 出現沖突, 比如以前安裝失敗過,然後會出來兩個選項,就選擇 合並修改的那個就行.
error
Failure to transfer org.apache.maven.plugins:maven-jar-plugin:pom:2.3.2 from http://repo.maven.apach.......Maven 安裝插件失敗的情況下
點擊eclipse 的 window - preferences - Maven - user settings . 這塊能拿到maven的根目錄. 找到根目錄下面 只要包含 lastupdate 的字樣, 不管是xxxlastupdate.jar 還是 xxx.lastupdate-jar.都算。
找到它的上一級/上上一級目錄,然後刪除, 然後右鍵項目 - maven - update project. ok
11. Log4j cannot find properties file in a simple application
添加 log4j.properties 文件
內容為:(僅供參考)
log4j.rootLogger = debug, stdout
log4j.appender.stdout = org.apache.log4j.ConsoleAppender
log4j.appender.stdout.Target = System.out
log4j.appender.stdout.layout = org.apache.log4j.PatternLayout
log4j.appender.stdout.layout.ConversionPattern=[項目名稱] [%d{yyyy/MM/dd HH:mm:ss:SSS}][%C] %m%n
log4j.logger.org.apache=warn
log4j.logger.org.displaytag=warn
log4j.logger.org.springframework=warn
log4j.logger.org.springmodules=warn
log4j.logger.net.sf.navigator=warn
log4j.logger.com.mchange.v2=warn
log4j.logger.ro.isdc.wro=warn
log4j.logger.org.apache.commons=error
12. maven 項目導入jar 包
在這個域名裡面 搜索想要的jar包 https://mvnrepository.com/artifact/log4j/log4j/1.2.17
下面會有maven 的配置, 直接復制 就行
或者直接在google 搜索 maven slf4j-log4j12-1.7.21-sources repository
(這裡寫需要的jar包)
13. IntelliJ IDEA 小編輯窗口
file - setting - editor tabs
Tab limit : 55
14. alt+t eclipse 啟動tomcat
更改 本地 tomcat D:\tools\apache-tomcat-7.0.64\conf 目錄下的
server.xml.bak 和 server.xml 文件
最後一行
<Context path= "web1" docBase="D:\java_eclipse\web1\WebContent" reloadable="false" crossContext="true" />
<!-- <Context path= "kms" docBase="D:\java_eclipse\web1\WebContent\WEB-INF" reloadable="false" crossContext="true" /> -->
15. 堆內存用來存放由new創建的對象和數組。
在堆中產生了一個數組或對象後,還可以在棧中定義一個特殊的變量,讓棧中這個變量的取值等於數組或對象在堆內存中的首地址,棧中的這個變量就成了數組或對 象的引用變量。
int a = 10;
(變量)棧 堆(new 出來)
16. Probably the path to Git executable is not valid. Fix it.
本地沒有安裝git
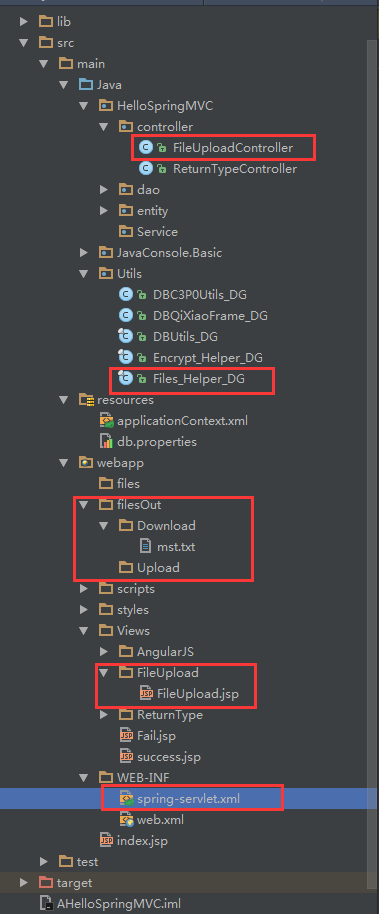
17. idea 導入項目 報 canoot resovle symbol 'alibaba' 之類的異常
file - project structure - 左側菜單 Modules - Sources、Path、Dependecies(一般情況下是這個, 它是jar包), 把錯誤的刪了重新再倒入一下jar包就行.
18. java.io.NotSerializableException: com.kuaikuai.dto.UnitDTO
直接將 UnitDTO implements Serializable 就ok了
19. mysql 本地安裝
一般是有兩次安裝窗口。如果只有一個, 那就點擊windows鍵, 然後找到mysql server instance config wizard 這個程序, 然後點擊接著安裝
20. eclipse 配置 外置的tomcat alt + t
server.xml : D:\tools\apache-tomcat-7.0.64\conf\server.xml 配置如下
<Context path= "demo" docBase="D:\java\demo\WebContent" reloadable="false" crossContext="true" />
path= "demo" : demo 是項目的名稱
docBase="D:\java\demo\WebContent" : 是項目的絕對路徑
如果能 進去index.jsp 但是訪問不了其他的servlet, 就 右鍵 項目 - properties - Java Build Path - source 裡面 最下面有一個 Browse 按鈕。點擊之後。選中WebContent下面的 WEB-INF 創建一個classes 的文件夾, 點擊ok
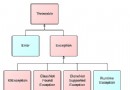
21. exception 分為編譯時異常和運行時異常, error 是發生大型的錯誤.
22. 將成績行數據轉成列
select name,
case when coach = 'a' then course end as a,
case when coach = 'b' then course end as b,
case when coach = 'c' then course end as c,
case when coach = 'd' then course end as d
from da;
23. mysql where id in 排序 按in的順序排序
1. select * from user_subject where id in(
2628,
2629,
3786
) order by field(
id,
2628,
2629,
3786
);
2. select * from user_subject where id in(
2628,
2629,
3786
) order by substring_index(
'2628,
2629,
3786',
id,
1
);
24. Error: Can't update: no tracked branch
No tracked branch configured for branch git. To make your branch track a remote branch call, for example,
git branch --set-upstream git origin/git
解決方案: IDEA 右下角有一個 Git:master , 當然報這個錯的時候可能不是Git:master 而是 Git:git 或者是 Git:XXX , 點擊它, current branch: 是否是master, 如果不是的話,
點擊local branch下面的 xxx , 再點擊 CheckOut 切換工作目錄, 然後xxx 分支如果沒有用的話, 就直接remove;
25. int[] arr = new int[0];
比直接賦null好的地方在於:可以避免arr.length出現空指針。
26. 將 textarea 不可變
27. centOS eclipse 加不了servers
1. 關閉Eclipse
2. 打開WorkSpace所在的位置。
{workspace-directory}/.metadata/.plugins/org.eclipse.core.runtime/.settings
刪除以下文件
org.eclipse.wst.server.core.prefs
org.eclipse.jst.server.tomcat.core.prefs
3. 重啟 Eclipse,即可解決所有問題。
28. could not load the tomcat server configuration at /servers/tomcat v7.0 server at localhost-config. the configruation may be corrupt or incomplete. -- 始終tomcat(web項目)跑不起來。
當前解壓的tomcat 文件配置有損壞。直接重新下載一個,重新解壓, 配置到eclipse就行。記得把原來的損壞的tomcat刪除掉。
29. checkbox 選中
$('input[type="checkbox"]').change(function() {
alert ("The element with id " + this.id + " -- " + this.value + " changed.");
});
選中的個數: var num = $("input:checked").length;
選中ID-checkbox: $("#role1").attr("checked", true);//false
30. 應用程序下面 有個 編程 ,編程裡面有個 Eclipse 4.4.1 怎麼刪除?
在/usr/share/applications 刪除 eclipse.desktop
ln -s /opt/eclipse/eclipse /usr/bin/eclipse 是軟鏈接
31. 前台通過id 取select 的值的時候, 如果一直取得是一樣的那就有可能是下面這種情況:
<form:hidden path="gym_id" />
<form:select cssClass="form-control" path="gym_id" items="${gymList}" itemLabel="name" itemValue="id"></form:select>
因為一個頁面同時存在兩個相同的gym_id, 所以在取值的時候一直取的是上面的id,
解決辦法就是把 上面那個沒有用的刪掉,就行.
32. The archive: C:/Program Files/Apache Software Foundation/Tomcat 7.0/bin/bootstrap.jar which is referenced by the classpath, does not exist.
因為我之前將window - perferenes - servers - runtime envionments - 裡面的tomcat 路徑從C 盤改到了 D盤。導致報了這個錯誤。
解決方案: 點擊window - show view - servers - 雙擊 tomcat server - open launch configuration - classpath - user entries - tools.jar、bootstrap.jar、tomcat.jar。 這三個jar包嗎,然後看看路徑對不對,如果路徑錯誤或者有重名的就把它刪掉。
33. eclipse 修改 console 字體大小
Windows - Preferences - General - Appearance - Color and Font - Debug - Console font - edit - console 常規 小五
34. java.lang.NoSuchMethodException: Unknown property 'isFirstGym' on class 'class com.kuaikuai.dto.SubjectUserClaasesDTO
應該是這個字段的get、set寫錯了。isFirstGym 寫成 FirstGym
35. 連接Robomongo
file - content - create/edit - connection
- name : kuaikuai
- address : 101.200.201.27 : (端口) : 37171
- authentication
將 perform authentication 的選擇框 勾選上
Database : admin
user name : root
password : Kuaimongodb001Kuai
Auth Mechanism :選擇的是 默認的 SCRAM-SHA-1
最後點擊左下角的 test - save
36. 取消form表單 input 回車自動提交
<input type="text" size="35" name="q" id="query" value="${param.q}" placeholder="請輸入要搜索的內容..." class="form-control input-sm" onkeypress="javascript:return checkKeys();"/>
function checkKeys(){
if(event.keyCode == 13){
doSearch();
return false;
}
}
37. 前台判斷list 為空 <c:if test="${kkUserList != '[]'}">
38. <display:table name="articles" cellspacing="0" cellpadding="0" requestURI="" defaultsort="1" id="article" />
name="articles" : articles 是屬於 後台傳過來的list
id="article" : article 可以自己定義,相當於變量
<img src="${article.article_img}" width="50px"/>
src="${article.article_img}" : article.article_img 中的 article 屬於上面定義的 id, 並不是 name
39. IntelliJ IDEA 取消控制台行數限制
安裝目錄 : C:\Program Files (x86)\JetBrains\IntelliJ IDEA Community Edition 2016.1.1\bin
在idea7之後的版本中取消了 控制台行數設置 選項,只能通過更改配置文件進行更改
在%安裝目錄%/bin中找到idea.properties文件,更改idea.Cycle.buffer.size項值為disabled,保存,重啟idea即可
40. 轉換大小寫
IDEA : ctrl + shift + u
eclipse : ctrl + shift + x / y
41. guava Join
uuid : String sql = "select name, uuid from user where uuid in ('" + Joiner.on("','").join(list) + "') ";
id : String gymSql = "select name, id from gym where id in (" + Joiner.on(",").join(gymList) + ") ";
42. java中long類型轉換為int類型
一、強制類型轉換
[java]
long ll = 300000;
int ii = (int)ll;
二、調用intValue()方法
[java]
long ll = 300000;
int ii= new Long(ll).intValue();
三、先把long轉換成字符串String,然後在轉行成Integer
[java]
long ll = 300000;
int ii = Integer.parseInt(String.valueOf(ll));
43. select * from `topic` limit 0, 10;
下標是從0開始, 查詢10條;
44. js Uncaught SyntaxError: Unexpected identifier
{"share":{"share_url":"http://www.kuaikuaikeji.com/page/bangyangdeliliangliyao","share_text":" 胖妞與女神之間就差一個\"快快\" 甩肉18斤女神用事實說話","share_title":"甩肉18斤,女神用行為證明"},"pic":"http://kuaikuai.oss-cn-beijing.aliyuncs.com/upload/bd7b4a90-c229-4cac-86c7-e90f199fc92e.png","type":"h5","url":"http://www.kuaikuaikeji.com/page/bangyangdeliliangliyao"}
這個json裡面 的 "快快"是有雙引號的。所以匯會錯
replace 一下 controller 的json就行 : bannerJson = bannerJson.replace("\\", "\\\\");
45. array : length, list : size
js :
imgArray.length
imgList.size
java :
imgArray.length()
imgList.size()
var textImgArray = eval("(" + textImg + ")");
eval:
1. 將字符串的數組 轉換成jsonArray
var a = JSON.stringify(imgArray[item]);
1. 將json數組轉成、字符串
JSON.stringify(uploadImgUrl); : 轉換成json 對象
for 循環
for ( var item in imgArray) {
jsonLength++;
}
46. 為圖片 加精
function showPreviewImageSortArray(picJsonDataDivId, imgPreviewDivId) {
var gymPicStr = $("#" + picJsonDataDivId).val();
if (gymPicStr != '') {
$("#" + imgPreviewDivId).empty();
var picStr = convertEntities(gymPicStr);
var imgArray = eval("(" + picStr + ")");
for (var i = 0; i < imgArray.length; i++) {
var imgElem = '<a class="example-image-link" href="' + imgArray[i].original_pic + '" data-lightbox="example-set" >';
imgElem += '<img class="example-image" src="' + imgArray[i].thumbnail_pic + '" alt="" />';
imgElem += '</a> <input type="button" id="button'+i+'" name="button'+i+'" value="為圖片加精" onclick="buttonClick('+i+');"/><br>';
$(imgElem).appendTo($("#" + imgPreviewDivId));
}
}
}
function buttonClick(i){
var button_id = "button"+i; //取出 當前點擊 button Id
if ($("#" + button_id).val()=='為圖片加精'){
$("#" + button_id).parents('#imgDiv').find('input').val('為圖片加精');
$("#" + button_id).val('取消加精');
$("#" + button_id).parents('#imgDiv').find('.icon-jing').remove();
$("#" + button_id).prev().append('<em class="icon-jing"><img src="<c:url value="/images/icon-jing.jpg" />" width="20"></em>')
} else if ($("#" + button_id).val()=='取消加精'){
$("#" + button_id).val('為圖片加精');
$("#" + button_id).parents('#imgDiv').find('.icon-jing').remove();
}
}
47. js
標簽: type="hidden"
方法: $("#a").hide();
.toFixed(1) 取小數點後1位,四捨五入 : toFixed() 方法可把 Number 四捨五入為指定小數位數的數字
//取出相對應的topic_uuid
var topic_uuid = $(this).attr('id');
48. 當頁面action 的值沒有錯誤的時候,始終跳轉不到指定的controller, 可能是js 裡面某個id或者name 的值 js 無法通過 :
<input type="text" id="picAddJing" name="picAddJing"/>
<input type="text" id="pics" name="pics"/>
49. mongodb 裡面是bson,能解析成json,但是它並不是json,它的每一個key的是數據庫的字段,不能隨便添加刪除
50. java set 直接轉成list
List<String> action_code_list = new ArrayList<String>();
action_code_list.addAll(set);
51. mysql 一共有三個表A/B/C,三個表中有一列相同(comment), 一條語句中把三個表中的這一列的全部數相加
select a+b+c from
(SELECT sum(comment) a FROM A)t1,
(SELECT sum(comment) b FROM B) t2,
(SELECT sum(comment) c FROM C) t3
52. 前端: 頁面 縮小, 列表 不會出邊框
theme-blue-gradient : 當前頁面 body 的class
$(".theme-blue-gradient").attr("style","min-width:1420px;");
53. 如何實現CentOS虛擬機 和windows主機 互相粘貼東西. [create_time : 2016-09-30 11:16, 主機: windows 7, 虛擬機: centOS 6.8]
1. 啟動虛擬機。
2.
1. 文字的共享粘貼 ----> 點擊設備-共享粘貼板-雙向
2.實現文件共享粘貼 ----> 點擊設備-拖放-雙向
3. 這樣就應該可以了.
如果不行的話。
1. 關閉虛擬機, 啟動 Oracle VM VirtualBox 管理器
2. 點擊設備 - 存儲 - 控制器:SATA, 把 "使用主機輸入輸出(I/O)緩存" 的選擇框 選上.
3. 點擊設備 - 存儲 - 控制器:SATA - centOS.vdi. 把"固態驅動器" 的選擇框 選上.
最後一個可能, 可能是沒有安裝增強centOS的 功能
54. 更改linux root 密碼. [create_time : 2016-09-30 11:21, 主機: windows 7, 虛擬機: centOS 6.8]
[e@localhost ~]$ su (這裡寫su或者是 su -root)
密碼:(我當前root密碼是1)
[root@localhost e]# passwd (輸入更改密碼的命令)
更改用戶 root 的密碼 。
新的 密碼:(這裡寫新的密碼, 下面這兩句是校驗密碼太短了, 如果無所謂的話, 直接回車就行.)
無效的密碼: WAY 過短
無效的密碼: 是回文
重新輸入新的 密碼:
passwd: 所有的身份驗證令牌已經成功更新。
[root@localhost e]# exit (是退出當前root(用戶), 回到上一個 e(用戶))
55. IDEA 編輯java項目
添加jar :右鍵項目 - open module settings - libraries - 點擊 " + " - 選擇 jar 目錄 - 導入 - ok
.java 文件 應該是 class 的圖標 :右鍵src 包名 - Mark directory As - source Root
創建github 上面的倉庫並使用
賬號 : 837535456@qq.com
密碼 :wjrw2012.12.10
url: https://github.com/randy-zs/kms_test ,
1. 給倉庫添加ssh-key 公鑰,
I. 在eclipse 上面 點擊 General - Network Connections - SSH2 - Key Management - Generate RSA Key - 如果本地 "C:\Users\Administrator\.ssh" 下面沒有 id_rsa(私鑰) 和 id_rsa.pub(公鑰) 這兩個文件的話,
就點擊右下角 save private key - ok,
II. 進入 "C:\Users\Administrator\.ssh" 目錄下面 把 id_rsa.pub (公鑰) 的 內容 拷貝出來. 放到 github 頁面中的 Settings(個人設置) - SSH and GPG keys - new SSH key -
Title : (隨便寫)
Key : (id_rsa.pub (公鑰) 的 內容)
然後點擊 Add SSH key
2. 進入 github kms_test頁面, 右邊有一個clone and download 點擊它 - 再點擊右上角 use ssh - 拷貝 "git@github.com:randy-zs/kms_test.git" 這個地址
在idea - VCS - Checkout out from version control - Git 上面 clone 下來 - 選擇好 目錄 - ok .
3. 如果 idea 文件名字 是紅色的. 點擊 項目名稱 - VCS - GIT - Add - ok .
56. 將 IDEA 提交的 項目重置 為最初始的項目.
57. 當IDEA 不需要 提交某個文件夾或者說文件的代碼的時候
在工作路徑 D:\java_idea\kms_test 的下面創建 .gitignore 文件
.gitignore 的 內容
.idea
*.iml
.svn
*.jar
.project
.classpath
.settings
target
bin
*.cfe
*.cfs
*.si
write.lock
/lucene/
.gitignore 的 內容 : 相當於屏蔽所有 帶 .jar 的文件.
如果 .gitignore 這個文件沒有作用的話。。就把不需要上傳的文件先刪了,再重新 加載一下就行。
58. idea 左下角 run todo 之類的不出來。 直接點左下角的按鈕就行.
59. 導出excel
如果導出來純數字的數據, 且在單元格的左上角有綠色三角團, 就在set value 的時候 parse 一下 : .setCellValue(Long.parseLong(tele));
60. 當clone 下來的 idea 項目 顯示不出來目錄結構、無法使用.
1. 右鍵項目 open Module Settings - Modules - 如果為空的話 點擊 " + " 號 import Module - 一路next - 在選擇項目的時候 選擇這個 目錄是這個格式的項目 (D:\temp\kms_test)[src] - 然後 finish.
2. 緊接著把 name 改成 跟項目名稱一樣, 其實主要是這塊的name 跟 根目錄 D:\temp\kms_test\out\production 下面的name 一樣, 如果名稱跟項目名稱一樣的話便於管理. - ok.
Modules - Name 裡面 的 名稱, 必須和 根目錄 D:\temp\kms_test\out\production 下面的 kms_test 名稱一樣, 否則程序 運行不了, 一直會報 ClassNotFoundException.
然後在 open Module Settings - libraries - 添加所以要的jar包.
61. windows 主機 linux(centOS) 虛擬機 互相粘貼 -- 如果不行,就可能是沒有安裝增強功能...
啟動虛擬機 - 設備 - 共享粘貼板 - 雙向.
62. windows 主機 linux(centOS) 虛擬機 共享文件夾 -- 如果不行,就可能是沒有安裝增強功能...
研究了N多天, 終於研究完了...
I. sudo usermod -aG vboxsf e (這個命令是 將 e 這個用戶添加的 vboxsf 的組裡). vboxsf: 共享文件夾 默認 組的名字. 全球都是這樣, 不要問為什麼.
如果提示 : 用戶不在sudoers文件中的解決方法, 就走第II步, 如果沒有的話, 就ok了.
II. 切換到root用戶
[linux@localhost ~]$ su root
密碼:
[root@localhost ~]#
2
查看/etc/sudoers文件權限,如果只讀權限,修改為可寫權限
[root@localhost ~]# ll /etc/sudoers
-r--r-----. 1 root root 4030 12月 10 09:55 /etc/sudoers
[root@localhost ~]# chmod 777 /etc/sudoers
[root@localhost ~]# ls -l /etc/sudoers
-rwxrwxrwx. 1 root root 4030 12月 10 09:57 /etc/sudoers
3
修改/etc/sudoers文件,執行命令如下:
/*username是你的用戶名*/
[root@localhost ~]# echo 'username ALL=(ALL) ALL' >> /etc/sudoers
或者root權限下輸入Visudo 或者 vim /etc/sudoers,找到 root ALL=(ALL) ALL的字段,在下一行追加:
username ALL=(ALL) ALL
5分鐘之後密碼過期,下次需要重新輸入,如果不想如此麻煩,可以用以下方法
username ALL=(ALL) NOPASSWD: ALL
說明:格式為{用戶名 網絡中的主機=(執行命令的目標用戶) 執行的命令范圍}
4
保存退出,並恢復/etc/sudoers的訪問權限為440
[root@localhost ~]# chmod 440 /etc/sudoers
[root@localhost ~]# ll /etc/sudoers
-r--r-----. 1 root root 4030 12月 10 09:59 /etc/sudoers
5
切換到普通用戶,測試用戶權限提升功能
III. 在虛擬機系統裡. 點擊 設備 - 共享文件夾 - 選擇 共享文件夾的路徑、填寫名稱 - 選擇 自動掛機、固定分配 - ok.
IV. 重啟 虛擬機 - ok .
另: gpasswd -d e vboxsf (這個命令是 將 e 這個用戶 從 vboxsf 這個組裡刪除)
63. 初學者利用git 上傳代碼到Coding的簡單操作步驟. 共有兩種方法,
第一種是參考第二種, 自己寫出來自己用的. 第二種是網上摘抄的. url: http://www.cnblogs.com/gdfhp/p/5889168.html author: skyfhp
1. 通過 Git Bash 命令, 進入項目根路徑.
git add .
git commit –m "第一次提交"
git remote add origin git@git.coding.net:zhangdeshuai/kms_test.git
git push origin master (這個命令完了之後會讓你輸入在coding雲端的賬號密碼.)
賬號: zhangdeshuai
密碼: qqmm(wjrw2012.....)
ok..
2. I. 首先登陸coding網站注冊賬號https://coding.net/
II. 登陸剛注冊的coding賬號 ,添加項目
添加項目—〉輸入項目名稱(chap1)—〉輸入對項目的簡單描述---〉選擇"私有"—〉創建項目
III. 到此為止,後面需要將本次實驗內容push到該項目chap1下。
此處,需要記錄http://git.coding.net/gdcs16_000/chap1.git (gdcs16_000為你的注冊名,chap1為創建的項目名)
也可以通過coding網站,選中你的項目—〉代碼,可以找到
IV. 安裝git 客戶端
先安裝Git軟件:Git for Windows下載。// http://git-scm.com/
安裝過程中的詳細說明可參考
http://blog.csdn.net/vipzjyno1/article/details/22098621
V. 創建本地git 倉庫
在本地磁盤創建一個文件夾,用來存放需要push到coding上的文件。打開此文件夾,單擊右鍵—〉 git bash here
輸入
git init (此步操作完成後,會在此文件夾下生成一個隱藏的.git後綴文件)
VI. 添加、提交文件到本地倉庫
在剛才創建的test文件夾中新建了3個文件,將這些文件添加並提交到本地倉庫
用到的命令:
git add . 或者 git add <filename>
git commit –m "項目描述"
VII. 將本地文件推送到coding服務器
git remote add origin https:// git.coding.net/用戶名/項目名.git
git push origin master
總結:
1>. Push 過程中遇到的問題及處理方法
(1) 如果push時遇到無權限,沒有提示輸入用戶名和密碼直接403的問題
處理方法:直接修改.git/config文件中url:
https://coding用戶名:密碼@git.coding.net/用戶名/項目名.git
或者通過命令:
git remote add origin https://coding用戶名:密碼@git.coding.net/用戶名/項目名.git
(2)如果出現(non-fast-forward)錯誤,
可以直接用-f(強制推送)
git push –f origin master
總結一下用到的命令,主要有
git init
git add
git commit
git remote add origin https://git.coding.net/用戶名/項目名.git
git push origin master
2>. 關於git的更多詳細說明請參考下列文獻
[1] Coding網站help中的git代碼托管
https://coding.net/help/faq/git/git.html#git--git--codingnet
[2] git教程(廖雪峰的官方網站
http://www.liaoxuefeng.com/
[3] 比較詳細的git原理及使用
https://git-scm.com/book/zh/v2
[4] git 的簡易指南
http://www.bootcss.com/p/git-guide/
64. 一個回車鍵占用幾個字節?
一個回車鍵=兩個字符, 兩個字符=2個字節, 2個字節=2byte
65. 數據庫: 當服務器 數據庫的 數據 導入本地數據庫的時候, 部分表的數據沒有能正確導入, 報了很多錯誤.
主要是因為兩個數據庫的 字符集和 排序規則不一樣.
如果 要將本地 數據庫的 字符集和 排序規則 更改成 服務器數據庫的 格式, 記得要將 字符集和 排序規則 一塊改, 如果 只改其中一個, 會報錯
服務器 字符集 :utf8 -- UTF-8 Unicode
排序規則:utf8_general_ci
66.