在傳統的Spring MVC開發方法中,必須在Bean配置文件中為每個控制器類配置實例和請求映射和讓每個控制器類去實現或者擴展特定於框架的接口或者基類,不夠靈活。
如果Spring MVC可以自動偵測你的控制器類和請求映射,就能減少配置所需要的工作量。
Spring2.5支持一種基於注解的控制器開發方法。
Spring可以通過@Controller注解自動發現你的控制器類以及@RequestMapping注解中的請求映射,這樣就為你免去了在Bean配置文件中配置它們的麻煩。此外,如果使用注解,控制器類和處理程序方法在訪問上下文資源(例如請求參數、模型屬性和會話屬性)時也會更加靈活。
常用到的注解
1、@Controller
2、@RequestMapping
3、@RequestParam, @PathVariable, @CookieValue
4、ModelAndView
@Controller注解能將任意的類標注成控制器類。與傳統的控制器相反,被標注的控制器類不需要實現特定於框架的接口,也不必擴展特定於框架的基類。
在控制器類內部,可能有一個或者多個處理程序方法添加了@RequestMapping注解。
處理程序方法的簽名非常靈活。你可以為處理程序方法指定任意的名稱,並定義以下任意一種類型作為它的方法參數。在這裡,只提到了常見的參數類型。關於有效參數類型的完整列表,請參閱有關配置基於注解的控制器的Spring文檔。
常見的參數類型
1.HttpServletRequest、HttpServletResponse或HttpSession。
2.添加了@RequestParam注解的任意類型的請求參數
3.添加了@ModelAttribute注解的任意類型的模型屬性
4.任意類型的命令對象,供Spring綁定請求參數
5.Map或者ModelMap,供處理程序方法向模型添加屬性
6.Errors或者BindingResult,讓處理程序方法訪問命令對象的綁定和驗證結果
7.SessionStatus,讓處理程序方法發出會話處理已經完成的通知
常見的返回值類型
處理程序方法的返回類型可以是ModelAndView、Model、Map、String、void
在創建基於注解的控制器之前,必須構建web應用程序上下文來處理注解。
首先,為了讓Spring用@Controller注解自動偵測控制器,必須通過<context:component-scan>元素啟用Spring的組件掃描特性。
其次Spring MVC還能夠根據@RequestMapping將請求映射到控制器類和處理程序方法。
為了使其生效,必須在web應用程序上下文中注冊DefaultAnnotationHandlerMapping實例和AnnotationMethodHandlerAdapter實例。
它們分別處理在類級別和方法級別上的@RequestMapping注解。
ModelAndView
這個構造方法構造出來的ModelAndView 不能直接使用,應為它沒有指定view,也沒有綁定對應的model對象。當然,model對象不是必須的,但是view確實必須的。
用這個構造方法構造的實例主要用來在以後往其中加view設置和model對象。
給ModelAndView實例設置view的方法有兩個:setViewName(String viewName) 和 setView(View view)。前者是使用viewName,後者是使用預先構造好的View對象。其中前者比較常用。事實上View是一個接口,而不是一個可以構造的具體類,我們只能通過其他途徑來獲取View的實例。對於viewname,它既可以是jsp的名字,也可以是tiles定義的名字,取決於使用的ViewNameResolver如何理解這個view name。如何獲取View的實例以後再研究。
而對應如何給ModelAndView實例設置model則比較復雜。有三個方法可以使用:
addObject(Object modelObject)
addObject(String modelName, Object modelObject)
addAllObjects(Map modelMap)
ModelAndView可以接收Object類型的對象,ModelAndView將它視為其眾多model中的一個。當使用Object類型的對象的時候,必須指定一個名字。ModelAndView也可以接收沒有明顯名字的對象,原因在於ModelAndView將調用spring自己定義的Conventions 類的.getVariableName()方法來為這個model生成一個名字。顯然,對model而言,名字是必須的。
Conventions.getVariableName()生成名字的規則是使用對象的類名的小寫模式來作model名字。當這個model是集合或數組的時候,使用集合的第一個元素的類名加s來作model的名字。
ModelAndView也可以接收Map類型的對象,ModelAndView將這個Map中的元素視為model,而不是把這個Map本身視為model。但是其他的集合類可以用本身作為model對象。實際上,ModelAndView對model的支持來自於類ModelMap,這個類繼承自HashMap。
<?xml version="1.0" encoding="UTF-8"?>
<web-app xmlns:xsi="http://www.w3.org/2001/XMLSchema-instance"
xmlns="http://java.sun.com/xml/ns/javaee"
xsi:schemaLocation="http://java.sun.com/xml/ns/javaee http://java.sun.com/xml/ns/javaee/web-app_2_5.xsd"
id="WebApp_ID" version="2.5">
<display-name>SpringMvc02</display-name>
<welcome-file-list>
<welcome-file>index.jsp</welcome-file>
</welcome-file-list>
<servlet>
<servlet-name>springmvc</servlet-name>
<servlet-class>org.springframework.web.servlet.DispatcherServlet</servlet-class>
<init-param>
<param-name>contextConfigLocation</param-name>
<param-value>classpath:spring-mvc.xml</param-value>
</init-param>
</servlet>
<servlet-mapping>
<servlet-name>springmvc</servlet-name>
<url-pattern>*.do</url-pattern>
</servlet-mapping>
</web-app>
<?xml version="1.0" encoding="UTF-8"?>
<beans xmlns="http://www.springframework.org/schema/beans"
xmlns:xsi="http://www.w3.org/2001/XMLSchema-instance"
xmlns:p="http://www.springframework.org/schema/p"
xmlns:context="http://www.springframework.org/schema/context"
xsi:schemaLocation="
http://www.springframework.org/schema/beans
http://www.springframework.org/schema/beans/spring-beans.xsd
http://www.springframework.org/schema/context
http://www.springframework.org/schema/context/spring-context.xsd">
<!-- 使用注解的包,包括子集 -->
<context:component-scan base-package="com"/>
<!-- 視圖解析器 -->
<bean id="viewResolver"
class="org.springframework.web.servlet.view.InternalResourceViewResolver">
<!—前綴 -->
<property name="prefix" value="/WEB-INF/jsp/" />
<!—後綴 -->
<property name="suffix" value=".jsp"></property>
</bean>
</beans>
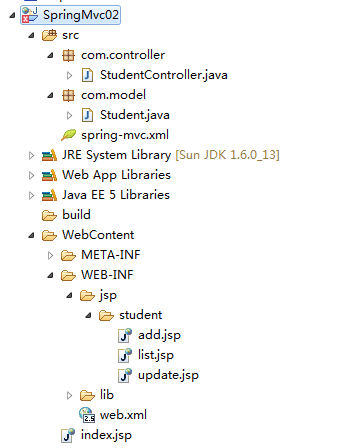
public class Student {
private int id;
private String name;
private int age;
public Student() {
super();
}
public Student(int id, String name, int age) {
super();
this.id = id;
this.name = name;
this.age = age;
}
<!-- 下面的get,set方法省略 -->
}
@Controller
@RequestMapping("/student")
public class StudentController {
private static List<Student> studentList=new ArrayList<Student>();
//只添加一次,用static
static{
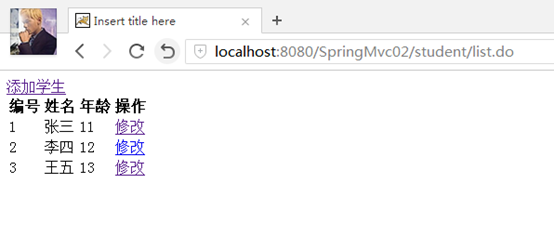
studentList.add(new Student(1,"張三",11));
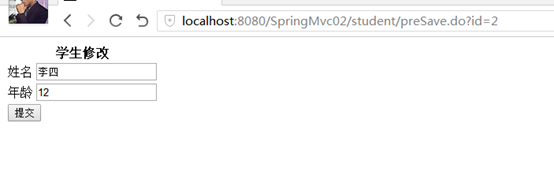
studentList.add(new Student(2,"李四",12));
studentList.add(new Student(3,"王五",13));
}
@RequestMapping("/list")
public ModelAndView list(){
ModelAndView mav=new ModelAndView();
mav.addObject("studentList", studentList);//這裡調用的是model的方法,將studentList對象傳遞到視圖上
mav.setViewName("student/list");//這裡視圖name對應student/list.jsp,調用student/list.do則頁面會返回到student/list.jsp
return mav;
}
@RequestMapping("/preSave")
public ModelAndView preSave(@RequestParam(value="id",required=false) String id){//參數id,這裡的id就相當於servlet中的request.getPaXXx("id"),required=false,表示不是必須參數,可以沒有參數,默認為true,另一個常見的參數是DefaultValue.
ModelAndView mav=new ModelAndView();
if(id!=null){
mav.addObject("student", studentList.get(Integer.parseInt(id)-1));
mav.setViewName("student/update");
}else{
mav.setViewName("student/add");
}
return mav;
}
}
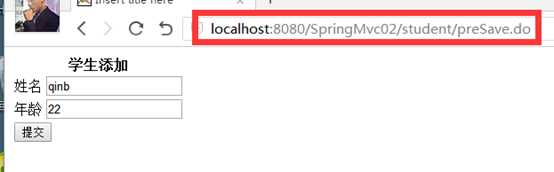
add.jsp
<body>
<form action="${pageContext.request.contextPath}/student/save.do" method="post">
<table>
<tr>
<th colspan="2">學生添加</th>
</tr>
<tr>
<td>姓名</td>
<td><input type="text" name="name"/></td>
</tr>
<tr>
<td>年齡</td>
<td><input type="text" name="age"/></td>
</tr>
<tr>
<td colspan="2">
<input type="submit" value="提交"/>
</td>
</tr>
</table>
</form>
</body>
list.jsp
頁面前引用:<%@ taglib prefix="c" uri="http://java.sun.com/jsp/jstl/core"%>
<body>
<a href="${pageContext.request.contextPath}/student/preSave.do">添加學生</a>
<table>
<tr>
<th>編號</th>
<th>姓名</th>
<th>年齡</th>
<th>操作</th>
</tr>
<c:forEach var="student" items="${studentList }">
<tr>
<td>${student.id }</td>
<td>${student.name }</td>
<td>${student.age }</td>
<td><a href="${pageContext.request.contextPath}/student/preSave.do?id=${student.id}">修改</a></td>
</tr>
</c:forEach>
</table>
</body>
update.jsp
<body>
<form action="${pageContext.request.contextPath}/student/save.do" method="post">
<table>
<tr>
<th colspan="2">學生修改</th>
</tr>
<tr>
<td>姓名</td>
<td><input type="text" name="name" value="${student.name }"/></td>
</tr>
<tr>
<td>年齡</td>
<td><input type="text" name="age" value="${student.age }"/></td>
</tr>
<tr>
<td colspan="2">
<input type="hidden" name="id" value="${student.id }"/>
<input type="submit" value="提交"/>
</td>
</tr>
</table>
</form>
</body>
Index.jsp轉向頁面
<%@ page language="java" contentType="text/html; charset=ISO-8859-1"
pageEncoding="ISO-8859-1"%>
<% response.sendRedirect("student/list.do"); %>
student/save.do還沒寫,修改和添加在下篇