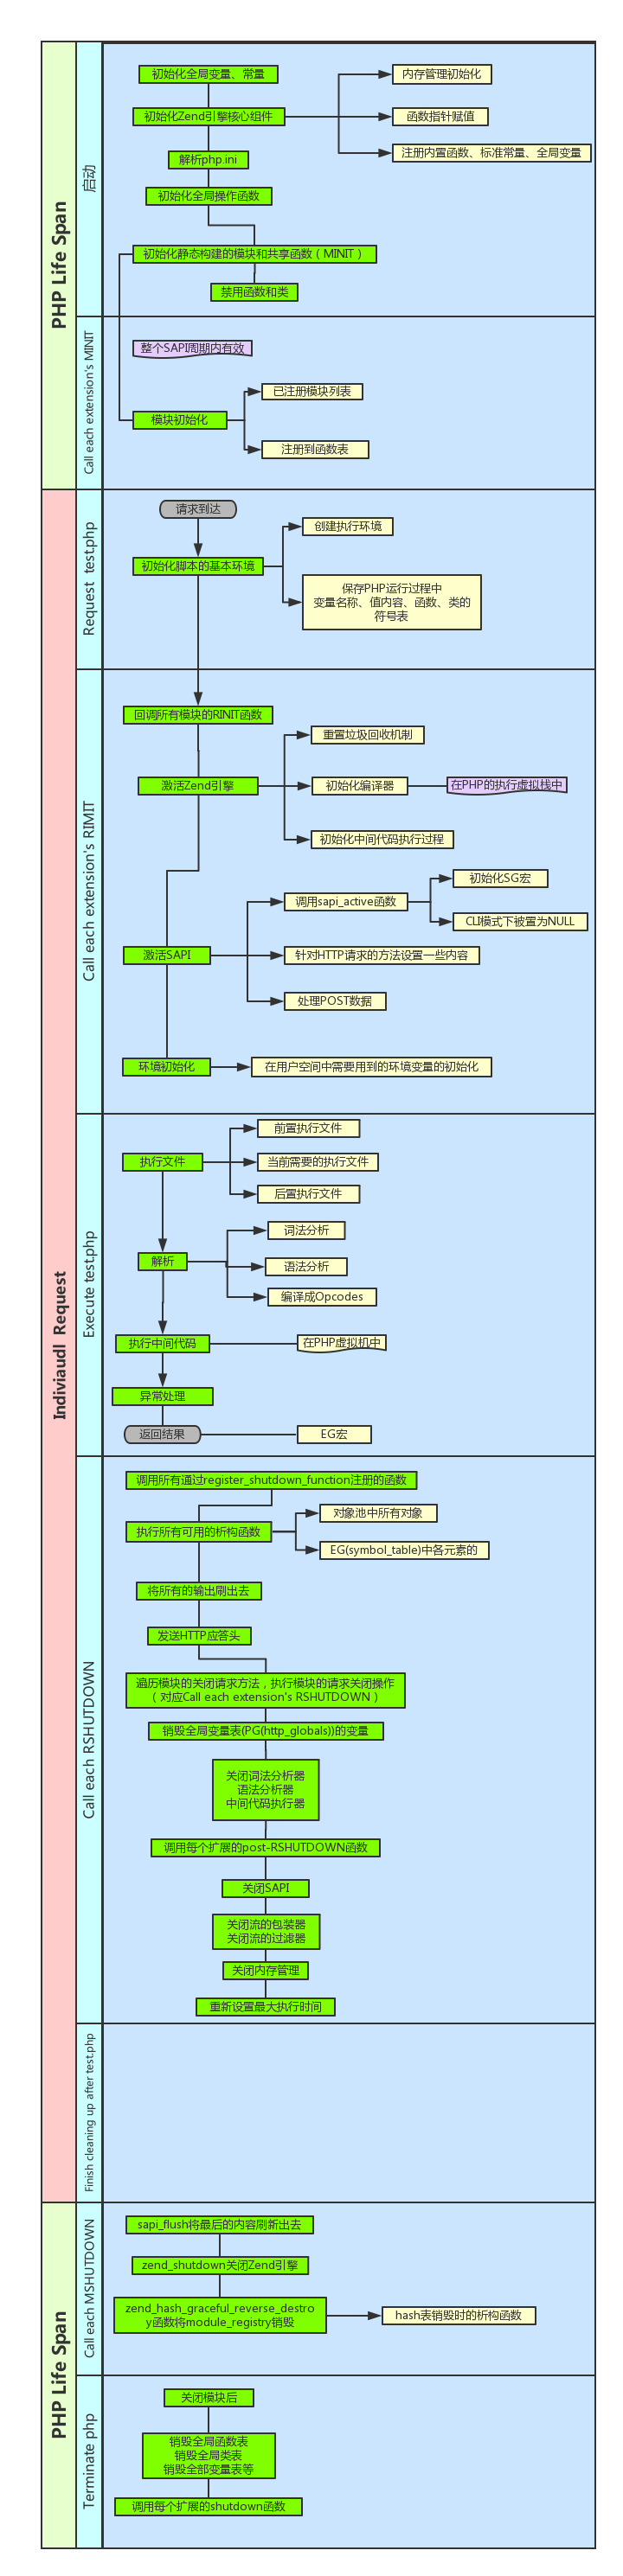
為了保持代碼的整潔性和可讀性,使用Repository Pattern 是非常有用的。事實上,我們也不必僅僅為了使用這個特別的設計模式去使用Laravel,然而在下面的場景下,我們將使用OOP的框架Laravel 去展示如何使用repositories 使我們的Controller層不再那麼啰嗦、更加解耦和易讀。下面讓我們更深入的研究一下。
repositories其實使用Repositories並不是必要的,在你的應用中你完全可以不使用這個設計模式的前提下完成絕大多數的事情,然而隨著時間的推移你可能把自己陷入一個死角,比如不選擇使用Repositories會使你的應用測試很不容易,(swapping out implementations)具體的實現將會變的很復雜,下面我們看一個例子。HousesController.php
<?php
    class HousesController extends BaseController {
        public function index()
        {
            $houses = House::all();
            return View::make('houses.index',compact('houses'));
        }

        public function create()
        {
            return View::make('houses.create');
        }
        public function show($id)
        {
            $house = House::find($id);
            return View::make('houses.show',compact('house'));
        }
    }
這是一個很典型的一段代碼使用Eloquent和數據庫交互,這段代碼工作的很正常,但是controller層對於Eloquent而言將是緊耦合的。在此我們可以注入一個repository創建一個解耦類型的代碼版本,這個解耦的版本代碼可以使後續程序的具體實現更加簡單。
repositories其實完成整個repository模式需要相當多的步驟,但是一旦你完成幾次就會自然而然變成了一種習慣了,下面我們將詳細介紹每一步。
Repository 文件夾首先我們需要在app文件夾創建自己Repository 文件夾repositories,然後文件夾的每一個文件都要設置相應的命名空間。
Interface類第二步創建對應的接口,其決定著我們的repository類必須要實現的相關方法,如下例所示,在此再次強調的是命名空間一定要記得加上。HouseRepositoryInterface.php
<?php namespace App\Repositories;

interface HouseRepositoryInterface {
    public function selectAll();

    public function find($id);
}
Repository類現在我們可以創建我們repository類 來給我們干活了,在這個類文件中我們可以把我們的絕大多數的數據庫查詢都放進去,不論多麼復雜。如下面的例子DbHouseRepository.php
<?php namespace App\Repositories;

use House;

class DbHouseRepository implements HouseRepositoryInterface {

    public function selectAll()
    {
        return House::all();
    }

    public function find($id)
    {
        return House::find($id);
    }
}
首先你需要理解所謂服務提供,請參考手冊服務提供者BackendServiceProvider.php
<?php namespace App\Repositories;

use IlluminateSupportSeriveProvider;

class BackSerivePrivider extends ServiceProvider {

    public function register()
    {
        $this->app->bind('App\Repositories\HouseRepositoryInterface', 'App\Repositories\DbHouseRepository');
    }
}
當然你也可以新建一個文件夾主要放我們的provider相關文件。
上面一段代碼主要說的是,當你在controller層使用類型提示HouseRepositoryInterface,我們知道你將會使用DbHouseRepository.
Providers Array其實在上面的代碼中,我們已經實現了一個依賴注入,但如果我們要使用在此我們是需要手動去寫的,為了更為方面,我們需要增加這個providers 到app/config/app.php 中的 providers數組裡面,只需要在最後加上App\Repositories\BackendServiceProvider::class,
controller當我們完成上面的那些內容之後,我們在Controller只需要簡單的調用方法代替之前的復雜的數據庫調用,如下面內容:HousesController.php
<?php

use App\repositories\HouseRepositoryInterface;

class HousesController extends BaseController {
    protected $house;

    public function __construct(HouseRepositoryInterface $house)
    {
        $this->house = $house;
    }


    public function index()
    {
        $houses = $this->house->selectAll();

        return View::make('houses.index', compact('houses'));

    }


    public function create()
    {
        return View::make('houses.create');
    }


    public function show($id)
    {
        $house = $this->house->find($id);

        return View::make('houses.show', compact('house'));

    }
}
這樣 整個模式的轉換就完成了