1) /********** php與html混編完成增刪改查功能**************************/
1.設計思路:
根據平時練習一個增刪改查的功能進行,即在一個php文件中完成,對數據庫的連接操作
及在php文件中展示html代碼。html提交到當前頁面的php部分進行處理入庫動作。
$_SERVER['SCRIPT_FILENAME']包含當前腳本的路徑。
這在頁面需要指向自己時非常有用。
區別於__FILE__常量包含當前腳本(例如包含文件)的完整路徑和文件名。
第一個類:增加商品文件:addProduct.php
<?php
if(isset($_POST['submit'])){
$name= $_POST['name'];
$price= $_POST['price'];
$description= $_POST['description'];
//連接數據庫操作
mysql_connect('localhost','root','master');
mysql_select_db('test');
mysql_query('set names gbk');
$query= "insert into product values(null,'$name','$price','$description')";
mysql_query($query);
mysql_close();
}
?>
<formmethod="post"action='<?php $_SERVER['SCRIPT_FILENAME']?>'>
產品名稱<inputtype="text"name="name"/><br>
產品價格<inputtype="text"name="price"/><br>
產品描述<inputtype="text"name="description"/><br>
<inputtype="submit"name='submit'value="提交"/>
</form>
思路:都是在同一文件(當前文件中)操作數據庫和展示:
Mysql_fetch_assoc 返回數組,一般需要放到一個空數組內組成一個二維數組返回到頁面 mysql_num_rows返回行數
查詢數據一般常用:
Php中
$result = Mysql_query(“select * fromproduct order by id desc”);
$data = array();
While ($row = Mysql_fecth_assoc($result)){
$data[]= $row;
}
Html中:
<?php foreach($data as $row) : ?>
<tr>
<td><?php echo $row[‘id’];?></td>
……
</tr>
<?php endforeach; ?>
查詢商品文件: listProduct.php
<?php
//連接數據庫操作
mysql_connect('localhost','root','master');
mysql_select_db('test');
mysql_query('set names gbk');
$query = "select * from product order by id desc";
$result = mysql_query($query);
$data = array();
while($row = mysql_fetch_assoc($result)){
$data[]= $row;
}
?>
<tableborder=1>
<tr>
<td>編號</td>
<td>名稱</td>
<td>價格</td>
<td>描述</td>
<td>刪除</td>
<td>更新</td>
</tr>
<?php
foreach($dataas$row):
?>
<tr>
<td><?phpecho$row['id'];?></td>
<td><?phpecho$row['name'];?></td>
<td><?phpecho$row['price'];?></td>
<td><?phpecho$row['description'];?></td>
<td><ahref="delProduct.php?id=<?phpecho$row['id'];?>">刪除</a></td>
<td><ahref="updateProduct.php?id=<?phpecho$row['id'];?>">更新</a></td>
</tr>
<?phpendforeach;?>
</table>
思路:接下來就進行刪除和更新操作,同樣是請求到新的php一個文件中來處理刪除和更新操作。新建php文件:delProduct.php
delProduct.php:
<?php
//連接數據庫操作
mysql_connect('localhost','root','master');
mysql_select_db('test');
mysql_query('set names gbk');
$id = $_GET['id'];
$query = "delete from product where id = '$id'";
mysql_query($query);
mysql_close();
//同時跳到listProduct展示結果
header('location:listProduct.php');
更新操作:
updateProduct.php(以下類只是作為展示,提交修改還需要一個php文件,為了不再增加一個文件,修改提到本頁面,在action中增加一個參數區別展示和提交修改的操作)
<?php
//連接數據庫操作
mysql_connect('localhost','root','master');
mysql_select_db('test');
mysql_query('set names gbk');
$id = $_GET['id'];
$query = "select * from product where id = '$id'";
$result = mysql_query($query);
$row = mysql_fetch_row($result);
?>
<formmethod="post"action='updateProduct.php'>
<inputtype="hidden"value="<?phpecho$row[0];?>"/>
產品名稱<inputtype="text"name="name"value="<?phpecho$row[1];?>"/><br>
產品價格<inputtype="text"name="price"value="<?phpecho$row[2];?>"/><br>
產品描述<inputtype="text"name="description"value="<?phpecho$row[3];?>"/><br>
<inputtype="submit"name='submit'value="修改"/>
</form>
修後類內容如下:
<?php
//連接數據庫操作
mysql_connect('localhost','root','master');
mysql_select_db('test');
mysql_query('set names gbk');
if(isset($_REQUEST['flag'])){
$id= $_POST['id'];
$name= $_POST['name'];
$price= $_POST['price'];
$description= $_POST['description'];
$query= "update product set name = '$name', price = '$price' , description = '$description' where id='$id'";
mysql_query($query);
mysql_close();
header('location:listProduct.php');
}else{
$id= $_GET['id'];
$query= "select * from product where id = '$id'";
$result= mysql_query($query);
$row= mysql_fetch_row($result);
}
?>
<formmethod="post"action='updateProduct.php?flag=submit'>
<inputtype="hidden"name='id'value="<?phpecho$row[0];?>"/>
產品名稱<inputtype="text"name="name"value="<?phpecho$row[1];?>"/><br>
產品價格<inputtype="text"name="price"value="<?phpecho$row[2];?>"/><br>
產品描述<inputtype="text"name="description"value="<?phpecho$row[3];?>"/><br>
<inputtype="submit"name='submit'value="修改"/>
</form>
/**************加入DB類封裝對數據庫的操作***************/
此時,已經完成了商品的增刪改查基本功能了,但是,有很多的冗余代碼,比如數據庫的操作,這時可以考慮把數據的操作提取出來:
DB.class.php:
<?php
/**
* 數據庫操作類
* @author heyongjia
*
*/
class DB{
private$host ='localhost';
private$username ='root';
private$password ='master';
private$dbname ='test';
private$setCoding ='set names gbk';//注意編碼的設置,有時候會出現插入不成功的情況
private$conn;//連接資源
private$result;//結果集
public functionconnect(){
$this->conn =mysql_connect($this->host,$this->username,$this->password);
mysql_select_db($this->dbname);
mysql_query($this->setCoding);
}
public functionquery($query){
$this->result = mysql_query($query);
}
public functionclose(){
mysql_close();
}
}
然後分別改造addProduct.php、delProduct.php、listProduct.php、updateProduct.php操作數據庫部分,把每個文件中連接數據,查詢的部分提取到數DB.class.php中,修改之後如下:
addProduct.php
if(isset($_POST['submit'])){
$name= $_POST['name'];
$price= $_POST['price'];
$description= $_POST['description'];
$query= "insert into product values(null,'$name','$price','$description')";
$db =newDB();
$db->connect();
$db->query($query);
$db->close();
}
delProduct.php:
include 'class/DB.class.php';
$id = $_GET['id'];
$query = "delete from product where id = '$id'";
$db = newDB();
$db->connect();
$db->query($query);
$db->close();
//同時跳到listProduct展示結果
header('location:listProduct.php');
listProduct.php:
<?php
//連接數據庫操作
include 'class/DB.class.php';
$query = "select * from product order by id desc";
$db = newDB();
$db->connect();
$db->query($query);
$data = array();
while($row = $db->fetch_assoc()){
$data[]= $row;
}
$db->close();
?>
/***********引用product對象進行數據傳遞,即數據模型*********************/
思路:增刪改查的操作屬於業務邏輯,應該封裝起來。
封裝到類Product.class.php
<?php
class Product {
private$id;
private$name;
private$price;
private$description;
public function__set($name,$value){
$this->$name= $value;
}
public function__get($name){
return$this->$name;
}
public functionadd(){
$query= "insert into product values(null,'$this->name','$this->price','$this->description')";
$db= newDB();
$db->connect();
$db->query($query);
$db->close();
}
}
然後在addProduct.php中引入該類,並修改操作數據庫動作:
$product= newProduct();
$product->name = $name;
$product->price = $price;
$product->description = $description;
$product->add();
其它的操作數據庫方法類似。
思路:通過觀察addProduct.php、delProduct.php、listProduct.php、updateProduct.php都有類似的代碼,那麼可不可以整合在一起呢,完成所有模塊的相關請求。
新建一個product.php文件,addProduct.php、delProduct.php中的相關操作數據庫的代碼拷貝到product.php文件中,並且在product.php中以action參數來區分不同的請求。
<?php
//用於完成所有相關product操作的請求
include 'class/DB.class.php';
include 'class/Product.class.php';
$action = $_GET['action'];
if($action =='add'){
//增加
$name= $_POST['name'];
$price= $_POST['price'];
$description= $_POST['description'];
$product= newProduct();
$product->name = $name;
$product->price = $price;
$product->description = $description;
$product->add();
}
if($action =='del'){
//刪除
$id= $_GET['id'];
$product= newProduct();
$product->id = $id;
$product->del();
//同時跳到listProduct展示結果
header('location:listProduct.php');
}
這時可以把addProduct.php中的php代碼部分刪除了,並把html部分獨立出來一個addProduct.html文件,
同時也可以把delProduct.php文件刪除,因為這兩個php文件的php代碼都移動了product.php中了。
/********************加入Smarty模擬類庫******************************/
先把以上兩個功能先完成,
1. 訪問addProduct.html文件,完成增加操作,並跳轉回addProduct.html頁面。訪問listProduct.php文件,查看增加的結果。
2. 訪問listProduct.php文件,並修改刪除鏈接的請求指向。並同時完成刪除的功能。
此時product.php的代碼如下:
<?php
//用於完成所有相關product操作的請求
include 'class/DB.class.php';
include 'class/Product.class.php';
$action = $_GET['action'];
if($action =='add'){
//增加
$name= $_POST['name'];
$price= $_POST['price'];
$description= $_POST['description'];
$product= newProduct();
$product->name = $name;
$product->price = $price;
$product->description = $description;
$product->add();
header('location:addProduct.html');
}
if($action =='del'){
//刪除
$id= $_GET['id'];
$product= newProduct();
$product->id = $id;
$product->del();
//同時跳到listProduct展示結果
header('location:listProduct.php');
}
/**************加入smarty類庫************************/
思路:此時已經把增加和刪除功能已經集合到了product.php中了,還有查詢和更新操作,由於listProduct.php中包含了顯示數據列表的功能,不容易展示(可以采用include一個頁來完成。)。此時,可以用smarty來完成,這樣就合理了。
這時可以考慮把addProduct.html也放入product.php來展示,修改成:
include 'class/Template.class.php';//注意導入該文件,該文件是模擬smarty實一類文件。(考慮到查詢功能也用要到,需要展示多個數據,所以模擬Smarty的類文件無法勝任,就直接引入smarty來作為展示)
/***********************加入smarty類庫********************/
這時可以把自己的寫的Templates類繼承Smarty類,這樣就可以使用Smarty中的功能,還可以擴展其功能。
Template.class.php內容如下:
<?php
/**
* 繼承了Smarty類的Template類
* @author heyongjia
*
*/
class TemplateextendsSmarty{
/**
* 調用父類的構造方法,確保父類中的構造方法已經執行
* 因為子類如果有構造方法,就不會執行父類中的構造方法
*/
function__construct(){
parent::__construct();
//初始化模板目錄
$this->setTemplateDir('tpl');
}
}
至此,CRUD功能已經整合在一product.php文件中了,也說是所有的請求都經過它,如:
Localhost/test/mvc/product.php?action=add/list/update等請求。這時product.php就相當於一個控制器的角色了。
/**************** 加入入口文件 *******************************、
我們程序中,會有很多的控制器,為了便於管理,我們定義一個入口文件,也就是說,所有的請求都經過這個入口文件,再由這個入口進行分發到各個控制器。
增一個index.php文件:
用於分發到控制器:
請求的url:
Localhost/test/mvc/index.php?module=product&action=add/list/update
所以index.php文件如下:
<?php
$module = $_GET['module'];
$action = $_GET['action'];
$file = $module.'Control.php?action='.$action;
header('location:'.$file);
此時,就可以通過上面的入口文件分發到不同的控制器(模塊)上的不同的操作(功能),但是由於使用的是header跳轉,在浏覽器上地址欄就變成了跳轉後的地址了,即脫離了入口文件。
那麼,如何實現?
將product.php改成一個類來實現。改造product.php為ProductControl.class.php,並移動control文件夾下,內容如下:
<?php
class ProductControl{
public functionaddok(){
//增加
$name= $_POST['name'];
$price= $_POST['price'];
$description= $_POST['description'];
$product= newProduct();
$product->name = $name;
$product->price = $price;
$product->description = $description;
$product->add();
header('location:product.php?action=list');
}
public functionadd(){
$smarty= newTemplate();
//$tpl = new Template();
//$tpl->display('addProduct.html');
$smarty->display('addProduct.html');
}
public functiondel(){
//刪除
$id= $_GET['id'];
$product= newProduct();
$product->id = $id;
$product->del();
//同時跳到listProduct展示結果
header('location:product.php?action=list');
}
public functionupdate(){
$smarty= newTemplate();
$id= $_GET['id'];
$product= newProduct();
$product->id = $id;
$row= $product->getRow();
$smarty->assign('id',$row['id']);
$smarty->assign('name',$row['name']);
$smarty->assign('price',$row['price']);
$smarty->assign('description',$row['description']);
$smarty->display('updateProduct.html');
}
public functionupdateok(){
$id= $_POST['id'];
$name= $_POST['name'];
$price= $_POST['price'];
$description= $_POST['description'];
$product= newProduct();
$product->id = $id;
$product->name = $name;
$product->price = $price;
$product->description = $description;
$product->update();
header('location:product.php?action=list');
}
}
此時,如何調用這個類的方法呢?在index.php中實例化該對象調用。
//用於完成所有相關product操作的請求
include 'class/DB.class.php';
include 'class/Product.class.php';
include 'smarty/Smarty.class.php';
include 'class/Template.class.php';
$module = $_GET['module'];
$module = ucfirst($module);
$action = $_GET['action'];
$className = $module.'Control';
include 'control/'.$className.'.class.php';
$class = new$className; //根據模塊名引用類文件並實例化該對象
$class->$action(); //調用對應的action方法。
修改調用的所有路徑為:index.php?module=product&action=xxx
addProduct.html updateProduct.htmllistProduct.html
優化:一般地不會在index.php文件中寫太多的代碼,可以將代碼移動配置文件中,在index.php中引入即可。
一般地,整個工程會有一個主控制器類,用於處理分發控制器,Application.class.php:
<?php
class Application{
static functionrun(){
global$module; //函數內要使用外部的變量
global$action;
$className= $module.'Control';
include'control/'.$className.'.class.php';
$class= new$className;
$class->$action();
}
}
init.php:
<?php
//用於完成所有相關product操作的請求
include 'class/DB.class.php';
include 'class/Product.class.php';
include 'smarty/Smarty.class.php';
include 'class/Template.class.php';
include 'control/Application.class.php';
$module = $_GET['module'];
$module = ucfirst($module);
$action = $_GET['action'];
Index.php:
<?php
include 'config/init.php';
Application::run();
此時,訪問的url為: index.php?module=product&action=xxx
但如果直接訪問index.php就會報錯:
Notice: Undefined index: module in F:\amp\apache\studydocs\test\php_js\mvc\config\init.phpon line10
Notice: Undefined index: action in F:\amp\apache\studydocs\test\php_js\mvc\config\init.phpon line12
這是因為在init.php中沒有對module和action進行初始化。
並將值配置到config文件夾下的conig.php文件中。
由於在product.php文件中(其實就是模型類),有很多類似的操作數據庫的代碼,所以可以將這部分代碼封裝到父類實現,該模型類只需要繼承即可。
/******************封裝核心文件core**************************
新建一個文件夾core,將DB.class.php和Application.php移動到core因為是共公的文件,不屬於功能文件。
新建一個基類文件(模型基類),用於實現對數據庫實例化的封裝,而子類模型只需要繼承即可獲取數據庫對象的實例。
Model.class.php:
<?php
class Medel{
protected$db;
public function__construct(){
$this->db =newDB();
}
}
新建文件夾model,然後將product.php移動到model文件夾下,並改名ProductModel.class.php:
<?php
class ProductModelextendsModel {
private$id;
private$name;
private$price;
private$description;
public function__set($name,$value){
$this->$name= $value;
}
public function__get($name){
return$this->$name;
}
public functionadd(){
$query= "insert into product values(null,'$this->name','$this->price','$this->description')";
$this->db->connect();
$this->db->query($query);
$this->db->close();
}
public functiondel(){
$query= "delete from product where id = '$this->id'";
$this->db->connect();
$this->db->query($query);
$this->db->close();
}
public functionselect(){
$query= "select * from product order by iddesc";
$this->db->connect();
$this->db->query($query);
$data= array();
while($row = $this->db->fetch_assoc()){
$data[]= $row;
}
$this->db->close();
return$data;
}
public functionupdate(){
$query= "update product set name = '$this->name', price = '$this->price' , description = '$this->description' where id='$this->id'";
$this->db->connect();
$this->db->query($query);
$this->db->close();
}
public functiongetRow(){
$query= "select * from product where id = '$this->id'";
$this->db->connect();
$this->db->query($query);
$row= $this->db->fetch_assoc();
$this->db->close();
return$row;
}
}
/***********************視圖封裝**************************
在控制器中每次都要實例化Template類,並調用display方法。
把Template.class.php移動core文件夾中,並改名為View.class.php:
這麼做的好處,讓每一個控制繼承於該類(構造一個控制器基類Control.class.php,在類中構造一個視圖實例),只要每個控制器繼承了該類(Control.class.php),即擁有了smarty實例。
<?php
/**
* 1.繼承了Smarty類的Template類
* 2.不用繼承Smarty了,是smarty的一個實例
* @author heyongjia
*
*/
class Viewextends Smarty{
}
這麼做的好處,讓每一個控制繼承於該類(構造一個控制器基類Control.class.php,在類中構造一個視圖實例),只要每個控制器繼承了該類(Control.class.php),即擁有了smarty實例。
/**
* 控制器基類
* @author heyongjia
*
*/
class Controlextends View{
protected$view;
public function__construct(){
$this->view = new View();
$this->view->setTemplateDir('tpl');
}
}
優化,直接在init.php中直接包含模型是不對的,因為可以出現很多的模型。這時可以考慮自動加載機載來實現。注意:smarty3.0中也用到了自動加載函數,所以要利用注冊來完成。
function autoload1($classname){
$filename= 'model/'.$classname.'.class.php';
if(is_file($filename)){
include"$filename";
}
}
spl_autoload_register('autoload1');
function addslashes_func(&$str){
$str= addslashes($str);
}
if(!get_magic_quotes_gpc()){
array_walk_recursive($_POST,'addslashes_func');
array_walk_recursive($_GET,'addslashes_func');
}
此至,就mvc簡易框架就到這裡差不多了。
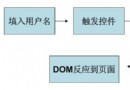
用圖總結一下,這樣就比較直觀了: