程序師世界是廣大編程愛好者互助、分享、學習的平台,程序師世界有你更精彩!
首頁
編程語言
C語言|JAVA編程
Python編程
網頁編程
ASP編程|PHP編程
JSP編程
數據庫知識
MYSQL數據庫|SqlServer數據庫
Oracle數據庫|DB2數據庫
 程式師世界 >> 數據庫知識 >> DB2數據庫 >> DB2教程 >> mybatis入門教程(初學者必看)

mybatis入門教程(初學者必看)

編輯:DB2教程

mybatis入門教程(初學者必看)


什麼是mybatis
MyBatis是支持普通SQL查詢,存儲過程和高級映射的優秀持久層框架。MyBatis消除了幾乎所有的JDBC代碼和參數的手工設置以及結果集的檢索。MyBatis使用簡單的XML或注解用於配置和原始映射,將接口和Java的POJOs(Plan Old Java Objects,普通的Java對象)映射成數據庫中的記錄.

orm工具的基本思想
無論是用過的hibernate,mybatis,你都可以法相他們有一個共同點:
1. 從配置文件(通常是XML配置文件中)得到 sessionfactory.
2. 由sessionfactory 產生 session
3. 在session 中完成對數據的增刪改查和事務提交等.
4. 在用完之後關閉session 。

5. 在java 對象和 數據庫之間有做mapping 的配置文件,也通常是xml 文件。

mybatis實戰教程(mybatis in action)之一:開發環境搭建

mybatis 的開發環境搭建,選擇: eclipse j2ee 版本,mysql 5.1 ,jdk 1.7,mybatis3.2.0.jar包。這些軟件工具均可以到各自的官方網站上下載。
首先建立一個名字為 MyBaits 的 dynamic web project
1. 現階段,你可以直接建立java 工程,但一般都是開發web項目,這個系列教程最後也是web的,所以一開始就建立web工程。
2. 將 mybatis-3.2.0-SNAPSHOT.jar,mysql-connector-java-5.1.22-bin.jar 拷貝到 web工程的lib目錄.
3. 創建mysql 測試數據庫和用戶表,注意,這裡采用的是 utf-8 編碼
\
創建用戶表,並插入一條測試數據
程序代碼 程序代碼
Create TABLE `user` (
`id` int(11) NOT NULL AUTO_INCREMENT,
`userName` varchar(50) DEFAULT NULL,
`userAge` int(11) DEFAULT NULL,
`userAddress` varchar(200) DEFAULT NULL,
PRIMARY KEY (`id`)
) ENGINE=InnoDB AUTO_INCREMENT=2 DEFAULT CHARSET=utf8;


Insert INTO `user` VALUES ('1', 'summer', '100', 'shanghai,pudong');

到此為止,前期准備工作就完成了。下面開始真正配置mybatis項目了。
1. 在MyBatis 裡面創建兩個源碼目錄,分別為 src_user,test_src, 用如下方式建立,鼠標右鍵點擊 JavaResource.
\

2. 設置mybatis 配置文件:Configuration.xml, 在src_user目錄下建立此文件,內容如下:
程序代碼 程序代碼
< ?xml version="1.0" encoding="UTF-8" ?>
< !DOCTYPE configuration PUBLIC "-//mybatis.org//DTD Config 3.0//EN"
"http://mybatis.org/dtd/mybatis-3-config.dtd">
< configuration>


< /configuration>


3. 建立與數據庫對應的 java class,以及映射文件.
在src_user下建立package:com.yihaomen.mybatis.model ,並在這個 package 下建立 User 類:
程序代碼 程序代碼
package com.yihaomen.mybatis.model;

public class User {

private int id;
private String userName;
private String userAge;
private String userAddress;

public int getId() {
return id;
}
public void setId(int id) {
this.id = id;
}
public String getUserName() {
return userName;
}
public void setUserName(String userName) {
this.userName = userName;
}
public String getUserAge() {
return userAge;
}
public void setUserAge(String userAge) {
this.userAge = userAge;
}
public String getUserAddress() {
return userAddress;
}
public void setUserAddress(String userAddress) {
this.userAddress = userAddress;
}

}


同時建立這個User 的映射文件 User.xml:
程序代碼 程序代碼
< ?xml version="1.0" encoding="UTF-8" ?>
< !DOCTYPE mapper PUBLIC "-//mybatis.org//DTD Mapper 3.0//EN"
"http://mybatis.org/dtd/mybatis-3-mapper.dtd">

< mapper namespace="com.yihaomen.mybatis.models.UserMapper">

< /mapper>


下面對這幾個配置文件解釋下:
1.Configuration.xml 是 mybatis 用來建立 sessionFactory 用的,裡面主要包含了數據庫連接相關東西,還有 java 類所對應的別名,比如 這個別名非常重要,你在 具體的類的映射中,比如User.xml 中 resultType 就是對應這裡的。要保持一致,當然這裡的 resultType 還有另外單獨的定義方式,後面再說。
2. Configuration.xml 裡面 的是包含要映射的類的xml配置文件。
3. 在User.xml 文件裡面 主要是定義各種SQL 語句,以及這些語句的參數,以及要返回的類型等.

開始測試
在test_src 源碼目錄下建立com.yihaomen.test這個package,並建立測試類Test:
程序代碼 程序代碼
package com.yihaomen.test;

import java.io.Reader;

import org.apache.ibatis.io.Resources;
import org.apache.ibatis.session.SqlSession;
import org.apache.ibatis.session.SqlSessionFactory;
import org.apache.ibatis.session.SqlSessionFactoryBuilder;

import com.yihaomen.mybatis.model.User;

public class Test {
private static SqlSessionFactory sqlSessionFactory;
private static Reader reader;

static{
try{
reader = Resources.getResourceAsReader("Configuration.xml");
sqlSessionFactory = new SqlSessionFactoryBuilder().build(reader);
}catch(Exception e){
e.printStackTrace();
}
}

public static SqlSessionFactory getSession(){
return sqlSessionFactory;
}

public static void main(String[] args) {
SqlSession session = sqlSessionFactory.openSession();
try {
User user = (User) session.selectOne("com.yihaomen.mybatis.models.UserMapper.selectUserByID", 1);
System.out.println(user.getUserAddress());
System.out.println(user.getUserName());
} finally {
session.close();
}
}
}

現在運行這個程序,是不是得到查詢結果了。恭喜你,環境搭建配置成功,接下來第二章,將講述基於接口的操作方式,增刪改查。
整個工程目錄結構如下:
\


除非申明,文章均為一號門原創,轉載請注明本文地址,謝謝!

mybatis實戰教程(mybatis in action)之二:以接口的方式編程


前面一章,已經搭建好了eclipse,mybatis,mysql的環境,並且實現了一個簡單的查詢。請注意,這種方式是用SqlSession實例來直接執行已映射的SQL語句:
session.selectOne("com.yihaomen.mybatis.models.UserMapper.selectUserByID", 1)
其實還有更簡單的方法,而且是更好的方法,使用合理描述參數和SQL語句返回值的接口(比如IUserOperation.class),這樣現在就可以至此那個更簡單,更安全的代碼,沒有容易發生的字符串文字和轉換的錯誤.下面是詳細過程:

在src_user源碼目錄下建立 com.yihaomen.mybatis.inter 這個包,並建立接口類 IUserOperation , 內容如下:
程序代碼 程序代碼
package com.yihaomen.mybatis.inter;
import com.yihaomen.mybatis.model.User;

public interface IUserOperation {
public User selectUserByID(int id);

}

請注意,這裡面有一個方法名 selectUserByID 必須與 User.xml 裡面配置的 select 的id 對應(
select * from user where userName like #{userName}


在 IUserOperation 接口中增加方法:public List selectUsers(String userName);
現在在 Test 類中做測試
程序代碼 程序代碼
public void getUserList(String userName){
SqlSession session = sqlSessionFactory.openSession();
try {
IUserOperation userOperation=session.getMapper(IUserOperation.class);
List users = userOperation.selectUsers(userName);
for(User user:users){
System.out.println(user.getId()+":"+user.getUserName()+":"+user.getUserAddress());
}

} finally {
session.close();
}
}

現在在main 方法中可以測試:
程序代碼 程序代碼
public static void main(String[] args) {
Test testUser=new Test();
testUser.getUserList("%");
}

可以看到,結果成功查詢出來。如果是查詢單個數據的話,用第二講用過的方法就可以了。

用mybatis 增加數據
在 IUserOperation 接口中增加方法:public void addUser(User user);
在 User.xml 中配置
程序代碼 程序代碼
< !--執行增加操作的SQL語句。id和parameterType
分別與IUserOperation接口中的addUser方法的名字和
參數類型一致。以#{name}的形式引用Student參數
的name屬性,MyBatis將使用反射讀取Student參數
的此屬性。#{name}中name大小寫敏感。引用其他
的gender等屬性與此一致。seGeneratedKeys設置
為"true"表明要MyBatis獲取由數據庫自動生成的主
鍵;keyProperty="id"指定把獲取到的主鍵值注入
到Student的id屬性-->
useGeneratedKeys="true" keyProperty="id">
insert into user(userName,userAge,userAddress)
values(#{userName},#{userAge},#{userAddress})


然後在 Test 中寫測試方法:
程序代碼 程序代碼
/**
* 測試增加,增加後,必須提交事務,否則不會寫入到數據庫.
*/
public void addUser(){
User user=new User();
user.setUserAddress("人民廣場");
user.setUserName("飛鳥");
user.setUserAge(80);
SqlSession session = sqlSessionFactory.openSession();
try {
IUserOperation userOperation=session.getMapper(IUserOperation.class);
userOperation.addUser(user);
session.commit();
System.out.println("當前增加的用戶 id為:"+user.getId());
} finally {
session.close();
}
}


用mybatis 更新數據
方法類似,先在 IUserOperation 中增加方法:public void addUser(User user);
然後配置 User.xml
程序代碼 程序代碼

update user set userName=#{userName},userAge=#{userAge},userAddress=#{userAddress} where id=#{id}


Test 類總的測試方法如下:
程序代碼 程序代碼
public void updateUser(){
//先得到用戶,然後修改,提交。
SqlSession session = sqlSessionFactory.openSession();
try {
IUserOperation userOperation=session.getMapper(IUserOperation.class);
User user = userOperation.selectUserByID(4);
user.setUserAddress("原來是魔都的浦東創新園區");
userOperation.updateUser(user);
session.commit();

} finally {
session.close();
}
}


用mybatis 刪除數據
同理,IUserOperation 增加方法:public void deleteUser(int id);
配置User.xml
程序代碼 程序代碼

delete from user where id=#{id}


然後在Test類中寫測試方法:
程序代碼 程序代碼

/**
* 刪除數據,刪除一定要 commit.
* @param id
*/
public void deleteUser(int id){
SqlSession session = sqlSessionFactory.openSession();
try {
IUserOperation userOperation=session.getMapper(IUserOperation.class);
userOperation.deleteUser(id);
session.commit();
} finally {
session.close();
}
}


這樣,所有增刪改查都完成了,注意在增加,更改,刪除的時候要調用session.commit(),這樣才會真正對數據庫進行操作,否則是沒有提交的。

到此為止,簡單的單表操作,應該都會了,接下來的時間了,我會講多表聯合查詢,以及結果集的選取。


除非申明,文章均為一號門原創,轉載請注明本文地址,謝謝!

mybatis實戰教程(mybatis in action)之四:實現關聯數據的查詢


有了前面幾章的基礎,對一些簡單的應用是可以處理的,但在實際項目中,經常是關聯表的查詢,比如最常見到的多對一,一對多等。這些查詢是如何處理的呢,這一講就講這個問題。我們首先創建一個Article 這個表,並初始化數據.
程序代碼 程序代碼
Drop TABLE IF EXISTS `article`;
Create TABLE `article` (
`id` int(11) NOT NULL auto_increment,
`userid` int(11) NOT NULL,
`title` varchar(100) NOT NULL,
`content` text NOT NULL,
PRIMARY KEY (`id`)
) ENGINE=InnoDB AUTO_INCREMENT=5 DEFAULT CHARSET=utf8;

-- ----------------------------
-- 添加幾條測試數據
-- ----------------------------
Insert INTO `article` VALUES ('1', '1', 'test_title', 'test_content');
Insert INTO `article` VALUES ('2', '1', 'test_title_2', 'test_content_2');
Insert INTO `article` VALUES ('3', '1', 'test_title_3', 'test_content_3');
Insert INTO `article` VALUES ('4', '1', 'test_title_4', 'test_content_4');

你應該發現了,這幾個文章對應的userid都是1,所以需要用戶表user裡面有id=1的數據。可以修改成滿足自己條件的數據.按照orm的規則,表已經創建了,那麼肯定需要一個對象與之對應,所以我們增加一個 Article 的class
程序代碼 程序代碼
package com.yihaomen.mybatis.model;

public class Article {

private int id;
private User user;
private String title;
private String content;

public int getId() {
return id;
}
public void setId(int id) {
this.id = id;
}

public User getUser() {
return user;
}
public void setUser(User user) {
this.user = user;
}
public String getTitle() {
return title;
}
public void setTitle(String title) {
this.title = title;
}
public String getContent() {
return content;
}
public void setContent(String content) {
this.content = content;
}

}


注意一下,文章的用戶是怎麼定義的,是直接定義的一個User對象。而不是int類型。

多對一的實現
場景:在讀取某個用戶發表的所有文章。當然還是需要在User.xml 裡面配置 select 語句, 但重點是這個 select 的resultMap 對應什麼樣的數據呢。這是重點,這裡要引入 association 看定義如下:
程序代碼 程序代碼
< !-- User 聯合文章進行查詢 方法之一的配置 (多對一的方式) -->


< select id="getUserArticles" parameterType="int" resultMap="resultUserArticleList">
select user.id,user.userName,user.userAddress,article.id aid,article.title,article.content from user,article
where user.id=article.userid and user.id=#{id}


這樣配置之後,就可以了,將select 語句與resultMap 對應的映射結合起來看,就明白了。用association 來得到關聯的用戶,這是多對一的情況,因為所有的文章都是同一個用戶的。

還有另外一種處理方式,可以復用我們前面已經定義好的 resultMap ,前面我們定義過一個 resultListUser ,看這第二種方法如何實現:
程序代碼 程序代碼


將 association 中對應的映射獨立抽取出來,可以達到復用的目的。

好了,現在在Test 類中寫測試代碼:
程序代碼 程序代碼
public void getUserArticles(int userid){
SqlSession session = sqlSessionFactory.openSession();
try {
IUserOperation userOperation=session.getMapper(IUserOperation.class);
List articles = userOperation.getUserArticles(userid);
for(Article article:articles){
System.out.println(article.getTitle()+":"+article.getContent()+
":作者是:"+article.getUser().getUserName()+":地址:"+
article.getUser().getUserAddress());
}
} finally {
session.close();
}
}


漏掉了一點,我們一定要在 IUserOperation 接口中,加入 select 對應的id 名稱相同的方法:
public List getUserArticles(int id);

然後運行就可以測試。

整個程序下載:
下載文件點擊下載此文件


除非申明,文章均為一號門原創,轉載請注明本文地址,謝謝!

mybatis實戰教程(mybatis in action)之五:與spring3集成(附源碼)


在這一系列文章中,前面講到純粹用mybatis 連接數據庫,然後 進行增刪改查,以及多表聯合查詢的的例子,但實際項目中,通常會用 spring 這個沾合劑來管理 datasource 等。充分利用spring 基於接口的編程,以及aop ,ioc 帶來的方便。用spring 來管理 mybatis 與管理hibernate 有很多類似的地方。今天的重點就是數據源管理以及 bean的配置。

你可以下載源碼後,對比著看,源代碼沒有帶jar包,太大了,空間有限. 有截圖,你可以看到用到哪些jar包,源碼在本文最後.

1. 首先對前面的工程結構做一點改變,在src_user源代碼目錄下建立文件夾config ,並將原來的 mybatis 配置文件 Configuration.xml 移動到這個文件夾中, 並在config 文家夾中建立 spring 配置文件:applicationContext.xml ,這個配置文件裡最主要的配置:
程序代碼 程序代碼
< !--本示例采用DBCP連接池,應預先把DBCP的jar包復制到工程的lib目錄下。 -->


[b]這裡面的重點就是 org.mybatis.spring.SqlSessionFactoryBean 與 org.mybatis.spring.mapper.MapperFactoryBean[b] 實現了 spring 的接口,並產生對象。詳細可以查看 mybatis-spring 代碼。(http://code.google.com/p/mybatis/),如果僅僅使用,固定模式,這樣配置就好。

然後寫測試程序
程序代碼 程序代碼
package com.yihaomen.test;

import java.util.List;

import org.springframework.context.ApplicationContext;
import org.springframework.context.support.ClassPathXmlApplicationContext;

import com.yihaomen.mybatis.inter.IUserOperation;
import com.yihaomen.mybatis.model.Article;
import com.yihaomen.mybatis.model.User;


public class MybatisSprintTest {

private static ApplicationContext ctx;

static
{
ctx = new ClassPathXmlApplicationContext("config/applicationContext.xml");
}

public static void main(String[] args)
{
IUserOperation mapper = (IUserOperation)ctx.getBean("userMapper");
//測試id=1的用戶查詢,根據數據庫中的情況,可以改成你自己的.
System.out.println("得到用戶id=1的用戶信息");
User user = mapper.selectUserByID(1);
System.out.println(user.getUserAddress());

//得到文章列表測試
System.out.println("得到用戶id為1的所有文章列表");
List articles = mapper.getUserArticles(1);

for(Article article:articles){
System.out.println(article.getContent()+"--"+article.getTitle());
}

}


}


運行即可得到相應的結果.
工程圖:
\
用到的jar包,如下圖:
\

源代碼下載,不帶 jar 包,
下載文件點擊下載此文件


除非申明,文章均為一號門原創,轉載請注明本文地址,謝謝!

mybatis實戰教程(mybatis in action)之六:與Spring MVC 的集成


前面幾篇文章已經講到了mybatis與spring 的集成。但這個時候,所有的工程還不是web工程,雖然我一直是創建的web 工程。今天將直接用mybatis與Spring mvc 的方式集成起來,源碼在本文結尾處下載.主要有以下幾個方面的配置
1. web.xml 配置 spring dispatchservlet ,比如為:mvc-dispatcher
2. mvc-dispatcher-servlet.xml 文件配置
3. spring applicationContext.XML文件配置(與數據庫相關,與mybatis sqlSessionFaction 整合,掃描所有mybatis mapper 文件等.)
4. 編寫controller 類
5. 編寫頁面代碼.
先有個大概映像,整個工程圖如下:
[/code]\

1. web.xml 配置 spring dispatchservlet ,比如為:mvc-dispatcher
程序代碼 程序代碼

contextConfigLocation
classpath*:config/applicationContext.xml


org.springframework.web.context.ContextLoaderListener


org.springframework.web.context.ContextCleanupListener


mvc-dispatcher
org.springframework.web.servlet.DispatcherServlet
1


mvc-dispatcher
/


2. 在web.xml 同目錄下配置 mvc-dispatcher-servlet.xml 文件,這個文件名前面部分必須與你在web.xml裡面配置的DispatcherServlet 的servlet名字對應.其內容為:
程序代碼 程序代碼
xmlns:context="http://www.springframework.org/schema/context"
xmlns:mvc="http://www.springframework.org/schema/mvc" xmlns:xsi="http://www.w3.org/2001/XMLSchema-instance"
xsi:schemaLocation="
http://www.springframework.org/schema/beans
http://www.springframework.org/schema/beans/spring-beans-3.0.xsd
http://www.springframework.org/schema/context
http://www.springframework.org/schema/context/spring-context-3.0.xsd
http://www.springframework.org/schema/mvc
http://www.springframework.org/schema/mvc/spring-mvc-3.0.xsd">


class="org.springframework.web.servlet.view.InternalResourceViewResolver">

/WEB-INF/pages/


.jsp


< /beans>

3. 在源碼目錄 config 目錄下配置 spring 配置文件 applicationContext.xml
程序代碼 程序代碼
< !--本示例采用DBCP連接池,應預先把DBCP的jar包復制到工程的lib目錄下。 -->


destroy-method="close" p:driverClassName="com.mysql.jdbc.Driver"
p:url="jdbc:mysql://127.0.0.1:3306/mybatis?characterEncoding=utf8"
p:username="root" p:password="password"
p:maxActive="10" p:maxIdle="10">


不知道為什麼,一旦我用了 MapperScannerConfigurer 去掃描所有的mapper 接口時,數據庫配置datasource 就不能用讀取database.properties文件了。報錯: Cannot load JDBC driver class '${jdbc.driverClassName}',網上有人說在spring 3.1.1 下用 sqlSessionFactionBean 注入可以解決,但我用 spring 3.1.3 還是有問題,所以只好把數據庫連接信息直接配置在了XML 文件裡面。

4. 編寫 controller 層
程序代碼 程序代碼
package com.yihaomen.controller;
import java.util.List;
import javax.servlet.http.HttpServletRequest;
import javax.servlet.http.HttpServletResponse;
import org.springframework.beans.factory.annotation.Autowired;
import org.springframework.stereotype.Controller;
import org.springframework.web.bind.annotation.RequestMapping;
import org.springframework.web.servlet.ModelAndView;
import com.yihaomen.inter.IUserOperation;
import com.yihaomen.model.Article;

@Controller
@RequestMapping("/article")
public class UserController {
@Autowired
IUserOperation userMapper;

@RequestMapping("/list")
public ModelAndView listall(HttpServletRequest request,HttpServletResponse response){
List articles=userMapper.getUserArticles(1);
ModelAndView mav=new ModelAndView("list");
mav.addObject("articles",articles);
return mav;
}
}

5. 頁面文件:
[code]
< c:forEach items="${articles}" var="item">
${item.id }--${item.title }--${item.content }


運行結果:
\

當然還有 mybatis 的Configure.xml 配置文件,與上一講的差不多,唯一不同的就是不用再配置類似如下的: ,所有這些都交給 在配置 sqlSessionFactory 的時候,由 去導入了。

源碼下載:

下載文件mybatis spring3 MVC 程序下載

數據庫下載:

下載文件spring mvc 數據庫測試文件


除非申明,文章均為一號門原創,轉載請注明本文地址,謝謝!

mybatis實戰教程(mybatis in action)之七:實現mybatis分頁(源碼下載)


上一篇文章裡已經講到了mybatis與spring MVC的集成,並且做了一個列表展示,顯示出所有article 列表,但沒有用到分頁,在實際的項目中,分頁是肯定需要的。而且是物理分頁,不是內存分頁。對於物理分頁方案,不同的數據庫,有不同的實現方法,對於mysql 來說 就是利用 limit offset,pagesize 方式來實現的。oracle 是通過rownum 來實現的,如果你熟悉相關數據庫的操作,是一樣的很好擴展,本文以mysql 為例子來講述.先看一下效果圖(源代碼在文章最後提供下載):
\
實現mybatis 物理分頁,一個最簡單的方式是,是在你的mapper的SQL語句中直接寫類似如下方式 :
程序代碼 程序代碼


請注意這裡的 parameterType 是你傳入的參數類,或者map ,裡面包含了offset,pagesize ,和其他你需要的參數,用這種方式,肯定可以實現分頁。這是簡單的一種方式。但更通用的一種方式是用 mybatis 插件的方式. 參考了網上的很多資料 ,mybatis plugin 方面的資料。寫自己的插件.

程序代碼 程序代碼
package com.yihaomen.util;

import java.lang.reflect.Field;
import java.sql.Connection;
import java.sql.PreparedStatement;
import java.sql.ResultSet;
import java.sql.SQLException;
import java.util.List;
import java.util.Map;
import java.util.Properties;

import javax.xml.bind.PropertyException;

import org.apache.ibatis.builder.xml.dynamic.ForEachSqlNode;
import org.apache.ibatis.executor.ErrorContext;
import org.apache.ibatis.executor.Executor;
import org.apache.ibatis.executor.ExecutorException;
import org.apache.ibatis.executor.statement.BaseStatementHandler;
import org.apache.ibatis.executor.statement.RoutingStatementHandler;
import org.apache.ibatis.executor.statement.StatementHandler;
import org.apache.ibatis.mapping.BoundSql;
import org.apache.ibatis.mapping.MappedStatement;
import org.apache.ibatis.mapping.ParameterMapping;
import org.apache.ibatis.mapping.ParameterMode;
import org.apache.ibatis.plugin.Interceptor;
import org.apache.ibatis.plugin.Intercepts;
import org.apache.ibatis.plugin.Invocation;
import org.apache.ibatis.plugin.Plugin;
import org.apache.ibatis.plugin.Signature;
import org.apache.ibatis.reflection.MetaObject;
import org.apache.ibatis.reflection.property.PropertyTokenizer;
import org.apache.ibatis.session.Configuration;
import org.apache.ibatis.session.ResultHandler;
import org.apache.ibatis.session.RowBounds;
import org.apache.ibatis.type.TypeHandler;
import org.apache.ibatis.type.TypeHandlerRegistry;

@Intercepts({ @Signature(type = StatementHandler.class, method = "prepare", args = { Connection.class }) })
public class PagePlugin implements Interceptor {

private static String dialect = "";
private static String pageSqlId = "";

@SuppressWarnings("unchecked")
public Object intercept(Invocation ivk) throws Throwable {

if (ivk.getTarget() instanceof RoutingStatementHandler) {
RoutingStatementHandler statementHandler = (RoutingStatementHandler) ivk
.getTarget();
BaseStatementHandler delegate = (BaseStatementHandler) ReflectHelper
.getValueByFieldName(statementHandler, "delegate");
MappedStatement mappedStatement = (MappedStatement) ReflectHelper
.getValueByFieldName(delegate, "mappedStatement");

if (mappedStatement.getId().matches(pageSqlId)) {
BoundSql boundSql = delegate.getBoundSql();
Object parameterObject = boundSql.getParameterObject();
if (parameterObject == null) {
throw new NullPointerException("parameterObject error");
} else {
Connection connection = (Connection) ivk.getArgs()[0];
String sql = boundSql.getSql();
String countSql = "select count(0) from (" + sql + ") myCount";
System.out.println("總數sql 語句:"+countSql);
PreparedStatement countStmt = connection
.prepareStatement(countSql);
BoundSql countBS = new BoundSql(
mappedStatement.getConfiguration(), countSql,
boundSql.getParameterMappings(), parameterObject);
setParameters(countStmt, mappedStatement, countBS,
parameterObject);
ResultSet rs = countStmt.executeQuery();
int count = 0;
if (rs.next()) {
count = rs.getInt(1);
}
rs.close();
countStmt.close();

PageInfo page = null;
if (parameterObject instanceof PageInfo) {
page = (PageInfo) parameterObject;
page.setTotalResult(count);
} else if(parameterObject instanceof Map){
Map map = (Map)parameterObject;
page = (PageInfo)map.get("page");
if(page == null)
page = new PageInfo();
page.setTotalResult(count);
}else {
Field pageField = ReflectHelper.getFieldByFieldName(
parameterObject, "page");
if (pageField != null) {
page = (PageInfo) ReflectHelper.getValueByFieldName(
parameterObject, "page");
if (page == null)
page = new PageInfo();
page.setTotalResult(count);
ReflectHelper.setValueByFieldName(parameterObject,
"page", page);
} else {
throw new NoSuchFieldException(parameterObject
.getClass().getName());
}
}
String pageSql = generatePageSql(sql, page);
System.out.println("page sql:"+pageSql);
ReflectHelper.setValueByFieldName(boundSql, "sql", pageSql);
}
}
}
return ivk.proceed();
}

private void setParameters(PreparedStatement ps,
MappedStatement mappedStatement, BoundSql boundSql,
Object parameterObject) throws SQLException {
ErrorContext.instance().activity("setting parameters")
.object(mappedStatement.getParameterMap().getId());
List parameterMappings = boundSql
.getParameterMappings();
if (parameterMappings != null) {
Configuration configuration = mappedStatement.getConfiguration();
TypeHandlerRegistry typeHandlerRegistry = configuration
.getTypeHandlerRegistry();
MetaObject metaObject = parameterObject == null ? null
: configuration.newMetaObject(parameterObject);
for (int i = 0; i < parameterMappings.size(); i++) {
ParameterMapping parameterMapping = parameterMappings.get(i);
if (parameterMapping.getMode() != ParameterMode.OUT) {
Object value;
String propertyName = parameterMapping.getProperty();
PropertyTokenizer prop = new PropertyTokenizer(propertyName);
if (parameterObject == null) {
value = null;
} else if (typeHandlerRegistry
.hasTypeHandler(parameterObject.getClass())) {
value = parameterObject;
} else if (boundSql.hasAdditionalParameter(propertyName)) {
value = boundSql.getAdditionalParameter(propertyName);
} else if (propertyName
.startsWith(ForEachSqlNode.ITEM_PREFIX)
&& boundSql.hasAdditionalParameter(prop.getName())) {
value = boundSql.getAdditionalParameter(prop.getName());
if (value != null) {
value = configuration.newMetaObject(value)
.getValue(
propertyName.substring(prop
.getName().length()));
}
} else {
value = metaObject == null ? null : metaObject
.getValue(propertyName);
}
TypeHandler typeHandler = parameterMapping.getTypeHandler();
if (typeHandler == null) {
throw new ExecutorException(
"There was no TypeHandler found for parameter "
+ propertyName + " of statement "
+ mappedStatement.getId());
}
typeHandler.setParameter(ps, i + 1, value,
parameterMapping.getJdbcType());
}
}
}
}


private String generatePageSql(String sql, PageInfo page) {
if (page != null && (dialect !=null || !dialect.equals(""))) {
StringBuffer pageSql = new StringBuffer();
if ("mysql".equals(dialect)) {
pageSql.append(sql);
pageSql.append(" limit " + page.getCurrentResult() + ","
+ page.getShowCount());
} else if ("oracle".equals(dialect)) {
pageSql.append("select * from (select tmp_tb.*,ROWNUM row_id from (");
pageSql.append(sql);
pageSql.append(") tmp_tb where ROWNUM<=");
pageSql.append(page.getCurrentResult() + page.getShowCount());
pageSql.append(") where row_id>");
pageSql.append(page.getCurrentResult());
}
return pageSql.toString();
} else {
return sql;
}
}

public Object plugin(Object arg0) {
// TODO Auto-generated method stub
return Plugin.wrap(arg0, this);
}

public void setProperties(Properties p) {
dialect = p.getProperty("dialect");
if (dialect ==null || dialect.equals("")) {
try {
throw new PropertyException("dialect property is not found!");
} catch (PropertyException e) {
// TODO Auto-generated catch block
e.printStackTrace();
}
}
pageSqlId = p.getProperty("pageSqlId");
if (dialect ==null || dialect.equals("")) {
try {
throw new PropertyException("pageSqlId property is not found!");
} catch (PropertyException e) {
// TODO Auto-generated catch block
e.printStackTrace();
}
}
}

}

此插件有兩個輔助類:PageInfo,ReflectHelper,你可以下載源代碼參考。
寫了插件之後,當然需要在 mybatis 的配置文件Configuration.xml 裡配置這個插件
程序代碼 程序代碼


請注意,這個插件定義了一個規則,也就是在mapper中sql語句的id 必須包含ListPage才能被攔截。否則將不會分頁處理.

插件寫好了,現在就可以在 spring mvc 中的controller 層中寫一個方法來測試這個分頁:
程序代碼 程序代碼
@RequestMapping("/pagelist")
public ModelAndView pageList(HttpServletRequest request,HttpServletResponse response){
int currentPage = request.getParameter("page")==null?1:Integer.parseInt(request.getParameter("page"));
int pageSize = 3;
if (currentPage<=0){
currentPage =1;
}
int currentResult = (currentPage-1) * pageSize;

System.out.println(request.getRequestURI());
System.out.println(request.getQueryString());

PageInfo page = new PageInfo();
page.setShowCount(pageSize);
page.setCurrentResult(currentResult);
List articles=iUserOperation.selectArticleListPage(page,1);

System.out.println(page);

int totalCount = page.getTotalResult();

int lastPage=0;
if (totalCount % pageSize==0){
lastPage = totalCount % pageSize;
}
else{
lastPage =1+ totalCount / pageSize;
}

if (currentPage>=lastPage){
currentPage =lastPage;
}

String pageStr = "";

pageStr=String.format("上一頁 下一頁",
request.getRequestURI()+"?page="+(currentPage-1),request.getRequestURI()+"?page="+(currentPage+1) );


//制定視圖,也就是list.jsp
ModelAndView mav=new ModelAndView("list");
mav.addObject("articles",articles);
mav.addObject("pageStr",pageStr);
return mav;
}


然後運行程序,進入分頁頁面,你就可以看到結果了:
\

源代碼下載:
下載文件點擊下載此文件
相關jar 包下載,請到下載這裡例子中的jar
http://www.yihaomen.com/article/java/318.htm (文章最後有源代碼下載,裡面有jar 包,拷貝到上面源代碼裡面所需要的lib 目錄下.)

另外,你還得在前面提到的數據庫artilce表裡面,多插入一些記錄,分頁效果就更好。


除非申明,文章均為一號門原創,轉載請注明本文地址,謝謝!

mybatis實戰教程(mybatis in action)之八:mybatis 動態sql語句
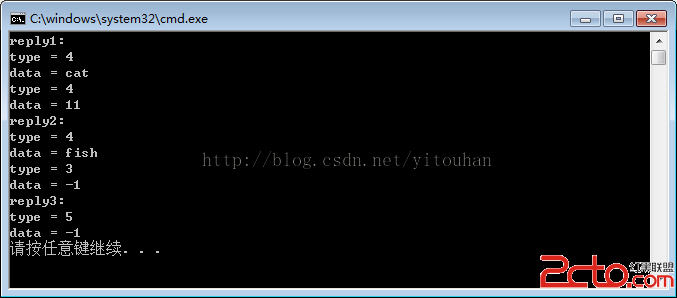

mybatis 的動態sql語句是基於OGNL表達式的。可以方便的在 sql 語句中實現某些邏輯. 總體說來mybatis 動態SQL 語句主要有以下幾類:
1. if 語句 (簡單的條件判斷)
2. choose (when,otherwize) ,相當於java 語言中的 switch ,與 jstl 中的choose 很類似.
3. trim (對包含的內容加上 prefix,或者 suffix 等,前綴,後綴)
4. where (主要是用來簡化sql語句中where條件判斷的,能智能的處理 and or ,不必擔心多余導致語法錯誤)
5. set (主要用於更新時)
6. foreach (在實現 mybatis in 語句查詢時特別有用)
下面分別介紹這幾種處理方式

1. mybaits if 語句處理
程序代碼 程序代碼


這條語句的意思非常簡單,如果你提供了title參數,那麼就要滿足title=#{title},同樣如果你提供了Content和Owner的時候,它們也需要滿足相應的條件,之後就是返回滿足這些條件的所有Blog,這是非常有用的一個功能,以往我們使用其他類型框架或者直接使用JDBC的時候, 如果我們要達到同樣的選擇效果的時候,我們就需要拼SQL語句,這是極其麻煩的,比起來,上述的動態SQL就要簡單多了

2.2. choose (when,otherwize) ,相當於java 語言中的 switch ,與 jstl 中的choose 很類似
程序代碼 程序代碼


when元素表示當when中的條件滿足的時候就輸出其中的內容,跟JAVA中的switch效果差不多的是按照條件的順序,當when中有條件滿足的時候,就會跳出choose,即所有的when和otherwise條件中,只有一個會輸出,當所有的我很條件都不滿足的時候就輸出otherwise中的內容。所以上述語句的意思非常簡單, 當title!=null的時候就輸出and titlte = #{title},不再往下判斷條件,當title為空且content!=null的時候就輸出and content = #{content},當所有條件都不滿足的時候就輸出otherwise中的內容。

3.trim (對包含的內容加上 prefix,或者 suffix 等,前綴,後綴)
程序代碼 程序代碼


trim元素的主要功能是可以在自己包含的內容前加上某些前綴,也可以在其後加上某些後綴,與之對應的屬性是prefix和suffix;可以把包含內容的首部某些內容覆蓋,即忽略,也可以把尾部的某些內容覆蓋,對應的屬性是prefixOverrides和suffixOverrides;正因為trim有這樣的功能,所以我們也可以非常簡單的利用trim來代替where元素的功能

4. where (主要是用來簡化sql語句中where條件判斷的,能智能的處理 and or 條件
程序代碼 程序代碼


where元素的作用是會在寫入where元素的地方輸出一個where,另外一個好處是你不需要考慮where元素裡面的條件輸出是什麼樣子的,MyBatis會智能的幫你處理,如果所有的條件都不滿足那麼MyBatis就會查出所有的記錄,如果輸出後是and 開頭的,MyBatis會把第一個and忽略,當然如果是or開頭的,MyBatis也會把它忽略;此外,在where元素中你不需要考慮空格的問題,MyBatis會智能的幫你加上。像上述例子中,如果title=null, 而content != null,那麼輸出的整個語句會是select * from t_blog where content = #{content},而不是select * from t_blog where and content = #{content},因為MyBatis會智能的把首個and 或 or 給忽略。

5.set (主要用於更新時)
程序代碼 程序代碼

update t_blog


title = #{title},


content = #{content},


owner = #{owner}


where id = #{id}


set元素主要是用在更新操作的時候,它的主要功能和where元素其實是差不多的,主要是在包含的語句前輸出一個set,然後如果包含的語句是以逗號結束的話將會把該逗號忽略,如果set包含的內容為空的話則會出錯。有了set元素我們就可以動態的更新那些修改了的字段

6. foreach (在實現 mybatis in 語句查詢時特別有用)
foreach的主要用在構建in條件中,它可以在SQL語句中進行迭代一個集合。foreach元素的屬性主要有item,index,collection,open,separator,close。item表示集合中每一個元素進行迭代時的別名,index指定一個名字,用於表示在迭代過程中,每次迭代到的位置,open表示該語句以什麼開始,separator表示在每次進行迭代之間以什麼符號作為分隔符,close表示以什麼結束,在使用foreach的時候最關鍵的也是最容易出錯的就是collection屬性,該屬性是必須指定的,但是在不同情況下,該屬性的值是不一樣的,主要有一下3種情況:
如果傳入的是單參數且參數類型是一個List的時候,collection屬性值為list
如果傳入的是單參數且參數類型是一個array數組的時候,collection的屬性值為array
如果傳入的參數是多個的時候,我們就需要把它們封裝成一個Map了,當然單參數也可以封裝成map,實際上如果你在傳入參數的時候,在MyBatis裡面也是會把它封裝成一個Map的,map的key就是參數名,所以這個時候collection屬性值就是傳入的List或array對象在自己封裝的map裡面的key

1.1.單參數List的類型
程序代碼 程序代碼


上述collection的值為list,對應的Mapper是這樣的
程序代碼 程序代碼
public List dynamicForeachTest(List ids);


測試代碼
程序代碼 程序代碼
@Test
public void dynamicForeachTest() {
SqlSession session = Util.getSqlSessionFactory().openSession();
BlogMapper blogMapper = session.getMapper(BlogMapper.class);
List ids = new ArrayList();
ids.add(1);
ids.add(3);
ids.add(6);
List blogs = blogMapper.dynamicForeachTest(ids);
for (Blog blog : blogs)
System.out.println(blog);
session.close();
}


2.數組類型的參數
程序代碼 程序代碼


對應mapper
程序代碼 程序代碼
public List dynamicForeach2Test(int[] ids);


3. Map 類型的參數
程序代碼 程序代碼


mapper 應該是這樣的接口:
程序代碼 程序代碼
public List dynamicForeach3Test(Map params);


通過以上方法,就能完成一般的mybatis 的 動態SQL 語句.最常用的就是 if where foreach這幾個,一定要重點掌握.
mybatis 應用程序,需要大量的配置文件,對於一個成百上千的數據庫表來說,完全手工配置,這是一個很恐怖的工作量. 所以mybatis 官方也推出了一個mybatis代碼生成工具的jar包. 今天花了一點時間,按照 mybatis generator 的doc 文檔參考,初步配置出了一個可以使用的版本,我把源代碼也提供下載,mybatis 代碼生成工具,主要有一下功能:
1.生成pojo 與 數據庫結構對應
2.如果有主鍵,能匹配主鍵
3.如果沒有主鍵,可以用其他字段去匹配
4.動態select,update,delete 方法
5.自動生成接口(也就是以前的dao層)
6.自動生成sql mapper,增刪改查各種語句配置,包括動態where語句配置
7.生成Example 例子供參考

下面介紹下詳細過程

1. 創建測試工程,並配置mybatis代碼生成jar包
下載地址:http://code.google.com/p/mybatis/downloads/list?can=3&q=Product%3DGenerator
mysql 驅動下載:http://dev.mysql.com/downloads/connector/j/
這些jar包,我也會包含在源代碼裡面,可以在文章末尾處,下載源代碼,參考。

用 eclipse 建立一個dynamic web project。
解壓下載後的 mybatis-generator-core-1.3.2-bundle.zip 文件,其中有兩個目錄:一個目錄是文檔目錄docs,主要介紹這個代碼生成工具如何使用,另一個是lib目錄,裡面的內容主要是jar 包,這裡我們需要 mybatis-generator-core-1.3.2.jar,這個 jar 包. 將它拷貝到我們剛剛創建的 web工程的 WebContent/WEB-INF/lib 目錄下.在這個目錄下也放入 mysql 驅動jar包.因為用 mysql 做測試的.

2.在數據庫中創建測試表
在mybatis數據庫中創建 用來測試的category表(如果沒有mybatis這個數據庫,要創建,這是基於前面這個系列文章而寫的,已經有了mybatis 這個數據庫)
程序代碼 程序代碼
Drop TABLE IF EXISTS `category`;
Create TABLE `category` (
`id` int(11) NOT NULL AUTO_INCREMENT,
`catname` varchar(50) NOT NULL,
`catdescription` varchar(200) DEFAULT NULL,
PRIMARY KEY (`id`)
) ENGINE=InnoDB DEFAULT CHARSET=utf8;


3. 配置mybatis 代碼生成工具的配置文件
在創建的web工程中,創建相應的package 比如 :
com.yihaomen.inter 用來存放mybatis 接口對象.
com.yihaomen.mapper用來存放sql mapper對應的映射,sql語句等.
com.yihaomen.model 用來存放與數據庫對應的model 。
在用mybatis 代碼生成工具之前,這些目錄必須先創建好,作為一個好的應用程序,這些目錄的創建也是有規律的。

根據mybatis代碼生成工具文檔,需要一個配置文件,這裡命名為:mbgConfiguration.xml 放在src 目錄下. 配置文件內容如下:
程序代碼 程序代碼
< ?xml version="1.0" encoding="UTF-8"?>
< !DOCTYPE generatorConfiguration
PUBLIC "-//mybatis.org//DTD MyBatis Generator Configuration 1.0//EN"
"http://mybatis.org/dtd/mybatis-generator-config_1_0.dtd">

< generatorConfiguration>
connectionURL="jdbc:mysql://127.0.0.1:3306/mybatis?characterEncoding=utf8"
userId="root"
password="password">
enableCountByExample="false" enableUpdateByExample="false"
enableDeleteByExample="false" enableSelectByExample="false"
selectByExampleQueryId="false">


< /generatorConfiguration>

用一個main 方法來測試能否用mybatis 成生成剛剛創建的`category`表對應的model,sql mapper等內容.
創建一個com.yihaomen.test 的package ,並在此package 下面建立一個測試的類GenMain:
程序代碼 程序代碼
package com.yihaomen.test;

import java.io.File;
import java.io.IOException;
import java.sql.SQLException;
import java.util.ArrayList;
import java.util.List;

import org.mybatis.generator.api.MyBatisGenerator;
import org.mybatis.generator.config.Configuration;
import org.mybatis.generator.config.xml.ConfigurationParser;
import org.mybatis.generator.exception.InvalidConfigurationException;
import org.mybatis.generator.exception.XMLParserException;
import org.mybatis.generator.internal.DefaultShellCallback;

public class GenMain {
public static void main(String[] args) {
List warnings = new ArrayList();
boolean overwrite = true;
String genCfg = "/mbgConfiguration.xml";
File configFile = new File(GenMain.class.getResource(genCfg).getFile());
ConfigurationParser cp = new ConfigurationParser(warnings);
Configuration config = null;
try {
config = cp.parseConfiguration(configFile);
} catch (IOException e) {
e.printStackTrace();
} catch (XMLParserException e) {
e.printStackTrace();
}
DefaultShellCallback callback = new DefaultShellCallback(overwrite);
MyBatisGenerator myBatisGenerator = null;
try {
myBatisGenerator = new MyBatisGenerator(config, callback, warnings);
} catch (InvalidConfigurationException e) {
e.printStackTrace();
}
try {
myBatisGenerator.generate(null);
} catch (SQLException e) {
e.printStackTrace();
} catch (IOException e) {
e.printStackTrace();
} catch (InterruptedException e) {
e.printStackTrace();
}
}
}


到此為止,eclipse項目工程圖應該如下:
\

4.運行測試的main 方法,生成mybatis 相關代碼
運行GenMain類裡的main方法,並刷新 工程,你會發現 各自package 目錄下已經響應生成了對應的文件,完全符合mybatis 規則,效果圖如下:
\

5.注意事項
如果你想生成example 之類的東西,需要在 裡面去掉
程序代碼 程序代碼
enableCountByExample="false" enableUpdateByExample="false"
enableDeleteByExample="false" enableSelectByExample="false"
selectByExampleQueryId="false"


這部分配置,這是生成Example而用的,一般來說對項目沒有用.

另外生成的sql mapper 等,只是對單表的增刪改查,如果你有多表join操作,你就可以手動配置,如果調用存儲過程,你也需要手工配置. 這時工作量已經少很多了。

如果你想用命令行方式處理,也是可以的.
程序代碼 程序代碼
比如:
java -jar mybatis-generator-core-1.3.2.jar -mbgConfiguration.xm -overwrite

這時,要用絕對路徑才行. 另外mbgConfiguration.xml 配置文件中targetProject 的配置也必須是絕對路徑了。


前面的系列mybatis 文章,已經基本講到了mybatis的操作,但都是基於mapper隱射操作的,在mybatis 3中這個mapper 接口貌似充當了以前在ibatis 2中的 DAO 層的作用。但事實上,如果有這個mapper接口不能完成的工作,或者需要更復雜的擴展的時候,你就需要自己的DAO 層. 事實上 mybatis 3 也是支持DAO 層設計的,類似於ibatis 2 .下面介紹下.

在此之前,請下載 上一篇文章提供的代碼:http://www.yihaomen.com/article/java/326.htm

首先創建一個com.yihaomen.dao的package.然後在裡面分別創建接口UserDAO,以及實現該接口的UserDAOImpl
程序代碼 程序代碼
package com.yihaomen.dao;
import java.util.List;
import com.yihaomen.model.Article;
public interface UserDAO {
public List
getUserArticles(int userid);
}


程序代碼 程序代碼
package com.yihaomen.dao;
import java.util.List;
import org.mybatis.spring.support.SqlSessionDaoSupport;
import org.springframework.stereotype.Repository;
import com.yihaomen.model.Article;

@Repository
public class UserDAOImpl extends SqlSessionDaoSupport implements UserDAO {
@Override
public List
getUserArticles(int userid) {
return this.getSqlSession().selectList("com.yihaomen.inter.IUserOperation.getUserArticles",userid);
}
}


執行的SQL 語句采用了命名空間+sql 語句id的方式,後面是參數.

注意繼承了 "SqlSessionDaoSupport" ,利用方法 getSqlSession() 可以得到 SqlSessionTemplate ,從而可以執行各種sql語句,類似於hibernatetemplate一樣,至少思路一樣.

如果與spring 3 mvc 集成要用 autowire的話,在daoimpl 類上 加上注解 “@Repository” ,另外還需要在spring 配置文件中加入 這樣在需要調用的地方,就可以使用autowire自動注入了。

當然,你也可以按一般程序的思路,創建一個service 的package, 用service 去調用 dao層,我這裡就沒有做了,因為比較簡單,用類似的方法,也機注意自動注入時,也要配置 等這樣的。

在controller層中測試,直接調用dao層方法
在controller中加入方法:
程序代碼 程序代碼

@Autowired
UserDAO userDAO;

.......

@RequestMapping("/daolist")
public ModelAndView listalldao(HttpServletRequest request,HttpServletResponse response){
List
articles=userDAO.getUserArticles(1);
//制定視圖,也就是list.jsp
ModelAndView mav=new ModelAndView("list");
mav.addObject("articles",articles);
return mav;
}


這樣可以得到同樣的結果,而且滿足了一般程序的設計方法.代碼結構如下:
\
 

  1. 上一頁:
  2. 下一頁:
Copyright © 程式師世界 All Rights Reserved