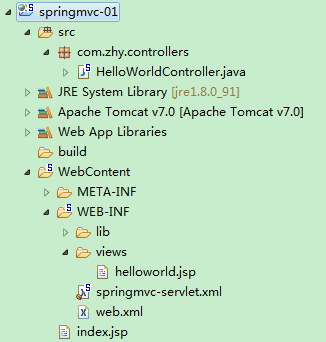
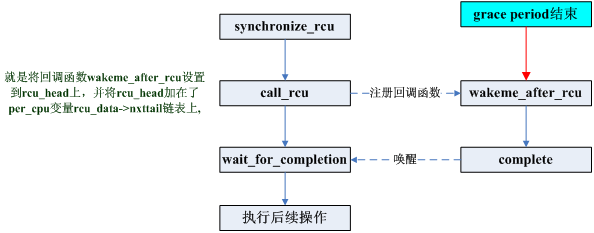
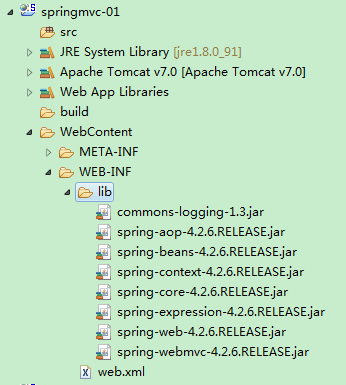
通過配置文件的方式實現一個簡單的HelloWorld。
<?xml version="1.0" encoding="UTF-8"?>
<web-app xmlns:xsi="http://www.w3.org/2001/XMLSchema-instance"
    xmlns="http://java.sun.com/xml/ns/javaee"
    xsi:schemaLocation="http://java.sun.com/xml/ns/javaee http://java.sun.com/xml/ns/javaee/web-app_3_0.xsd"
    id="WebApp_ID" version="3.0">
  <!-- The front controller of this Spring Web application, responsible for handling all application requests -->
    <servlet>
        <servlet-name>springmvc</servlet-name>
        <servlet-class>org.springframework.web.servlet.DispatcherServlet</servlet-class>
        <load-on-startup>1</load-on-startup>
    </servlet>

    <!-- Map all requests to the DispatcherServlet for handling -->
    <servlet-mapping>
        <servlet-name>springmvc</servlet-name>
        <url-pattern>/</url-pattern>
    </servlet-mapping>
</web-app>
<?xml version="1.0" encoding="UTF-8"?>
<beans xmlns="http://www.springframework.org/schema/beans"
    xmlns:xsi="http://www.w3.org/2001/XMLSchema-instance" xmlns:context="http://www.springframework.org/schema/context"
    xmlns:mvc="http://www.springframework.org/schema/mvc"
    xsi:schemaLocation="http://www.springframework.org/schema/beans http://www.springframework.org/schema/beans/spring-beans.xsd
        http://www.springframework.org/schema/context http://www.springframework.org/schema/context/spring-context-4.2.xsd
        http://www.springframework.org/schema/mvc http://www.springframework.org/schema/mvc/spring-mvc-4.2.xsd">

    <!-- 配置HandlerMapping,根據BeanName找到對應的Controller -->
    <bean class="org.springframework.web.servlet.mvc.support.ControllerBeanNameHandlerMapping"></bean>

    <!-- 配置Controller,響應mvc請求 -->
    <bean name="/mvc" class="com.zhy.controllers.HelloWorldController"></bean>

    <!-- 配置視圖解析器 -->
    <bean class="org.springframework.web.servlet.view.InternalResourceViewResolver">
        <!-- 配置前綴 -->
        <property name="prefix" value="/WEB-INF/views/"></property>
        <!-- 配置後綴 -->
        <property name="suffix" value=".jsp"></property>
    </bean>
</beans>
package com.zhy.controllers;
import javax.servlet.http.HttpServletRequest;
import javax.servlet.http.HttpServletResponse;
import org.springframework.web.servlet.ModelAndView;
import org.springframework.web.servlet.mvc.Controller;
public class HelloWorldController implements Controller {
/*
* 通過視圖解析器(ViewResolver)得到實際的物理視圖
* 視圖解析器的解析規則:prefix + viewname + suffix
* 結合本實例,視圖解析器的解析出來的物理視圖為:/WEB-INF/views/helloworld.jsp
* */
@Override
public ModelAndView handleRequest(HttpServletRequest arg0, HttpServletResponse arg1) throws Exception {
// TODO Auto-generated method stub
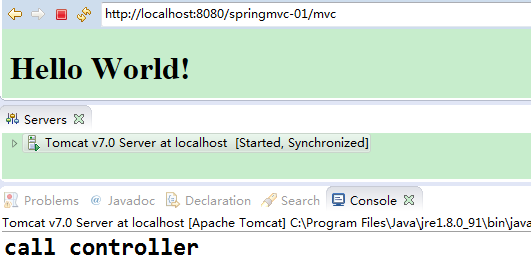
System.out.println("call controller");
return new ModelAndView("helloworld");
}
}
<%@ page language="java" contentType="text/html; charset=ISO-8859-1"
    pageEncoding="ISO-8859-1"%>
<!DOCTYPE html PUBLIC "-//W3C//DTD HTML 4.01 Transitional//EN" "http://www.w3.org/TR/html4/loose.dtd">
<html>
<head>
<meta http-equiv="Content-Type" content="text/html; charset=ISO-8859-1">
<title>Insert title here</title>
</head>
<body>
    <h1>Hello World!</h1>
</body>
</html>
<%@ page language="java" contentType="text/html; charset=ISO-8859-1"
    pageEncoding="ISO-8859-1"%>
<!DOCTYPE html PUBLIC "-//W3C//DTD HTML 4.01 Transitional//EN" "http://www.w3.org/TR/html4/loose.dtd">
<html>
<head>
<meta http-equiv="Content-Type" content="text/html; charset=ISO-8859-1">
<title>Insert title here</title>
</head>
<body>
    <a href="mvc">hello world</a>
</body>
</html>