在制作.Net安裝包的時候,如果項目有用到數據庫,怎麼能夠把數據庫打包安裝呢?網上已經有很多自動安裝Sql Server數據庫的例子,但是自動安裝mysql的例子似乎不多。本文就介紹一下如何在.Net安裝包中自動安裝Mysql數據庫。
最終我們要實現的效果是,部署.Net桌面應用程序時,能夠一鍵自動安裝應用程序以及附帶的MySql數據庫,並初始化數據庫。
實現步驟如下:
mysql本身是開源的,安裝完mysql數據庫後,其實只是在系統裡面安裝了一個Windows服務(相對於Windows系統來說)
可以從網上下載一個mysql版本,比如我用的是Mysql5.5,下載地址:http://dev.mysql.com/downloads/mysql/5.5.html
下載安裝包,按照正常安裝流程安裝完後,直接將安裝後的目錄拷貝一份為我們後面制作安裝項目所用。
一般的mysql目錄如: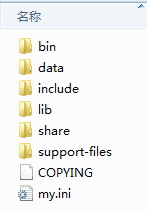
拷貝一份Mysql目錄之後,需要根據項目的需要,需改一下mysql的設置,如設置緩存大小、存儲類型等參數。
需要特別設置的是:
端口需要做特別設置,一般默認是3306端口,我們為了防止沖突,將端口改為3307
[mysqld]
# The TCP/IP Port the MySQL Server will listen on port=3307
basedir需要修改,此目錄就是MySql文件夾的物理位置,這裡顯然需要動態配置,我們暫時用一個自定義的占位符來代替,後面在程序中修改。
#Path to installation directory. All paths are usually resolved relative to this.
basedir="%BaseDir%/MySQL Server 5.5/"
datadir需要修改,此目錄是Mysql數據的存放路徑,也需要動態配置,暫時用占位符代替,後面用程序修改。
#Path to the database root
datadir="%BaseDir%/MySQL Server 5.5/data/"
為了測試,我建了如下三個項目:
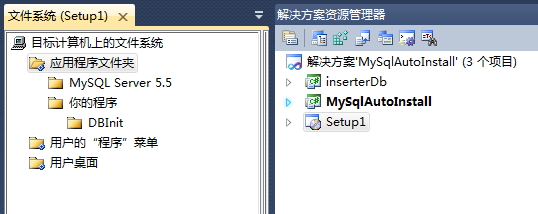
setup1項目就是.Net的安裝項目
MySqlAutoInstall是模擬的一個需要使用mysql數據庫的桌面程序。
InserterDb項目是一個DLL類庫項目,功能是安裝mysql數據庫。我們將在setup1項目中調用此類庫實現mysq數據庫自動安裝。
右鍵Setup1項目,選擇“視圖”--“文件系統”,將第一步准備的干淨Mysql數據庫文件夾拖入“應用程序文件夾”下。
再建一個“你的程序”文件夾(可自定義名稱),下面放你的桌面程序,本例中是MySqlAutoInstall項目。
建InserterDb的類庫項目,添加一個“安裝程序類”Installer1.cs
代碼如下:
using System;
using System.Collections;
using System.Collections.Generic;
using System.ComponentModel;
using System.Configuration.Install;
using System.Linq;

using MySql.Data.MySqlClient;
using System.IO;
using System.Threading;

namespace inserterDb
{
    [RunInstaller(true)]
    public partial class Installer1 : System.Configuration.Install.Installer
    {
        public Installer1()
        {
            InitializeComponent();
        }

        public override void Install(IDictionary stateSaver)
        {
            base.Install(stateSaver);

            InsertMySql();
            CreatDataBase();
            Log("安裝成功!");
        }

       //安裝mysql
        protected void InsertMySql()
        {
            string physicalRoot = this.Context.Parameters["targetdir"]; // 安裝物理路徑 C:\program\microp
            string appPath = physicalRoot + "\\MySQL Server 5.5\\";

            //1.修改my.ini配置  為防止本機已裝mysql,特修改my.ini中端口號為3307
            string iniFile = File.ReadAllText(appPath + "my.ini");
            iniFile = iniFile.Replace("%BaseDir%", physicalRoot.Replace("\\", "/")); //%BaseDir%為my.ini中自定義的目錄參數
            File.WriteAllText(appPath + "my.ini", iniFile);

            Log("創建win服務……");
            //2.創建win服務
            string info1 = CommandHelper.Execute(appPath + "bin\\mysqld.exe", " install MySQL2 --defaults-file=\"" + appPath + "my.ini\"", 0);
            Log(info1);
            Thread.Sleep(3000);
            Log("使用net start啟動服務");
            //3.啟動服務
            string info2 = CommandHelper.Execute("net start MySQL2", 0);
            Log(info2);

            Log("啟動服務完成!");
            Thread.Sleep(5000);
            MySqlConnection con = new MySqlConnection("Data Source='localhost';Port='3307';Database='';User Id='root';Password='';");
            try
            {
                con.Open();
                con.Close();
                Log("連接成功!");
            }
            catch (Exception ex)
            {
                Log("連接失敗!" + ex.Message);
            }
        }
        //創建數據庫並初始化表
        protected void CreatDataBase()
        {
            string physicalRoot = this.Context.Parameters["targetdir"]; // 安裝物理路徑 C:\program\microp
            string mysqlcon = "Data Source='localhost';Port='3307';Database='{0}';User Id='root';Password='';";

            MySqlConnection conn = new MySqlConnection(string.Format(mysqlcon, ""));
            FileInfo file = new FileInfo(physicalRoot + "\\DBInit\\yourDB.sql");  //filename是sql腳本文件路徑。
            string sql = file.OpenText().ReadToEnd();

            try
            {
                MySqlScript script = new MySqlScript(conn);
                script.Query = sql;
                int count = script.Execute();
                Log("數據庫初始化完成!");

                MySqlConnection con2 = new MySqlConnection(string.Format(mysqlcon, "yourDB"));
                con2.Open();
                MySqlCommand dbcom = new MySqlCommand("select count(*) from t_image", con2);
                dbcom.ExecuteScalar();
                con2.Close();
                Log("數據庫創建OK!");

                //修改config.xml中的數據庫鏈接地址

            }
            catch (Exception ex2)
            {
                Log("數據庫創建失敗!" + ex2.Message);
            }


        }

        //寫日志
        protected void Log(string line)
        {
            string physicalRoot = this.Context.Parameters["targetdir"]; // 安裝物理路徑 C:\program\microp
            string filePath = physicalRoot + "Install_log.txt";
            if (File.Exists(filePath))
            {
                File.AppendAllLines(filePath, new string[] { DateTime.Now.ToString("[yyyy-MM-dd HH:mm:ss] ") + line });
            }
            else
            {
                File.WriteAllLines(filePath, new string[] { DateTime.Now.ToString("[yyyy-MM-dd HH:mm:ss] ") + line });
            }
        }
    }
}
此類 override void Install方法,當程序安裝完後,立即啟動數據庫的安裝。
用代碼安裝MySql數據庫安裝步驟是:
1)修改my.ini配置 為防止本機已裝mysql,特修改my.ini中端口號為3307
my.ini中的路徑應該設置為安裝程序的安裝目錄,這個目錄是用戶自定義的,可以通過設置Setup的customActionData屬性來傳遞參數,詳見後文介紹。
2)調用“mysqld.exe -install ”命令安裝mysql數據庫服務
3)使用net start啟動Mysql服務
4)驗證數據庫安裝結果
5)執行初始化腳本,初始化數據庫
右鍵單擊“setup1”項目,選擇“視圖”--“自定義操作” 在“安裝”文件夾下右鍵選“添加自定義操作” 選擇第4步制作的InserterDb的類庫項目。
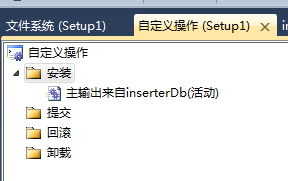
設置剛添加的自定義操作的屬性,CustomActionData 為 /targetdir="[TARGETDIR]\"

這裡的targetdir是自定義的參數名稱,目的是獲取用戶選擇的程序安裝路徑,用於修改Mysql配置文件中的%BaseDir%參數。
測試源碼下載: Source
注意,由於mysql文件太大,該目錄只留目錄名,文件自己拷貝進去即可。