文件的讀寫對我們來說不應該陌生,而應該說是非常熟悉了。在學習.NET其他開發技術的時候,IO是我們必須學習的,畢竟那是數據存儲與處理的最基本操作。
在Windows Store應用程序開發中,同樣需要對文件的讀寫,但由於安全與權限的限制,我們不可能像以前那樣“自由干活”了。這是有好處的,我們要知道,“板磚”應用是針對移動平台的,至少通常情況下是這樣的。如果我們希望像過去一樣可以自由地讀寫各種路徑,那不妨考慮使用傳統桌面應用。
其實,什麼叫Windows 8應用程序開發,並不僅僅包含Store應用,只要能在Win 8上運行的程序我們都可以說是Windows 8應用,像老套一點的MFC,以前的Windows Form,以及後來的WPF等等都可以並入Windows 8應用。
在商店應用程序中,通常我們要讀寫的目錄有兩類,一類是應用程序數據文件夾,另一類是用戶的文檔庫,至於路徑,如果你認為ms-appx://和ms-appdata://不好記的話,你可以干脆不記,就算你不知道這種路徑表示法也不會影響你寫程序的,至於你信不信,反正我深信不疑。
現在,我們拿出文本第一個例子,看看如何利用現有API來訪問應用程序的本地數據目錄。
第一步,新建一個“板磚”應用項目,這個不用我說了,此處省略38個字。
第二步,布局,MainPage.xaml的XAML如下:
<Page
    x:Class="App1.MainPage"
    xmlns="http://schemas.microsoft.com/winfx/2006/xaml/presentation"
    xmlns:x="http://schemas.microsoft.com/winfx/2006/xaml"
    xmlns:local="using:App1"
    xmlns:d="http://schemas.microsoft.com/expression/blend/2008"
    xmlns:mc="http://schemas.openxmlformats.org/markup-compatibility/2006"
    mc:Ignorable="d">

    <Grid Background="{StaticResource ApplicationPageBackgroundThemeBrush}">
        <RichTextBlock Margin="15">
            <Paragraph FontSize="24">
                <Span>本地存儲目錄:</Span>
                <Run x:Name="rnLocal"/>
                <LineBreak/>
                <LineBreak/>
                <Span>漫游存儲目錄:</Span>
                <Run x:Name="rnRoaming"/>
                <LineBreak/>
                <LineBreak/>
                <Span>臨時目錄:</Span>
                <Run x:Name="rnTemp"/>
            </Paragraph>
        </RichTextBlock>
    </Grid>
</Page>
第三步,編寫C#代碼,盡管外面謠言四起,但我還是很喜歡C#,畢竟謠言起於愚者,止於智者。
protected override void OnNavigatedTo(NavigationEventArgs e)
{
    this.rnLocal.Text = Windows.Storage.ApplicationData.Current.LocalFolder.Path;
    this.rnRoaming.Text = Windows.Storage.ApplicationData.Current.RoamingFolder.Path;
    this.rnTemp.Text = Windows.Storage.ApplicationData.Current.TemporaryFolder.Path;
}
其實從上面代碼中你已經看出,為什麼我前面說即使你不記住路徑的架構方法也可以輕松訪問這些文件夾的原因了。
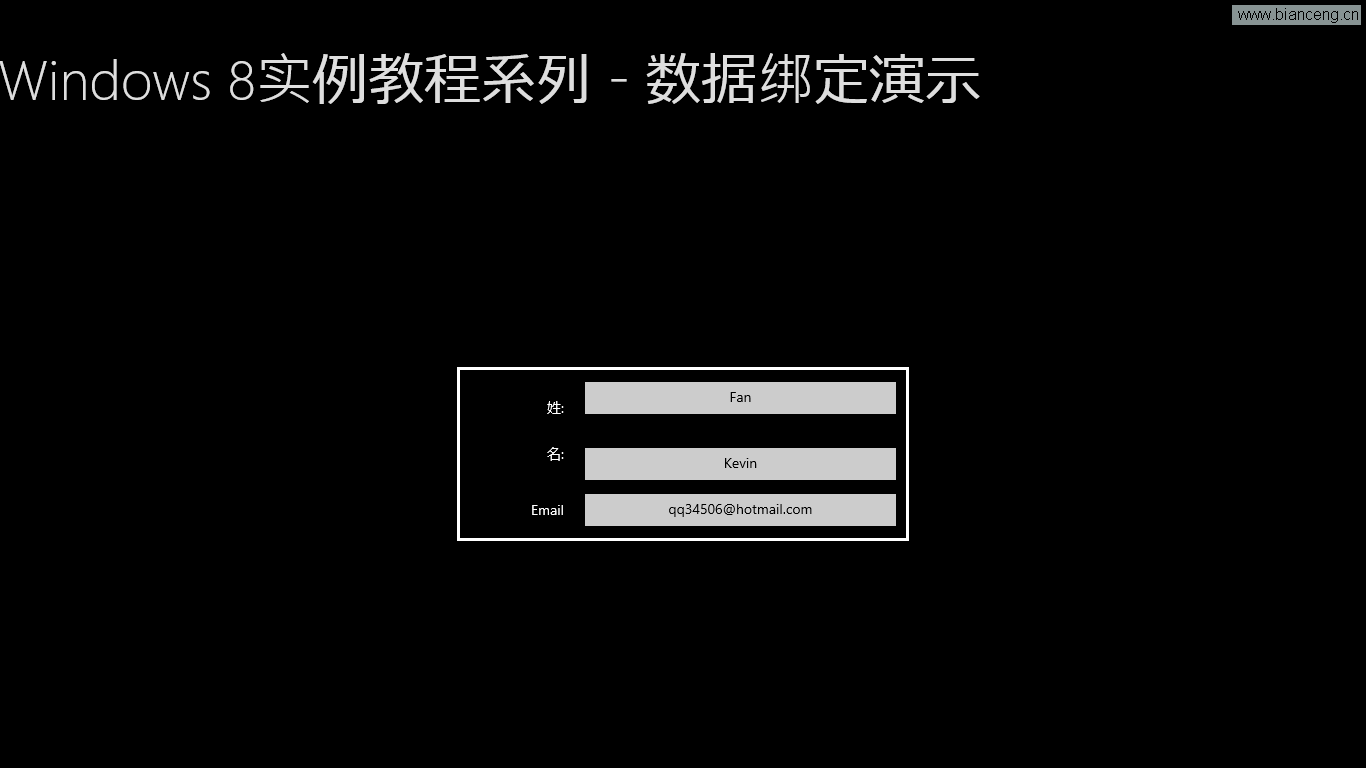
還是運行一下吧。

從運行結果中我們看到了,這些目錄都位於【用戶】\\【AppData\\Local】\\【應用程序包名】下面。
接下來拿出本文第二個例子,向本地數據存儲區中讀寫文件。
這玩意兒就相當靈活了,最簡單的方法,有兩個類可以實現:FileIO和PathIO。
都是靜態類,直接調用方法就完事了,這裡選擇FileIO類來做實驗。
第一步,新建一個商店應用項目。
第二步,主頁面的XAML如下:
<Grid Background="{StaticResource ApplicationPageBackgroundThemeBrush}">
    <Grid.RowDefinitions>
        <RowDefinition Height="*"/>
        <RowDefinition Height="auto"/>
        <RowDefinition Height="*"/>
    </Grid.RowDefinitions>
    <TextBox x:Name="txtInput" Margin="13" Grid.Row="0" TextWrapping="Wrap"/>
    <StackPanel Orientation="Horizontal" Margin="14,10" Grid.Row="1">
        <Button FontFamily="Segoe UI Symbol" FontSize="25" Click="onWrite" >
            <Button.Content>
                <Grid>
                    <Grid.ColumnDefinitions>
                        <ColumnDefinition Width="auto"/>
                        <ColumnDefinition Width="*"/>
                    </Grid.ColumnDefinitions>
                    <TextBlock x:Name="tbSob" Grid.Column="0" Text=""/>
                    <TextBlock Grid.Column="1" Text="寫入文件"/>
                </Grid>
            </Button.Content>
        </Button>
        <Button Margin="16,0,0,0" FontFamily="Segoe UI Symbol" FontSize="25" Click="onRead" >
            <Button.Content>
                <Grid>
                    <Grid.ColumnDefinitions>
                        <ColumnDefinition Width="*"/>
                        <ColumnDefinition Width="auto"/>
                    </Grid.ColumnDefinitions>
                    <TextBlock Grid.Column="0" Text="從文件讀取"/>
                    <TextBlock Grid.Column="1" Text="{Binding ElementName=tbSob,Path=Text}" RenderTransformOrigin="0.5,0.5">
                        <TextBlock.RenderTransform>
                            <RotateTransform Angle="180"/>
                        </TextBlock.RenderTransform>
                    </TextBlock>
                </Grid>
            </Button.Content>
        </Button>
    </StackPanel>
    <TextBlock x:Name="txtRead" Grid.Row="2" Margin="15" TextWrapping="Wrap" FontSize="24"/>
</Grid>
第三步,編寫代碼。
private async void onWrite(object sender, RoutedEventArgs e)
{
    if (string.IsNullOrWhiteSpace(this.txtInput.Text)) return;
    var local = Windows.Storage.ApplicationData.Current.LocalFolder;
    var myFile = await local.CreateFileAsync("my.txt");
    if (myFile != null)
    {
        await Windows.Storage.FileIO.WriteTextAsync(myFile, this.txtInput.Text);
        Windows.UI.Popups.MessageDialog dlg = new Windows.UI.Popups.MessageDialog("寫入成功。");
        await dlg.ShowAsync();
    }
}

private async void onRead(object sender, RoutedEventArgs e)
{
    Windows.UI.Popups.MessageDialog dlg = null;
    string msg = string.Empty;
    try
    {
        var local = Windows.Storage.ApplicationData.Current.LocalFolder;
        var file = await local.GetFileAsync("my.txt");
        if (file != null)
        {
            this.txtRead.Text = await Windows.Storage.FileIO.ReadTextAsync(file);
            msg = "讀取完成。";
        }
    }
    catch (Exception ex)
    {
        msg = ex.Message;
    }
    dlg = new Windows.UI.Popups.MessageDialog(msg);
    await dlg.ShowAsync();
}
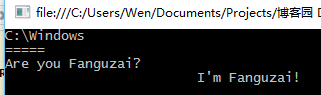
運行的結果如下圖所示。
本欄目
下面我們亮出第二把劍——KnownFolders類,使用它的靜態成員,我們可以獲取如“我的圖片”、“我的音樂”、“我的文檔”等用戶個人目錄的路徑,這樣我們也可以在其中進行文件的讀寫。就是包含下圖中顯示的這幾個家伙。

不用一個個解釋了吧,以小學五年級的英語水平也能理解是啥意思了。
下面拿出本文第三個例子,把文件寫到文檔庫中。
第一步,新建商店應用程序。
第二步,主頁布局比較簡陋,沒辦法,生活艱難。
<Grid Background="{StaticResource ApplicationPageBackgroundThemeBrush}">
    <StackPanel Margin="20">
        <TextBox x:Name="txtInput" TextWrapping="Wrap" Height="320" FontSize="20"/>
        <Button Content="保存到文檔庫" Margin="8,10,0,0" Padding="12,7" FontSize="25" Click="onSaveDoc"/>
    </StackPanel>
</Grid>
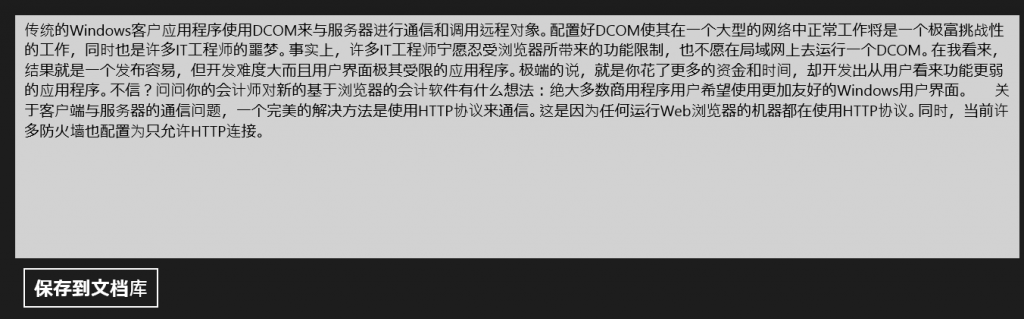
第三步,編寫後台代碼,把文本框中的內容寫到文檔庫中。
private async void onSaveDoc(object sender, RoutedEventArgs e)
{
    if (string.IsNullOrWhiteSpace(this.txtInput.Text)) return;

    var MyDocuments = Windows.Storage.KnownFolders.DocumentsLibrary;
    // 創建文件
    var tmdFile = await MyDocuments.CreateFileAsync("Data.tmd");
    if (tmdFile != null)
    {
        string strInfo = string.Empty;
        try
        {
            await Windows.Storage.FileIO.WriteTextAsync(tmdFile, this.txtInput.Text);
            strInfo = "已寫入文檔。";
        }
        catch (Exception ex)
        {
            strInfo = ex.Message;
        }
        // 提示操作結果
        Windows.UI.Popups.MessageDialog dlg = new Windows.UI.Popups.MessageDialog(strInfo);
        await dlg.ShowAsync();
    }
}
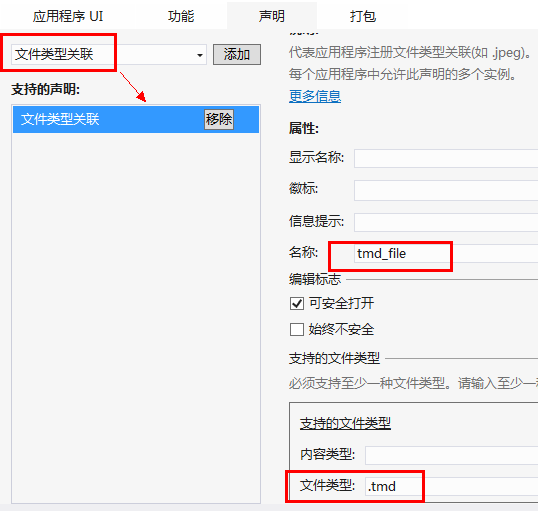
第四步,還沒完,用戶個人文檔不像前面的寫入應用程序數據存儲區那麼輕松,這裡畢竟要考慮安全問題,因此,打開清單文件設計器,切換到“功能”選項卡,勾選“文檔庫”。
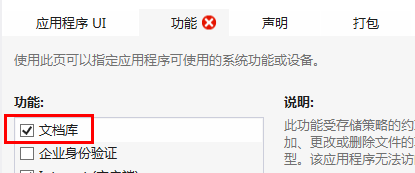
這時候我們看到標簽上顯示了一個紅叉,因為出於安全因素,雖然選用了可訪問文檔庫,但並不意味著你在裡面可以為所欲為,必須指定文件類型,而你的代碼只能操作指定的文件類型,不能操作其他未指定的文件。
切換到“聲明”選項卡,從下拉列表中選擇“文件類型關聯”,點擊“添加”按鈕,然後在窗格的右邊進行,我們的文件類是 tmd文件。
現在,你可以嘗試運行程序了。
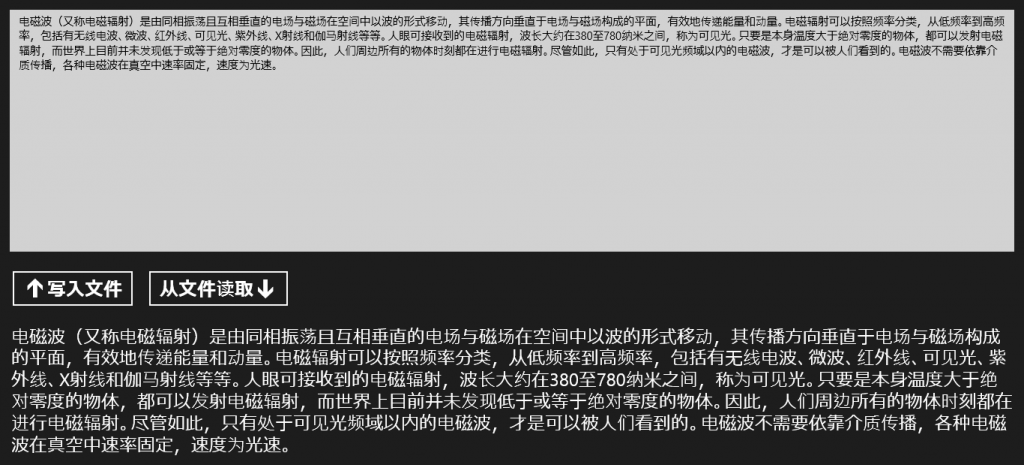
操作成功後,打開“我的文檔”,找到Data.tmd文件,用記事本打開它,看看裡面是否有內容。
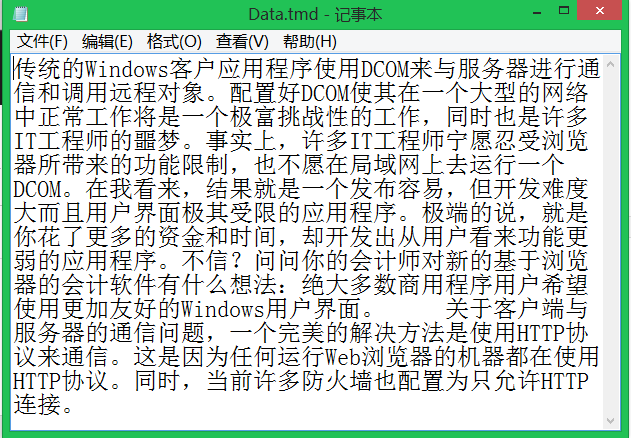
如果看到已保存的內容,說明實驗成功。