首先,我們按照以往的思路,先將上一章中的t_product進行一定的擴展,如下圖:
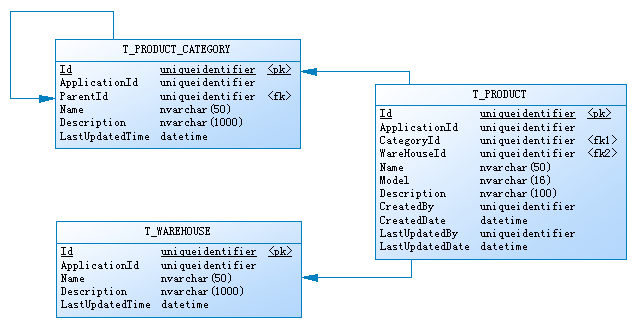
在這裡,我增加了一張T_PRODUCT_CATEGORY表,用於存放產品分類信息,分類為樹型結構,另外增加了一個T_WAREHOUSE表,用於存放倉庫信信息,然後在T_PRODUCT增加了相應的外鍵和一些擴展字段。有了數據表,就開始分別對分類和倉庫建了對應的管理代碼(CRUD, UI等),然後在產品頁面對其調用。為了節約篇幅,這裡就不貼這些代碼了,反正是一大堆。
在RapidWebDev中,類似於分類,倉庫信息這種數據量不是很大的表,完全可以使用HierarchyDate和ConcreteData所替代。使用RapidWebDev,我們只需要將保留T_PRODUCT表,然後在sitemap.config中加入產品分類和倉庫信息的配置信息,就可以實現上述的功能,在需求簡單的情況下,連代碼編寫都省下了。
<Item Text="業務模塊">

      <Item Text="產品管理" PageUrl="~/ProductManagement/DynamicPage.svc" Value="Everyone" />

      <Item Text="產品分類管理" PageUrl="~/HierarchyDataManagement/DynamicPage.svc?HierarchyType=產品分類" Value="ProductGategoryManagement" />

      <Item Text="倉庫管理" PageUrl="~/ConcreteDataManagement/DynamicPage.svc?ConcreteDataType=倉庫" Value="DepotManagement" />

</Item>
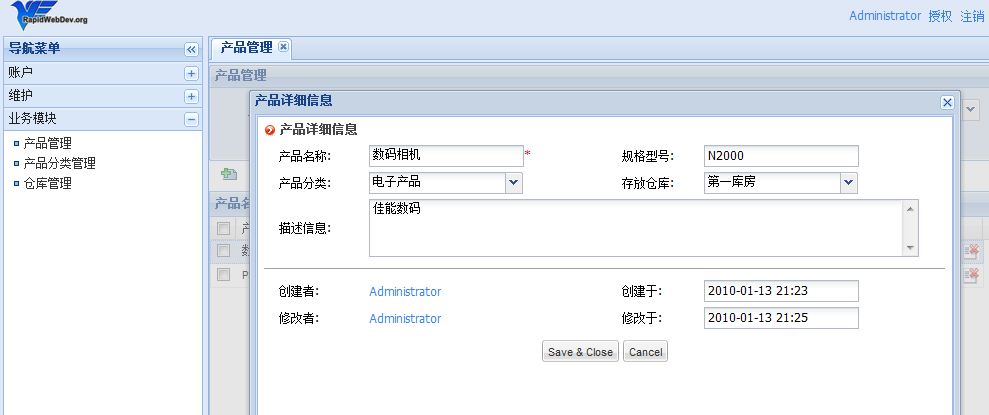
先來張貼圖,這樣更能說明問題,O(∩_∩)O
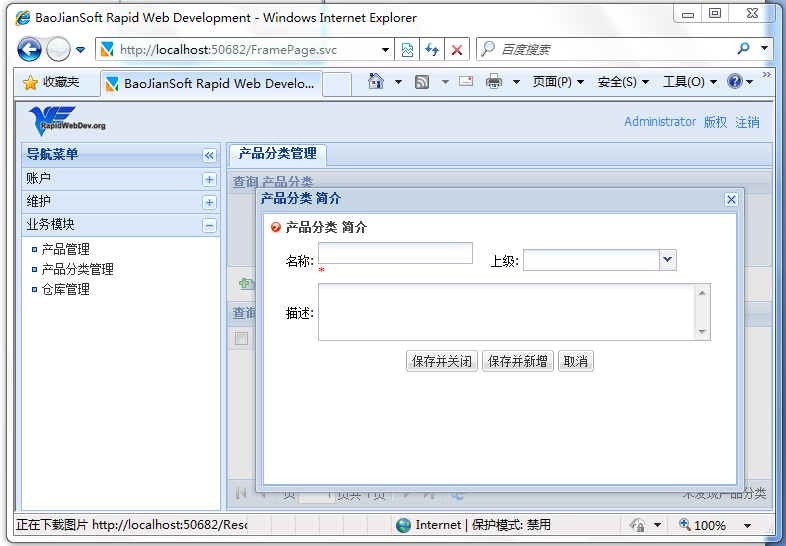
這裡的一些文字信息的中文定義有些不盡人意,如果有好的建議,大家可以留言。英文版裡面是Profile,中文版叫簡介感覺很別扭。先將就了吧,反正在資源文件裡面,可以自己動手改。^_^
分類信息和倉庫信息已經有了,接下來該是產品管理了,這下需要自己編碼了,不過也不是很多了。由於我在寫本文的時候,RapidWebDev 1.4.2剛好發布,所以我就直接在code發布的編譯版上面做demo了,一些上一章中的代碼文件可以直接copy過來,然後做一定的修改。
STEP1.將我們需要的數據表添加到數據庫中
create table T_PRODUCT (

    Id                     uniqueidentifier     not null default newid(),

    ApplicationId        uniqueidentifier     not null,

    CategoryId           uniqueidentifier     null,

    WarehouseId          uniqueidentifier     null,

    Name                  nvarchar(50)         not null,

    Model                 nvarchar(16)         null,

    Description          nvarchar(100)        null,

    CreatedBy             uniqueidentifier     not null,

    CreatedDate           datetime             not null default getdate(),

    LastUpdatedBy        uniqueidentifier     not null,

    LastUpdatedDate      datetime             not null default getdate(),

    constraint PK_T_PRODUCT primary key (Id)

)
STEP2.在Product項目中添加一個Linq2SQL文件,命名為Product.dbml,將T_PRODUCT拖到LINQ的設計器裡面,並將其重命名為Product.
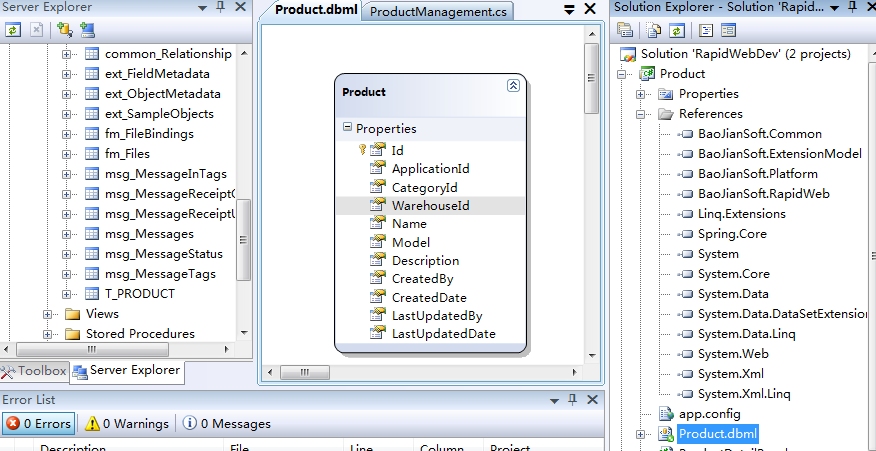
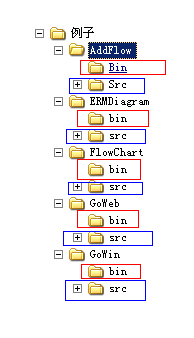
STEP3.為Product項目添加必要的引用,比如:BaoJianSoft.Common, Spring.Core等(如上圖)
STEP4.將上一章中的ProductManagement添加到Product項目,並為調整為像下面這樣。(高亮部分為改動的代碼)
public override QueryResults Query(QueryParameter parameter)

{

     LinqPredicate predicate = parameter.Expressions.Compile();


     string sortingExpression = null;

     if (parameter.SortExpression != null)

         sortingExpression = parameter.SortExpression.Compile();

     if (Kit.IsEmpty(sortingExpression))

         sortingExpression = "LastUpdatedDate ASC";

     using (ProductDataContext ctx = DataContextFactory.Create<ProductDataContext>())

     {

         int recordCount;

         var q = ctx.Products.AsQueryable();

         if (!Kit.IsEmpty(predicate.Expression))

             q = q.Where(predicate.Expression, predicate.Parameters);


         q = q.OrderBy(sortingExpression);

         recordCount = q.Count();


         var products = q.Skip(parameter.PageIndex * parameter.PageSize).Take(parameter.PageSize).ToList();

         return new QueryResults(q.Count(), products);

     }

}
這裡需要注意的是ProductDataContext ctx = DataContextFactory.Create<ProductDataContext>(),這裡通過RapidWebDev的DataContextFactory創建一個LINQ CONTEXT,所以需要在web.config將ProductDataContext添加到dataContexxt中,如下代碼:
<dataContext>

                    <settings>

                             <setting name="MembershipDataContext" type="BaoJianSoft.Platform.Linq.MembershipDataContext, BaoJianSoft.Platform" connectionString="Global" />

                             <setting name="ExtensionModelDataContext" type="BaoJianSoft.ExtensionModel.Linq.ExtensionModelDataContext, BaoJianSoft.ExtensionModel" connectionString="Global" />

       <setting name="ProductDataContext" type="Product.ProductDataContext, Product" connectionString="Global" />

                    </settings>

          </dataContext>
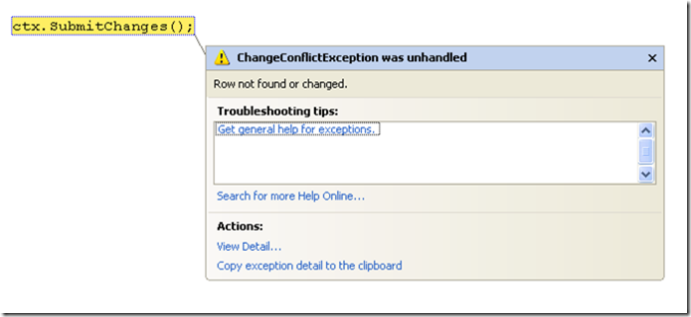
STEP 5.重寫ProductManagement類的Detete方法,為系統添加刪除功能:
public override void Delete(string entityId)

{

     Kit.NotNull(entityId, "entityId");

     Guid productId = new Guid(entityId);

     using (ProductDataContext ctx = DataContextFactory.Create<ProductDataContext>())

     {

         Product product = ctx.Products.FirstOrDefault(d => d.Id == productId);

         if (product == null) return;

         ctx.Products.DeleteOnSubmit(product);

         ctx.SubmitChanges();

     }

}
SETUP6.這裡,我們得先將上一章中的ProductManagement.dp.xml文件copy到當前解決方案的web\Spring\DynamicPage\Product\目錄下。然後我們在這個文件裡面進行擴展,實現一個完整產品模塊。
首先,先為查詢面板增加產品的規格型號和產品分類兩個條件:
<QueryPanel HeaderText="產品管理">

   <TextBox FieldName="Name" Label="產品名稱: " />

   <TextBox FieldName="Model" Label="規格型號:" />

   <ComboBox FieldName="CategoryId" Label="產品分類:" Editable="true"

                    MinChars="2" FieldValueType="System.Guid" ForceSelection="true">

     <DynamicDataSource Url="/Services/HierarchyService.svc/json/FindByKeyword?limit=999" Method="GET" TextField="Name" ValueField="Id" QueryParam="q">

       <Param Name="hierarchyType" Value="產品分類" />

     </DynamicDataSource>

   </ComboBox>

</QueryPanel>
然後,我們給GridView增加幾個顯示column
<Fields>

         <Field FieldName="Name" HeaderText="產品名稱" Width="280" />

         <Field FieldName="Model" HeaderText="規格型號" />

         <Field FieldName="CategoryId" HeaderText="所屬分類" >

           <Transform-Callback Type="Product.ShowCategoryById, Product"/>

         </Field>

         <Field FieldName="WarehouseId" HeaderText="存放倉庫" >

           <Transform-Callback Type="Product.ShowWarehouseById, Product"/>

         </Field>

         <Field FieldName="CreatedDate" HeaderText="創建日期"/>

         <Field FieldName="LastUpdatedDate" HeaderText="最後修改日期" />

       </Fields>
請注意這裡的兩個Transform-Callback,它能讓我們能按照自己的意願來顯示列表中的值,我們只需要實現IGridViewFieldValueTransformCallback接口的Format方法,並將實現類指定在這裡就可以了。在這裡我只是簡單的將分類和倉庫的名稱顯示在列表中,代碼如下:
if (Kit.IsEmpty(fieldValue))

    return string.Empty;


Guid id = new Guid(fieldValue.ToString());

HierarchyDataObject categoryObj = hierarchyApi.GetHierarchyData(id);

return categoryObj.Name;

ShowCategoryById

if(Kit.IsEmpty(fieldValue))

    return string.Empty;


Guid id = new Guid(fieldValue.ToString());

ConcreteDataObject warehouseObj = concreteDataApi.GetById(id);

return warehouseObj.Name;

ShowWarehouseById
STEP7.實現編輯頁面
在ProductManagement.dp.xml配置文件中,增加DetailPanel配置節
<DetailPanel HeaderText="產品詳細信息" ShowMessageAfterSavedSuccessfully="false">

      <Type>Product.ProductDetailPanel, Product</Type>

      <SkinPath>~/Templates/Product/ProductDetail.ascx</SkinPath>

      <SaveButton />

      <CancelButton />

</DetailPanel>
這裡的Type裡面指定了在詳細頁面中的業務邏輯,這裡指定的類必須實現IDetailPanelPage接口或者繼承於DetailPanelPage類。ProductDetailPanel類稍微長一點,這裡就不貼代碼了,只對裡面的幾個DetailPanelPage重要方法簡單介紹一下。
1.Create方法,這個方法在新增數據到數據庫時調用
2.Update方法,這個方法在修改數據時調用
3.Reset方法,這個方法在點擊新增並繼續按鈕時調用
4.LoadWriteableEntity方法,這個方法在點擊列表中的修改按鈕時調用
5.LoadReadOnlyEntity方法,這個方法在點擊列表中的查看按鈕時調用,如果使用是系統的標准控件,此方法可以不用實現
最後,這DetailPanelPage類的子類中需要使用服務器端控件只需要向定義個和服務器端控件類型和名字相同的變量,然後為其指定[Binding]特性即可。如下:
[Binding]

protected TextBox TextBoxName;
SkinPath裡面指定的是詳細頁面的模板,這個是標准的ASP.NET代碼,就沒有什麼好說的了。
好了,這次就到這裡了: