以前編寫adb工具都是bat格式的,今天分享一下利用python tkinterGUI編程來寫工具。
基於python+adb 編寫的安卓助手工具。支持錄屏、截圖、日志抓取、性能數據查看等功能。目前的功能不是很完善,只是單純的打個樣兒。
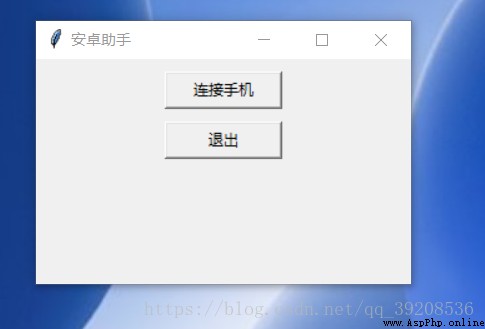
鏈接手機界面:
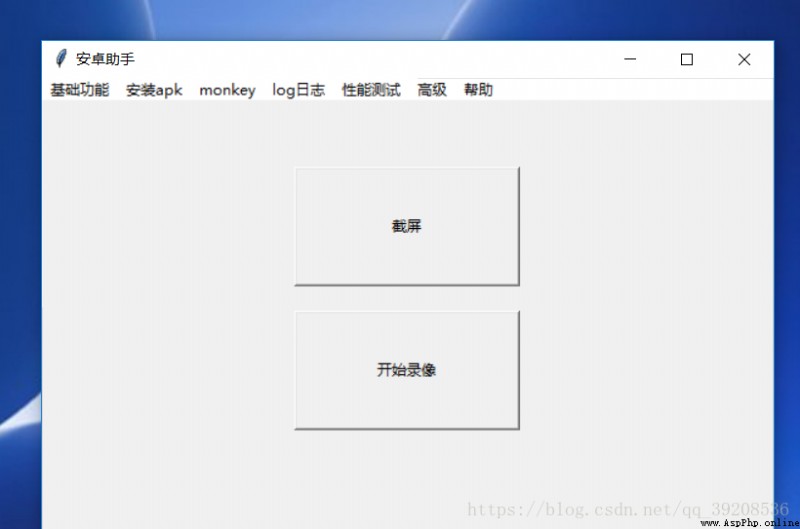
連接成功後,功能如圖:
截屏 錄屏界面:
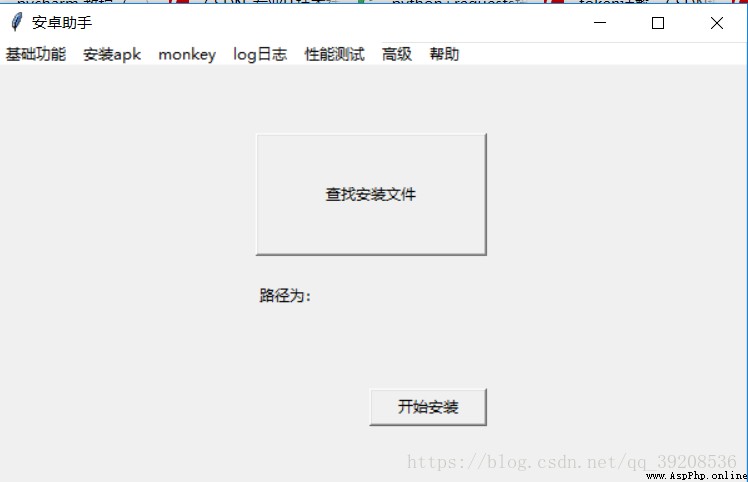
安裝APK界面:
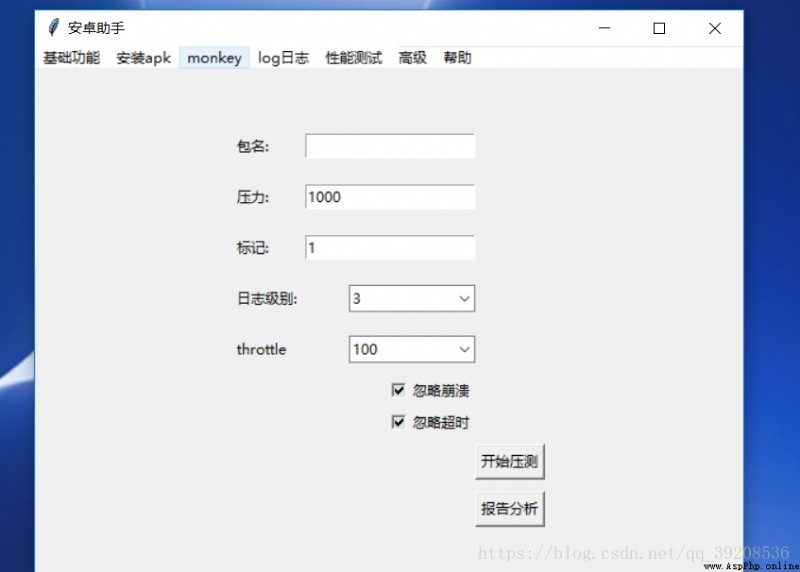
monkey界面:
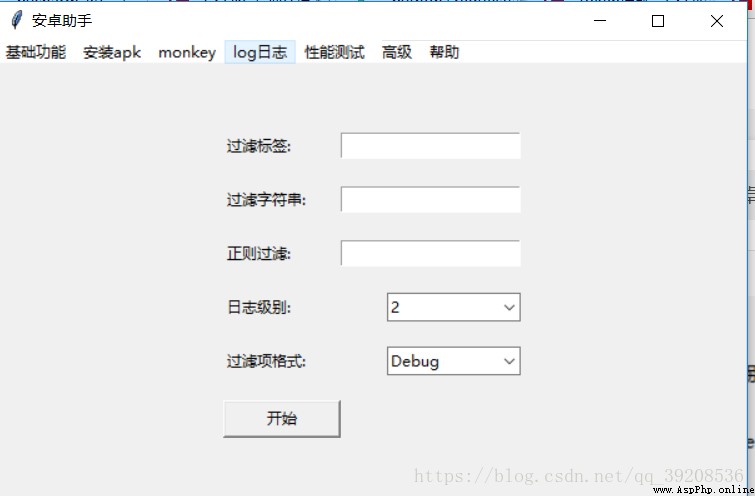
LOG日志抓取界面:
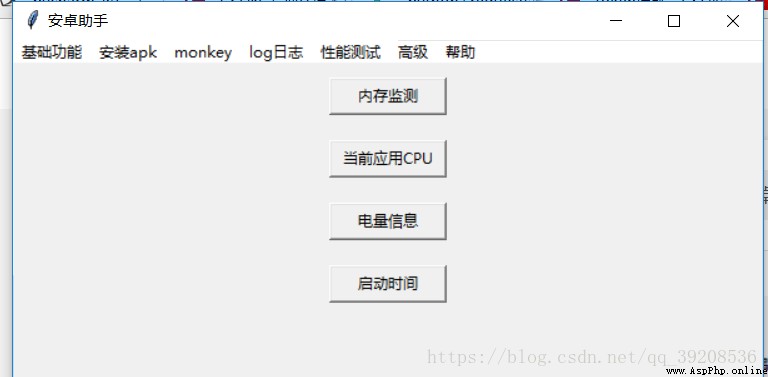
性能數據查看界面:
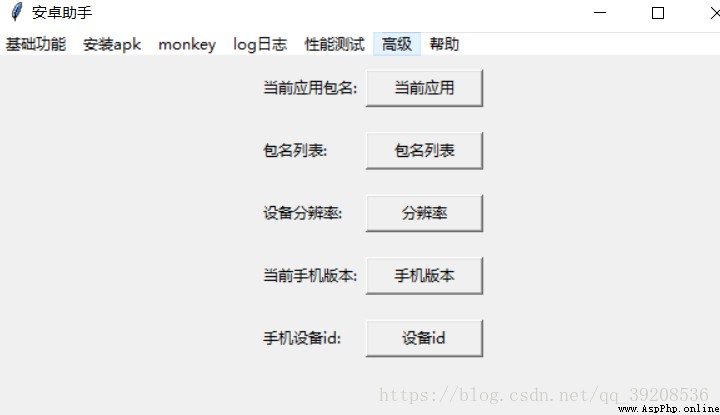
一些其他功能:
這些功能的實現全部是基於adb命令實現。
具體的實現邏輯等就不講了,上代碼:
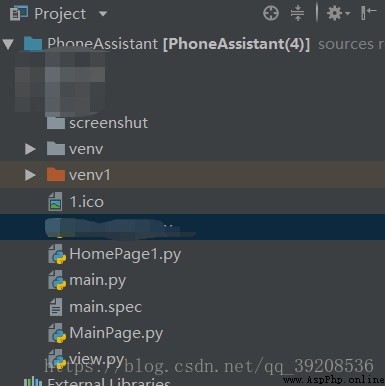
目錄結構如下:
首先,編寫首頁,
# -*- coding:utf-8 -*-
#作者:張興,陳帥
#修改日期:2018.7.7
#修改功能:鏈接手機時,增加了對是否安裝adb的判斷
from tkinter import *
from tkinter.messagebox import *
import tkinter as tk
from MainPage import *
import os
import re
import subprocess
class HomePage1(object):
def __init__(self, master=None):
self.root = master # 定義內部變量root
self.root.geometry('%dx%d' % (300, 180)) # 設置窗口大小
self.createPage()
def createPage(self):
self.page = Frame(self.root) # 創建Frame
self.page.pack()
Button(self.page, text='連接手機',width=12, command=self.loginCheck).grid(row=1, stick=W, pady=10,column=1)
Button(self.page, text='退出',width=12, command=self.page.quit).grid(row=2, column=1, stick=E)
def loginCheck(self):
#點擊後去連接手機,連接手機後,對是否連接成功做一些判斷,
# 如何獲取控制台的內容,Python2 與Python3 處理是不一樣的
#Python2的處理方式為commands模塊,但是Python3中廢掉了commands模塊,用subprocess代替,詳情使用方法訪問博客:
#https://blog.csdn.net/qq_39208536/article/details/80894752
out = subprocess.getstatusoutput('adb devices -l')
out1 = subprocess.getstatusoutput('adb devices')
#out是一個tuple,(0, 'List of devices attached \nc0cfe4a4 device product:PD1515A model:vivo_X6Plus_A device:PD1515A\n')
#out[0]為狀態碼,0成功,1失敗
if out[0]==0:#命令成功之後,進行判斷
if 'device product' in out[1]:
self.page.destroy()
MainPage(self.root)
#連接成功返回新的頁面
else:
self.sayTry()
#此時命令執行成功,但是手機沒有連接上
else:
if out1[0]==0:
if 'device' in out1[1]:
self.page.destroy()
MainPage(self.root)
#連接成功返回新的頁面
else:
self.sayTry()
else:
self.sayNoadb()#增加了對adb命令執行失敗的判斷。
def connectPhone(self):
self.page.destroy()
def sayTry(self):
tk.messagebox.showinfo("Message", "手機連接失敗,請嘗試重新連接") # 彈出消息窗口
def sayFail(self):
tk.messagebox.showinfo("Message", "手機連接失敗,未知錯誤") # 彈出消息窗口
#沒有安裝adb判斷
def sayNoadb(self):
tk.messagebox.showinfo("Message", "沒有安裝adb或者未配置adb環境變量") # 彈出消息窗口
MainPage.py
from tkinter import *
from view import * # 菜單欄對應的各個子頁面
class MainPage(object):
def __init__(self, master=None):
self.root = master # 定義內部變量root
self.root.geometry('%dx%d' % (600, 450)) # 設置窗口大小
self.createPage()
def createPage(self):
self.inputPage = InputFrame(self.root) # 創建不同Frame
self.installPage=InstallFrame(self.root)
self.queryPage = QueryFrame(self.root)
self.countPage = CountFrame(self.root)
self.aboutPage = AboutFrame(self.root)
# self.settingPage = SeetingFrame(self.root)
self.seniorPage = SeniorFrame(self.root)#高級頁面
self.helpPage=HelpFrame(self.root)
self.inputPage.pack() # 默認顯示基礎功能界面
menubar = Menu(self.root)
menubar.add_command(label='基礎功能', command=self.inputData)
menubar.add_command(label='安裝apk', command=self.installData)
menubar.add_command(label='monkey', command=self.queryData)
menubar.add_command(label='log日志', command=self.countData)
menubar.add_command(label='性能測試', command=self.aboutDisp)
# menubar.add_command(label='設置', command=self.setting)
menubar.add_command(label='高級', command=self.senior)
menubar.add_command(label='幫助', command=self.helpMe)
self.root['menu'] = menubar # 設置菜單欄
def inputData(self):
self.inputPage.pack()
self.installPage.pack_forget()
self.queryPage.pack_forget()
self.countPage.pack_forget()
self.aboutPage.pack_forget()
# self.settingPage.pack_forget()
self.helpPage.pack_forget()
self.seniorPage.pack_forget()#不顯示高級頁面
def installData(self):
self.inputPage.pack_forget()
self.installPage.pack()
self.queryPage.pack_forget()
self.countPage.pack_forget()
self.aboutPage.pack_forget()
# self.settingPage.pack_forget()
self.helpPage.pack_forget()
self.seniorPage.pack_forget() # 不顯示高級頁面
def queryData(self):
self.inputPage.pack_forget()
self.queryPage.pack()
self.countPage.pack_forget()
self.aboutPage.pack_forget()
# self.settingPage.pack_forget()
self.helpPage.pack_forget()
self.installPage.pack_forget()
self.seniorPage.pack_forget() # 不顯示高級頁面
def countData(self):
self.inputPage.pack_forget()
self.queryPage.pack_forget()
self.countPage.pack()
self.aboutPage.pack_forget()
# self.settingPage.pack_forget()
self.helpPage.pack_forget()
self.installPage.pack_forget()
self.seniorPage.pack_forget() # 不顯示高級頁面
def aboutDisp(self):
self.inputPage.pack_forget()
self.queryPage.pack_forget()
self.countPage.pack_forget()
self.aboutPage.pack()
# self.settingPage.pack_forget()
self.helpPage.pack_forget()
self.installPage.pack_forget()
self.seniorPage.pack_forget() # 不顯示高級頁面
# def setting(self):#設置頁面
# self.inputPage.pack_forget()
# self.queryPage.pack_forget()
# self.countPage.pack_forget()
# self.aboutPage.pack_forget()
# self.settingPage.pack()
# self.helpPage.pack_forget()
# self.installPage.pack_forget()
# self.seniorPage.pack_forget() # 不顯示高級頁面
def helpMe(self):#幫助頁面
self.inputPage.pack_forget()
self.queryPage.pack_forget()
self.countPage.pack_forget()
self.aboutPage.pack_forget()
# self.settingPage.pack_forget()
self.helpPage.pack()
self.installPage.pack_forget()
self.seniorPage.pack_forget() # 不顯示高級頁面
def senior(self):#高級頁面
self.inputPage.pack_forget()
self.queryPage.pack_forget()
self.countPage.pack_forget()
self.aboutPage.pack_forget()
# self.settingPage.pack_forget()
self.helpPage.pack_forget()
self.installPage.pack_forget()
self.seniorPage.pack() # 顯示高級頁面
view.py
from tkinter import *
from tkinter import ttk
from tkinter.messagebox import *
import os
import subprocess
import datetime
import tkinter as tk
import threading
import time
#from PIL import Image, ImageTk
import re
import signal
import tkinter.filedialog
#基礎功能
class InputFrame(Frame): # 繼承Frame類
def __init__(self, master=None):
Frame.__init__(self, master)
self.root = master # 定義內部變量root
self.itemName = StringVar()
self.importPrice = StringVar()
self.sellPrice = StringVar()
self.deductPrice = StringVar()
self.createPage()
#基礎功能頁面展示
def createPage(self):
Label(self).grid(row=0, stick=W, pady=10)
Button(self,text='截屏',width=25,height=5,command=self.screenshot).grid(row=1, stick=W, pady=10)
# Button(self, text='錄像',width=25,height=5,command=self.screenrecord).grid(row=2, stick=W, pady=10)
self.switchscrBtn = Button(self, text='開始錄像', width=25, height=5, command=self.switchscreenrecord)
self.switchscrBtn.grid(row=2, stick=W, pady=10)
# Button(self, text='安裝APK', width=25, height=5, command=self.screenrecord).grid(row=3, stick=W, pady=10)
# def screenrecord(self):
# Label(self).grid(row=0, stick=W, pady=10)
# Label(self, text='開始錄屏請點擊下方按鈕').grid(row=3, stick=W, pady=10)
# self.B = Button(self, text='開始', width=12, command=self.switch)
# self.B.grid(row=6, stick=E, pady=10)
def switchscreenrecord(self):
if self.switchscrBtn['text'] == '開始錄像':
self.switchscrBtn['text'] = '結束錄像'
self.startrecord()
else:
self.switchscrBtn['text'] = '開始錄像'
self.endrecord()
def startrecord(self):
nowtime = datetime.datetime.now().strftime('%Y%m%d%H%M%S')
self.name1 = nowtime + 'test.mp4'
out = 'adb shell screenrecord /sdcard/test.mp4'
self.pro = subprocess.Popen(out, stderr=subprocess.PIPE)
# 結束進程
def endrecord(self):
self.pro.kill()
out2 = subprocess.getstatusoutput('adb pull /sdcard/test.mp4 .\{}'.format(self.name1)) # .close()是關閉文件的 .kill()是殺掉進程
#截圖函數
def screenshot(self):
nowtime=datetime.datetime.now().strftime('%Y%m%d%H%M%S')
name=nowtime+'.png'
out = subprocess.getstatusoutput('adb shell screencap -p /sdcard/screen.png')
out1 = subprocess.getstatusoutput('adb pull /sdcard/screen.png .\{}'.format(name))
if out[0]==0 and out1[0]==0:
pass
else:
tk.messagebox.showinfo("Message", "未知原因,截圖失敗") # 彈出消息窗口
#安裝APK
class InstallFrame(Frame):
def __init__(self, master=None):
Frame.__init__(self, master)
self.root = master # 定義內部變量root
self.itemName = StringVar()
self.importPrice = StringVar()
self.sellPrice = StringVar()
self.deductPrice = StringVar()
self.number = StringVar()
self.createPage()
def createPage(self):
Label(self).grid(row=0, stick=W, pady=10)
Button(self, text='查找安裝文件', width=25, height=5, command=self.search).grid(row=1, stick=W, pady=10)
def search(self):
default_dir = r"C:\Users\lenovo\Desktop" # 設置默認打開目錄
self.filename = tkinter.filedialog.askopenfilename(title=u"選擇文件",initialdir=(os.path.expanduser(default_dir)),filetypes=[("apk格式", "apk")])
Label(self,text='路徑為:').grid(row=2,stick=W,pady=10)
Label(self, text=self.filename).grid(row=3, pady=10, stick=W)
self.B = Button(self, text='開始安裝', width=12, command=self.switch)
self.B.grid(row=6, stick=E, pady=10)
def switch(self):
print(self.B)
if self.B['text'] == '開始安裝':
self.B['text'] = '結束安裝'
self.startinstall() # 調取安裝APK函數
else:
self.B['text'] = '開始安裝'
self.endinstall() # 結束抓取日志函數
def startinstall(self):
tk.messagebox.showinfo("Message", "馬上開始安裝")
out1=self.filename
out = 'adb install -r '
#adb install 為安裝 adb install -r為覆蓋安裝
out2=out+out1
self.pro = subprocess.Popen(out2, stderr=subprocess.PIPE)
def endinstall(self):
self.pro.kill()
#monkey壓測
class QueryFrame(Frame): # 繼承Frame類
def __init__(self, master=None):
Frame.__init__(self, master)
self.root = master # 定義內部變量root
self.packageName=StringVar()#包名
self.pressureNum=StringVar()#打壓次數
self.seedNum=StringVar()#標記
self.logLevel=StringVar()#日志級別
self.throttle=StringVar()#時間間隔
self.ignoreCrash=StringVar()#忽略崩潰
self.ignoreANR=StringVar()#忽略閃退
self.ignoreTimeout=StringVar()#忽略超時
self.createPage()
def createPage(self):
Label(self).grid(row=0, stick=W, pady=10)
Label(self, text='包名: ').grid(row=1, stick=W, pady=10)
Entry(self, textvariable=self.packageName).grid(row=1, column=1, stick=E)
Label(self, text='壓力: ').grid(row=2, stick=W, pady=10)
Entry(self, textvariable=self.pressureNum).grid(row=2, column=1, stick=E)
self.press = Entry(self, textvariable=self.pressureNum)
self.press.insert(10, 1000)
Label(self, text='標記: ').grid(row=3, stick=W, pady=10)
Entry(self, textvariable=self.seedNum).grid(row=3, column=1, stick=E)
self.seed =Entry(self, textvariable=self.seedNum)
self.seed.insert(10, 1)
# 創建一個下拉列表
Label(self, text='日志級別: ').grid(row=4, stick=W, pady=10)
numberChosen = ttk.Combobox(self, width=12, textvariable=self.logLevel, state='readonly')
numberChosen['values'] = (1, 2, 3) # 設置下拉列表的值
numberChosen.grid(column=1, row=4,stick=E) # 設置其在界面中出現的位置 column代表列 row 代表行
numberChosen.current(2) # 設置下拉列表默認顯示的值,1為 numberChosen['values'] 的下標值
# 創建一個下拉列表,時間間隔throttle
Label(self, text='throttle').grid(row=5, stick=W, pady=10)
numberChosen = ttk.Combobox(self, width=12, textvariable=self.throttle, state='readonly')
numberChosen['values'] = (100,150,200,250,300,350,400) # 設置下拉列表的值
numberChosen.grid(column=1, row=5, stick=E) # 設置其在界面中出現的位置 column代表列 row 代表行
numberChosen.current(0) # 設置下拉列表默認顯示的值,1為 numberChosen['values'] 的下標值
Checkbutton(self,text='忽略崩潰',onvalue=1,offvalue=0,variable =self.ignoreCrash).grid(row=6, column=1, stick=E)
#offvalue #設置Off的值=0
#onvalue #設置on的值=1
Checkbutton(self, text='忽略超時',onvalue=1,offvalue=0,variable =self.ignoreTimeout).grid(row=7, column=1, stick=E)
self.startBtn=Button(self, text='開始壓測',command=self.switch)
self.startBtn.grid(row=8, column=5, stick=E, pady=5)
Button(self, text='報告分析').grid(row=9, column=5, stick=E, pady=5)
# 制作中
# 開始與結束之間的切換
def switch(self):
if self.startBtn['text'] == '開始壓測':
self.startBtn['text'] = '強行終止'
self.monkey() # 開始跑monkey
else:
self.startBtn['text'] = '開始壓測'
self.killPro() # 結束monkey
def monkey(self):
packageName=self.packageName.get() # 包名
print('包名{}'.format(packageName))
pressureNum=int(self.pressureNum.get()) # 打壓次數
print('打壓次數:{}'.format(pressureNum))
seedNum=int(self.seedNum.get()) # 標記
print('標記:{}'.format(seedNum))
logLevel=int(self.logLevel.get()) # 日志級別
print('日志級別:{}'.format(logLevel))
ignoreCrash=self.ignoreCrash.get()
print('忽略崩潰:{}'.format(ignoreCrash))
ignoreTimeout=self.ignoreTimeout.get()
throttle=int(self.throttle.get())
print('時間間隔:{}'.format(throttle))
print('忽略超時:{}'.format(ignoreTimeout))
nowtime = datetime.datetime.now().strftime('%Y%m%d%H%M%S')
filename = 'Monkey'+nowtime + ".txt"
logcat_file = open(filename, 'w')
logcmd = r'adb shell monkey -p {} -s {} -v -v -v --throttle {} --ignore-crashes --ignore-timeouts --ignore-security-exceptions --ignore-native-crashes --monitor-native-crashes {}'.format(packageName,seedNum,throttle,pressureNum)
self.pro = subprocess.Popen(logcmd, stdout=logcat_file, stderr=subprocess.PIPE)
# 結束進程
def some_adb_cmd(self):
p = subprocess.Popen('adb shell cd sdcard && cd Android && cd data && ps |grep monkey',stdout=subprocess.PIPE, stderr=subprocess.PIPE)
return_code = p.poll()
while return_code is None:
line = p.stdout.readline()
return_code = p.poll()
line = line.strip()
line1=str(line,"utf-8")
pattern = re.compile(r'[^\d]+(\d+)[^\d]+')
res = re.findall(pattern, line1)
#os.kill(int(res), signal.SIGKILL)
res1=res[0]
a='adb shell cd sdcard && cd Android && cd data'
a1='kill '+res1
a2=a+" && "+a1
p1 = subprocess.Popen(a2,stdout=subprocess.PIPE, stderr=subprocess.PIPE)
break
def killPro(self):
self.some_adb_cmd()
#log日志
class CountFrame(Frame): # 繼承Frame類
def __init__(self, master=None):
Frame.__init__(self, master)
self.root = master # 定義內部變量root
self.filterTag=StringVar() # 過濾標簽
self.filterStr=StringVar() # 過濾字符串
self.filterRegular=StringVar() # 正則過濾
self.logLevel = StringVar() # 日志級別
self.filterFormat=StringVar()#過濾項格式
self.createPage()
def createPage(self):
#Label(self, text='過濾標簽: ').grid(row=1, stick=W, pady=10)
#entry=Entry(self, textvariable=self.filterTag).grid(row=1, column=1, stick=E)
Label(self, text='過濾字符串: ').grid(row=2, stick=W, pady=10)
Entry(self, textvariable=self.filterStr).grid(row=2, column=1, stick=E)
#Label(self, text='正則過濾: ').grid(row=3, stick=W, pady=10)
#Entry(self, textvariable=self.filterRegular).grid(row=3, column=1, stick=E)
#日志級別############################################################
# 創建一個下拉列表
# Label(self, text='日志級別: ').grid(row=4, stick=W, pady=10)
# Label(self).grid(row=0, stick=W, pady=10)
#numberChosen = ttk.Combobox(self, width=12, textvariable=self.logLevel, state='readonly')
# numberChosen['values'] = (1, 2, 3) # 設置下拉列表的值
# numberChosen.grid(column=1, row=4, stick=E) # 設置其在界面中出現的位置 column代表列 row 代表行
# numberChosen.current(1) # 設置下拉列表默認顯示的值,1為 numberChosen['values'] 的下標值
#過濾格式############################################################
Label(self, text='過濾項格式: ').grid(row=5, stick=W, pady=10)
Label(self).grid(row=0, stick=W, pady=10)
filterFormat = ttk.Combobox(self, width=12, textvariable=self.filterFormat, state='readonly')
#-- V : Verbose (明細);
#-- D : Debug (調試);
#-- I : Info (信息);
#-- W : Warn (警告);
#-- E : Error (錯誤);
#-- F : Fatal (嚴重錯誤);
filterFormat['values'] = ('Verbose','Debug','Warn','Error','Fatal') # 設置下拉列表的值
filterFormat.grid(column=1, row=5, stick=E) # 設置其在界面中出現的位置 column代表列 row 代表行
filterFormat.current(1) # 設置下拉列表默認顯示的值,1為 numberChosen['values'] 的下標值
# Button(self, text='開始', width=12,command=self.switch).grid(row=6, stick=E, pady=10)
self.B=Button(self, text='開始', width=12,command=self.switch)
self.B.grid(row=6, stick=E, pady=10)
# 開始與結束之間的切換
def switch(self):
print(self.B)
if self.B['text'] == '開始':
self.B['text'] = '結束'
self.logCat()#調取抓取日志函數
else:
self.B['text'] = '開始'
self.killPro()#結束抓取日志函數
#def filterLog(self):
def logCat(self):
#packageName = self.packageName.get() # 包名
#print('包名{}'.format(packageName))
#過濾標簽
# filterTag=self.filterTag.get()
# print('過濾標簽:{}'.format(filterTag))
# print('過濾字符串:{}'.format(self.filterStr.get()))
#過濾字符串
filterStr=self.filterStr.get()
print('過濾字符串:{}'.format(filterStr))
#正則過濾
# filterRegular=self.filterRegular.get()
# print('正則過濾:{}'.format(filterRegular))
#日志級別
# logLevel=self.logLevel.get()
# print('日志級別:{}'.format(logLevel))
#過濾格式項
filterFormat=self.filterFormat.get()
print('過濾格式項:{}'.format(filterFormat))
#抓取日志
#def logCat(self):
nowtime = datetime.datetime.now().strftime('%Y%m%d%H%M%S')
filename = nowtime + ".txt"
logcat_file = open(filename, 'w')
#logcmd = r'adb shell monkey -p {} -s {} -v -v -v --throttle {} --ignore-crashes --ignore-timeouts --ignore-security-exceptions --ignore-native-crashes --monitor-native-crashes {}'.format(
# packageName, seedNum
# p = subprocess.Popen('adb shell cd sdcard && cd Android && cd data && ps |grep monkey', stdout=subprocess.PIPE,stderr=subprocess.PIPE)
if filterFormat!='' and filterStr!='':
logcmd = r'adb shell cd sdcard && cd Android && cd data && logcat *:{} | grep {}'.format(filterFormat,filterStr)
elif filterFormat!='' and filterStr=='':
logcmd = r'adb shell cd sdcard && cd Android && cd data && logcat *:{}'.format(filterFormat)
elif filterFormat=='' and filterStr !='':
logcmd = r'adb shell cd sdcard && cd Android && cd data && logcat | grep {}'.format(filterStr)
else:
logcmd = 'adb logcat -v time'
#logcmd = 'adb logcat -v time'
self.pro = subprocess.Popen(logcmd, stdout=logcat_file, stderr=subprocess.PIPE)
#結束進程
def killPro(self):
self.pro.kill() # .close()是關閉文件的 .kill()是殺掉進程
#性能測試界面
class AboutFrame(Frame): # 繼承Frame類
def __init__(self, master=None):
Frame.__init__(self, master)
self.root = master # 定義內部變量root
self.createPage()
def createPage(self):
Button(self, text='內存監測', width=12, command=self.getMemory).grid(row=1, stick=E, pady=10, column=1)
# Button(self, text='手機CPU監測', width=12, command=self.allCpu).grid(row=2, stick=E, pady=10, column=1)
Button(self, text='當前應用CPU', width=12, command=self.myCpu).grid(row=2, stick=E, pady=10, column=1)
Button(self, text='電量信息', width=12, command=self.charge).grid(row=3, stick=E, pady=10, column=1)
Button(self, text='啟動時間', width=12, command=self.startTime).grid(row=4, stick=E, pady=10, column=1)
#電量信息
def charge(self):
print('電量信息')
out = subprocess.getstatusoutput('adb shell dumpsys battery')
top = tk.Toplevel()
top.title('電量信息')
top.geometry('%dx%d' % (600, 600)) # 設置窗口大小
t = Text(top, width=600, height=600)
t.insert('1.0', "{}".format(out[1]))
t.pack()
top.mainloop()
#內存數據獲取
def getMemory(self):
import re
out = subprocess.getstatusoutput('adb shell dumpsys window | findstr mCurrentFocus ')
str1 =out[1]
pattern = re.compile(r'u0\s*(.+?)\/')
res = re.findall(pattern, str1)
self.package=res[0]#獲取當前應用的包名
nowtime = datetime.datetime.now().strftime('%Y%m%d%H%M%S')
# filename = "startime"+nowtime+".txt"
filename = "startime" + nowtime + ".xls"
startime_file = open(filename, 'w')
order = "adb shell dumpsys meminfo {}".format(self.package) # 獲取內存的命令
self.pro = subprocess.Popen(order, stdout=startime_file, stderr=subprocess.PIPE)
#手機內當前前十位的應用cpu占用動態監測
def allCpu(self):
top = tk.Toplevel()
top.title('內存監測')
top.geometry('%dx%d' % (700, 1400)) # 設置窗口大小
#Text文本框的定義和輸出
t = Text(top, width=700, height=100)
t.pack(fill=tkinter.X, side=tkinter.BOTTOM)
top.mainloop()
# out = subprocess.getstatusoutput('adb shell&&top -m 10 -s cpu')
logcmd='adb shell&&top -m 10 -s cpu'
out=subprocess.Popen(logcmd,stderr=subprocess.PIPE)
t.insert(tkinter.END,"{}".format(out[1]))
t.see(tkinter.END)
t.update()
#當前應用占用CPU顯示
def myCpu(self):
import re
out = subprocess.getstatusoutput('adb shell dumpsys window | findstr mCurrentFocus ')
str1 = out[1]
pattern = re.compile(r'u0\s*(.+?)\/')
res = re.findall(pattern, str1)
self.packageName = res[0] # 獲取當前應用的包名
out = subprocess.getstatusoutput('adb shell dumpsys cpuinfo | find "{}"'.format(self.packageName))
top = tk.Toplevel()
top.title('當前應用')
top.geometry('%dx%d' % (300, 100)) # 設置窗口大小
t = Text(top, width=300, height=100)
t.insert('1.0', "{}".format(out[1]))
t.pack()
top.mainloop()
def startTime(self):
pass
#設置頁面
class SeetingFrame(Frame): # 繼承Frame類
def __init__(self, master=None):
Frame.__init__(self, master)
self.root = master # 定義內部變量root
self.createPage()
def createPage(self):
Label(self, text='設置開發中').pack()
#高級頁面
class SeniorFrame(Frame):
def __init__(self, master=None):
Frame.__init__(self, master)
self.root = master # 定義內部變量root
self.createPage()
def createPage(self):
# 查看手機上已經安裝的所有的包名列表
Label(self, text='當前應用包名: ').grid(row=1, stick=W, pady=10)
Button(self, text='當前應用', width=12, command=self.currentPackage).grid(row=1, stick=E, pady=10, column=1)
#查看手機上已經安裝的所有的包名列表
Label(self, text='包名列表: ').grid(row=2,stick=W, pady=10)
Button(self, text='包名列表', width=12, command=self.listPackage).grid(row=2, stick=E, pady=10,column=1)
# 查看當前手機屏幕分辨率
Label(self, text='設備分辨率: ').grid(row=3, stick=W, pady=10)
Button(self, text='分辨率', width=12, command=self.resolution).grid(row=3, stick=E, pady=10, column=1)
#查看手機系統版本
Label(self, text='當前手機版本: ').grid(row=4, stick=W, pady=10)
Button(self, text='手機版本', width=12, command=self.systemversion).grid(row=4, stick=E, pady=10, column=1)
Label(self, text='手機設備id: ').grid(row=5, stick=W, pady=10)
Button(self, text='設備id', width=12, command=self.deviceid).grid(row=5, stick=E, pady=10, column=1)
#當前應用的包名及activity
def currentPackage(self):
out =subprocess.getstatusoutput('adb shell dumpsys window | findstr mCurrentFocus ')
top = tk.Toplevel()
top.title('當前應用')
top.geometry('%dx%d' % (700,100)) # 設置窗口大小
t = Text(top, width=700, height=100)
t.insert('1.0', "{}".format(out[1]))
t.pack()
top.mainloop()
#所有的包名列表
def listPackage(self):
nowtime = datetime.datetime.now().strftime('%Y%m%d%H%M%S')
filename = 'package'+nowtime + ".txt"
logcat_file = open(filename, 'w')
logcmd = 'adb shell pm list packages'
self.pro = subprocess.Popen(logcmd, stdout=logcat_file, stderr=subprocess.PIPE)
out = subprocess.getstatusoutput('adb shell pm list packages')
top = tk.Toplevel()
top.title('包名列表')
top.geometry('%dx%d' % (400, 1200)) # 設置窗口大小
t=Text(top,width=400,height=900)
t.insert('1.0',"{}".format(out[1]))
#插入文本,用引號引起來“1.0” 這個是插入文本的坐標,且1與0之間為點,而不是逗號,切記
#wraplength: 指定多少單位後開始換行
#justify: 指定多行的對齊方式
#例子: Label(top, text='查看當前手機上所有包名: ',wraplength = 80,justify = 'left').grid(row=1,stick=W, pady=10)
t.pack()
top.mainloop()
# 當前應用的包名及activity
def resolution(self):
out = subprocess.getstatusoutput('adb shell wm size')
top = tk.Toplevel()
top.title('分辨率')
top.geometry('%dx%d' % (300, 100)) # 設置窗口大小
t = Text(top, width=300, height=100)
t.insert('1.0', "{}".format(out[1]))
t.pack()
top.mainloop()
def systemversion(self):
out = subprocess.getstatusoutput('adb shell getprop ro.build.version.release')
top = tk.Toplevel()
top.title('手機系統版本')
top.geometry('%dx%d' % (300, 100)) # 設置窗口大小
t = Text(top, width=300, height=100)
t.insert('1.0', "{}".format(out[1]))
t.pack()
top.mainloop()
def deviceid(self):
out = subprocess.getstatusoutput('adb get-serialno')
top = tk.Toplevel()
top.title('手機設備id')
top.geometry('%dx%d' % (600, 100)) # 設置窗口大小
t = Text(top, width=600, height=100)
t.insert('1.0', "{}".format(out[1]))
t.pack()
top.mainloop()
#幫助頁面
class HelpFrame(Frame): # 繼承Frame類
def __init__(self, master=None):
Frame.__init__(self, master)
self.root = master # 定義內部變量root
self.createPage()
def createPage(self):
a='''如有疑問,請聯系...'''
b='''Python2的處理方式為commands模塊,但是Python3中廢掉了commands模塊,用subprocess代替'''
c='''詳情使用方法訪問博客:'''
d='''#https://blog.csdn.net/qq_39208536/article/details/80894752'''
Label(self, text=a).grid(row=1, stick=W, pady=10)
# Label(self, text=b).grid(row=2, stick=W, pady=10)
# Label(self, text=c).grid(row=3, stick=W, pady=10)
# Label(self, text=d).grid(row=4, stick=W, pady=10)
最後是main.py
from tkinter import *
from HomePage1 import *
# from icon import img
# import base64
root = Tk()
root.title('安卓助手')
HomePage1(root)
root.mainloop()
具體細節就不講了,很簡單。大家一定都會的
最後十分感謝張興老師的努力。