install OpenCV And running examples are interesting , But at this stage , We hope to
Try it in your own way . This chapter will introduce OpenCV Of I/O function , Items will also be discussed
The concept of , And began to carry out object-oriented design for the project , And in the following chapters continue to
The project is enriched .
First , Let's take a look I/O Functions and design patterns , We will make sandwiches
Build the project in a way —— From the outside to the inside . Slice and spread bread , Or end point and bonding ,
It's all the work before adding stuffing and Algorithm . The reason for choosing this method is that computers
Vision is usually extroverted —— It focuses on the real world beyond computers —— We hope
Apply all subsequent algorithm work to the real world through a common interface .
This chapter will introduce the following topics :
· From image file 、 Video file 、 Raw data bytes in camera device or memory
Read images .
· Write an image to an image file or video file .
· stay NumPy Processing image data in an array .
· Show the image in the window .
· Handle keyboard and mouse input .
· Realize the application program based on object-oriented design .
2.1 Technical requirements
It's used in this chapter Python、OpenCV as well as NumPy. For installation instructions, refer to page 1 Chapter .
The complete code of this chapter can be found in this book GitHub library ( The website is
https://github.com/PacktPublishing/Learning-OpenCV-4-
Computer-Vision-with-Python-Third-Edition) Of chapter02 In file
find .
2.2 basic I/O Script
Most computer vision (Computer Vision,CV) The application needs to get the graph
Like as input . Most computer vision applications also generate images as output . hand over
Interactive computer vision applications may need to use cameras as input sources , You also need to close the window
As the output target . But other possible sources and targets include image files 、 Video file
And raw bytes . for example , If you synthesize procedural graphics into an application , So the original
The first byte may be transmitted through a network connection , It may also be generated by algorithm . Let's see
Every possibility .
2.2.1 Read / Write image file
OpenCV Provides imread Function to load an image from a file , Also provided imwrite Letter
Count to write the image to the file . These functions support still images ( Non video ) Various documents
Format . Supported formats vary —— stay OpenCV You can add or
Delete some formats —— however , Usually BMP、PNG、JPEG and TIFF Are all supported lattice
type .
Let's take a look at OpenCV and NumPy The anatomical structure represented by the image in . A picture
Like a multidimensional array , There are column pixels and row pixels , Each pixel has a value . Yes
For different types of image data , Pixel values can be in different formats . for example , Through Jane
Simply create a two-dimensional NumPy Array , You can create one from scratch 3×3 Black square
Shape image :

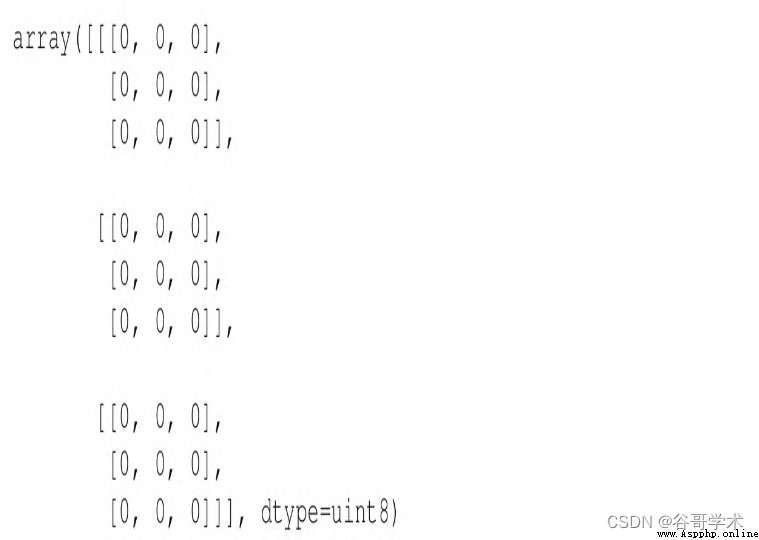
If you print this image to the console , The results obtained are as follows :

here , One for each pixel 8 Bit integers represent , This means that the value of each pixel is
stay 0~255 Within the scope of , among 0 According to black ,255 Said the white , The middle value indicates gray
color . This is a grayscale image .
Now? , We use cv2.cvtColor The function converts this image to blue – green – red
(Blue-Green-Red,BGR) Format :

Let's see how the image changes :
As you can see , Now each pixel is represented by a ternary array , Each integer is
Represents three color channels (B、G and R) One of them .HSV Other common color patterns such as
The representation of type is similar , Only the value range is different . for example ,HSV Hue of color model
The range of values is 0~180.
More about color models , Please refer to the first 3 Chapter , In especial 3.2 section .
By looking at shape attribute , You can view the structure of the image ,shape Property returns
That's ok 、 Number of columns and channels ( If there are multiple channels ).
Consider the following example :

The above code will be printed (5,3), Means we have one 5 That's ok 3 Grayscale image of column . Such as
If the image is converted into BGR Format ,shape It will be (5,3,3), Indicates that each pixel has 3
Channels .
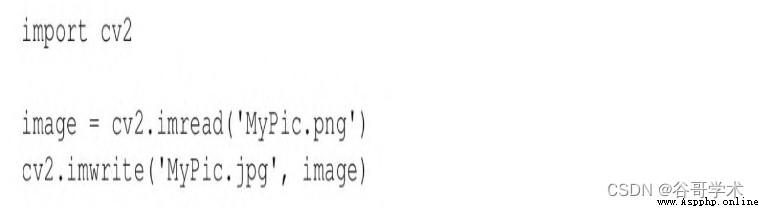
Images can be loaded from one file format and saved to another . for example , Put one
Images from PNG Convert to JPEG:
OpenCV Of Python The module is named cv2, Although we use OpenCV
4.x Instead of OpenCV 2.x. before ,OpenCV There are two Python modular :cv2 and cv.cv seal
Installed with C Realized OpenCV An old version of . at present ,OpenCV Only cv2 Python
modular , The module is encapsulated with C++ Realized OpenCV current version .
By default ,imread return BGR Format image , Even if the file is gray
Degree format .BGR Express and red – green – blue (Red-Green-Blue,RGB) The same color
Model , Only the byte order is opposite .
We can also specify imread The pattern of , Supported options include :
·cv2.IMREAD_COLOR: This mode is the default option , Provide 3 The tunnel BGR chart
image , One per channel 8 A value (0~255).
·cv2.IMREAD_GRAYSCALE: This mode provides 8 Bit gray image .
·cv2.IMREAD_ANYCOLOR: This mode provides each channel 8 Bit BGR chart
Like or 8 Bit gray image , It depends on the metadata in the file .
·cv2.IMREAD_UNCHANGED: This mode reads all image data , package
As the first 4 The tunnel α Or transparency channel ( If any ).
·cv2.IMREAD_ANYDEPTH: This mode loads the grayscale image of the original bit depth
image . for example , If the file represents an image in this format , Then it provides each channel
16 Bit of a grayscale image .
·cv2.IMREAD_ANYDEPTH|cv2.IMREAD_COLOR: The combination mode
Load the original bit depth BGR Color images .
·cv2.IMREAD_REDUCED_GRAYSCALE_2: The grayscale loaded by this mode
The resolution of the image is that of the original 1/2. for example , If the document includes a 640×480
Image , Then it loads a 320×240 Image .
·cv2.IMREAD_REDUCED_COLOR_2: This mode loads each channel 8 position
Of BGR Color images , The resolution is that of the original image 1/2.
·cv2.IMREAD_REDUCED_GRAYSCALE_4: This mode loads grayscale images
image , The resolution is that of the original image 1/4.
·cv2.IMREAD_REDUCED_COLOR_4: This mode loads each channel 8 position
Color image of , The resolution is that of the original image 1/4.
·cv2.IMREAD_REDUCED_GRAYSCALE_8: This mode loads grayscale images
image , The resolution is that of the original image 1/8.
·cv2.IMREAD_REDUCED_COLOR_8: This mode loads each channel 8 position
Color image of , The resolution is... Of the original image 1/8.
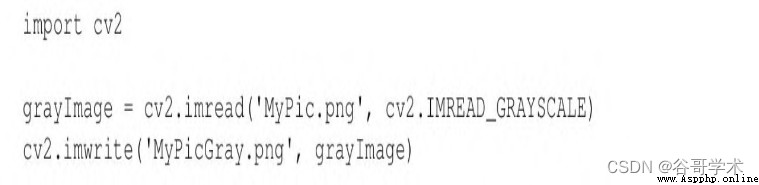
for instance , We will PNG The file is loaded as a grayscale image ( In the process, you will lose
Lose all color information ), Then save it as a gray PNG Images :
Unless it's an absolute path , Otherwise, the path of the image is relative to the working directory (Python
The running path of the script ) Of , So in the previous example ,MyPic.png Must be at work
Recording , Otherwise, the image will not be found . If you want to avoid assumptions about working directories , can
To use absolute paths , such as Windows Upper
C:\Users\Joe\Pictures\MyPic.png、Mac On
Of /Users/Joe/Pictures/MyPic.png, perhaps Linux On
Of /home/joe/pictures/MyPic.png.
imwrite() The function requires the image to be BGR Format or grayscale format , Each channel has
The specific number of bits that the output format can support . for example ,BMP The file format requires each channel 8
position , and PNG Allow each channel 8 Bit or 16 position .
2.2.2 Convert between image and original bytes
conceptually , One byte is 0~255 An integer in the range . at present , stay
In real-time graphics applications , Pixels are usually represented by one byte per channel , But
Other representations can be used .
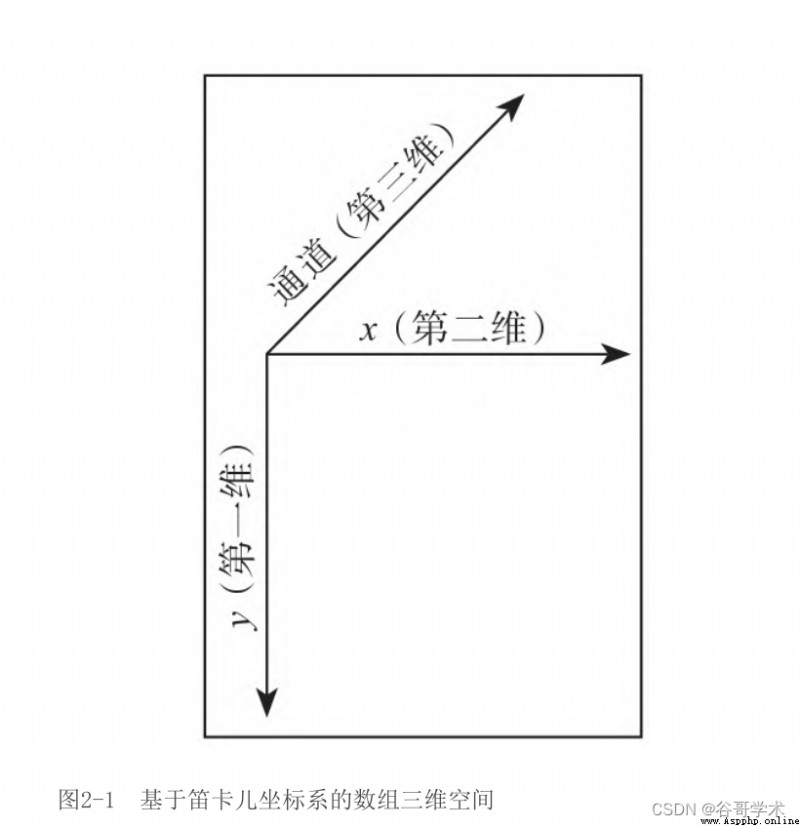
OpenCV Image is numpy.array Type of two-dimensional or three-dimensional array .8 Bit grayscale
Like a two-dimensional array containing byte values .24 Bit BGR The image is a three-dimensional array , also
Contains byte values . We can use something like image[0,0] perhaps image[0,0,0]
To access these values . The first index is pixel y Coordinates or lines ,0 Represents the top
Ministry . The second index is pixel x Coordinates or columns ,0 Represents the leftmost . The third index
( If any ) Represents a color channel . It can be seen with the following Cartesian coordinate system
Normalize the three-dimensional space of the array ( See the picture 2-1).
for example , White pixels in the upper left corner 8 Bit gray image ,image[0,0] yes
255. Blue pixels in the upper left corner 24 position ( Every channel 8 position )BGR Image ,
image[0,0] yes [255,0,0].
Suppose each channel of the image has 8 position , We can force it into standard
Python bytearray object ( One dimensional ):

contrary , hypothesis bytearray Include the bytes in a suitable order , We're going to do
Change the dimension after forced conversion , You can get a picture of numpy.array Types of images :

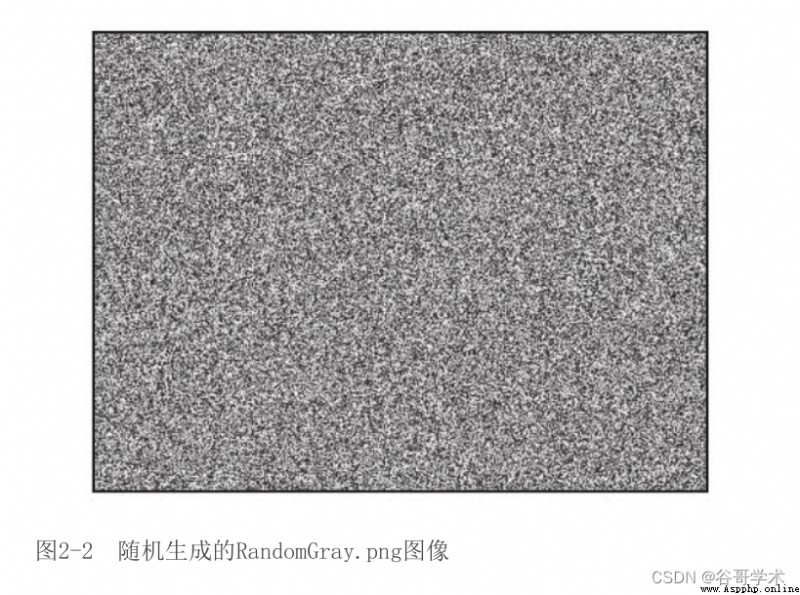
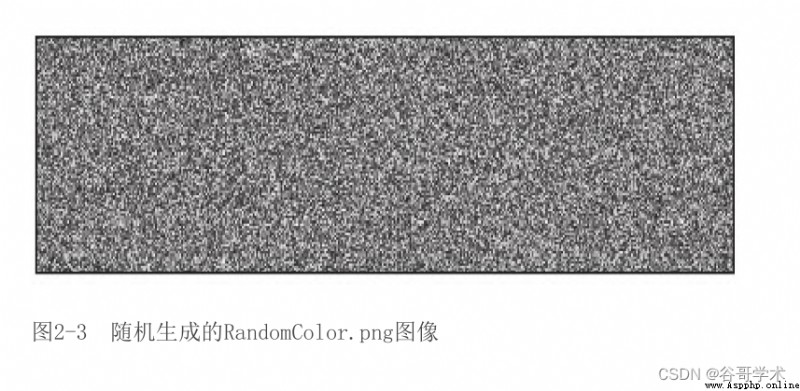
Take a more complete example , We will include random bytes bytearray Convert to grayscale
Images and BGR Images :

here , We use Python Standards for os.urandom Function generates random primitive
byte , And then turn it into NumPy Array . Please note that , You can also use the
numpy.random.randint(0,256,120000).reshape(300,400) Such a statement directly ( and
And more effective ) Generate random NumPy Array . We use os.urandom The only reason is :
This helps to show the conversion of raw bytes .
After running this script , There should be a pair of randomly generated images in the script directory :
RandomGray.png and RandomColor.png.
chart 2-2 yes RandomGray.png An example of ( The results you get are likely to be
Different , Because this is randomly generated ).
Similarly , chart 2-3 yes RandomColor.png An example of .
Now that we have a better understanding of how data forms images , then
You can start to perform basic operations on it .
2.2.3 be based on numpy.array Access image data
We already know that OpenCV Loading images in is the easiest ( It is also the most common ) Methods
It's using imread function . We also know that this will return an image , It's actually a
Array ( Whether it is two-dimensional or three-dimensional depends on whether it is passed to imread Parameters of ).
numpy.array Class greatly optimizes array operations , It allows certain types of batches
Quantity operation , These operations are common Python Not available in the list . These types of
numpy.array All are OpenCV Array type specific operations in , For image manipulation
Very convenient . however , Let's start with a basic example , Explore image manipulation step by step
do . Suppose you want to operate BGR Graphic (0,0) Pixels at coordinates , And convert it into white
Color pixel :
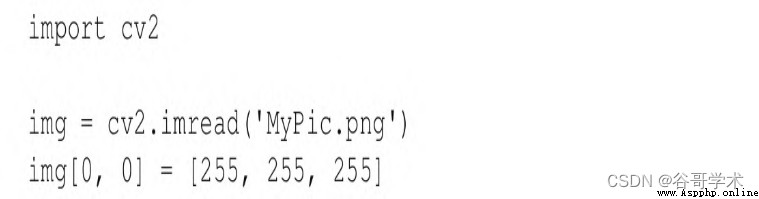
If you save the modified image to a file and then view the image , You will be in the image
See a white dot in the upper left corner . Of course , This modification is not very useful , But it shows
The possibility of some kind of modification . Now? , We make use of numpy.array The function of is executed on the array
The transformation speed is faster than ordinary Python The list is much faster .
Suppose you want to change the blue value of a particular pixel , for example (150,120) At coordinates
Pixels .numpy.array Type provides a convenient method item, It has three parameters :
x( perhaps left) Location 、y( perhaps top) Position and in the array (x,y) Location cable
lead ( please remember , stay BGR Image , The data at a particular location is a ternary array ,
Include according to B、G and R Ordered values ), And return the value of the index position . Another way
itemset You can set the value of a specific channel of a specific pixel to the specified value .
itemset There are two parameters : A triple (x、y And index ) And new values .
In the following example , We will (150,120) The blue channel value at is changed from its current value
Change to 255: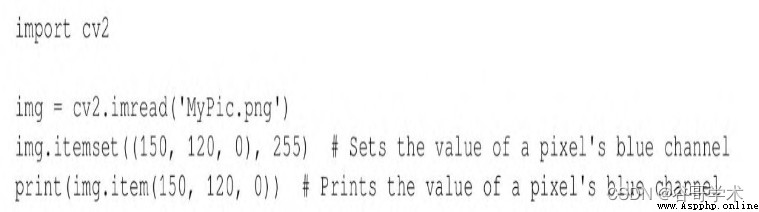
For modifying a single element in an array ,itemset The method is better than our first example in this section
The index syntax seen in the sub is faster .
Again , Modifying an element of the array itself doesn't make much sense , But it does hit
Opened a world full of possibilities . However , In terms of performance , This is only for those who are interested
A small area of . When you need to operate the whole image or a large area of interest , It is recommended to use
OpenCV Function or NumPy Array slice .NumPy The array slice of allows you to specify the index
The scope of the . Let's consider an example of using array slicing to manipulate color channels . Will one
All of the images G( green ) Values are set to 0 It's simple , This is shown in the following code :
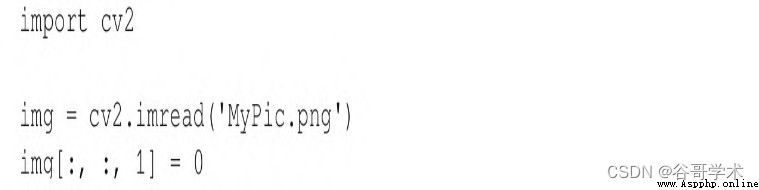
This code performs a very important operation , And it's easy to understand . dependent
The code line is the last line , It instructs the program to get all pixels from all rows and columns , And put
Green value ( At three yuan BGR At an index of the array ) Set to 0. If this image is displayed ,
You will notice that green has completely disappeared .
By using NumPy The array slice of accesses the original pixels , We can do something interesting
Thing , One of them is to define the region of interest (Region Of Interest,ROI). One
Dan defines the region of interest , You can perform a series of operations . for example , You can put this
Regions are bound to a variable , Define the second area , Assign the value of the first area to the
Two areas ( Thus, a part of the image is copied to another position of the image ):
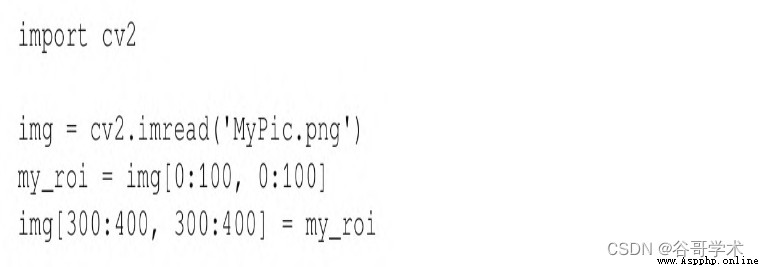
It is important to ensure that the two areas are consistent in size . If the size is inconsistent ,NumPy Meeting
( immediately ) Complain that the two shapes do not match .
Last , We can visit numpy.array Properties of , As shown in the following code :
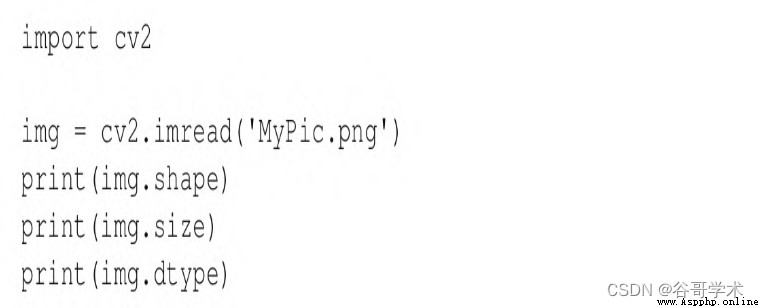
These three attributes are defined as follows :
·shape: A tuple that describes the shape of an array . For the image , it ( successively ) Include
Height 、 Width 、 The channel number ( If it's a color image ).shape The length of tuples is correct
A useful way to determine whether an image is gray or color . For grayscale images ,
len(shape)==2, For color images ,len(shape)==3.
·size: Number of elements in the array . For grayscale images , This is the same as the number of pixels .
about BGR Images , It is the number of pixels 3 times , Because every pixel is made of 3 Elements (B、G
and R) Express .
·dtype: Data type of array element . For each channel 8 Bitwise image , Data class
The type is numpy.uint8.
All in all , It is strongly recommended that you use OpenCV when , understand NumPy And
numpy.array In special circumstances . This class is Python Use in OpenCV Perform all images
The basis of processing .
2.2.4 Read / Write video file
OpenCV Provides VideoCapture and VideoWriter class , Support various video files
Format . The supported formats depend on the operating system and OpenCV Build configuration for , But usually
Condition , Suppose to support AVI The format is secure . Through it read Method ,VideoCapture
Objects can query new frames in turn , Until you reach the end of the video file . Every frame is a
picture BGR Format image .
contrary , Images can be transferred to VideoWriter Class write Method , This method will figure
Like adding to VideoWriter In the file of . Let's take an example , From a AVI file
Read frame , Reuse YUV Encode and write it to another file :
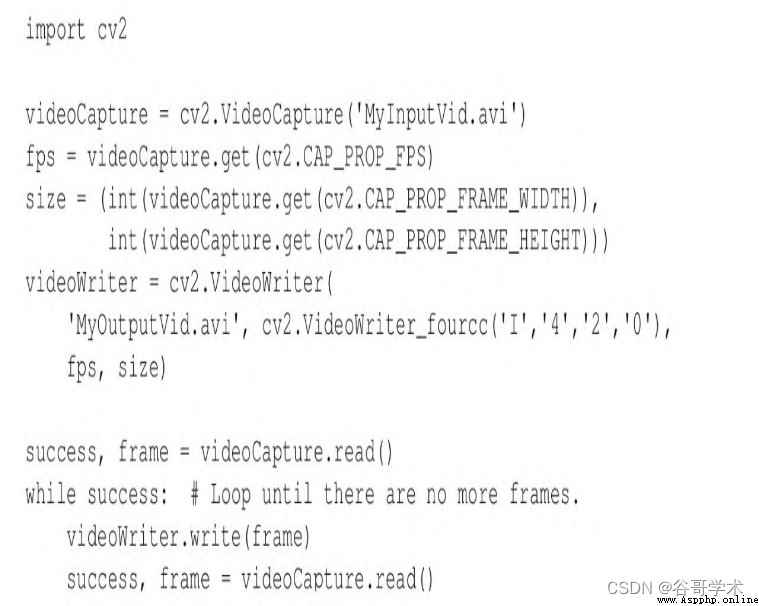
VideoWriter The parameters of the constructor of the class deserve special attention . You must specify a visual
Name of frequency file . All pre-existing files with this name will be overwritten . Still must
A video codec must be specified . Available codecs vary from system to system . Supported options
May include the following :
·0: This option represents the uncompressed original video file . The file extension should
yes .avi.
·cv2.VideoWriter_fourcc('I','4','2','0'): This option represents uncompressed YUV Ed
code ,4:2:0 Chroma sampling . This coding is widely compatible , But it will produce large files . writing
The file extension should be .avi.
·cv2.VideoWriter_fourcc('P','I','M','1'): This option is MPEG-1. Document expansion
The exhibition name should be .avi.
·cv2.VideoWriter_fourcc('X','V','I','D'): This option is a relatively old
MPEG-4 code . If you want to limit the size of the generated video , This is a good option . writing
The file extension should be .avi.
·cv2.VideoWriter_fourcc('M','P','4','V'): This option is another relatively old
Of MPEG-4 code . If you want to limit the size of the generated video , This is a good option .
The file extension should be .mp4.
·cv2.VideoWriter_fourcc('X','2','6','4'): This option is a relatively new
MPEG-4 code . If you want to limit the size of the generated video , This may be the best option . writing
The file extension should be .mp4.
·cv2.VideoWriter_fourcc('T','H','E','O'): This option is Ogg Vorbis. writing
The file extension should be .ogv.
·cv2.VideoWriter_fourcc('F','L','V','1'): This option means Flash video . writing
The file extension should be .flv.
Frame rate and frame size must also be specified . Because we copied it from another video , the
With these attributes, you can choose from VideoCapture Class get Method reading .
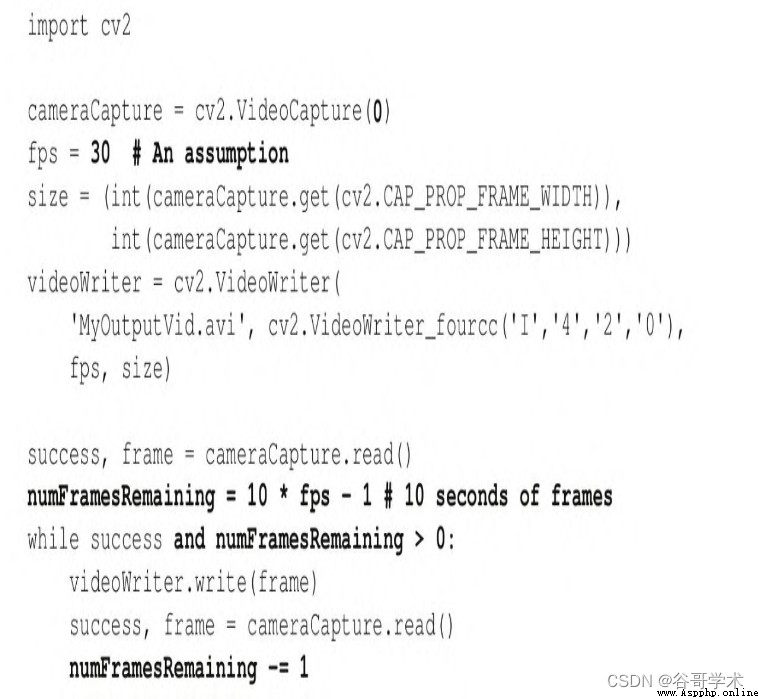
2.2.5 Capture camera frames
Camera frame streams can also be used VideoCapture Object to represent . however , For camera
head , We pass the index of camera equipment ( Not the name of the video file ) To construct the
VideoCapture object . Let's consider the following example , It grabs from the camera 10 second
In the video , And write it in AVI file . Code and the 2.2.4 An example section of ( Get... From the video file
Taken , Not from the camera ) similar , Changes are marked in bold :
For some cameras on some systems ,
cameraCapture.get(cv2.CAP_PROP_FRAME_WIDTH) and
cameraCapture.get(cv2.CAP_PROP_FRAME_HEIGHT) May return inaccurate
Result . In order to determine the actual size of the image more , You can grab a frame first , Again like
h,w=frame.shape[:2] Such code to obtain the height and width of the image . Sometimes , You can
You will encounter the camera before it starts to produce a good frame with stable size , Produce some size instability
Fixed bad frame . If your concern is how to prevent this situation , At the beginning of capture
You may want to read and ignore some frames .
But , in the majority of cases ,VideoCapture Of get Method does not return the camera
The exact value of the frame rate , Usually back to 0.
http://docs.opencv.org/modules/highgui/doc/reading_and_writin
g_images_and_video.html The official document warning on is as follows :
When the query VideoCapture The instance uses properties that are not supported by the backend , The return value is 0.
Be careful :
read / Writing attributes involves many layers . Some unexpected knots may occur along this chain
fruit [sic].
VideoCapture->API Backend->Operating System->DeviceDriver-
>Device Hardware
The return value may be different from the value actually used by the device , Equipment related rules may also be used
( for example , Step size or percentage ) Code it . Effective behavior depends on [sic] equipment
Drivers and API Back end .
To create a suitable VideoWriter class , We must make a false frame rate
set up ( As in the previous code ), Or use a timer to measure the frame rate . The second one
This method is better , We will introduce it later in this chapter .
Of course , The number of cameras and their order depend on the system . But ,OpenCV No
How to query the number of cameras or camera properties . If an invalid index is used to construct
VideoCapture class ,VideoCapture Class will not produce any frames , its read Method
Will return (False,None). Avoid trying to open it incorrectly VideoCapture object
Retrieve frames , You may want to call VideoCapture.isOpened Method , Returns a Boolean
value .
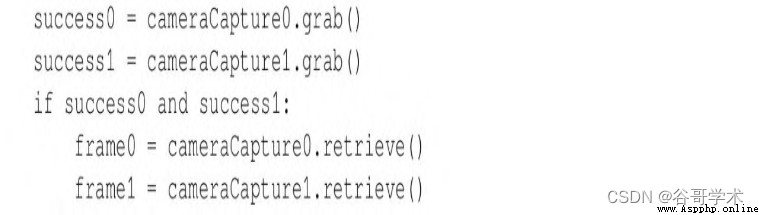
When we need to synchronize a group of cameras or multiple cameras ( Such as stereo camera )
when ,read The method is not suitable . We can use grab and retrieve Method . about
A group of ( Two sets of ) The camera , You can use code similar to the following :
2.2.6 Show the image in the window
OpenCV One of the most basic operations in is to display the image in the window . This can be done by
imshow Function implementation . If you have any other GUI Frame background , Then it may be thought that the call
imshow To display the image is enough . But , stay OpenCV in , Only when calling another
function waitKey when , Will draw ( Or redraw ) window . The latter function extracts the window
Mouth event queue ( Allow to handle various events , Like drawing ), And it returns what the user is referring to
The key code of any key entered within the specified timeout . In a way , This basic design
Simplifies the task of developing demo programs that use video or webcam input , At least develop
Personnel can manually control the acquisition and display of new frames .
Here is a very simple example script , Used to read images from files , Also on
It displays :
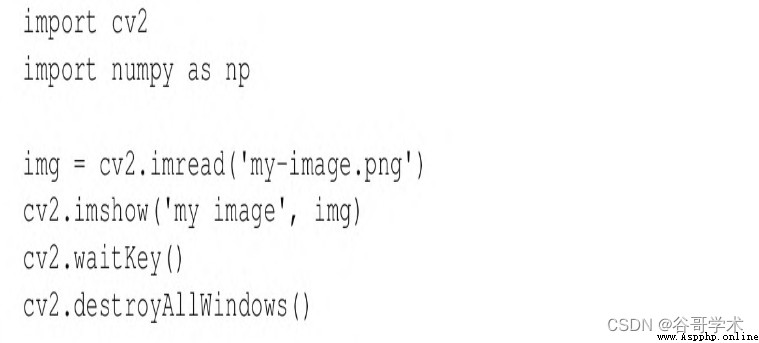
imshow Function has two arguments : The name of the window that displays the image and the name of the image itself
call . We will be in 2.2.7 Right in the middle waitKey For a more detailed introduction .
Just like its name ,destroyAllWindows Function will be unregistered by OpenCV All windows created
mouth .
2.2.7 Display the camera frame in the window
OpenCV Allow to use namedWindow、imshow and destroyWindow Function to create
build 、 Redraws and unregisters the specified window . Besides , Any window can be accessed waitKey
Function to capture keyboard input , adopt setMouseCallback Function to capture mouse input . We
Let's look at an example , Show the frames obtained from the real-time camera :
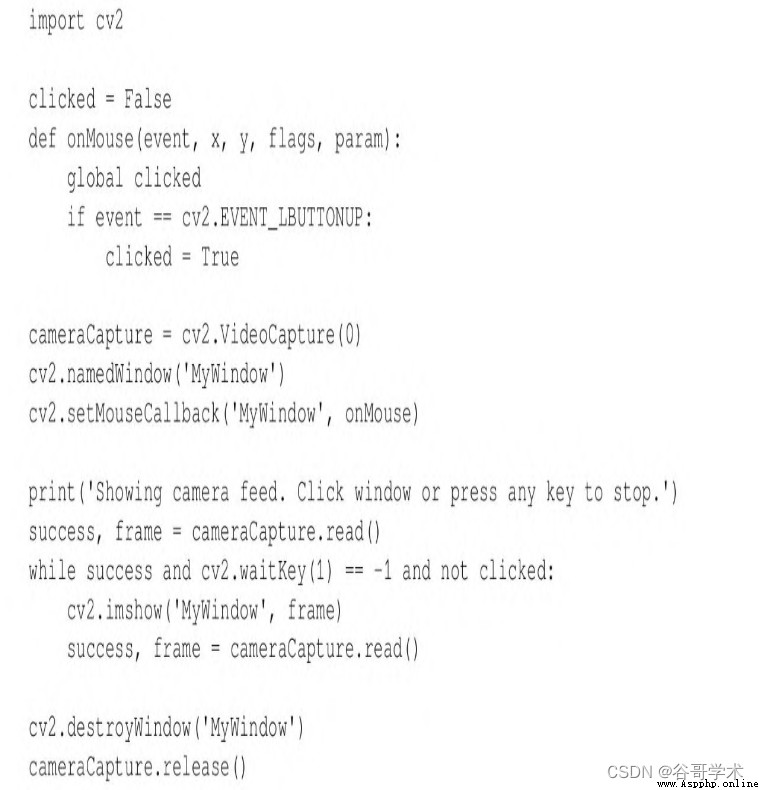
waitKey The parameter of is the number of milliseconds waiting for keyboard input , By default 0, This is a
A special value , Infinity . The return value can be -1( Indicates that no
key ), It can also be ASCII Key code ( Such as 27 Express Esc). of ASCII List of key codes ,
see also http://www.asciitable.com/. in addition , Please note that Python One... Is provided
A standard function ord, You can convert characters into ASCII Key code . for example ,ord('a') return
97.
Again , Please note that ,OpenCV Window function and waitKey It's interdependent .
OpenCV The window only calls waitKey When the update . contrary ,waitKey Only in OpenCV window
Capture input only when there is focus .
Pass to setMouseCallback The mouse callback of should 5 Parameters , As the code example
in . Put the callback param Parameter set to setMouseCallback Of the 3 Optional parameters ,
By default 0. The event parameter of the callback is one of the following operations :
·cv2.EVENT_MOUSEMOVE: This event refers to mouse movement .
·cv2.EVENT_LBUTTONDOWN: This event refers to when the left button is pressed ,
Left key down .
·cv2.EVENT_RBUTTONDOWN: This event refers to when the right button is pressed ,
Right click down .
·cv2.EVENT_MBUTTONDOWN: This event refers to pressing the middle key
when , Middle key down .
·cv2.EVENT_LBUTTONUP: This event refers to when the left key is released , left-click
Go back to where you are .
·cv2.EVENT_RBUTTONUP: This event refers to when the right button is released , Right click
Go back to where you are .
·cv2.EVENT_MBUTTONUP: This event refers to the release of the intermediate key , in
The intermediate key returns to its original position .
·cv2.EVENT_LBUTTONDBLCLK: This event refers to double clicking the left button .
·cv2.EVENT_RBUTTONDBLCLK: This event refers to double clicking .
·cv2.EVENT_MBUTTONDBLCLK: This event refers to double clicking in the middle
key .
Mouse callback flag Parameters may be some bitwise combinations of the following events :
·cv2.EVENT_FLAG_LBUTTON: This event refers to pressing the left button .
·cv2.EVENT_FLAG_RBUTTON: This event refers to pressing the right button .
·cv2.EVENT_FLAG_MBUTTON: This event refers to pressing the middle key .
·cv2.EVENT_FLAG_CTRLKEY: This event refers to pressing Ctrl key .
·cv2.EVENT_FLAG_SHIFTKEY: This event refers to pressing Shift key .
·cv2.EVENT_FLAG_ALTKEY: This event refers to pressing Alt key .
But ,OpenCV There is no way to manually handle window events . for example , single click
The window close button cannot stop the application . because OpenCV And GUI Functions include
limit , Many developers prefer to integrate it with other application frameworks . In this chapter 2.4
In the festival , We will design an abstraction layer to help OpenCV Integration with application framework .
2.3 project Cameo( Face tracking and image processing )
Usually , Study through a cookbook style method OpenCV, This method covers very
Multiple algorithms , But it doesn't involve advanced application development . In a way , This method
It's understandable , because OpenCV Its potential applications are very diverse .OpenCV extensive use
For various applications , Such as photos / Video editor 、 Motion control game 、 Robot people
Industrial intelligence , Or we record the psychological experiments of participants' eye movements . In these different
In the use case of , Can we really study a set of useful abstractions ?
The author of this book believes that we can , And the sooner you start abstracting , The better the learning effect .
We will build many around a single application OpenCV Example , But in every step ,
We will design an extensible and reusable application component .
We will develop an interactive application , Real time face detection based on camera input
Tracking and image processing . This type of application covers OpenCV Various functions of , and
And it is a challenge for us to create an efficient and effective implementation .
say concretely , Our application will merge faces in real time . Given 2 Camera inputs
flow ( Or pre recorded video input ), The application will superimpose the faces of one stream onto another
On a streaming face . Apply filters and distortion to this mixed scene , Will give people
A sense of unity . Users should have access to another environment and role to participate in live performances
Experience . This type of user experience is very popular in amusement parks like Disneyland
To meet .
In an application like this , Users will immediately notice the defect , Such as low frame rate or follow
Inaccurate tracking, etc . In order to achieve the best effect , We will try to use traditional imaging and depth
Several methods of imaging .
We name the application “Cameo”.Cameo( In jewelry ) It's a person
A small portrait of , perhaps ( In the movie ) It's played by celebrities 、 A very short corner
color .
2.4 Cameo: Object oriented design
It can be written in a pure procedural style Python Applications . Usually , This is through small
Applications ( For example, the basic I/O Script ) Realized . however , From now on
beginning , We will often use an object-oriented style , Because object orientation promotes modularity and
Extensibility .
From the OpenCV Of I/O Function overview , We know that no matter the source image or the target image
Like what , All images are similar . No matter what the image stream is , Or will
Where is it sent as output , We can all apply the same features to each frame of this stream
Application specific logic . Using multiple I/O Streaming applications ( for example Cameo)
in ,I/O The separation of code and application code becomes particularly convenient .
We will name the created class CaptureManager and WindowManager, As
I/O High level interface of stream . Application code can use CaptureManager Read new frame ,
Each frame can also be assigned to one or more outputs , Include still image files 、 Video text
Pieces and windows ( adopt WindowManager class ).WindowManager Class allows applications
The code handles windows and events in an object-oriented style .
CaptureManager and WindowManager It's all scalable . We can achieve no
rely on OpenCV Of I/O.
2.4.1 be based on managers.CaptureManager Extract video stream
As we can see ,OpenCV Can get 、 Display and record from video files
Or image stream from camera , But in each case there are special considerations
term .CaptureManager Class extracts some differences and provides a more advanced interface ,
Distribute images from the acquisition stream to one or more outputs —— Still image file 、 Video text
Pieces of , Or the window .
CaptureManager The object is VideoCapture Object initialization , And possess
enterFrame and exitFrame Method , Usually it should be in each iteration of the application main loop
Call these two methods in . Calling enterFrame and exitFrame Between , The application can
With ( Any time ) Set up a channel Property and get a frame attribute .channel Belong to
Sex starts with 0, Only multi camera cameras use other values .frame Property is calling
enterFrame when , An image corresponding to the current channel state .
CaptureManager Classes also have writeImage、
startWriting Video and stopWritingVideo Method . The actual file write is pushed
late exitFrame. Again , In execution exitFrame During the method , It can be displayed in the window
in frame, It depends on how the application code will WindowManager Class as
CaptureManager The arguments of the constructor provide , Or by setting
previewWindowManager Properties provide .
If the application code operates frame, Then this will be reflected in the record file and window
Some operations .CaptureManager Class has a constructor parameter and a constructor named
shouldMirrorPreview Properties of , If you want to mirror in the window ( Flip horizontal )
frame, But not recorded in the document , Then this attribute should be True. Usually , In front of the camera
Like head , Users prefer to mirror the signal returned by the real-time camera .
Think about it ,VideoWriter Object needs a frame rate , however OpenCV Not provided
Any reliable method to obtain the accurate frame rate for the camera .CaptureManager Class passing
Use frame counters and Python Standards for time.time Function to solve this limitation , If necessary,
It also estimates the frame rate . This method is not foolproof . Depends on the fluctuation of frame rate and depends on
Systematic time.time Realization , The accuracy of estimates may still be poor in some cases .
however , If deployed to unknown hardware , This is also better than just assuming that the user's camera has a specific
Better frame rate .
Let's create a name managers.py The file of , The file will contain
CaptureManager Realization . This implementation is very long , So we will divide it into several parts
Introduce :
(1) First , Add import and constructor , As shown below :
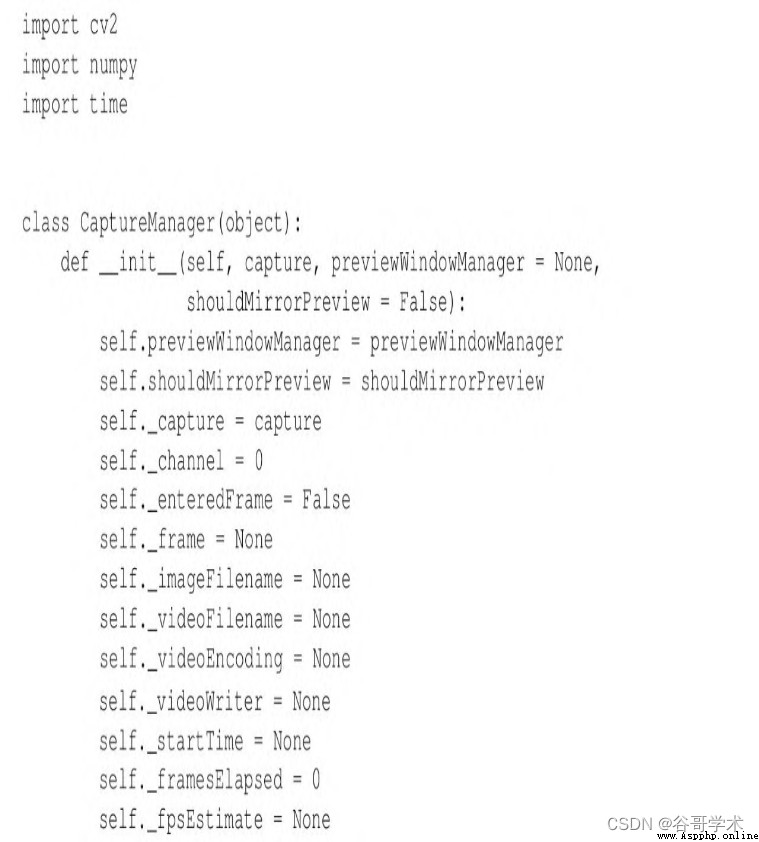
2) Next , by CaptureManager Add the following getter and
setter Method :
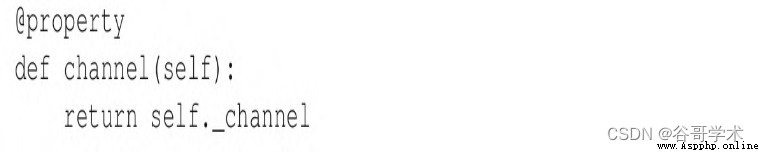
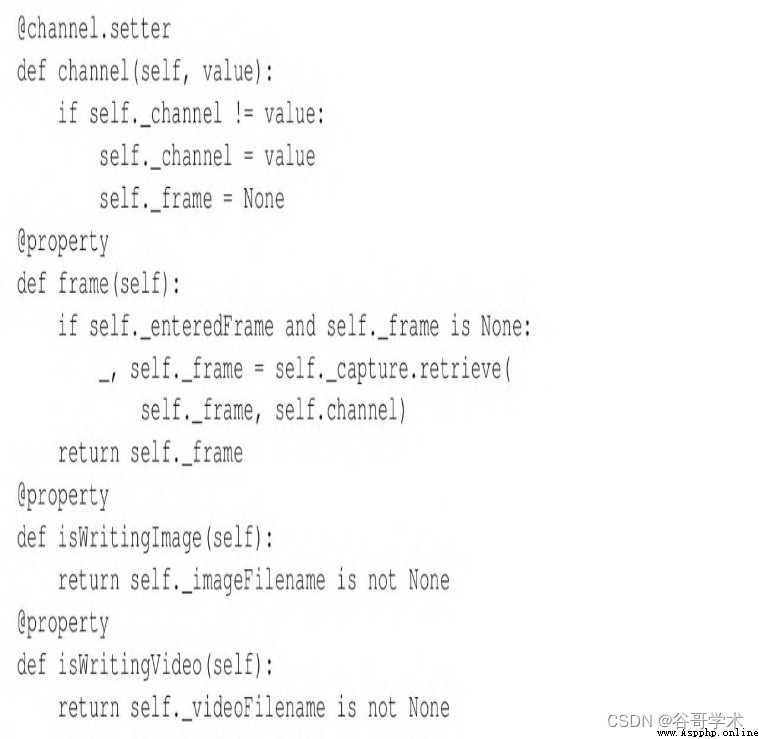
Please note that , majority member Variables are not public , Before the underscore in the variable name
As shown in the affixes , Such as self._enteredFrame. These non-public variables are related to the state of the current frame and
The write operation of any file is related . As mentioned earlier , The application code only needs to be configured
Content , These contents are used as constructor parameters and settable public properties ( The camera is connected
Avenue 、 Window manager and options for mirror camera preview ) Realized .
This book assumes that the reader is right Python Have some understanding , But if you are right about these @ notes
( for example @property) Feel confused , Please refer to the relevant decorator Of Python file ,
decorator yes Python Built in features of the language , Allow a function to be encapsulated by another function , through
It is often used to apply user-defined behavior in several places of an application . say concretely , Sure
stay
https://docs.python.org/3/reference/compound_stmts.html#gramm
ar-token-decorator View related documents .
Python There is no concept of mandatory use of non-public member variables , But in the developer
When a member wants to treat variables as non-public , Usually you will see a single underlined prefix (_) or
Double underlined prefix (__). The single underscore prefix is just a convention , It means that it should change
Quantity is considered protected ( Access only in classes and their subclasses ). The double underlined prefix actually
Lead to Python The interpreter renames variables , such MyClass.__myVariable It becomes
MyClass._MyClass__myVariable. This is called name reorganization ( Very appropriate ). according to
practice , Such variables should be treated as private ( You can only access... Within a class , Cannot be in subclass
Medium visit ). Same prefix , Have the same meaning , Can be applied to methods and variables .
(3) take enterFrame Method to add to managers.py:
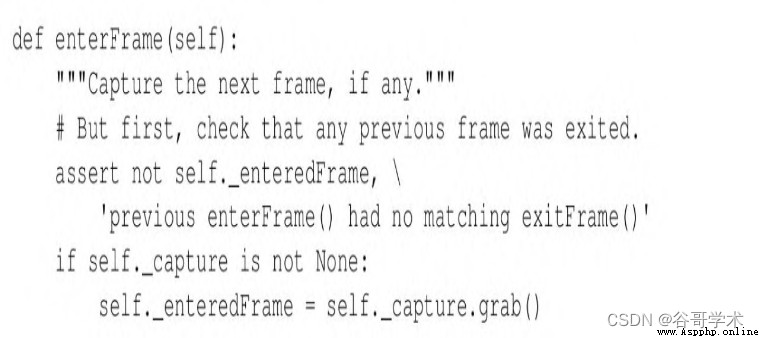
Please note that ,enterFrame The implementation of only ( Synchronously ) Grab a frame , And from the channel
The actual retrieval of was postponed to frame Subsequent reading of variables .
(4) Next , hold exitFrame Method to add to managers.py:
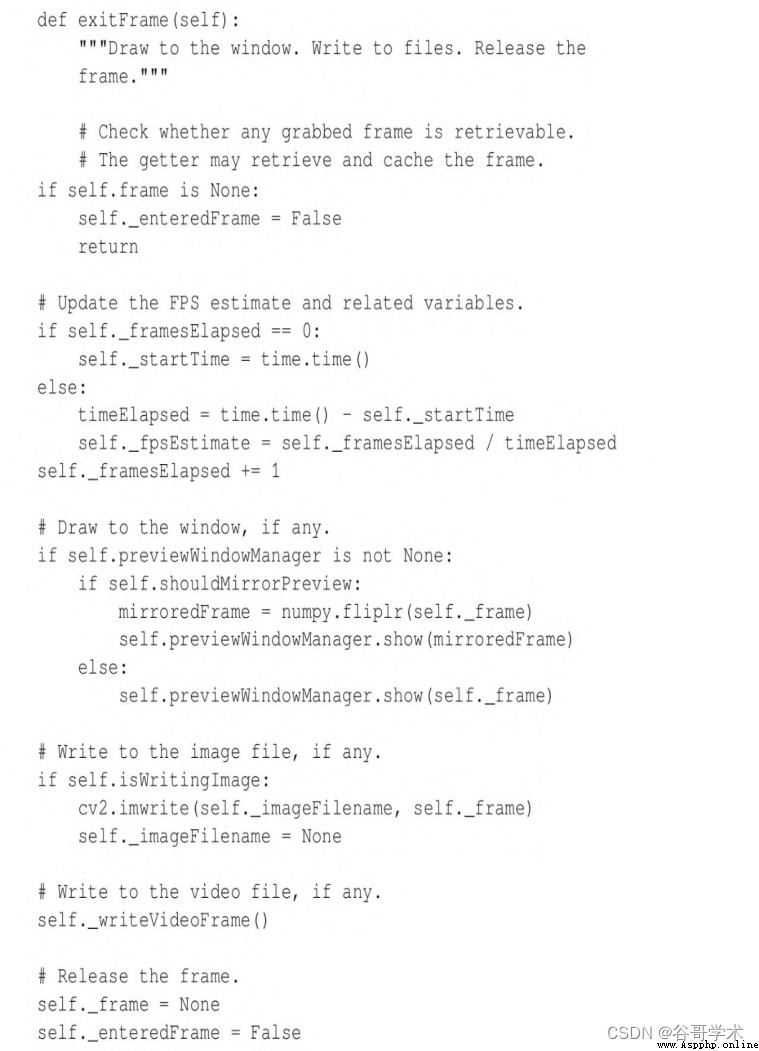
exitFrame The implementation of obtains images from the current channel , Estimated frame rate , Manage through windows
device ( If any ) Display images , And complete all the suspensions of writing the image to the file, please
seek .
(5) Several other methods are also applicable to file writing . Name the following
writeImage、startWriting Video and stopWritingVideo Of public methods
Implementation added to managers.py:
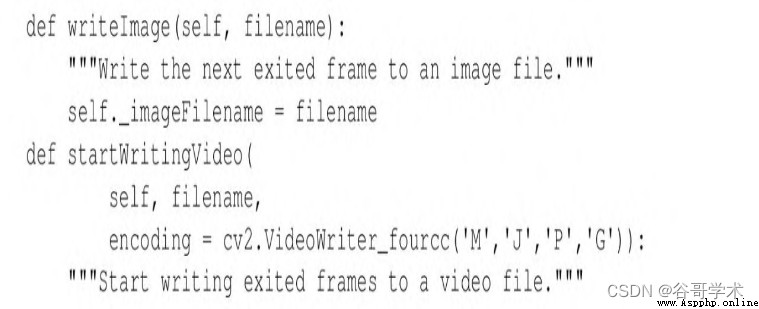
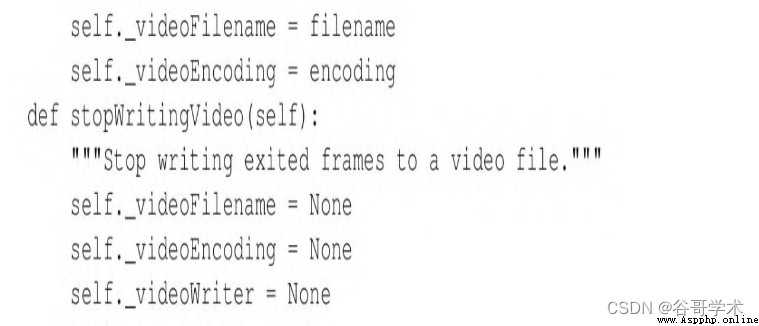
The above method only updates the parameters of the file write operation , The actual write operation is delayed
To exitFrame The next call to .
(6) At the beginning of this section , We see exitFrame A call named
_writeVideoFrame Auxiliary method of . Put the following _writeVideoFrame Implementation add
To managers.py:
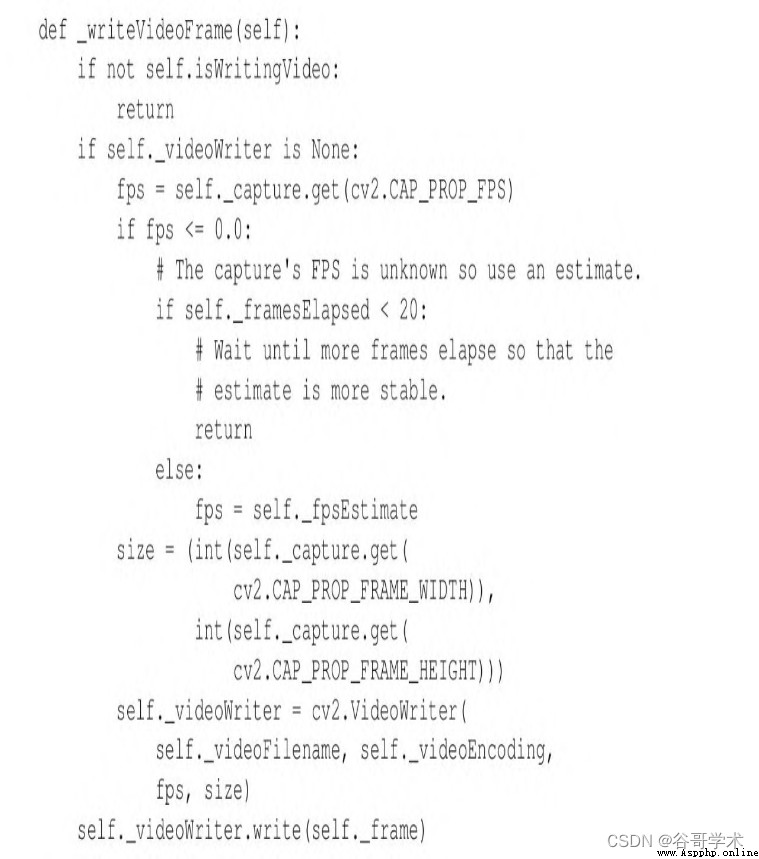
The above method to create or add video files should be similar to the previous script ( please
Reference resources 2.2.4 section ). however , When the frame rate is unknown , We are beginning the capture session
when , Skip some frames , In this way, there is time to build the estimation of frame rate .
We are right. CaptureManager It's over . Even though CaptureManager Of
Implementation depends on VideoCapture, We can complete without using OpenCV Its as input
He realizes . for example , We can create subclasses instantiated with socket connections , Put its bytes
The stream is parsed as an image stream . in addition , We can also create subclasses using third-party camera libraries ,
And provide with OpenCV Different hardware support . however , about Cameo, The current implementation is sufficient
Enough is enough .
2.4.2 be based on managers.WindowManager Extract windows and keyboards
As we can see ,OpenCV Some functions are provided to create 、 Undo window , display
Display images and process events . These functions are not methods of window classes , Therefore, it is required that the window
Name is passed as a parameter . Because this interface is not object-oriented , So with OpenCV Of
The general style is inconsistent . and , It's unlikely to match what we ultimately want to use ( instead of
OpenCV Of ) Compatible with other windows or event processing interfaces .
For object orientation and adaptability , We abstract this function as having
createWindow、destroy Window、show and processEvents Methodical
WindowManager class . As an attribute ,WindowManager There is one named
keypressCallback Function of , When responding to the key, you can processEvents call
( If not None Words ).keypressCallback The object must be a single
Parameters ( In especial ASCII Key code ) Function of .
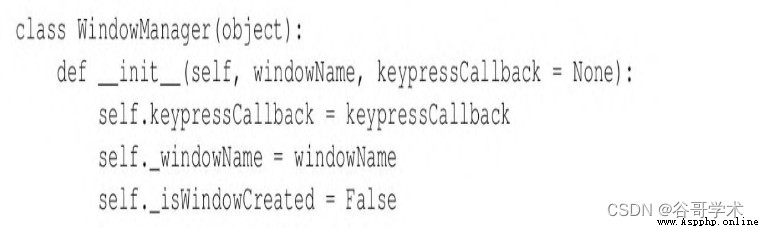
We will WindowManager The implementation added to managers.py. The implementation first determines
The following class declarations and __init__ Method :
The implementation then uses the following methods to manage the lifecycle of windows and their events :
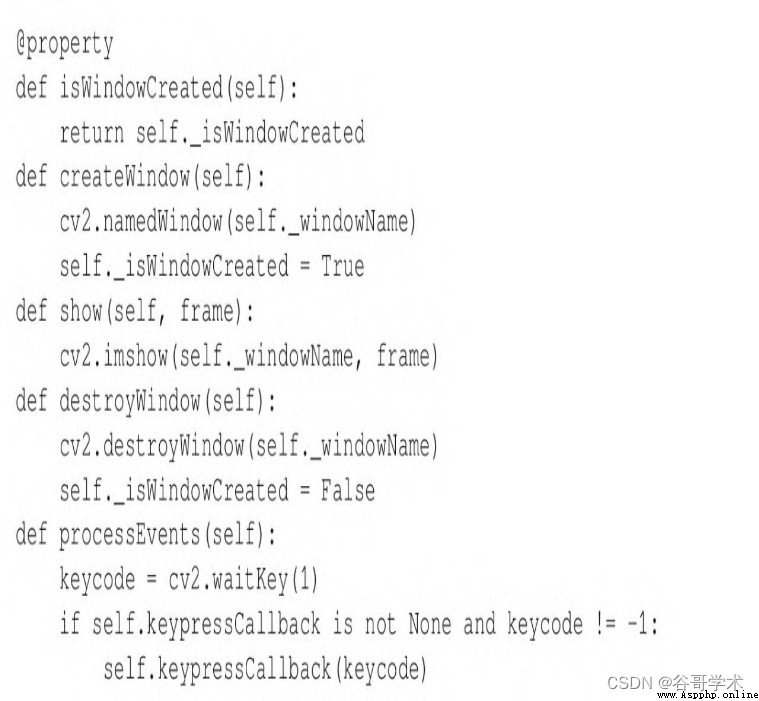
The current implementation only supports keyboard events , about Cameo enough . however , We can also
To modify Window Manager To support mouse events . for example , Class interfaces can be extended to packages
contain mouseCallback attribute ( And optional constructor parameters ), But other aspects remain
unchanged . Use OpenCV Outside the event framework , We can add callback attributes to match
How to support other event types .
2.4.3 be based on cameo.Cameo Apply everything
Our application consists of two methods (run and onKeypress) Of Cameo class
Express . At initialization ,Cameo Object creates a WindowManager object ( take
onKeypress As a callback ), And a camera ( say concretely , It's one
individual cv2.VideoCapture object ) And the same WindowManager Object's
CaptureManager object . Calling run when , The application executes a main loop , And in
This main loop handles frames and events .
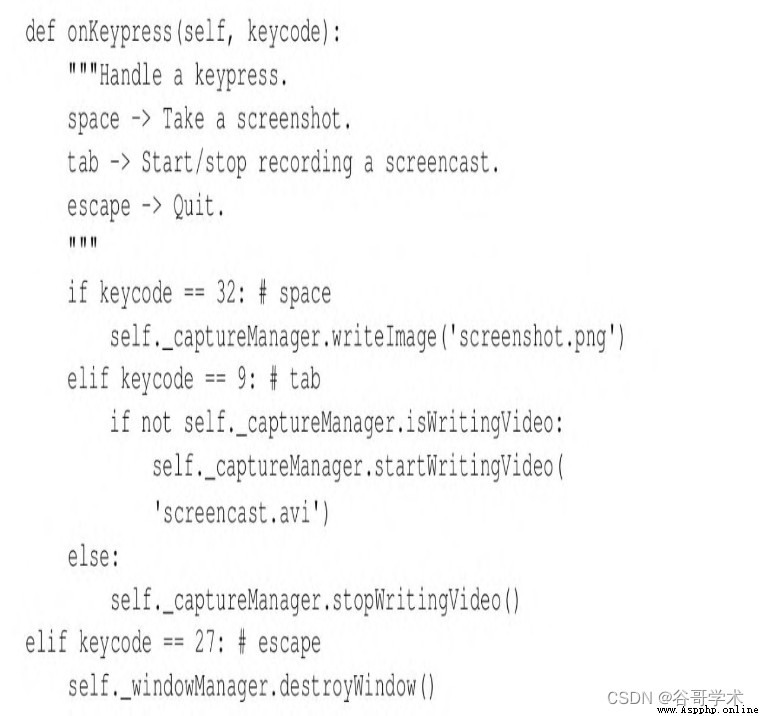
As a result of event processing , May call onKeypress. The space bar will produce a
Screenshots , tab (Tab) Key will make the screen play ( video recording ) Start / stop
stop ,Esc Key will cause the application to exit .
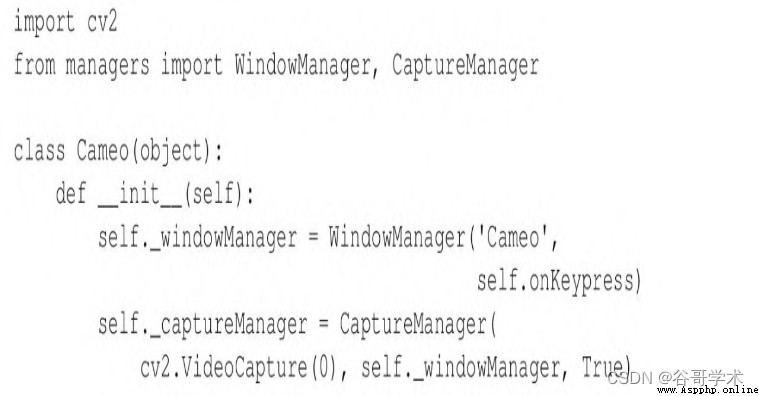
With the managers.py In the same directory , Create a file called cameo.py The file of ,
And realize here Cameo class :
(1) First , Realize the following import Statement and __init__ Method :
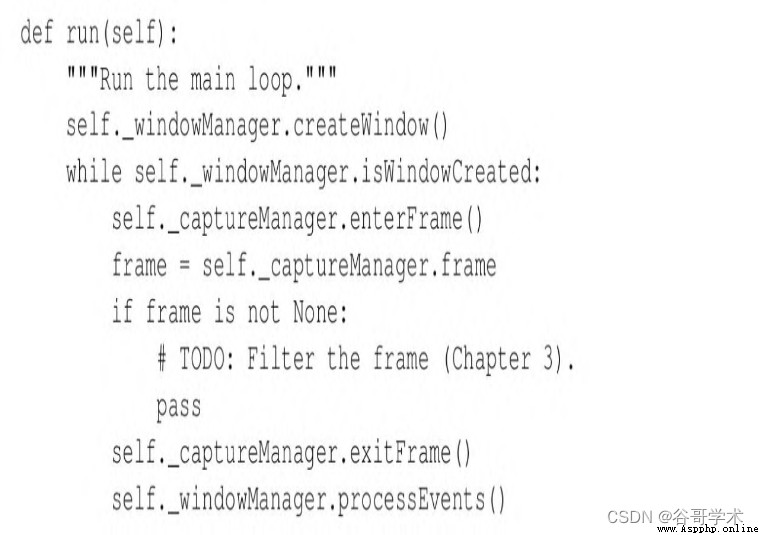
(2) Next , Add the following run() Method implementation :
(3) The following is to complete Cameo Class implements the onKeypress() Method :
(4) Last , Add one __main__ Block to instantiate and run Cameo, As follows
in :

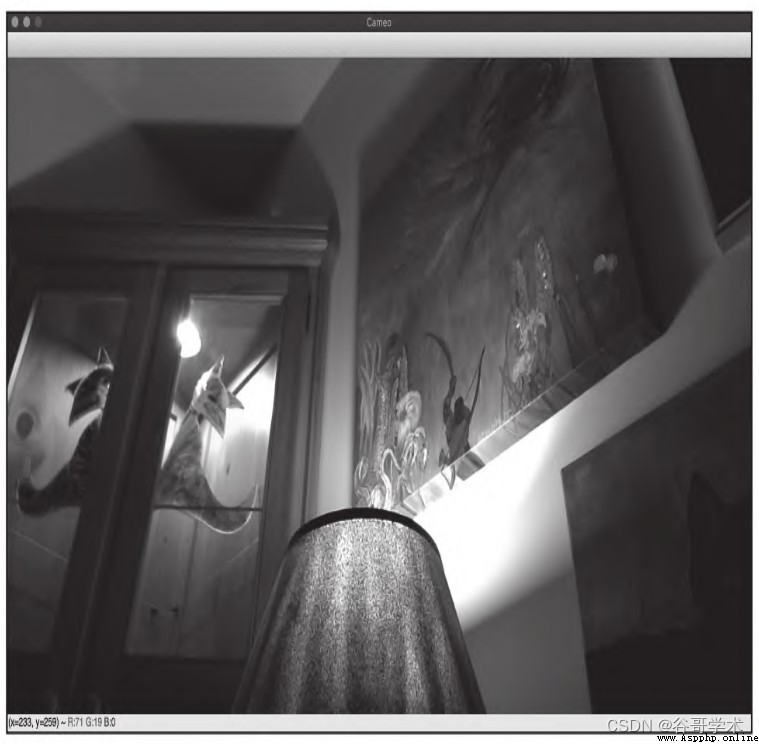
When running the application , Please note that the signal returned by the real-time camera is mirrored , And screen
Screenshots and screen play are not mirrored . This is expected behavior , Because it's initializing
CaptureManager Class time , We will True Passed on to shouldMirrorPreview.
chart 2-4 yes Cameo A screenshot of , A window is displayed ( The title is Cameo)
And the current frame from the camera .
up to now , In addition to mirroring frames for preview , We don't hold on to the frame
Do anything . We will be in the 3 Chapter begins by adding more interesting effects .
2.5 Summary of this chapter
Now? , We should have a display camera to send back signals 、 Monitor keyboard input
and ( Under orders ) An application that records screenshots or screen plays . We intend to pass
Insert some image filtering code between the beginning and end of each frame ( See the first 3 Chapter ) To expand
Applications . Besides , except OpenCV In addition to those functions supported , We are also ready to integrate
Other camera drivers or application frameworks .
We also learned to regard images as NumPy Knowledge of array operations . This will be the next
A theme —— Image filter —— Lay a perfect foundation .
 Python - demandes de bibliothèques http tierces utilisant detail 5 (beautiful soup, Web crawler)
Six、Utiliser BeautifulSoup Ana
 Python uses opencv to calibrate the camera to obtain parameters, and correct the image according to the distortion parameters. All codes are attached (smooth and painless version)
python利用opencvPerform camera c
 Python tutorial 88-- accounting tutorial 8- cost analysis pandas_ Using the profiling Library
Use pandas_profiling Th