C:\Users\Administrator\AppData\Local\Programs\Python\Python36C:\Users\Administrator\AppData\Local\Programs\Python\Python36\Scripts for example :pip install -i https://pypi.tuna.tsinghua.edu.cn/simple geventfrequently-used pip The sources are as follows :
pypi Tsinghua University source :https://pypi.tuna.tsinghua.edu.cn/simplepypi Douban source :http://pypi.douban.com/simple/pypi Tencent source :http://mirrors.cloud.tencent.com/pypi/simplepypi Aliyuan :https://mirrors.aliyun.com/pypi/mkdir ~/.pipvi ~/.pip/pip.conf Add the following : [global] index-url = https://pypi.tuna.tsinghua.edu.cn/simplewindows Next , Directly in user Create a pip Catalog , Such as :C:\Users\xx\pip, New file pip.ini, The contents are as follows
[global] index-url = https://pypi.tuna.tsinghua.edu.cn/simpleThe code is as follows ( Example ):
pip freeze > requirements.txt # The version number of the dependent package may be lost # perhaps pip list --format=freeze> requirements.txtGenerate requirements.txt,pip freeze Will the current PC All installation packages in the environment are generated , Many packages will be installed when installing again . It's not advisable to spend time and effort .
Use pipreqs, The advantage of this tool is that it can scan the project directory , Discover which libraries are used , Generate dependency list
pip install pipreqsstay python The root directory of the project Use pipreqs ./
pipreqs ./ --encoding=utf8INFO: Successfully saved requirements file in ./requirements.txt: Reappear
The final product is requirements.txt, You can download all the dependencies from this file .pip install -r requirements.txt# Temporary source change pip install -i https://pypi.tuna.tsinghua.edu.cn/simple -r requirements.txt1. install virtualenv
pip install virtualenvpip install virtualenvwrapper # That's right virtualenv The packaged version of , Must be in virtualenv After the installation 2. Creating a virtual environment
Select a file to store the virtual environment , Such as E:/python3cd /d E:python3 # Enter the file virtualenv cui_py37 # Create a name for envname Virtual environment for dir # Check the current directory to know a envname The file of has been created 3. Start the virtual environment
cd envname/Scripts # Go to the relevant startup folder activate # Start the virtual environment deactivate # Exit virtual environment Now you are free to install various packages in the virtual environment
1 Creating a virtual environment
virtualenv venv_cui -p python3.72 Activate the virtual environment
source venv_cui/bin/active3 Exit virtual environment
deactivate1. be based on venv install virtualenv
sudo apt-get update && apt-get install -y virtualenv2. Create a virtual environment
virtualenv -p python3.7 venv3. Activate the virtual environment
source venv/bin/activate4. Install in this virtual environment poetry
python3.7 -m pip install poetry==1.1.11Direct will poetry Install the package of into the current virtual environment
poetry installPut the following 3 Add a path folder to the environment variable ( Modify according to the actual installation path of your computer )
C:\Users\xiao_CUI\Anaconda3C:\Users\xiao_CUI\Anaconda3\Library\binC:\Users\xiao_CUI\Anaconda3\Scripts installed Anaconda python 3.7, Want to use python3.6 Method
(1)cmd Use command :
conda create -n py36_cui python=3.6 (2) After installed , There will be hints. :
conda activate py36 # Activate the environment conda deactivate # Out of the environment Be careful not to have Chinese and spaces in the path , Otherwise, the set path will not take effect
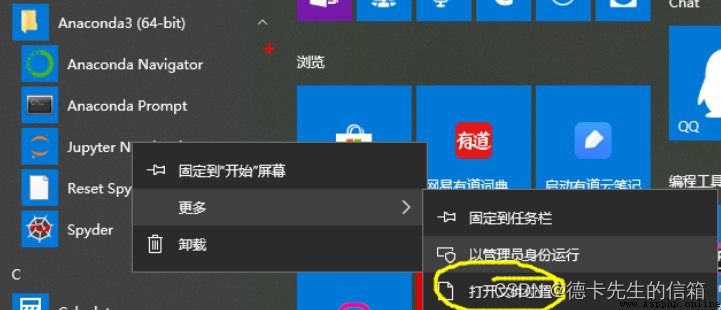
Open directly by default jupyternotebook Will open User's personal directory , That is to say c:/users/** If you want to change your project directory
First you need to generate the configuration file , stay cmd Input from the command line jupyter notebook --generate-config
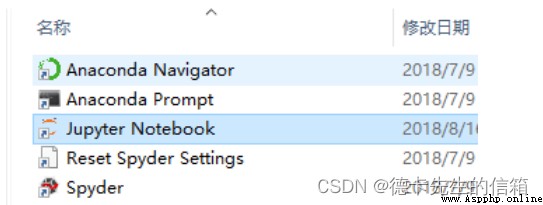
If the configuration file just generated ok 了 , Then go to find the file in this path
Open the file and find the following line
Get rid of # Number , And put your project path in quotation marks c.NotebookApp.notebook_dir = 'F:/cuidemo' Such as my
If your folder appears \n In this way Need to escape again , It's written in \n Save after changing
application , Just ok 了 , Restart jupyternotebook
1. install modular
conda install XXXX2. Check out the installation package
conda list3. Uninstall package
conda remove XXXX4. Upgrade package
conda updateconda create -n TF2.1 python==3.7conda activate TF2.1 conda install cudatoolkit=10.1 conda install cudnn=7.6 pip install tensorflow==2.1 pip3 install -i https://pypi.tuna.tsinghua.edu.cn/simple --upgrade tensorflow==2.1Test for successful installation
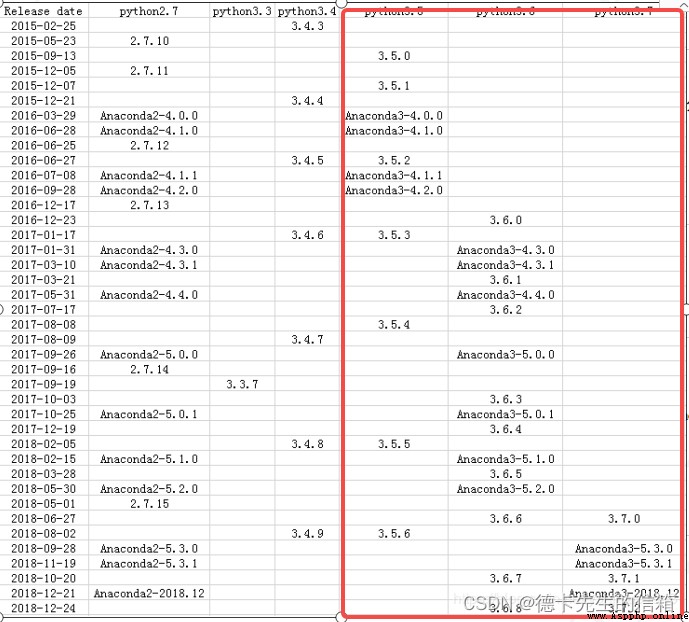
import tensorflow as tfprint(tf.__version__) 1.anaconda Historical version download link
https://repo.continuum.io/archive/
7.1 open jupyter notebook Flash back , Will not open the browser , Don't complain
terms of settlement :
1. stay cmd Input jupyter notebook View error message , Then Baidu
2.tornado Version too high and jupyter notebook Mismatch , Install a lower version of tornado 【pip install tornado==4.5.3】
git config --global user.name "jeremy" (github The user name registered on the official website )git config --global user.email "[email protected]" (gitub Register the bound email on the official website )Check the configuration :git config --list
Not configured SSH,[email protected] Of URL Can't download , Large files are transferred through SSH Stable . Generate SSH Secret key
ssh-keygen -t rsa -C “[email protected]”
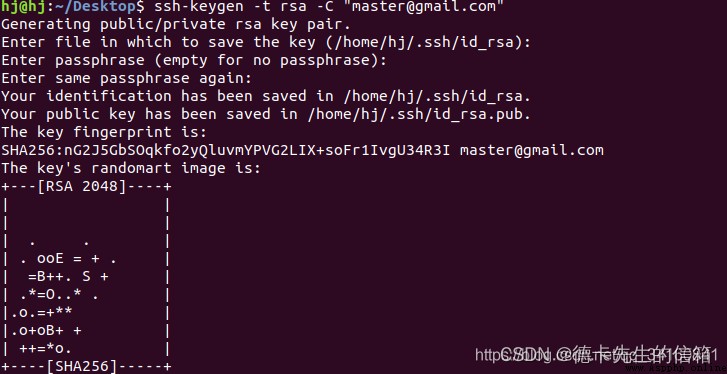
cat ~/.ssh/id_rsa.pub perhaps gedit ~/.ssh/id_rsa.pub Sign in git Official website , website :https://github.com/. Upper right corner After logging in, click settings->SSH and GPS keys->New SSH key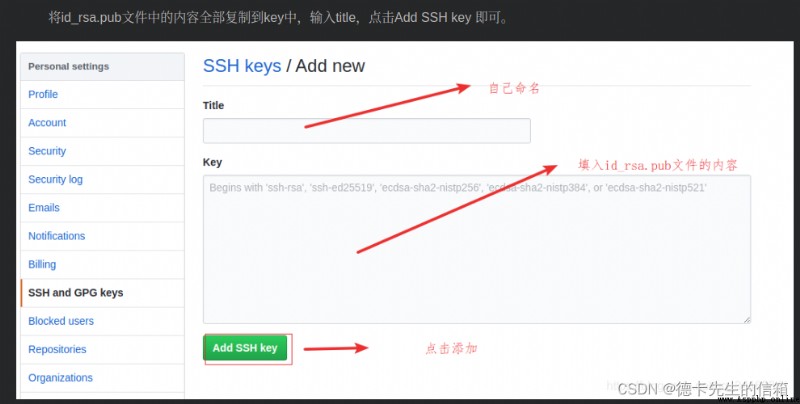
(git Some files are ignored when submitting )
Is to create a new project under the project directory .gitignore file , Then declare the folder or file to be ignored in it . Here comes the trouble , Because the file starts with a dot , No file name , There's no way to go straight to windows Create . We can install Git, Then right click on the project root directory and select “Git Bash Here”, adopt linux To create new .gitignore file .
The detailed steps are as follows :
install Git, Come first Git Download the latest Git for the Windows platform. When the download is complete , Click on the install , stay “Select Components” Step by step , Remember to choose Simple context menu( Here's the picture ). Others are selected by default , Click Next directly to complete the installation .
Right click the project root directory and select “Git Bash Here” Go to the command line .
Input vim .gitignore command , Edit content
.project
.classpath
.settings
.gitignore
Press wq Save and exit , Will generate .gitignore file . Use again at this time Git Conduct Commit when , You will not see the above excluded files .
.gitignore There are two modes of file filtering , Open model and conservative model
Open mode is responsible for setting which files and folders to filter
settings/ It means to filter this folder
.zip Filter zip Suffix file
Test.java Filter the file
Conservative mode is responsible for setting which files are not filtered , Which files are to be tracked .
!src/ Track this folder
! .java track java Source file
!Test.java Track this file
original Subl3 install Package Control so much trouble , Now here's the easy way
Use Ctrl+` 【Tab The symbol above 】 Shortcut key or through View->Show Console Menu open command line , Paste the following code :
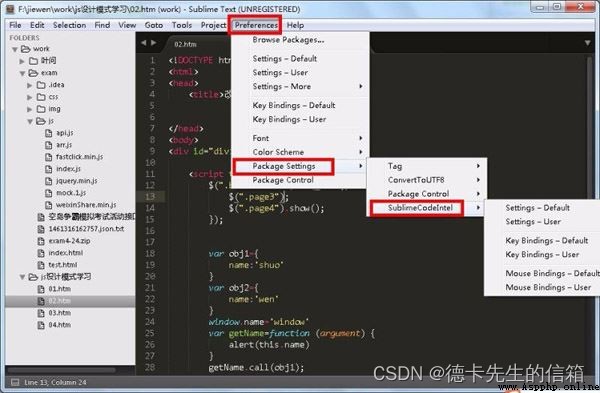
import urllib.request,os; pf = 'Package Control.sublime-package'; ipp = sublime.installed_packages_path(); urllib.request.install_opener( urllib.request.build_opener( urllib.request.ProxyHandler()) ); open(os.path.join(ipp, pf), 'wb').write(urllib.request.urlopen( 'http://sublime.wbond.net/' + pf.replace(' ','%20')).read())With luck , At this time, it can be in Preferences You can see it under the menu Package Settings and Package Control There are two menus .
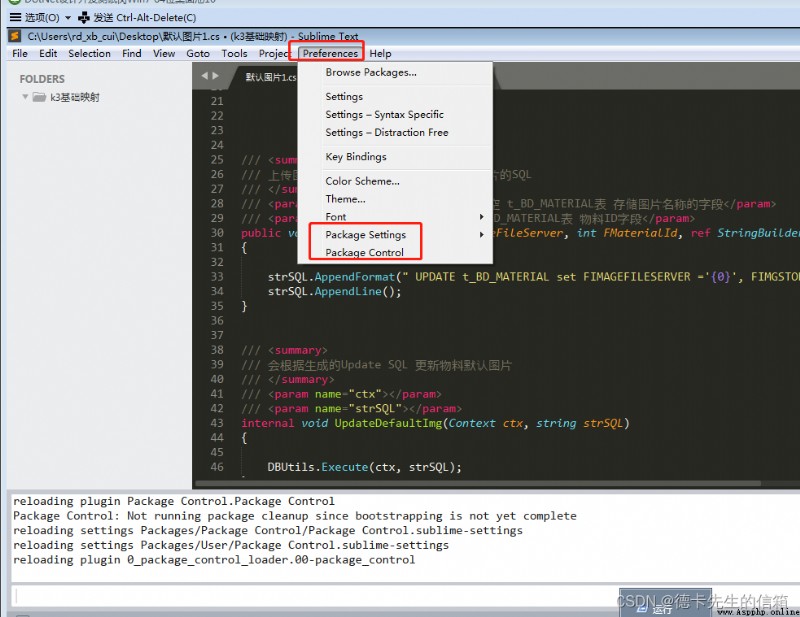
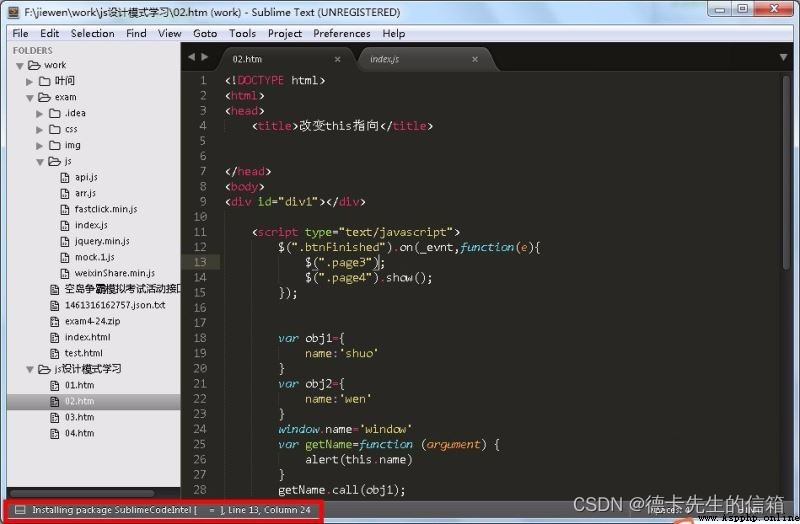
Have to say sublime text3 It is a powerful editor , Its main feature is its small size , Fast start . But at the same time, it brings bad side , Is that all “ Special function ” Depend on the installation of plug-ins to improve . therefore sublime text3 No smart code , It is the lack of a plug-in , The following editor will briefly introduce how to make sublime text3 Intelligent code prompt . (1) Click on “preferences”——“package control” Prepare all operations of plug-in package ;
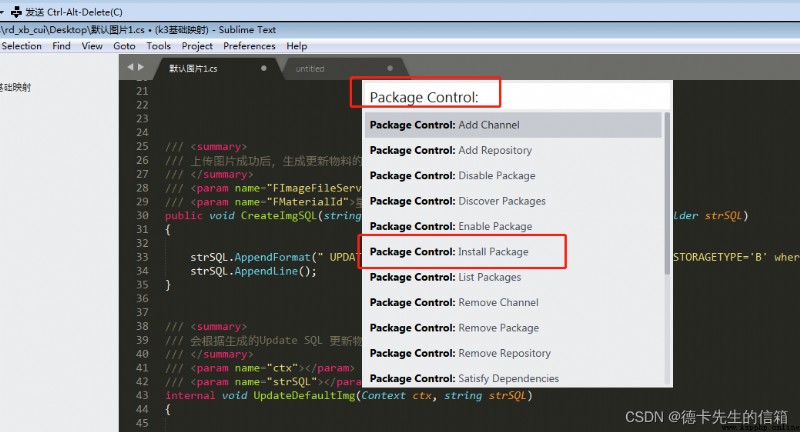
(2) Click on the “install package” Install the plug-in package ,
(3) Enter in the input box “sublimecodeintel”, Prompt appears , Click to enter the installation immediately ;
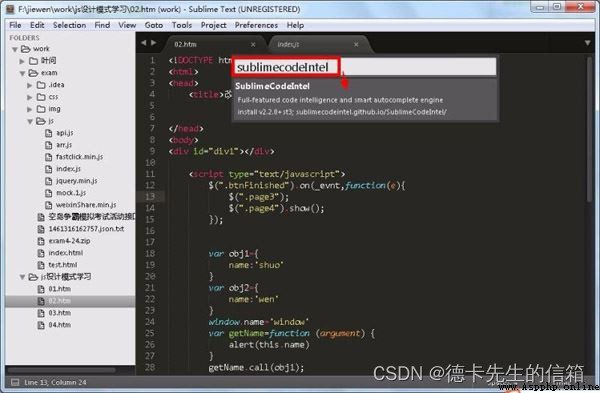
(4) Prompt installation , Wait a few seconds ;
(5)、 Installation successful , Return to the prompt ;
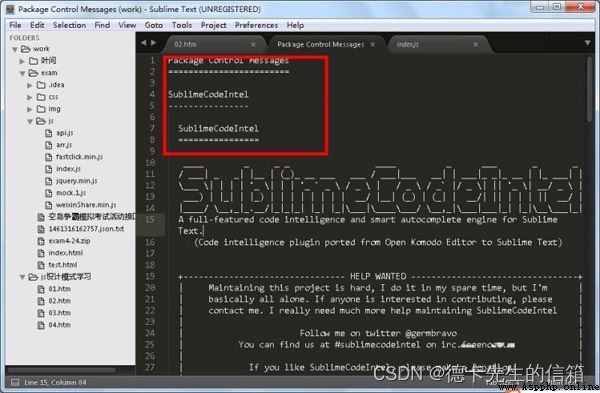
(6)、 You can also check whether there is a plug-in package in the menu bar , If yes, the installation is successful ;
1. Create a new file named python3.sublime-build
2. Save in 【Preferences】-》【Browse Package】-》【User】 Next
3. Put the following cmd in python Change the path to your computer . Copy to the above file
{"cmd": ["C:\\ProgramData\\Anaconda3\\python.exe", "-u", "$file"],"file_regex": "^[ ]*File \"(...*?)\", line ([0-9]*)","selector": "source.python","encoding": "cp936"}4.ctrl+B Whether the test runs successfully
Q: There is no right-click attribute in my folder “ share ” But there are “ Security ”, I can't see anything in the folder tab “ Simple file sharing ” A: Turn on Server service : Start - function , Input services.msc, Find the following server service , First set it to automatic , application , Then enable the service win+R Open the command line
Input cmd, And return
Right click the top border , choice 【 attribute 】, Check 【 Quick Edit mode 】
Replication time , Select the content to copy , Press 【enter】 Copy successfully
【 When pasting 】, Right click , It will automatically paste the copied content
cd /d D:\cuiWant to turn on the computer C:\Users\Administrator.-20171116XTDXHT\AppData\Roaming Folder discovery is hidden
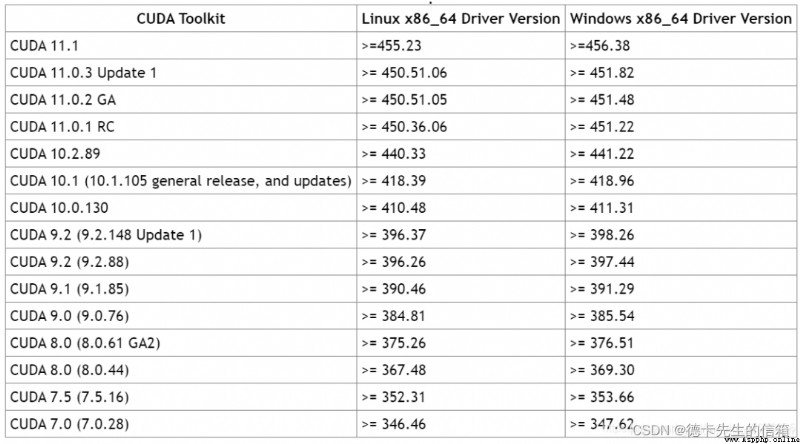
stay cmd Command box input %appdata%mstsc Remote connection dcomcnfg Open system component services regedit Check the registry services.msc system service notepad Open Notepad calc Start the calculator notes : The driver is downward compatible , It determines what can be installed CUDA and CUDAToolkit Highest version .
Insert picture description here
Insert picture description here
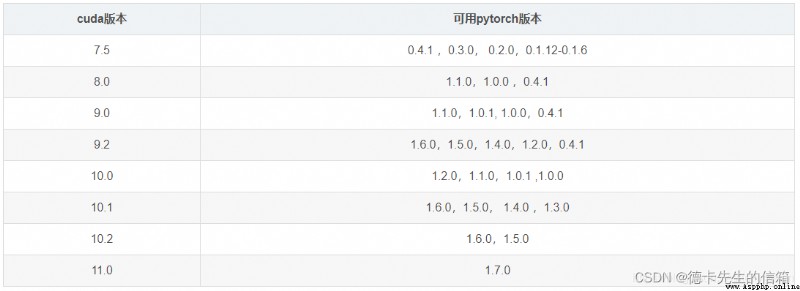
(1) Specify installation PyTorch edition
When known CUDA version , According to table 2 Directly query the corresponding version PyTorch, function conda install pytorch=X.X.X -c pytorch You can install the specified version PyTorch. This order is made by conda Decision and PyTorch Corresponding CUDAToolkit. But there is no guarantee PyTorch Normal use ,CUDAToolkit The version is not suitable for the graphics card driver , Can lead to CUDAToolkit Version higher than CUDA drive .
(2) Appoint CUDAToolkit edition
The first run nvidia-smi Inquire about CUDA Driver version , According to 1 Query the corresponding CUDAToolkit edition , Run again conda install pytorch cudatoolkit=X.X -c pytorch You can install the specified CUDAToolkit Version of PyTorch.
(3) At the same time specified PyTorch and CUDAToolkit edition
If you are quite sure CUDA Version and corresponding PyTorch and CUDAToolkit The corresponding version can run
conda install pytorch=X.X.X cudatoolkit=X.X -c pytorchAfter installation, you can use python see
import torchprint(torch.__version__)print(torch.cuda.is_available())author : Mr. Deka's mailbox
Game programming , A game development favorite ~
If the picture is not displayed for a long time , Please use Chrome Kernel browser .