西瓜視頻主頁常住: @智能之心
import cv2
import collections
import numpy as np
import PIL.Image as Image
from typing import Union, List
import matplotlib.pyplot as plt
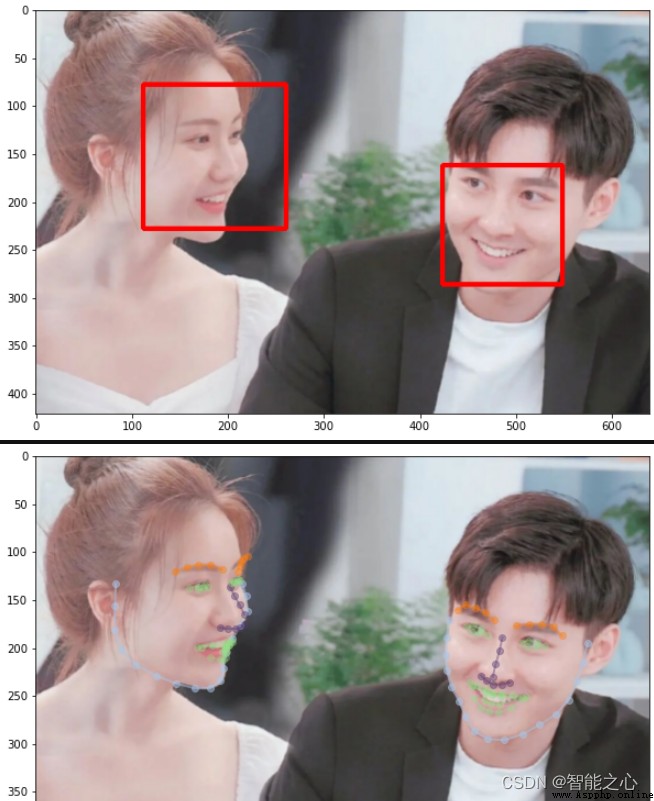
def display_faces(img, faces, fig_size=[4, 4]):
# 畫圖- 人臉定位
for face in faces:
cv2.rectangle(img, (face.left(), face.top()), (face.right(), face.bottom()), (255,0,0), 4)
pass
fig = plt.figure(figsize=fig_size)
plt.imshow(img)
plt.show()
def display_facial_landmarks(
img: Image,
landmarks: List[np.ndarray],
fig_size=[4, 4]
):
'''
landmarks[0].shape = (68,2)
'''
plot_style = dict(
marker='o',
markersize=6,
linestyle='-',
lw=2,
)
pred_type = collections.namedtuple('prediction_type', ['slice', 'color'])
pred_types = {
'face': pred_type(slice(0, 17), (0.682, 0.780, 0.909, 0.5)),
'eyebrow1': pred_type(slice(17, 22), (1.0, 0.498, 0.055, 0.4)),
'eyebrow2': pred_type(slice(22, 27), (1.0, 0.498, 0.055, 0.4)),
'nose': pred_type(slice(27, 31), (0.345, 0.239, 0.443, 0.4)),
'nostril': pred_type(slice(31, 36), (0.345, 0.239, 0.443, 0.4)),
'eye1': pred_type(slice(36, 42), (0.596, 0.875, 0.541, 0.3)),
'eye2': pred_type(slice(42, 48), (0.596, 0.875, 0.541, 0.3)),
'lips': pred_type(slice(48, 60), (0.596, 0.875, 0.541, 0.3)),
'teeth': pred_type(slice(60, 68), (0.596, 0.875, 0.541, 0.4))
}
fig = plt.figure(figsize=fig_size)
ax = fig.add_subplot(1, 1, 1)
ax.imshow(img)
ax.axis('on')
for face in landmarks:
for pred_type in pred_types.values():
ax.plot(
face[pred_type.slice, 0],
face[pred_type.slice, 1],
color=pred_type.color, **plot_style
)
plt.show()
passimport cv2
import dlib # pip install cmake + pip instal dlib :有人臉檢測定位+人臉關鍵點檢測定位-> 工具 Get - 不用自己再建立模型了
import requests
import numpy as np
import PIL.Image as Image
import matplotlib.pyplot as plt
############################################
# 圖片
############################################
img_url = 'http://t10.baidu.com/it/u=3509745159,152503870&fm=30&app=106&f=PNG?w=640&h=421&s=99A9FB1508A375155D99D0C503006021'
src = Image.open(requests.get(img_url, stream=True).raw).convert("RGB")
############################################
# 模型 - 人臉定位 -> faces
############################################
img0 = src.copy()
if isinstance(img0, Image.Image):
img0 = np.array(img0)
pass
detector = dlib.get_frontal_face_detector()
faces = detector(img0, 0)
# 畫圖- 人臉定位
from utils.plot_landmarks import display_faces
display_faces(img0, faces, [10,10])
############################################
# 模型 - 關鍵定位 -> landmarks
############################################
img1 = src.copy()
if isinstance(img1, Image.Image):
img1 = np.array(img1)
pass
shape_predictor = dlib.shape_predictor("./weights/shape_predictor_68_face_landmarks.dat")
landmarks = []
for face in faces:
shape = shape_predictor(img1, face)
landmarks.append(np.array([[v.x, v.y] for v in shape.parts()]))
pass
# 畫圖- 關鍵定位
from utils.plot_landmarks import display_facial_landmarks
display_facial_landmarks(img1, landmarks, [10,10]) # 人臉關鍵點顯示