today ,ofter Will share an exclusive app : Image animation system . Original ofter Just write an image processing tool , But when I finished writing this application , I find this is a great learning case : Simple 、 Clean and complete . This system will be front-end 、 Back end 、 Deep learning 、 Image processing is perfectly integrated , Here is a list of what we can learn :
Through this practical case , We can get started vue、python、 Deep learning 、 Interface 、 Deploy , Definitely worth collecting 、 Learn and use .
See the end of the article for the download address of the complete information .
#src
├── api/ # Front end interface
├── assets/ # Static picture path
├── components/ # Components
├── anime.vue/ # Picture animation page
├── sort.vue/ # Dynamically sort pages
├── layouts/ # Page layout components
├── router/ # route
├── utils/ # Front end interface request
├── App.vue #App The main page
├── main.js # The main definition 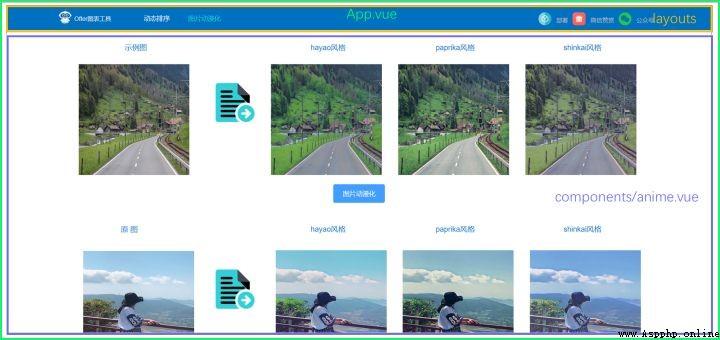
Don't look at the simple pages , The front end mainly includes 3 Function points :1) To upload pictures : Get links to pictures ;2) The compressed image ;3) Animation : Send pictures to the back end through the interface , And return the animation result .
element-ui It is simple and classic UI Component library , We can see how to achieve .
<el-dialog
class="temp_dialog"
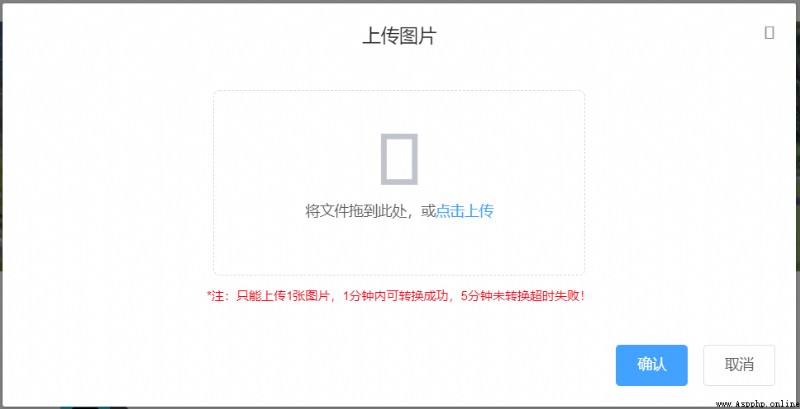
title=" To upload pictures "
:visible.sync="uploadVisible"
>
<el-form
ref="ruleForm"
:model="form"
label-width="100px"
:hide-required-asterisk="true"
>
<el-upload
class="temp_upload"
ref="fileUpload"
drag
action="/api/images/"
:on-change="importPic"
:on-exceed="onFileExceed"
:on-remove="onFileRemove"
:auto-upload="false"
:limit="1"
:file-list="fileList"
multiple
>
<i class="el-icon-upload"/>
<div class="el-upload__text">
Drag files here , or <em> Click upload </em>
</div>
<div slot="tip" class="el-upload__tip" >* notes : Can only upload 1 A picture ,1 It can be converted successfully within minutes ,5 Minutes not converted timeout failed !</div>
</el-upload>
</el-form>
<div
slot="footer"
class="dialog-footer"
>
<el-button
type="primary"
@click="uploadImages()"
>
{
{ ' confirm ' }}
</el-button>
<el-button @click="uploadVisible = false">
{
{ ' Cancel ' }}
</el-button>
</div>
</el-dialog>Here we take a look at the core code of uploading pictures importPic():
//:on-change="importPic"
methods: {
importPic (file, fileList) {
const imgUrl = []
let dtUrl = []
let typeDis = true
let that = this
fileList.forEach(function (value, index) {
const types = value.name.split('.')[1]
const fileType = ['jpg', 'JPG', 'png', 'PNG', 'jpeg', 'JPEG'].some(
item => item === types
)
if (fileType === false) {
typeDis = false
} else {
// imgUrl[index] = URL.createObjectURL(value.raw) // Assigned image url, Used for picture echo function
let reader = new FileReader()
reader.readAsDataURL(value.raw)
reader.onload = (e) => {
let result = e.target.result
let img = new Image()
img.src = result.toString()
console.log('******* Original image size *******')
console.log(result.length / 1024)
// const temp = reader.result
that.compress(img).then((value) => {
dtUrl[index] = value
})
}
}
})
if (typeDis === false) {
this.$message.error(' Format error ! Please reselect !')
this.form.data = []
this.$refs['fileUpload'].clearFiles()
this.fileList = []
this.dataUrl = []
} else {
this.fileList = fileList
this.imageUrl = imgUrl
this.dataUrl = dtUrl
}
}Although we limit the ability to upload 1 A picture ( In order to prevent uploading too many pictures and causing too long waiting time ), But our method is based on uploading multiple pictures .
fileList.forEach(function (value, index) {}We must filter the format in advance , Avoid unnecessary operations on the back end
const types = value.name.split('.')[1]
const fileType = ['jpg', 'JPG', 'png', 'PNG', 'jpeg', 'JPEG'].some(
item => item === types
)
if (fileType === false) {
typeDis = false
} else {}The most critical thing we need to get through el-upload Upload picture link , And then pass it to the back end . Here we combine multiple picture links into an array dtUrl[] Interface transfer , Of course, we can also form json Format .
 let reader = new FileReader()
reader.readAsDataURL(value.raw)
reader.onload = (e) => {
let result = e.target.result
let img = new Image()
img.src = result.toString()
console.log('******* Original image size *******')
console.log(result.length / 1024)
// const temp = reader.result
that.compress(img).then((value) => {
dtUrl[index] = value
})
}
There are two main ways to get picture links :a)blob link ;b)base64 link . What we use here is b The way , and that.compress(img) That is, the method to obtain the compressed picture .
Compressing pictures is also an important part , Generally, pictures are easy to move mb, This takes longer time and resources on the back end . For users , Also need to wait longer , Waiting is the killer of losing users .
How to compress pictures compress():
compress (img) {
const canvas = document.createElement('canvas')
const ctx = canvas.getContext('2d')
let that = this
return new Promise(function (resolve, reject) {
img.onload = setTimeout(() => {
// The original size of the picture
let originWidth = img.width
let originHeight = img.height
// Maximum size limit , The picture compression degree can be realized by setting the width and height
let maxWidth = 1200
let maxHeight = 1200
// Target size
let targetWidth = originWidth
let targetHeight = originHeight
// Picture size exceeds the limit
if (originWidth > maxWidth || originHeight > maxHeight) {
if (originWidth / originHeight > maxWidth / maxHeight) {
// Wider , Size according to width
targetWidth = maxWidth
targetHeight = Math.round(maxWidth * (originHeight / originWidth))
} else {
targetHeight = maxHeight
targetWidth = Math.round(maxHeight * (originWidth / originHeight))
}
}
// canvas Scale the image
canvas.width = targetWidth
canvas.height = targetHeight
// Clear the canvas
ctx.clearRect(0, 0, targetWidth, targetHeight)
// Picture compression
ctx.drawImage(img, 0, 0, targetWidth, targetHeight)
// Perform minimum compression
that.result = canvas.toDataURL('image/jpeg', 0.7)
resolve(that.result)
console.log('******* The size of the compressed image *******')
console.log(that.result.length / 1024)
}, 1000)
})
}There are many similar methods on the Internet , But you will often find that you can't get pictures , Because of asynchrony , We'd better use promise Method , adopt resolve To save image data .
return new Promise(function (resolve, reject) {
...
that.result = canvas.toDataURL('image/jpeg', 0.7)
resolve(that.result)
...
}
then , We can review importPic() In order to get resolve Method of saving compressed pictures .
that.compress(img).then((value) => {
dtUrl[index] = value
})
Here's a reminder , Data needs to be defined in advance .
data () {
return {
result: ''
}
},When we get the compressed image , We began to anime .
uploadImages () {
this.uploadVisible = false
this.loading = true
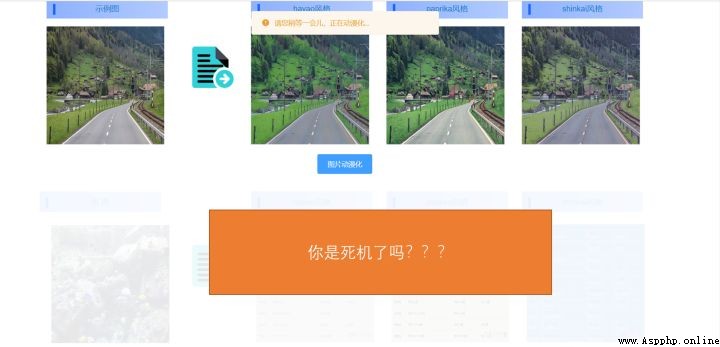
this.$message.warning(' The larger the image, the longer it may take ,ofter Is trying to anime ...')
let dtUrl = {}
this.dataUrl.forEach(function (value, index) {
dtUrl[index] = value
})
return getImages(dtUrl).then(
res => {
const {code, data} = res
if (code !== 200) {
this.$message.error(' Unable to get data from the back end ')
this.fileList = []
this.dataUrl = []
this.loading = false
} else {
this.fileList = []
this.imgList1 = data.Hayao
this.imgList2 = data.Paprika
this.imgList3 = data.Shinkai
this.loading = false
}
}
).catch(() => {
})
},adopt getImages() Method , We're going into api Interface part , About to connect back end .
return getImages(dtUrl).then()api:
import request from '../utils/request'
export function getImages (data) {
return request({
url: '/connect/anime',
method: 'post',
data: data
})
}
request.js:
import axios from 'axios'
import { Message } from 'element-ui'
const service = axios.create({
baseURL: 'http://127.0.0.1:5000/', // Connecting to the back end url
timeout: 300000 // request timeout
})
service.interceptors.response.use(
response => {
const res = response.data
return res
},
error => {
console.log('err' + error) // for debug
Message({
message: ' There is a problem with animation , Please refresh later and try again !',
type: 'error',
duration: 300 * 1000
})
return Promise.reject(error)
}
)
export default service
Yes , This is all the front-end interface code , It's simple enough !
├── checkpoint/ # Generator weights
├── dist/ # Front end package file
├── net/ # mesh generator
├── discriminator/ # Picture discriminator
├── generator/ # Image generator
├── response/ # Return the front-end interface code
├── results/ # Image generation result saving path
├── tools2/ # Tool function
├── adjust_brightness.py/ # Adjust picture brightness
├── base64_code.py/ #base64 Image format conversion
...
├── app.py # Run the program
├── README.md # Instructions
├── requirements.txt # Install library files
├── test.py # Animation code
├── start.sh # Start the program script
├── stop.sh # Stop the program script To interface with the front end ,flask A lightweight back-end framework is a good choice . The code is also simple , Front end by axios Pass the 3 Parameters :
 url: '/connect/anime',
method: 'post',
data: data
So in flask-python In file ,app.py:
@app.route('/connect/anime', methods=['POST'])
def upload_images():
data = request.get_data()
data = json.loads(data.decode("UTF-8"))
if data is None or data == '':
return response_fail(403, ' No pictures received ')
images = []
for i in range(len(data)):
images.append(data[str(i)])
Hayao = 'checkpoint/generator_Hayao_weight'
Paprika = 'checkpoint/generator_Paprika_weight'
Shinkai = 'checkpoint/generator_Shinkai_weight'
save_add = 'imgs/'
brightness = False
result_Hayao = test_anime(Hayao, save_add, images, brightness)
result_Paprika = test_anime(Paprika, save_add, images, brightness)
result_Shinkai = test_anime(Shinkai, save_add, images, brightness)
result_arr = {
'Hayao': result_Hayao,
'Paprika': result_Paprika,
'Shinkai': result_Shinkai
}
return response_success('success', result_arr)
And get Post Data are available. 3 Ways of planting :a)params;b)form.data;c)data. We use the method here c:
data = request.get_data()Let's introduce a little AnimeGanV2 Network architecture and implementation of . If you don't know about neural networks , I suggest you read ofter With the simplest way to write about convolutional neural networks :
[5 machine learning ] The world of computer vision - Convolutional neural networks (CNNs) - You know
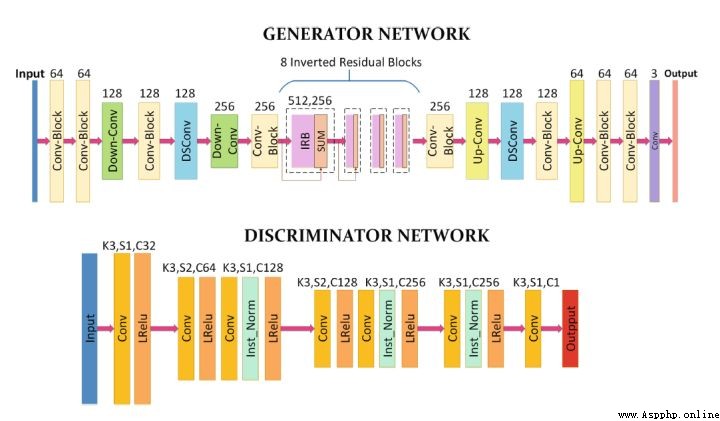
Because the discriminator network is just to identify whether the picture is Cartoon picture , So the network architecture is very simple , We mainly look at the implementation of generator network , We divided the network architecture into several parts .
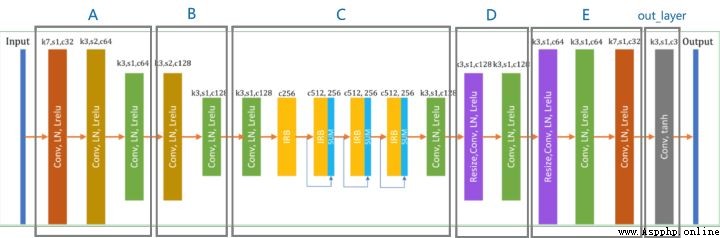
with tf.compat.v1.variable_scope('A'):
inputs = Conv2DNormLReLU(inputs, 32, 7)
inputs = Conv2DNormLReLU(inputs, 64, strides=2)
inputs = Conv2DNormLReLU(inputs, 64)
with tf.compat.v1.variable_scope('B'):
inputs = Conv2DNormLReLU(inputs, 128, strides=2)
inputs = Conv2DNormLReLU(inputs, 128)
with tf.compat.v1.variable_scope('C'):
inputs = Conv2DNormLReLU(inputs, 128)
inputs = self.InvertedRes_block(inputs, 2, 256, 1, 'r1')
inputs = self.InvertedRes_block(inputs, 2, 256, 1, 'r2')
inputs = self.InvertedRes_block(inputs, 2, 256, 1, 'r3')
inputs = self.InvertedRes_block(inputs, 2, 256, 1, 'r4')
inputs = Conv2DNormLReLU(inputs, 128)
with tf.compat.v1.variable_scope('D'):
inputs = Unsample(inputs, 128)
inputs = Conv2DNormLReLU(inputs, 128)
with tf.compat.v1.variable_scope('E'):
inputs = Unsample(inputs, 64)
inputs = Conv2DNormLReLU(inputs, 64)
inputs = Conv2DNormLReLU(inputs, 32, 7)
with tf.compat.v1.variable_scope('out_layer'):
out = Conv2D(inputs, filters =3, kernel_size=1, strides=1)
self.fake = tf.tanh(out)
Code implementation and network architecture are matched one by one , Of course tensorflow There is no such convenient method in , And we just need to write down for each method .
Conv2DNormLReLU Method :
def Conv2DNormLReLU(inputs, filters, kernel_size=3, strides=1, padding='VALID', Use_bias = None):
x = Conv2D(inputs, filters, kernel_size, strides,padding=padding, Use_bias = Use_bias)
x = layer_norm(x,scope=None)
return lrelu(x)
def Conv2D(inputs, filters, kernel_size=3, strides=1, padding='VALID', Use_bias = None):
if kernel_size == 3 and strides == 1:
inputs = tf.pad(inputs, [[0, 0], [1, 1], [1, 1], [0, 0]], mode="REFLECT")
if kernel_size == 7 and strides == 1:
inputs = tf.pad(inputs, [[0, 0], [3, 3], [3, 3], [0, 0]], mode="REFLECT")
if strides == 2:
inputs = tf.pad(inputs, [[0, 0], [0, 1], [0, 1], [0, 0]], mode="REFLECT")
return tf_layers.conv2d(
inputs,
num_outputs=filters,
kernel_size=kernel_size,
stride=strides,
weights_initializer=tf_layers.variance_scaling_initializer(),
biases_initializer= Use_bias,
normalizer_fn=None,
activation_fn=None,
padding=padding)
def layer_norm(x, scope='layer_norm') :
return tf_layers.layer_norm(x, center=True, scale=True, scope=scope)
def lrelu(x, alpha=0.2):
return tf.nn.leaky_relu(x, alpha)
Unsample Method :
def Unsample(inputs, filters, kernel_size=3):
new_H, new_W = 2 * tf.shape(inputs)[1], 2 * tf.shape(inputs)[2]
inputs = tf.compat.v1.image.resize_images(inputs, [new_H, new_W])
return Conv2DNormLReLU(filters=filters, kernel_size=kernel_size, inputs=inputs)
In order to avoid losing image information , We try to avoid using pooled operations .
For image style transfer , The most important link is Gan Cyber warfare . This section has nothing to do with our practical application , It is used for model training , Since the theme of our application today is image animation , Let me mention it a little . Take the loss of the generator as an example :
# gan
c_loss, s_loss = con_sty_loss(self.vgg, self.real, self.anime_gray, self.generated)
tv_loss = self.tv_weight * total_variation_loss(self.generated)
t_loss = self.con_weight * c_loss + self.sty_weight * s_loss + color_loss(self.real,self.generated) * self.color_weight + tv_loss
g_loss = self.g_adv_weight * generator_loss(self.gan_type, generated_logit)
self.Generator_loss = t_loss + g_loss
G_vars = [var for var in t_vars if 'generator' in var.name]
self.G_optim = tf.train.AdamOptimizer(self.g_lr , beta1=0.5, beta2=0.999).minimize(self.Generator_loss, var_list=G_vars)
Here we are in the training process , Use AdamOptimizer The optimization algorithm minimizes the loss of our generator network .
opencv Is a more commonly used image processing library .
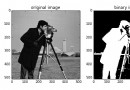
Let's start with an example of a local image , We know that the computer processing of pictures is actually the processing of matrix arrays , Then we can use cv2.imread Get the matrix array of pictures .
import cv2
image_path = 'D:/XXX.png'
img = cv2.imread(image_path).astype(np.float32)
print(img)
Output results :
[[255,255,255],[],[],...]But in this case ofter What you get is base64 Images , Therefore, another function for reading image data is adopted :
cap = cv2.VideoCapture(image_path)
ret, frame = cap.read()
among frame Is the image data we need , Let's look at how we load image data , The method of pretreatment :
def load_test_data(image_path, size):
# img = cv2.imread(image_path).astype(np.float32)
cap = cv2.VideoCapture(image_path)
ret, frame = cap.read()
img = cv2.cvtColor(frame, cv2.COLOR_BGR2RGB)
img = preprocessing(img, size)
img = np.expand_dims(img, axis=0)
return img
def preprocessing(img, size):
h, w = img.shape[:2]
if h <= size[0]:
h = size[0]
else:
x = h % 32
h = h - x
if w < size[1]:
w = size[1]
else:
y = w % 32
w = w - y
# the cv2 resize func : dsize format is (W ,H)
img = cv2.resize(img, (w, h))
return img/127.5 - 1.0Save the image data , We use cv2.imwrite() Method :
cv2.imwrite(path, cv2.cvtColor(images, cv2.COLOR_BGR2RGB))When we have the path of the picture , We return it to the front end through the interface .
return base64 How to link pictures :
# Get local pictures
def return_img_stream(img_local_path):
img_stream = ''
with open(img_local_path, 'rb') as img_f:
img_stream = img_f.read()
img_stream = str("data:;base64," + str(base64.b64encode(img_stream).decode('utf-8')))
return img_stream
return Image link array :
result_arr=[]
result_arr.append(return_img_stream('./'+image_name))
return result_arrIf you only need local tests , This case provides args Methods , Under the project path , The implementation is as follows :
python test.py --checkpoint_dir checkpoint/generator_Hayao_weight --test_dir dataset/pics --save_dir /imgs
# --checkpoint_dir Pull generator weights , There are hayao/paprika/shinkai.
# --test_dir Need the path of animation pictures
# --save_dir The path to save the animation result pictures
You can save the animation results to the specified path .
Use your computer as a server , Download before use Nginx.
Under the project path , Execute the following command :
chmod u+x start.sh # Authorize the script to run
./start.sh > result.log & # Run script
# Stop script :./stop.shTo configure Nginx
#nginx.conf
server
{
listen 80;
server_name localhost;
location / {
index index.html index.htm;
root XX/dist; #dist route
}
# Interface
location /api {
proxy_pass http://127.0.0.1:5000/;
}
}
start-up Nginx
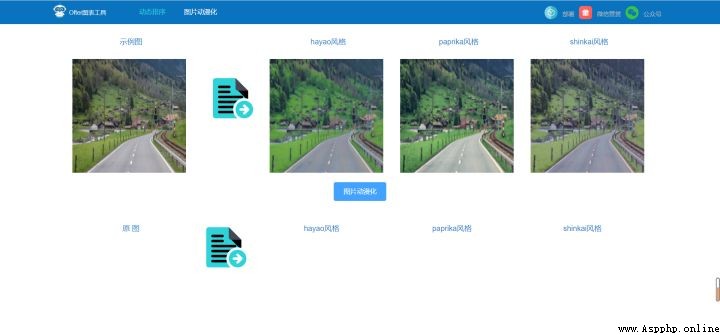
service nginx start # restart : service nginx restartType in the browser localhost, You can run .
The deployment mode of ECS is similar to that of local servers , The experience address is as follows :
http://139.159.233.237/#/anime
https://www.jdmm.top/file/2707572/