這種方式實現最簡單,在循環裡放入要執行的任務,然後 sleep 一段時間在執行。這個方法的缺點是只能在固定的時間間隔下執行,如果有定時任務也無法完成。,n 值需要自己計算,並且 sleep 會阻塞進程的執行,在阻塞過程中程序什麼都無法只能等。
import time
from datetime import datetime
# 每 n 秒執行一次
def timer(n):
while True:
print('do something...')
time.sleep(n)
Timer 使用
from threading import Timer
Time(ince, printTime, (time, ))
Timer 函數第一個參數是時間間隔(單位是秒),第二個參數是要調用的函數名,第三個函數是調用函數的參數(tuple)
from threading import Timer
from datetime import datetime
def printTime(time):
print(datetime.now().strftime('%Y-%m-%d'))
time = 3
t = Timer(time, printTime, (time, ))
t.start()
print('over')
輸出:
>>> over
>>> 2020-12-31
sched 模塊是 python 內置的模塊,它是一個調度(延時處理機制),每次想要定時執行某任務都必須寫入一個調度。且程序會出現阻塞仍然無法執行
sched 用法
生成調度器
schedule = sched.scheduler(time.time, time.sleep) 第一個參數是一個可以返回時間戳的函數,第二個參數可以在定時未到達之前阻塞(可以不傳遞,默認 time.sleep)
加入調度事件
調度事件:enter、enterables 等,s.enter(param1, param2, param3, param4),四個參數分別為:時間間隔、優先級(用於同時間到達的兩個事件同事執行時的順序)、被調用觸發的函數、被調用觸發的函數(注意:一定要以 tuple 傳入,如果沒有參數就 ())
運行
s.run(),注意:sched 模塊不是循環執行,一次調度被執行完成就結束啦,如果想在執行需再次 enter
import sched
import time
from datetime import datetime
# 初始 sched 模塊 schedule 類
schedule = sched.scheduler(time.time, time.sleep)
# 被調用的函數
def printTime():
print(datetime.now().strftime(r'%Y-%m-%d'))
def main(interval):
# enter四個參數分別為:間隔事件、優先級(用於同時間到達的兩個事件同時執行時定序)、被調用觸發的函數,
schedule.enter(interval, 0, printTime, ())
schedule.run()
main(5)
print('overs')
輸出:
>>> 2020-12-31
>>> over
APScheduler 是一個python 定時任務框架,使用起來十分方便。提供基於日期、固定時間間隔以及 crontab 類型的任務,並且可以持久化任務、並以 daemon 方式運行應用。
pip install APScheduler
APScheduler 使用實例
from apscheduler.schedulers.blocking import BlockingScheduler
from datetime import datetime
def printTime():
print(datetime.now().strftime(r'%Y-%m-%d'))
scheduler = BlockingScheduler()
scheduler.add_job(printTime, 'interval', seconds=2)
scheduler.start()
APScheduler 四個組件
APScheduler 四個組件分別為:觸發器(ttigger)、作業存儲(job store)、執行器(e xecutor)、調度器(scheduler)
觸發器(tigger)
包含調度邏輯每一個作業有它租戶的觸發器,用於決定接下來哪一個作業會運行,除了他們自己初始配置以外觸發器完全是無狀態的。
APScheduler 有三種內建的 tigger(觸發器)
data: 特定時間點觸發
interval:固定時間間隔觸發
cron:在特定時間周期性觸發
date
最基本的一種調度,作業只會執行一次。它的參數如下:
from datetime import date
from apscheduler.schedulers.blocking import BlockingScheduler
sched = BlockingScheduler()
def my_job(text):
print(text)
# The job will be executed on November 6th, 2009
sched.add_job(my_job, 'date', run_date=date(2009, 11, 6), args=['text'])
sched.add_job(my_job, 'date', run_date=datetime(2009, 11, 6, 16, 30, 5), args=['text'])
sched.add_job(my_job, 'date', run_date='2009-11-06 16:30:05', args=['text'])
# The 'date' trigger and datetime.now() as run_date are implicit
sched.add_job(my_job, args=['text'])
sched.start()
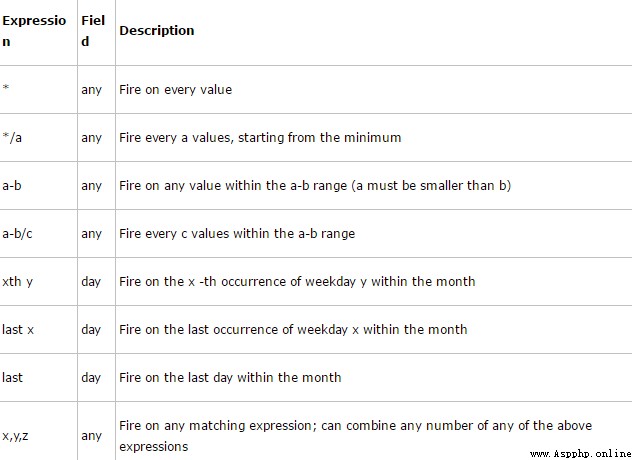
cron
表達式:
from apscheduler.schedulers.blocking import BlockingScheduler
def job_function():
print("Hello World")
# BlockingScheduler
sched = BlockingScheduler()
# Schedules job_function to be run on the third Friday
# of June, July, August, November and December at 00:00, 01:00, 02:00 and 03:00
sched.add_job(job_function, 'cron', month='6-8,11-12', day='3rd fri', hour='0-3')
# Runs from Monday to Friday at 5:30 (am) until 2014-05-30 00:00:00
sched.add_job(job_function, 'cron', day_of_week='mon-fri', hour=5, minute=30, end_date='2014-05-30')
sched.start()
interval
參數:
作業存儲(job store)
存儲被調度的作業,默認的作業存儲是簡單地把作業保存在內存中,其他的作業存儲是將作業保存在數據庫中,一個作業的數據將保存在持久化作業存儲時被序列化,並在加載時被反向序列化,且調度器不能分享同一個作業存儲。
APScheduler 默認使用 MemoryJobStore
執行器
處理作業的運行,他們通常通過在作業中提交制定的可調用對象到一個線程或者進城池來進行,當作業完成時執行器將會通知調度器。
常用的執行器官有以下兩種:
ProcessPoolExecutor
ThreadPoolExecutor
調度器
通常在應用中只有一個調度器,應用的開發者通常不會直接處理作業存儲、調度器和觸發器,相反調度器提供了處理這些合適的接口,配置作業存儲和執行器可以在調度器中完成,例如添加、修改、移除作業。
配置調度器
APScheduler 提供了許多不同的方式來配置調度器,你可以使用一個配置字典作為參數關鍵字的方式傳入,也可以先創建調度器,再配置和添加作業,這樣您可以在不同的環境中得到更大的靈活性。
from apscheduler.schedulers.blocking import BlockingScheduler
from datetime import datetime
def printTime():
print(datetime.now().strftime(r'%Y-%m-%d'))
# 創建 BlockingScheduler
scheduler = BlockingScheduler()
scheduler.add_job(printTime, 'interval', seconds=2)
scheduler.start()
上述代碼創建了一個 BlockingScheduler,默認使用默認存儲和默認執行器(MemoryJobStore 和 T hreadPoolExecutor,其中線程池最大線程數 <= 10),配置完成使用 start() 啟動
配置數據庫存儲
from datetime import datetime
from pymongo import MongoClient
from apscheduler.schedulers.blocking import BlockingScheduler
from apscheduler.jobstores.memory import MemoryJobStore
from apscheduler.jobstores.mongodb import MongoDBJobStore
from apscheduler.executors.pool import ThreadPoolExecutor, ProcessPoolExecutor
# MongoDB 參數
host = '127.0.0.1'
port = 27017
client = MongoClient(host, port)
# 輸出時間
def job():
print(datetime.now().strftime("%Y-%m-%d %H:%M:%S"))
# 存儲方式
jobstores = {

'mongo': MongoDBJobStore(collection='job', database='test', client=client),
'default': MemoryJobStore()
}
# 執行器
executors = {

'default': ThreadPoolExecutor(10),
'processpool': ProcessPoolExecutor(3)
}
job_defaults = {

'coalesce': False,
'max_instances': 3
}
scheduler = BlockingScheduler(jobstores=jobstores, executors=executors, job_defaults=job_defaults)
scheduler.add_job(job, 'interval', seconds=5, jobstore='mongo')
scheduler.start()
APSchduler 對 Job 相關操作
添加 job
add_job()
scheduler_job()
注意️:該方法只適用於應用程序在運行期間不會改變的 job,而 add_job() 返回一個 apscheduler.job.Job實例,可以用來改變或者移除 job
移除 job
remove_job():使用 jobId 移除 job
job.remove():使用 add_job() 返回的實例
from apscheduler.schedulers.blocking import BlockingScheduler
from datetime import datetime
def printTime():
print(datetime.now().strftime(r'%Y-%m-%d'))
scheduler = BlockingScheduler()
job = scheduler.add_job(printTime, 'interval', seconds=2, id='remove_id')
# 方式一
job.remove()
# 方式二
scheduler.remove_job('remove_id')
暫停和恢復 job
from apscheduler.schedulers.blocking import BlockingScheduler
from datetime import datetime
def printTime():
print(datetime.now().strftime(r'%Y-%m-%d'))
scheduler = BlockingScheduler()
job = scheduler.add_job(printTime, 'interval', seconds=2, id='remove_id')
# 暫停任務
job.pause()
# 恢復任務
job.resume()
scheduler.start()