source : The Internet
1. Realization principle
Just recently learned http agreement , Think of it as a review .
In a nutshell , Find the login interface through the website , And then send post request , Submit the login information to the server , To complete the login .
1.1 know URL
What we call the web site , In fact, it is the uniform resource locator (uniform resource locator abbreviation URL), Through this unique address , You can find the corresponding service . Its standard format is as follows :
agreement :// user name : password @ subdomain . domain name . Top-level domain name : Port number / Catalog / file name . file extension ? Parameters = value # sign

This is just a standard format , Some information can be omitted , Such as login information , There are also server addresses that can be domain names , It can also be used. ip Address . The hierarchical file path is actually the server resource you want to access , question mark ?
And then get Requested parameters .http The protocol has multiple request methods ,post and get Just two of them .
1.get The main method is to obtain the resource information of the server , The requested parameters are generally placed in url? Back .
2.post The main method is to submit the data to the server , Submit in the body of the message .
http The essence of the agreement is to obtain some “ resources ”( video 、 Audio 、 Webpage 、 picture ……), Transmission is its function . actually , Most of the Internet behavior , Are communicating between processes , Since it's communication , You need to get information and send information , So corresponding to our life , Most Internet behaviors are nothing more than two kinds :
1. Get the resources on the server to the local ( Download short video 、 Network novel ……)
2. Push the local server to the server ( Search for 、 Sign in 、 Place an order ……)
1.2 http Request message format
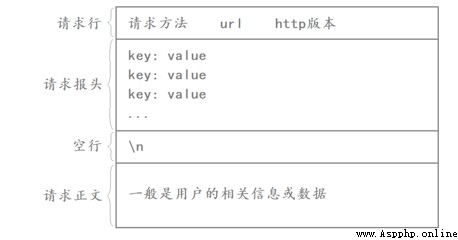
First line : [ Method ] + [url] + [ edition ]
Header: Requested properties , Colon divided key value pairs ; Use... Between each set of attributes \n Separate ; When you meet a blank line, it means Header Partial end
Body: The content behind the blank line is Body. Body Allow empty string . If Body There is , It's in Header There will be one Content-Length Property to identify Body The length of ;
1.3 http Response header format
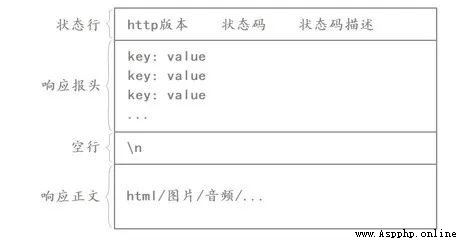
First line : [ Version number ] + [ Status code ] + [ State code interpretation ]
Header: Requested properties , Colon divided key value pairs ; Use... Between each set of attributes \n Separate ; When you meet a blank line, it means Header Partial end
Body: The content behind the blank line is Body. Body Allow empty string . If Body There is , It's in Header There will be one Content-Length Property to identify Body The length of ; If the server returns a html page , that html The content of the page is in body in .
HTTP common Header:
Content-Type: data type (text/html etc. ) Content-Length: Body The length of
Host: Client notification server , The requested resource is on which port of which host ; User-Agent: Declare the user's operating system and browser version information ;
referer: Which page does the current page Jump from ;
location: collocation 3xx Use of status code , Tell the client where to visit next ;
Cookie: For storing a small amount of information on the client side . Usually used to implement a session (session) The function of ;
2. Concrete realization
import requestsimport socket# obtain ip Address def get_host_ip():
"""
Check this machine ip Address
:return: ip
"""
try:
s = socket.socket(socket.AF_INET, socket.SOCK_DGRAM)
s.connect(('10.255.255.255', 1))
ip = s.getsockname()[0]
finally:
s.close()
return ip
user_ip = get_host_ip()# Campus network address , It's best not to use... In the browser url, It is still recommended to capture packets for post_addr = "http://10.10.244.11:801/eportal/"# In the following two curly brackets, you copy the information in your school's website , Use double quotes around the colon post_header = { # Headlines , By grabbing bags , obtain }
post_data = {
# Body data , Get it by grabbing it }
# Submit http Request message z = requests.post(post_addr, data=post_data, headers=post_header)print(" Log in to the campus network successfully , LAN ip as follows :")print(user_ip)#input("")
The above is the main logic of the code , The details also need to be filled in by capturing packets . At first, there was no installation on the computer requests Bag , You need to install it yourself , Back python The packages to be imported are all in pip3 Command to install . If not installed pip3 Ordered , Please install it yourself. .
pip3 install requests2.1 obtain url
First open the Internet login window in Google browser , Then press F12 Key to enter developer mode , Check keep log , Enter the account and password , Log in , Get the login information from the network http Request message .

Then check the bag you caught , Just check the first one , It's usually the first , If you are not sure, you can click into the area to check , See the request method in the header , Make sure it is post. Then there is a request URL , Namely url 了 . Just copy ? The content in front of the question mark is enough , In the back are some get Method , If you don't understand what it means, read the long article url The explanation of .
Pull down , And the response header , Request header and other information ,:warning: Be careful , Because we need to ask the server to log in , So what we need is a request header , Instead of responding , Don't get me wrong .

# Campus network address , It's best not to use... In the browser url, It is still recommended to capture packets for post_addr = "http://10.10.244.11:801/eportal/"This completes the first step , Got the campus network address . Why is it not recommended to copy directly from the browser , For example, the response from our school is 3xx, The URL has been redirected , So the address captured is more accurate .
2.2 Get the header of the request message
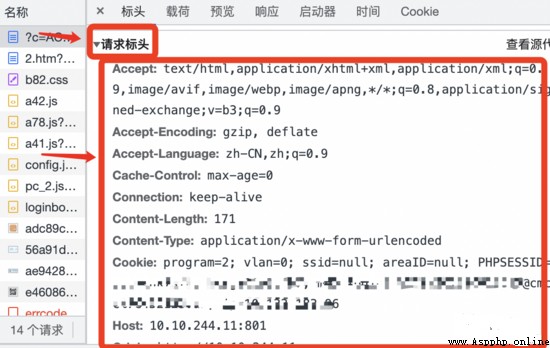
Fill the code block with the contents of the request header , part header The meaning of has been explained above , To learn more, please search by yourself . The format of filling is key value key:values Pattern ,key and values All strings need quotation marks , The upper and lower key values are separated by commas , Here is my own message , Just an example .
# In the following two curly brackets, you copy the information in your school's website , Use double quotes around the colon post_header = {
'Accept': '*/*',
'Accept-Encoding': 'gzip, deflate',
'Accept-Language': 'zh-CN,zh;q=0.9',
'Cache-Control': 'max-age=0',
'Connection': 'keep-alive',
'Host': '10.10.244.11',
'Referer': 'http://10.10.244.11/',
'Upgrade-Insecure-Requests': '1',
'User-Agent': 'Mozilla/5.0 (Macintosh; Intel Mac OS X 10_15_7) AppleWebKit/537.36 (KHTML, like Gecko) Chrome/101.0.4951.64 Safari/537.36',}
2.3 Obtain the data of the request message
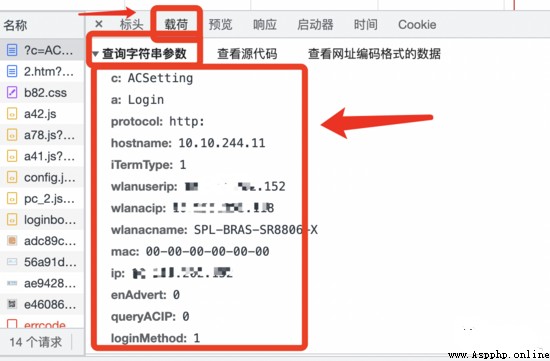
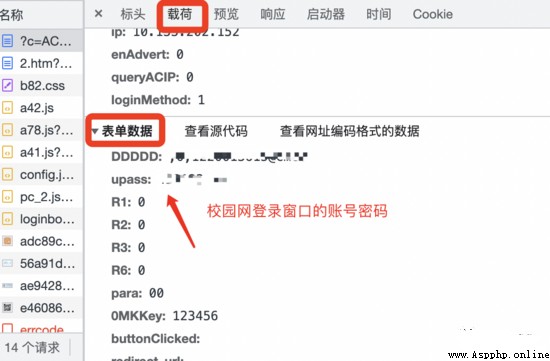
Put the query string in the load 、 The form data is filled into the program block , The main upload here is your login information , Don't make a mistake .
post_data = {
'c': 'ACSetting',
'a': 'Login',
'DDDDD': 'xxxx',
'upass': 'xxxxx',
'protocol': 'http:',
'hostname': '10.10.244.11',
'iTermType': '1',
'wlanuserip': user_ip,
'wlanacip': 'xxxxxx',
'wlanacname': 'SPL-BRAS-SR8806-X',
'mac': '00-00-00-00-00-00',
'ip': user_ip,
'enAdvert': '0',
'queryACIP': '0',
'loginMethod': '1'}
2.4 Get the local area network of this machine ip
Why write a separate function to get the host IP Well , because IP The address is divided into fixed IP Address and news IP Address , What we need to get is dynamic IP Address , It's always changing , You cannot directly fill in the address obtained by capturing packets in the request data , Or you go somewhere else , Maybe that address is invalid .
Fix IP: Fix IP Addresses are permanently assigned to a computer for use IP Address , It is usually a special server that has a fixed server IP Address .
dynamic IP: because IP Address resources are very scarce , Dial up internet access through telephone or ordinary broadband Internet users generally do not have fixed IP Address , But by the ISP Dynamic allocation of a temporary IP Address , These are all done automatically by the computer system .
# obtain ip Address # Import required socket package , The system should come with def get_host_ip():
"""
Check this machine ip Address
:return: ip
"""
try:
s = socket.socket(socket.AF_INET, socket.SOCK_DGRAM)
s.connect(('10.255.255.255', 1))
ip = s.getsockname()[0] finally:
s.close()
return ip
user_ip = get_host_ip()
Writing here is actually , It has been able to automatically connect to the campus network , But only if you open it first Wi-Fi, Connect to the campus network of the school Wi-Fi. At the end of the day , The current function can only help you log in to the campus network , Connect to the campus network Wi-Fi You still have to do all the things , If you were connected to another network , Then you have to switch networks .
So we need to add an automatic connection Wi-Fi The function of , just python There's one in it pywifi Packages can support this function . however !! direct pip3 Installed pywifi The package does not support mac os Of Wi-Fi control , Because developing this pywifi The author of the package does not mac os System , therefore pywifi Package only supports windows and linux.
Fortunately , This question was raised later , The author later wrote a book suitable for mac os My bag , But you need to download it yourself . I also experienced many twists and turns , Just solved this problem .
3. Auto connect Wi-Fi
First install at the terminal pywifi package , And then find pywifi Package corresponding position , Replace all content with support moc os Of pywifi package .
pip3 install pywifiIf you can't find it pywifi The path can be unloaded first , Then all installed package paths will pop up , Then copy the required path , Best choice n command , Just stop uninstalling .
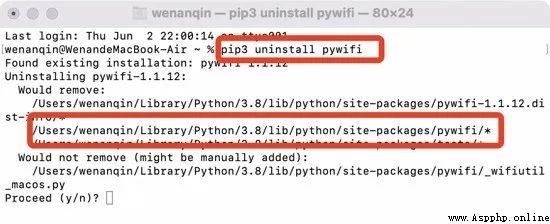
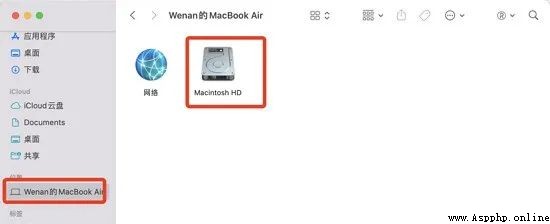
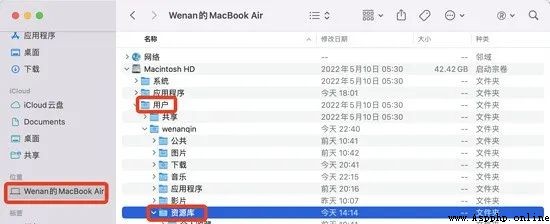
After getting the installation path , It can be viewed in the terminal , It can also be in mac View in visual file mode , I prefer visualization , Some folders are translated into Chinese when you open them , I believe you can find it with your heart .

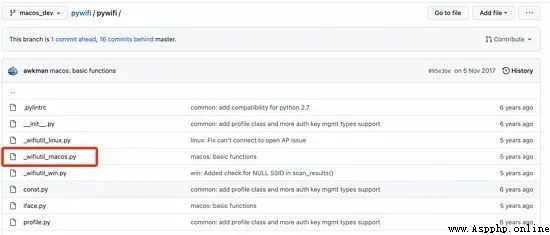
find pywifi After the path , Download support mac os Of pywifi It's packed , After downloading, replace it . This support mac os Of pywifi Where to? ? Here is the author github The address of , author awkman stay Issue24 It also answered , He wrote a compatible Macos Of demo Program .
moc edition pywifi
The author replied
It can be used at the terminal git Command download , It's fine too , Go directly to the author's warehouse to download , You're welcome .git The command download instructions are as follows :-b What follows is a branch , The author put macos_dev In the .
git clone -b macos_dev https://github.com/awkman/pywifi.git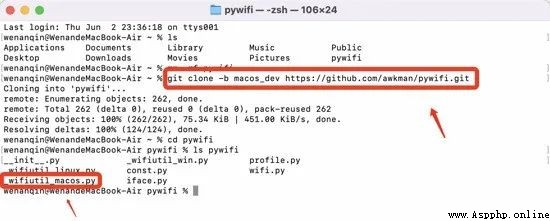
After downloading, check whether it contains mac Of .py file , No problem if it is included . And then include mac This pywifi Documents and previous pywifi Just replace it . First cd To the current folder , then cp Copy to the original path ( How to find the path has been mentioned above ), If the file name is the same, the contents will be automatically replaced .
cd pywifi
cp -r pywifi /Users/wenanqin/Library/Python/3.8/lib/python/site-packages
I have done this before , Running or reporting an error , Because of the discovery _wifiutil_macos.py There is a package not installed in the , It will be OK after loading .
pip3 install pyobjc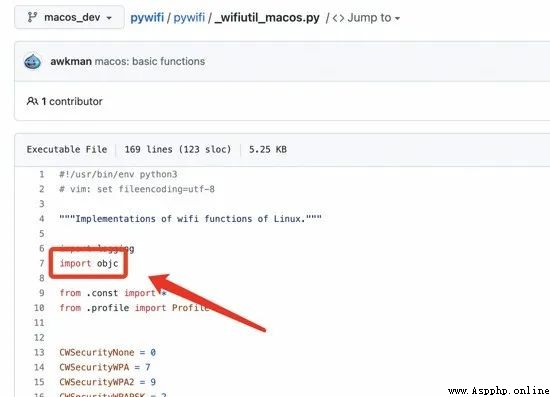
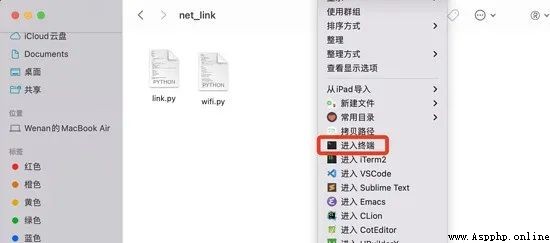
Now let's finish the connection wifi Function code , Under the unified path , Create a new one wifi.py file .
import pywifiimport time# Save constants written in the package from pywifi import constdef wifi_connect_status():
"""
Determine whether this computer has a wireless network card , And connection status
:return: Connected or existing wireless network card returns 1, Otherwise return to 0
"""
# Create a meta line object
wifi = pywifi.PyWiFi() # Take the current machine , The first Yuanxian network card
iface = wifi.interfaces()[0] # There may be multiple wireless network cards , So specify
# Determine if the connection is successful
if iface.status() in [const.IFACE_CONNECTED,const.IFACE_INACTIVE]: #print('wifi Already connected to the network ')
return 1
else:
print(" brother , I didn't set it to turn on automatically Wi-Fi function , You open it first wifi Try again ?") return 0def scan_wifi():
"""
Scan attachments wifi
:return: Scan result object
"""
# Scan attachments wifi
wifi = pywifi.PyWiFi()
iface = wifi.interfaces()[0]
iface.scan() # Scan attachments wifi
time.sleep(1)
basewifi = iface.scan_results() # for i in basewifi:
# print('wifi Scan results :{}'.format(i.ssid)) # ssid by wifi name
# print('wifi equipment MAC Address :{}'.format(i.bssid))
return basewifidef connect_wifi():
wifi = pywifi.PyWiFi() # Create a wifi object
ifaces = wifi.interfaces()[0] # Take the first infinite network card
#print(" Name of local wireless network card :")
#print(ifaces.name()) # Output wireless card name
ifaces.disconnect() # Disconnect the network card
time.sleep(3) # buffer 3 second
profile = pywifi.Profile() # The configuration file
profile.ssid = "NJUPT-CMCC" # wifi name
# You don't need a password to log in to the campus network , There is also a login module
# profile.auth = const.AUTH_ALG_OPEN # Need a password
# profile.akm.append(const.AKM_TYPE_WPA2PSK) # Encryption type
# profile.cipher = const.CIPHER_TYPE_CCMP # Encryption unit
# profile.key = '4000103000' #wifi password
ifaces.remove_all_network_profiles() # Delete other profiles
tmp_profile = ifaces.add_network_profile(profile) # Load profile
ifaces.connect(tmp_profile) # Connect
time.sleep(1) # Try 10 Seconds to connect successfully
isok = True
if ifaces.status() == const.IFACE_CONNECTED:
print(" Successfully connected to the campus network ") else:
print(" Failed to connect to campus network ") #ifaces.disconnect() # disconnect
time.sleep(1) return isok
There are three functions here , For the first two tests , You can actually call only the third .link.py Call the connection before logging in to the campus network wifi modular .
import requestsimport socket# Import what you just wrote wifi modular , It must be in the same folder import wifi# see wifi state wifi.wifi_connect_status()# Connect wifiwifi.connect_wifi()# obtain ip Address def get_host_ip():
"""
Check this machine ip Address
:return: ip
"""
try:
s = socket.socket(socket.AF_INET, socket.SOCK_DGRAM)
s.connect(('10.255.255.255', 1))
ip = s.getsockname()[0]
finally:
s.close()
return ip
user_ip = get_host_ip()# Campus network address post_addr = "http://10.10.244.11:801/eportal/"# In the following two curly brackets, you copy the information in your school's website , Use double quotes around the colon post_header = {
'Accept': '*/*',
'Accept-Encoding': 'gzip, deflate',
'Accept-Language': 'zh-CN,zh;q=0.9',
'Cache-Control': 'max-age=0',
'Connection': 'keep-alive',
'Host': '10.10.244.11',
'Referer': 'http://10.10.244.11/',
'Upgrade-Insecure-Requests': '1',
'User-Agent': 'Mozilla/5.0 (Macintosh; Intel Mac OS X 10_15_7) AppleWebKit/537.36 (KHTML, like Gecko) Chrome/101.0.4951.64 Safari/537.36',}
post_data = {
'c': 'ACSetting',
'a': 'Login',
'DDDDD': ',0,[email protected]',
'upass': 'xxxxx',
'protocol': 'http:',
'hostname': '10.10.244.11',
'iTermType': '1',
'wlanuserip': user_ip,
'wlanacip': 'xxxxxxx',
'wlanacname': 'SPL-BRAS-SR8806-X',
'mac': '00-00-00-00-00-00',
'ip': user_ip,
'enAdvert': '0',
'queryACIP': '0',
'loginMethod': '1'}
z = requests.post(post_addr, data=post_data, headers=post_header)# If you don't want to close the window manually every time, you can delete the following input, And then print Change the content in the to what you want print(" Log in to the campus network successfully , LAN ip as follows :")print(user_ip)#input("")
4. Pack it up exe file
1. Install first pyinstaller package
pip3 install pyinstaller2. find pyinstaller Command path ( belt bin, The old method uninstalls to see the path ), I can't do it directly pyinstaller Instructions , because python The system has , Environment variables have not been configured .
3. Execute instruction packaging
First cd Go to the path where you need to package the file , Then execute the command , I installed a super right-click program , Easy to operate
# take xx.py Packaging for xx.exe
/Users/wenanqin/Library/Python/3.8/bin/pyinstaller -F xx.py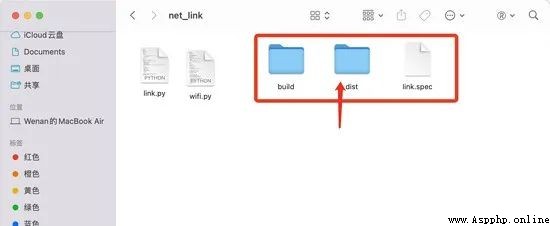
Finish the operation , Three files will be generated ,exe The file in dist In the file , thus , All the work is done .
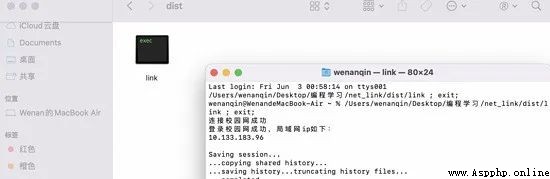
Execution procedure , The effect is as above .
Recommended reading Click on the title to jump to
Python Learning manual
Pandas Learning gift bag
100+Python Reptile project
Python Introduction to data analysis
Inside Zhejiang University Python course
240 individual Python Exercise cases with source code
70 individual Python Classic practical hand training project
Tidy up 30 paragraph Python Small game with source code