概述
單元測試和集成測試在我們的軟件開發整個流程中占有舉足輕重的地位,一方面,程序員通過編寫單元測試 來驗證自己程序的有效性,另外一方面,管理者通過持續自動的執行單元測試和分析單元測試的覆蓋率等來確保軟件本身的 質量。這裡,我們先不談單元測試本身的重要性,對於目前大多數的基於 Java 的企業應用軟件來說,Spring 已經成為了 標准配置,一方面它實現了程序之間的低耦合度,另外也通過一些配置減少了企業軟件集成的工作量,例如和 Hibernate、 Struts 等的集成。那麼,有個問題,在普遍使用 Spring 的應用程序中,我們如何去做單元測試?或者說,我們怎麼樣能 高效的在 Spring 生態系統中實現各種單元測試手段?這就是本文章要告訴大家的事情。
單元測試目前主要的框架 包括 Junit、TestNG,還有些 MOCK 框架,例如 Jmock、Easymock、PowerMock 等,這些都是單元測試的利器,但是當把他 們用在 Spring 的開發環境中,還是那麼高效麼?還好,Spring 提供了單元測試的強大支持,主要特性包括:
支持主流的測試框架 Junit 和 TestNG
支持在測試類中使用依賴注入 Denpendency Injection
支持測試類的自動化事務管理
支持使用各種注釋標簽,提高開發效率和代碼簡潔性
Spring 3.1 更是支持在測試類中使用非 XML 配置方法和基於 Profile 的 bean 配置模式
通過閱讀本文,您能夠快速的掌握基於 Spring TestContext 框架的測試方法,並了解基本的實現原理。本文將提供大 量測試標簽的使用方法,通過這些標簽,開發人員能夠極大的減少編碼工作量。OK,現在讓我們開始 Spring 的測試之旅吧 !
原來我們是怎麼做的
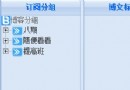
這裡先展示一個基於 Junit 的單元測試,這個單元測試運行在基於 Spring 的應用 程序中,需要使用 Spring 的相關配置文件來進行測試。相關類圖如下:
數據庫表
假設有一個員工賬號表, 保存了員工的基本賬號信息,表結構如下:
ID:整數類型,唯一標識
NAME:字符串,登錄賬號
SEX:字符串,性別
AGE:字符串,年齡
假設表已經建好,且內容為空。
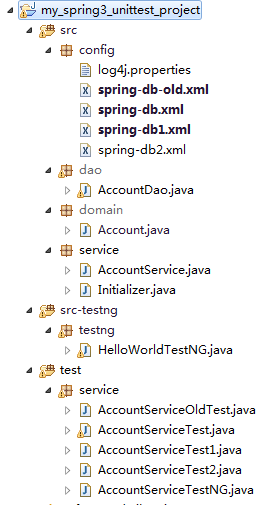
測試工程目錄結構和依賴 jar 包
在 Eclipse 中,我們可以展開工程目 錄結構,看到如下圖所示的工程目錄結構和依賴的 jar 包列表:
您需要引入的 jar 包括:
cglib-nodep- 2.2.3.jar
commons-logging.jar
hsqldb.jar
Junit-4.5.jar
log4j-1.2.14.jar
Spring-asm-3.2.0.M1.jar
Spring-beans-3.2.0.M1.jar
Spring-context-3.2.0.M1.jar
Spring-core-3.2.0.M1.jar
Spring-expression-3.2.0.M1.jar
Spring-jdbc-3.2.0.M1.jar
Spring-test-3.2.0.M1.jar
Spring-tx-3.2.0.M1.jar
testng-6.8.jar
其中的 hsqldb 是我們測試用數據庫。
圖 1. 工程目錄結構
類總體介紹
假設我們現在有一個基於 Spring 的應用程序,除了 MVC 層,還包括業務層和數據訪問層,業務層有一個類 AccountService,負責處理賬號類的業 務,其依賴於數據訪問層 AccountDao 類,此類提供了基於 Spring Jdbc Template 實現的數據庫訪問方法, AccountService 和 AccountDao 以及他們之間的依賴關系都是通過 Spring 配置文件進行管理的。
現在我們要對 AccountService 類進行測試,在不使用 Spring 測試方法之前,我們需要這樣做:
清單 1. Account.Java
此類代表賬號的基本信息,提供 getter 和 setter 方法。
package domain;

public class Account {
    public static final String SEX_MALE = "male";
    public static final String SEX_FEMALE = "female";

    private int id;
    private String name;
    private int age;
    private String sex;
    public String toString() {
       return String.format("Account[id=%d,name=%s,age:%d,sex:%s]",id,name,age,sex);
    }
    public int getId() {
        return id;
    }
    public void setId(int id) {
        this.id = id;
    }
    public String getName() {
        return name;
    }
    public void setName(String name) {
        this.name = name;
    }
    public int getAge() {
        return age;
    }
    public void setAge(int age) {
        this.age = age;
    }
    public String getSex() {
        return sex;
    }
    public void setSex(String sex) {
        this.sex = sex;
    }

    public static Account getAccount(int id,String name,int age,String sex) {
        Account acct = new Account();
        acct.setId(id);
        acct.setName(name);
        acct.setAge(age);
        acct.setSex(sex);
        return acct;
    }
}
注意上面的 Account 類有一個 toString() 方法和一個靜態的 getAccount 方法,getAccount 方法用於快速獲 取 Account 測試對象。
清單 2. AccountDao.Java
這個 DAO 我們這裡為了簡單起見,采用 Spring Jdbc Template 來實現。
package DAO;

import Java.sql.ResultSet;
import Java.sql.SQLException;
import Java.util.HashMap;
import Java.util.List;
import Java.util.Map;

import org.Springframework.context.ApplicationContext;
import org.Springframework.context.support.ClassPathXmlApplicationContext;

import org.Springframework.jdbc.core.RowMapper;
import org.Springframework.jdbc.core.namedparam.NamedParameterJdbcDaoSupport;
import org.Springframework.jdbc.core.simple.ParameterizedRowMapper;

import domain.Account;

public class AccountDao extends NamedParameterJdbcDaoSupport {
    public void saveAccount(Account account) {
        String sql = "insert into tbl_account(id,name,age,sex) " +
               "values(:id,:name,:age,:sex)";
        Map paramMap = new HashMap();
        paramMap.put("id", account.getId());
        paramMap.put("name", account.getName());
        paramMap.put("age", account.getAge());
        paramMap.put("sex",account.getSex());
        getNamedParameterJdbcTemplate().update(sql, paramMap);
    }

    public Account getAccountById(int id) {
        String sql = "select id,name,age,sex from tbl_account where id=:id";
        Map paramMap = new HashMap();
        paramMap.put("id", id);
        List<Account> matches = getNamedParameterJdbcTemplate().query(sql,
        paramMap,new ParameterizedRowMapper<Account>() {
                    @Override
                    public Account mapRow(ResultSet rs, int rowNum)
                            throws SQLException {
                        Account a = new Account();
                        a.setId(rs.getInt(1));
                        a.setName(rs.getString(2));
                        a.setAge(rs.getInt(3));
                        a.setSex(rs.getString(4));
                        return a;
                    }

        });
        return matches.size()>0?matches.get(0):null;
    }

}
AccountDao 定義了幾個賬號對象的數據庫訪問方法:
saveAccount:負責把傳入的賬號對象入庫
getAccountById:負責根據 Id 查詢賬號
清單 3. AccountService.Java
package service;

import org.apache.commons.logging.Log;
import org.apache.commons.logging.LogFactory;
import org.Springframework.beans.factory.annotation.Autowired;

import DAO.AccountDao;
import domain.Account;

public class AccountService {
    private static final Log log = LogFactory.getLog(AccountService.class);

    @Autowired
    private AccountDao accountDao;

    public Account getAccountById(int id) {
        return accountDao.getAccountById(id);
    }

    public void insertIfNotExist(Account account) {
        Account acct = accountDao.getAccountById(account.getId());
        if(acct==null) {
            log.debug("No "+account+" found,would insert it.");
            accountDao.saveAccount(account);
        }
        acct = null;
    }

}
AccountService 包括下列方法:
getAccountById:根據 Id 查詢賬號信息
insertIfNotExist :根據傳入的對象插入數據庫
其依賴的 DAO 對象 accountDao 是通過 Spring 注釋標簽 @Autowired 自動注入的。
清單 4. Spring 配置文件
上述幾個類的依賴關系是通過 Spring 進行管理的,配置文件如下:
<beans xmlns="http://www.Springframework.org/schema/beans"
    xmlns:xsi="http://www.w3.org/2001/XMLSchema-instance"
xmlns:context="http://www.Springframework.org/schema/context"
xsi:schemaLocation="http://www.Springframework.org/schema/beans
http://www.Springframework.org/schema/beans/Spring-beans-3.0.xsd
http://www.Springframework.org/schema/context
http://www.Springframework.org/schema/context/Spring-context-3.0.xsd ">

<context:annotation-config/>
<bean id="datasource" class="
org.Springframework.jdbc.datasource.DriverManagerDataSource">
        <property name="driverClassName" value="org.hsqldb.jdbcDriver" />
        <property name="url" value="jdbc:hsqldb:hsql://localhost" />
        <property name="username" value="sa" />
        <property name="password" value="" />
    </bean>
    <bean id="initer" init-method="init" class="service.Initializer">
    </bean>
<bean id="accountDao" depends-on="initer" class="DAO.AccountDao">
        <property name="dataSource" ref="datasource" />
    </bean>
<bean id="accountService" class="service.AccountService">
    </bean>
</beans>
注意其中的“<context:annotation-config/>”的作用,這個配置啟用了 Spring 對 Annotation 的支持,這樣在我們的測試類中 @Autowired 注釋才會起作用(如果用了 Spring 測試框架,則不需要這樣的 配置項,稍後會演示)。另外還有一個 accountDao 依賴的 initer bean, 這個 bean 的作用是加載 log4j 日志環境,不 是必須的。
另外還有一個要注意的地方,就是 datasource 的定義,由於我們使用的是 Spring Jdbc Template,所 以只要定義一個 org.Springframework.jdbc.datasource.DriverManagerDataSource 類型的 datasource 即可。這裡我們 使用了簡單的數據庫 HSQL、Single Server 運行模式,通過 JDBC 進行訪問。實際測試中,大家可以選擇 Oracle 或者 DB2、Mysql 等。
好,萬事具備,下面我們來用 Junit4 框架測試 accountService 類。代碼如下:
清單 5. AccountServiceOldTest.Java
package service;

import static org.Junit.Assert.assertEquals;

import org.Junit.BeforeClass;
import org.Junit.Test;
import org.Springframework.context.ApplicationContext;
import org.Springframework.context.support.ClassPathXmlApplicationContext;

import domain.Account;


public class AccountServiceOldTest {
    private static AccountService service;

    @BeforeClass
    public static void init() {
        ApplicationContext
context = new ClassPathXmlApplicationContext("config/Spring-db-old.xml");
        service = (AccountService)context.getBean("accountService");
    }

    @Test
    public void testGetAcccountById() {
Account acct = Account.getAccount(1, "user01", 18, "M");
        Account acct2 = null;
        try {
service.insertIfNotExist(acct);
            acct2 = service.getAccountById(1);
            assertEquals(acct, acct2);
        } catch (Exception ex) {
            fail(ex.getMessage());
        } finally {
            service.removeAccount(acct);
        }
}
}
注意上面的 Junit4 注釋標簽,第一個注釋標簽 @BeforeClass,用來執行整個測試類需要一次性初始化的環境 ,這裡我們用 Spring 的 ClassPathXmlApplicationContext 從 XML 文件中加載了上面定義的 Spring 配置文件,並從中 獲得了 accountService 的實例。第二個注釋標簽 @Test 用來進行實際的測試。
測試過程:我們先獲取一個 Account 實例對象,然後通過 service bean 插入數據庫中,然後通過 getAccountById 方法從數據庫再查詢這個記錄,如 果能獲取,則判斷兩者的相等性;如果相同,則表示測試成功。成功後,我們嘗試刪除這個記錄,以利於下一個測試的進行 ,這裡我們用了 try-catch-finally 來保證賬號信息會被清除。
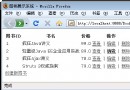
執行測試:(在 Eclipse 中,右鍵選擇 AccountServiceOldTest 類,點擊 Run as Junit test 選項),得到的結果如下:
執行測試的結果
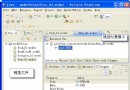
在 Eclipse 的 Junit 視圖中,我們可以看到如下的結果:
圖 2. 測試的結果

對於這種不使用 Spring test 框架進行的單 元測試,我們注意到,需要做這些工作:
在測試開始之前,需要手工加載 Spring 的配置文件,並獲取需要的 bean 實例
在測試結束的時候,需要手工清空搭建的數據庫環境,比如清除您插入或者更新的數據,以保證對下一個測試沒有影響
另外,在這個測試類中,我們還不能使用 Spring 的依賴注入特性。一切都靠手工編碼實現。好,那麼我們看看 Spring test 框架能做到什麼。
首先我們修改一下 Spring 的 XML 配置文件,刪除 <context:annotation-config/> 行,其他不變。
清單 6. Spring-db1.xml
<beans

xmlns="http://www.Springframework.org/schema/beans"
    xmlns:xsi="http://www.w3.org/2001/XMLSchema-instance"
xsi:schemaLocation="http://www.Springframework.org/schema/beans
http://www.Springframework.org/schema/beans/Spring-beans-3.2.xsd">
<bean id="datasource"
class="org.Springframework.jdbc.datasource.DriverManagerDataSource">
        <property name="driverClassName" value="org.hsqldb.jdbcDriver" />
        <property name="url" value="jdbc:hsqldb:hsql://localhost" />
        <property name="username" value="sa"/>
        <property name="password" value=""/>
    </bean>
<bean id="transactionManager"
class="org.Springframework.jdbc.datasource.DataSourceTransactionManager">
        <property name="dataSource" ref="datasource"></property>
    </bean>
    <bean id="initer" init-method="init" class="service.Initializer">
    </bean>
<bean id="accountDao" depends-on="initer" class="DAO.AccountDao">
        <property name="dataSource" ref="datasource"/>
    </bean>
    <bean id="accountService" class="service.AccountService">
    </bean>
</beans>
其中的 transactionManager 是 Spring test 框架用來做事務管理的管理器。
清單 7. AccountServiceTest1.Java
package service;
import static org.Junit.Assert.assertEquals;

import org.Junit.Test;
import org.Junit.runner.RunWith;
import org.Springframework.beans.factory.annotation.Autowired;
import org.Springframework.test.context.ContextConfiguration;
import org.Springframework.test.context.Junit4.SpringJUnit4ClassRunner;
import org.Springframework.transaction.annotation.Transactional;

import domain.Account;

@RunWith(SpringJUnit4ClassRunner.class)
@ContextConfiguration("/config/Spring-db1.xml")
@Transactional
public class AccountServiceTest1 {
    @Autowired
    private AccountService service;

    @Test
    public void testGetAcccountById() {
Account acct = Account.getAccount(1, "user01", 18, "M");
        service.insertIfNotExist(acct);
        Account acct2 = service.getAccountById(1);
        assertEquals(acct,acct2);
    }
}
對這個類解釋一下:
@RunWith 注釋標簽是 Junit 提供的,用來說明此測試類的運行者,這裡用了 SpringJUnit4ClassRunner,這個類是一 個針對 Junit 運行環境的自定義擴展,用來標准化在 Spring 環境中 Junit4.5 的測試用例,例如支持的注釋標簽的標准 化
@ContextConfiguration 注釋標簽是 Spring test context 提供的,用來指定 Spring 配置信息的來源,支持指定 XML 文件位置或者 Spring 配置類名,這裡我們指定 classpath 下的 /config/Spring-db1.xml 為配置文件的位置
@Transactional 注釋標簽是表明此測試類的事務啟用,這樣所有的測試方案都會自動的 rollback,即您不用自己清除 自己所做的任何對數據庫的變更了
@Autowired 體現了我們的測試類也是在 Spring 的容器中管理的,他可以獲取容器的 bean 的注入,您不用自己手工 獲取要測試的 bean 實例了
testGetAccountById 是我們的測試用例:注意和上面的 AccountServiceOldTest 中相同的測試方法的對比,這裡我們 不用再 try-catch-finally 了,事務管理自動運行,當我們執行完成後,所有相關變更會被自動清除
執行結果
在 Eclipse 的 Junit 視圖中,我們可以看到如下的結果:
圖 3. 執行結果

小結
如果 您希望在 Spring 環境中進行單元測試,那麼可以做如下配置:
繼續使用 Junit4 測試框架,包括其 @Test 注釋標簽和相關的類和方法的定義,這些都不用變
您需要通過 @RunWith(SpringJUnit4ClassRunner.class) 來啟動 Spring 對測試類的支持
您需要通過 @ContextConfiguration 注釋標簽來指定 Spring 配置文件或者配置類的位置
您需要通過 @Transactional 來啟用自動的事務管理
您可以使用 @Autowired 自動織入 Spring 的 bean 用來測試
另外您不再需要:
手工加載 Spring 的配置文件
手工清理數據庫的每次變更
手工獲取 application context 然後獲取 bean 實例
Spring 測試注釋標簽
我們已經看到利用 Spring test framework 來進行基於 Junit4 的單元測試是多麼的簡單 ,下面我們來看一下前面遇到的各種注釋標簽的一些可選用法。
@ContextConfiguration 和 @Configuration 的使 用
剛才已經介紹過,可以輸入 Spring xml 文件的位置,Spring test framework 會自動加載 XML 文件,得到 application context,當然也可以使用 Spring 3.0 新提供的特性 @Configuration,這個注釋標簽允許您用 Java 語言來 定義 bean 實例,舉個例子:
現在我們將前面定義的 Spring-db1.xml 進行修改,我們希望其中的三個 bean: initer、accountDao、accountService 通過配置類來定義,而不是 XML,則我們需要定義如下配置類:
注意:如果 您想使用 @Configuration,請在 classpath 中加入 cglib 的 jar 包(cglib-nodep-2.2.3.jar),否則會報錯。
清單 8. SpringDb2Config.Java
package config;

import org.Springframework.beans.factory.annotation.Autowired;
import org.Springframework.context.annotation.Bean;
import org.Springframework.context.annotation.Configuration;
import org.Springframework.jdbc.datasource.DriverManagerDataSource;

import service.AccountService;
import service.Initializer;
import DAO.AccountDao;

@Configuration
public class SpringDb2Config {
    private @Autowired DriverManagerDataSource datasource;
    @Bean
    public Initializer initer() {
        return new Initializer();
    }

    @Bean
    public AccountDao accountDao() {
AccountDao DAO = new AccountDao();
DAO.setDataSource(datasource);
return DAO;
    }

    @Bean
    public AccountService accountService() {
return new AccountService();
    }
}
注意上面的注釋標簽:
@Configuration:表明這個類是一個 Spring 配置類,提供 Spring 的 bean 定 義,實際效果等同於 XML 配置方法
@Bean:表明這個方法是一個 bean 的定義,缺省情況下,方法名稱就是 bean 的 Id
@Autowired:這個 datasource 采用自動注入的方式獲取
注意,我們采用的是 XML+config bean 的 方式進行配置,這種方式比較符合實際項目的情況。相關的 Spring 配置文件也要做變化,如下清單所示:
清單 9. Spring-db2.xml
<beans xmlns="http://www.Springframework.org/schema/beans"
    xmlns:xsi="http://www.w3.org/2001/XMLSchema-instance"
xmlns:context="http://www.Springframework.org/schema/context"
xsi:schemaLocation="http://www.Springframework.org/schema/beans
http://www.Springframework.org/schema/beans/Spring-beans-3.0.xsd
http://www.Springframework.org/schema/context
http://www.Springframework.org/schema/context/Spring-context-3.0.xsd">
<context:annotation-config/>
<bean id="datasource"
class="org.Springframework.jdbc.datasource.DriverManagerDataSource">
        <property name="driverClassName" value="org.hsqldb.jdbcDriver" />
        <property name="url" value="jdbc:hsqldb:hsql://localhost" />
        <property name="username" value="sa"/>
        <property name="password" value=""/>
    </bean>
<bean id="transactionManager"
         class="org.Springframework.jdbc.datasource.DataSourceTransactionManager">
        <property name="dataSource" ref="datasource"></property>
    </bean>

    <bean class="config.SpringDb2Config"/>
</beans>
注意裡面的 context 命名空間的定義,如代碼中黑體字所示。另外還必須有 <context:annotaiton-config/> 的定義,這個定義允許采用注釋標簽的方式來控制 Spring 的容器,最後我們看到 beans 已經沒有 initer、accountDao 和 accountService 這些 bean 的定義,取而代之的是一個 SpringDb2Config bean 的定義,注意這個 bean 沒有名稱,因為不需要被引用。
現在有了這些配置,我們的測試類只要稍稍修改一下,即 可實現加載配置類的效果,如下:
@ContextConfiguration("/config/Spring-db2.xml")
通過上面的配置,測試用例就可以實現加載 Spring 配置類,運行結果也是成功的 green bar。
@DirtiesContext
缺省情況下,Spring 測試框架一旦加載 applicationContext 後,將一直緩存,不會改變 ,但是,
由於 Spring 允許在運行期修改 applicationContext 的定義,例如在運行期獲取 applicationContext, 然後調用 registerSingleton 方法來動態的注冊新的 bean,這樣的情況下,如果我們還使用 Spring 測試框架的被修改過 applicationContext,則會帶來測試問題,我們必須能夠在運行期重新加載 applicationContext,這個時候,我們可以在 測試類或者方法上注釋:@DirtiesContext,作用如下:
如果定義在類上(缺省),則在此測試類運行完成後,重新 加載 applicationContext
如果定義在方法上,即表示測試方法運行完成後,重新加載 applicationContext
@TransactionConfiguration 和 @Rollback
缺省情況下,Spring 測試框架將事務管理 委托到名為 transactionManager 的 bean 上,如果您的事務管理器不是這個名字,那需要指定 transactionManager 屬性 名稱,還可以指定 defaultRollback 屬性,缺省為 true,即所有的方法都 rollback,您可以指定為 false,這樣,在一 些需要 rollback 的方法,指定注釋標簽 @Rollback(true)即可。
對 Junit4 的注釋標簽支持
看了上面 Spring 測試框架的注釋標簽,我們來看看一些常見的基於 Junit4 的注釋標簽在 Spring 測試環境中的使用方法。
@Test(expected=...)
此注釋標簽的含義是,這是一個測試,期待一個異常的發生,期待的異常通過 xxx.class 標識。例如,我們修改 AccountService.Java 的 insertIfNotExist 方法,對於傳入的參數如果為空,則拋出 IllegalArgumentException,如下:
public void insertIfNotExist(Account account) {
if (account==null)
throw new IllegalArgumentException("account is null");
Account acct = accountDao.getAccountById(account.getId());
if(acct==null) {
log.debug("No "+account+" found,would insert it.");
accountDao.saveAccount(account);
}
acct = null;
}
然後,在測試類中增 加一個測試異常的方法,如下:
@Test(expected=IllegalArgumentException.class)
public void testInsertException() {
service.insertIfNotExist(null);
}
運行結果是 green bar。
@Test(timeout=...)
可以給測試方法指定超時時間(毫秒級別),當測試方法的執行時間超過此值,則失敗 。
比如在 AccountService 中增加如下方法:
public void doSomeHugeJob() {
try {
Thread.sleep(2*1000);
} catch (InterruptedException e) {
}
}
上述方法模擬任務執行時間 2 秒,則測試方法如下:
@Test(timeout=3000)
public void testHugeJob() {
service.doSomeHugeJob();
}
上述測試方法期待 service.doSomeHugeJob 方法能在 3 秒內結束,執行測試結果是 green bar。
@Repeat
通過 @Repeat,您可以輕松的多次執行測試用 例,而不用自己寫 for 循環,使用方法:
@Repeat(3)
@Test (expected=IllegalArgumentException.class)
public void testInsertException() {
service.insertIfNotExist(null);
}
這樣,testInsertException 就能被執行 3 次。
在測 試類中基於 profile 加載測試 bean
從 Spring 3.2 以後,Spring 開始支持使用 @ActiveProfiles 來指定測試類 加載的配置包,比如您的配置文件只有一個,但是需要兼容生產環境的配置和單元測試的配置,那麼您可以使用 profile 的方式來定義 beans,如下:
清單 10. Spring-db.xml
<beans

xmlns="http://www.Springframework.org/schema/beans"
     xmlns:xsi="http://www.w3.org/2001/XMLSchema-instance"
 xsi:schemaLocation="http://www.Springframework.org/schema/beans
 http://www.Springframework.org/schema/beans/Spring-beans-3.2.xsd">
     <beans profile="test">
 <bean id="datasource"
 class="org.Springframework.jdbc.datasource.DriverManagerDataSource">
 <property name="driverClassName" value="org.hsqldb.jdbcDriver" />
     <property name="url" value="jdbc:hsqldb:hsql://localhost" />
     <property name="username" value="sa"/>
     <property name="password" value=""/>
     </bean>
</beans>

<beans profile="production">
 <bean id="datasource"
 class="org.Springframework.jdbc.datasource.DriverManagerDataSource">
     <property name="driverClassName" value="org.hsqldb.jdbcDriver" />
     <property name="url" value="jdbc:hsqldb:hsql://localhost/prod" />
     <property name="username" value="sa"/>
     <property name="password" value=""/>
     </bean>
 </beans>
 <beans profile="test,production">
 <bean id="transactionManager"
     class="org.Springframework.jdbc.datasource.DataSourceTransactionManager">
     <property name="dataSource" ref="datasource"></property>
     </bean>
     <bean id="initer" init-method="init" class="service.Initializer">
     </bean>
 <bean id="accountDao" depends-on="initer" class="DAO.AccountDao">
             <property name="dataSource" ref="datasource"/>
         </bean>

         <bean id="accountService" class="service.AccountService">
         </bean>
         <bean id="envSetter" class="EnvSetter"/>
     </beans>
 </beans>
上面的定義,我們看到:
在 XML 頭中我們引用了 Spring 3.2 的 beans 定義,因為只 有 Spring 3.2+ 才支持基於 profile 的定義
在 <beans> 根節點下可以嵌套 <beans> 定義,要指定 profile 屬性,這個配置中,我們定義了兩個 datasource,一個屬於 test profile,一個輸入 production profile,這 樣,我們就能在測試程序中加載 test profile,不影響 production 數據庫了
在下面定義了一些屬於兩個 profile 的 beans,即 <beans profile=”test,production”> 這樣方便重用一些 bean 的定義,因為這些 bean 在兩個 profile 中都是一樣的
清單 11. AccountServiceTest.Java
@RunWith(SpringJUnit4ClassRunner.class)
@ContextConfiguration("/config/Spring-db.xml")
@Transactional
@ActiveProfiles("test")
public class AccountServiceTest {
...
}
注意上面的 @ActiveProfiles,可以指定一個或者多個 profile,這樣我們的測試類就僅僅加載這些名字的 profile 中定義的 bean 實例。
對 TestNG 的支持
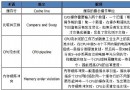
Spring 2.5 以後,就開始支持 TestNG 了,支持的方法 包括:
將您的 TestNG 測試類繼承 Spring 的測試父類:AbstractTransactionalTestNGSpringContextTests 或者 AbstractTestNGSpringContextTests,這樣您的 TestNG 測試類內部就可以訪問 applicationContext 成員變量了
不繼承 Spring 父類,在測試類上使用 @TestExecutionListeners 注釋標簽,可以引入的監聽器包括 DependencyInjectionTestExecutionListener:使得測試類擁有依賴注入特性 DirtiesContextTestExecutionListener:使得測試類擁有更新 applicationContext 能力 TransactionalTestExecutionListener:使得測試類擁有自動的事務管理能力
這裡我們演示一下如何使用 Spring 提供的 TestNG 父類來進行測試。
清單 12. AccountServiceTestNGTest.Java
package testng;

import static org.Junit.Assert.assertEquals;

import org.Springframework.beans.factory.annotation.Autowired;
import org.Springframework.test.context.ActiveProfiles;
import org.Springframework.test.context.ContextConfiguration;
import org.Springframework.test.context.testng.
AbstractTransactionalTestNGSpringContextTests;
import org.Springframework.transaction.annotation.Transactional;

import service.AccountService;
import domain.Account;

@ContextConfiguration("/config/Spring-db.xml")
@Transactional
@ActiveProfiles("test")
public class AccountServiceTestNGTest extends
AbstractTransactionalTestNGSpringContextTests {
    @Autowired
    private AccountService service;

    @org.testng.annotations.Test
    public void testGetAcccountById() {
        Account acct = Account.getAccount(1, "user01", 18, "M");
        service.insertIfNotExist(acct);
        Account acct2 = service.getAccountById(1);
        assertEquals(acct,acct2);
    }
}
執行測試,我們將看到測試成功。
圖 4. 測試成功
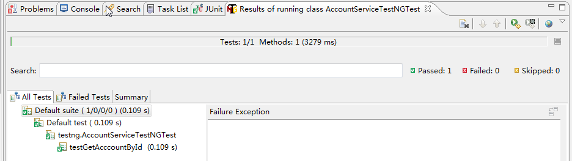
搜索數據庫對應的表,我們看到裡面沒有數 據,說明自動事務起作用了。
基本原理
Spring test framework 主要位於 org.Springframework.test.context 包中,主要包括下面幾個類:
圖 5. Spring 測試框架類圖
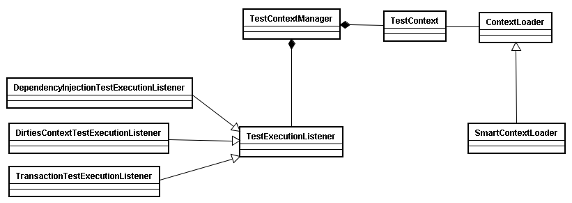
TestContextManager:主要的入口類,提供 TestContext 實例的管理,負責根據各種事件來通知測試監聽器
TestContext:實體類,提供訪問 Spring applicatoin context 的能力,並負責緩存 applicationContext
TestExecutionListener:測試監聽器,提供依賴注入、applicationContext 緩存和事務管理等能力
ContextLoader:負責根據配置加載 Spring 的 bean 定義,以構建 applicationContext 實例對象
SmartContextLoader:Spring 3.1 引入的新加載方法,支持按照 profile 加載
Spring 通過 AOP hook 了測試類的實例創建、beforeClass、before、after、afterClass 等事件入口,執行順序主要 如下:
圖 6. Spring 測試框架執行序列圖
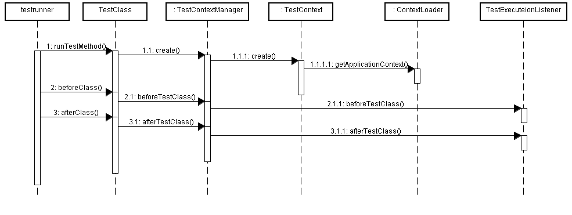
測試執行者開始執行測試類,這個時候 Spring 獲取消息,自動創建 TestContextManager 實例
TestContextManager 會創建 TestContext,以記錄當前測試的上下文信息,TestContext 則通過 ContextLoader 來獲 取 Spring ApplicationContext 實例
當測試執行者開始執行測試類的 BeforeClass、Before、After、AfterClass 的時候,TestContextManager 將截獲事件 ,發通知給對應的 TestExecutionListener
總結
根據上面的例子和介紹,我們可以看到,Spring 測試框架的主要特點如下:
完美的支持了 Junit4 (提供特別的 SpringJunit4ClassRunner),比較好的支持了 TestNG
在支持原有單元測試能力的基礎上,通過各種 監聽器,支持了測試類的依賴注入、對 Spring applicationContext 的訪問以及事務管理能力,為使用 Spring 架構的應 用程序的測試帶來了極大的便利性
Spring 3.1 引入的基於 profile 的加載能力使得測試環境和正式環境可以在一 個 XML 定義中完美的結合
總之,如果您的程序中使用了 Spring,且對用 Junit 或者 testNG 來對他們進行單元測 試感到力不從心,可以考慮使用 Spring test framework,它將使您的應用程序的質量上一個新的台階。