第八步、使用Spring Security保護Web資源。在SpringSide 3項目中,已經 整合進了SpringSecurity,實現了符合RBAC規范的權限管理系統,並把數據保存 到了數據庫中。我以前的博文SpringSide 3 中的安全框架中對SpringSecurity 有一個初步的探討,我認為我寫的東西對入門來說是很有幫助的,入門以後再深 入就簡單了,在評論中我又補充了幾點,其中就提到如果要把資源權限配置內容 放到數據庫中,就要從objectDefinitionSource著手。事實上,在最新的 SpringSide 3版本中,就是通過定義一個databaseDefinitionSource來實現從數 據庫中讀取資源和權限之間的關系,而 databaseDefinitionSource引用 resourceDetailService,而該Service調用 personal.youxia.service.security.ResourceDetailServiceImpl。就是這樣一 層套一層的關系,但是最終只需要用戶實現 personal.youxia.service.security.ResourceDetailServiceImpl即可。在 SpringSide 3項目中,實現該Service的工作都可以省略,因為江南白衣已經做 好了。而我們要做的,就是在他提供的基礎上進行擴展。
在項目中,已經定義好了users、roles、authorities和resource,如果需要 擴展其中任意一項,只需要向對應的數據表添加記錄即可。預定義的role有“管 理員”和“用戶”兩種,我認為在該示例中已經沒有增加角色的必要了,而 authorities是肯定要增加的,我想讓只有“用戶”能夠添加文章,只有“管理 員”能夠刪除文章,所以在authorities表中增加如下兩行:
insert into AUTHORITIES (NAME,DISPLAY_NAME) values ('A_ADD_ARTICLE','添加文章');

insert into AUTHORITIES (NAME,DISPLAY_NAME) values ('A_DELETE_ARTICLE','刪除文章');
建立authorities表和roles表的聯系,用戶可以添加文章,管理員當然也能 夠添加文章,而只有管理員能夠刪除文章,所以在數據庫中添加如下三行:
insert into ROLES_AUTHORITIES values(1,5);

insert into ROLES_AUTHORITIES values(1,6);

insert into ROLES_AUTHORITIES values(2,5);
再來看看需要保護的資源,它們應該分別為article.action、article! input.action、article!save.action、article!delete.action,其中只有後面 三個需要保護,因此在數據庫中添加如下三行:
insert into RESOURCES (RESOURCE_TYPE,VALUE,ORDER_NUM)  values('url','/article!input*',7.0);

insert into RESOURCES (RESOURCE_TYPE,VALUE,ORDER_NUM) values ('url','/article!save*',8.0);

insert into RESOURCES (RESOURCE_TYPE,VALUE,ORDER_NUM) values ('url','/article!delete*',9.0);
最後,需要建立授權和資源之間的聯系,如下:
insert into RESOURCES_AUTHORITIES values(5,7);

insert into RESOURCES_AUTHORITIES values(5,8);

insert into RESOURCES_AUTHORITIES values(6,9);
這時,再運行項目,會發現沒有登錄的用戶只能察看文章,而點擊增加文章 或刪除文章的鏈接,就會跳到Login界面,或顯示你沒有訪問該頁面的權限。
對於項目中自帶的用戶、角色、授權和資源管理,我是這樣的看法:最開始 接觸SpringSide 3項目的時候,我覺得該功能是個雞肋,甚至想過把這些功能刪 除掉,弄一個干淨的項目從頭做;經過一段時間的思考後,我的觀念變了,我覺 得這個功能非常有用,是一個很好的基礎,而我們自己的功能,都可以從這裡進 行擴展;這裡的擴展,大部分都只需要在數據庫中添加數行記錄即可,正如上面 的演示,唯一不能達到要求的,可能是有的人覺得users表字段太少,而實際項 目中我們要記錄用戶的信息遠遠不止這麼少,其實這個問題也好解決,只需要創 建一個 user_details表即可,或者叫user_profiles,再按照之前的步驟創建針 對user_details表的增刪查改功能;總之,盡量不要去更改江南白衣已經實現了 的數據庫結構和程序代碼。
SpringSecurity針對資源的保護,不僅僅是只能在數據庫中配置,其實 SpringSecurity更提供了一些有用的標簽,可以在視圖文件中靈活使用。具體內 容,大家請參考SpringSecurity文檔。
第九步、將項目遷移到多數據庫環境。其實只要了解前面的八步,簡單的項 目就可以搞定了,但是對於致力於高並發高負載的分布式應用,則離不開多數據 源和分布式事務管理,Web Service和AJAX的跨域訪問也是做分布式應用的有力 武器。在我前面的博文中,我已經探討過了多數據源配置的各種問題:
SpringSide 3 中的多數據源配置的問題
在SpringSide 3 中使用多個數據庫的方法
在這裡,我選擇了第三種方法,就是在Spring中整合Atomikos。下載 Atomikos 3.5.5版,把如下transactions-essentials-alljar文件和 jta.properties文件拷入到項目的WEB-INF/lib目錄下。
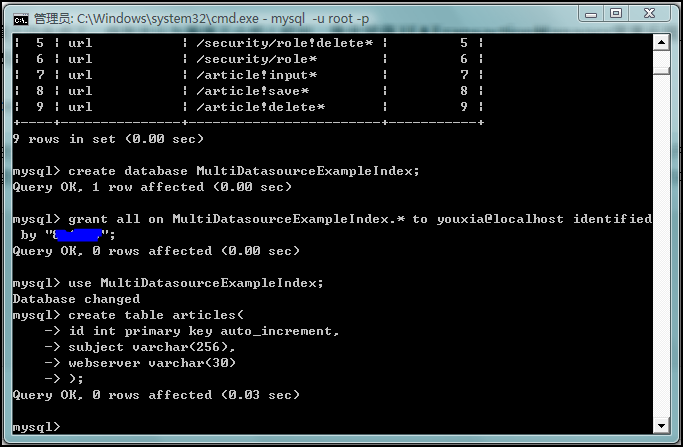
創建第二個數據庫,名稱為MultiDatasourceExampleIndex,其中包含一個 Article表,如下:
創建Entity類ArticleIndex.java,創建Dao類ArticleIndexDao.java,創建 Manager類 ArticleIndexManager.java,這幾個過程和前面的過程沒有什麼區別 ,所以我就不列代碼出來了。為了減少編寫Action的工作,我將添加 ActionIndex的動作放到了ArticleAction中,即在添加Article的同時添加 ArticleIndex。
修改applicationContext.xml文件,配置雙份的dataSource、雙份的 sessionFactory,並使用JTATransactionManager,如下:
<?xml version="1.0" encoding="UTF-8"?>

<beans xmlns="http://www.springframework.org/schema/beans"  xmlns:xsi="http://www.w3.org/2001/XMLSchema-instance"

     xmlns:jee="http://www.springframework.org/schema/jee"  xmlns:tx="http://www.springframework.org/schema/tx"

     xmlns:context="http://www.springframework.org/schema/context"

     xsi:schemaLocation="http://www.springframework.org/schema/beans  http://www.springframework.org/schema/beans/spring-beans-2.5.xsd  http://www.springframework.org/schema/tx  http://www.springframework.org/schema/tx/spring-tx-2.5.xsd  http://www.springframework.org/schema/jee  http://www.springframework.org/schema/jee/spring-jee-2.5.xsd  http://www.springframework.org/schema/context  http://www.springframework.org/schema/context/spring-context- 2.5.xsd"

     default-lazy-init="true">

     <description>Spring公共配置文件 </description>

     <!-- 定義受環境影響易變的變量 -->

     <bean  class="org.springframework.beans.factory.config.PropertyPlaceholderCon figurer">

         <property name="systemPropertiesModeName"  value="SYSTEM_PROPERTIES_MODE_OVERRIDE" />

         <property name="ignoreResourceNotFound" value="true" />

         <property name="locations">

             <list>

                 <!-- 標准配置 -->

                 <value>classpath*:/application.properties</value>

                 <!-- 本地開發環境配置 -->

                 <value>classpath*:/application.local.properties</value>

                 <!-- 服務器生產環境配置 -->

                 <!--  <value>file:/var/myapp/application.server.properties</value&g t; -->

             </list>

         </property>

     </bean>

     <!-- 使用annotation 自動注冊bean,並保證@Required,@Autowired的屬 性被注入 -->

     <context:component-scan base- package="personal.youxia" />

<bean id="dataSourceContent"  class="com.atomikos.jdbc.AtomikosDataSourceBean" init-method="init"  destroy-method="close">

         <property name="uniqueResourceName">

             <value>jdbc/dataSourceContent</value>

         </property>

         <property name="xaDataSourceClassName">

             <value>com.mysql.jdbc.jdbc2.optional.MysqlXADataSource</value >

         </property>

         <property name="xaProperties">

             <props>

                 <prop key="serverName">localhost</prop>

                 <prop key="portNumber">3306</prop>

                 <prop  key="databaseName">MultiDatasourceExample</prop>

                 <prop key="user">youxia</prop>

                 <prop key="password">******</prop>

             </props>

         </property>

         <property name="poolSize">

             <value>3</value>

         </property>

     </bean>

     <bean id="dataSourceIndex"  class="com.atomikos.jdbc.AtomikosDataSourceBean" init-method="init"  destroy-method="close">

         <property name="uniqueResourceName">

             <value>jdbc/dataSourceIndex</value>

         </property>

         <property name="xaDataSourceClassName">

             <value>com.mysql.jdbc.jdbc2.optional.MysqlXADataSource</value >

         </property>

         <property name="xaProperties">

             <props>

                 <prop key="serverName">localhost</prop>

                 <prop key="portNumber">3306</prop>

                 <prop  key="databaseName">MultiDatasourceExample</prop>

                 <prop key="user">youxia</prop>

                 <prop key="password">******</prop>

             </props>

         </property>

         <property name="poolSize">

             <value>3</value>

         </property>

     </bean>

     <!-- Hibernate配置 -->

     <bean id="sessionFactoryContent"  class="org.springframework.orm.hibernate3.annotation.AnnotationSession FactoryBean">

         <property name="dataSource" ref="dataSourceContent" />

         <property name="namingStrategy">

             <bean  class="org.hibernate.cfg.ImprovedNamingStrategy" />

         </property>

         <property name="hibernateProperties">

             <props>

                 <prop  key="hibernate.dialect">org.hibernate.dialect.MySQL5InnoDBDialect&l t;/prop>

                 <prop key="hibernate.show_sql">${hibernate.show_sql} </prop>

                 <prop key="hibernate.format_sql">${hibernate.format_sql} </prop>

                 <prop  key="hibernate.cache.provider_class">org.hibernate.cache.EhCachePro vider

                 </prop>

                 <prop  key="hibernate.cache.provider_configuration_file_resource_path">${h ibernate.ehcache_config_file}</prop>

             </props>

         </property>

         <property name="packagesToScan"  value="personal.youxia.entity.*" />

     </bean>

     <bean id="sessionFactoryIndex"  class="org.springframework.orm.hibernate3.annotation.AnnotationSession FactoryBean">

         <property name="dataSource" ref="dataSourceIndex" />

         <property name="namingStrategy">

             <bean  class="org.hibernate.cfg.ImprovedNamingStrategy" />

         </property>

         <property name="hibernateProperties">

             <props>

                 <prop  key="hibernate.dialect">org.hibernate.dialect.MySQL5InnoDBDialect&l t;/prop>

                 <prop key="hibernate.show_sql">${hibernate.show_sql} </prop>

                 <prop key="hibernate.format_sql">${hibernate.format_sql} </prop>

                 <prop  key="hibernate.cache.provider_class">org.hibernate.cache.EhCachePro vider

                 </prop>

                 <prop  key="hibernate.cache.provider_configuration_file_resource_path">${h ibernate.ehcache_config_file}</prop>

             </props>

         </property>

         <property name="packagesToScan"  value="personal.youxia.entity.*" />

     </bean>


     <!-- 事務管理器配置,多數據源JTA事務-->

      <bean id="atomikosTransactionManager"  class="com.atomikos.icatch.jta.UserTransactionManager" init- method="init" destroy-method="close">

         <property  name="forceShutdown"><value>true</value></property&g t;

     </bean>


     <bean id="atomikosUserTransaction"  class="com.atomikos.icatch.jta.UserTransactionImp">

         <property name="transactionTimeout" value="300"/>

     </bean>

     <bean id="transactionManager"  class="org.springframework.transaction.jta.JtaTransactionManager">< BR>          <property name="transactionManager"  ref="atomikosTransactionManager" />

         <property name="userTransaction"  ref="atomikosUserTransaction"/>

     </bean>

     <!-- 使用annotation定義事務 -->

     <tx:annotation-driven transaction-manager="transactionManager"  />

</beans>
修改web.xml,配置雙份的OpenSessionInViewFilter,如下: 1321
<?xml version="1.0" encoding="UTF-8"?>

<web-app version="2.4" xmlns="http://java.sun.com/xml/ns/j2ee"  xmlns:xsi="http://www.w3.org/2001/XMLSchema-instance"

     xsi:schemaLocation="http://java.sun.com/xml/ns/j2ee  http://java.sun.com/xml/ns/j2ee/web-app_2_4.xsd">

     <display-name>MultiDatasourceExample</display-name>

     <!-- Spring ApplicationContext配置文件的路徑,可使用通配符,多個路 徑用,號分隔

         此參數用於後面的Spring Context Loader -->

     <context-param>

         <param-name>contextConfigLocation</param-name>

         <param-value>classpath*:/applicationContext*.xml</param- value>

     </context-param>

     <!-- Character Encoding filter -->

     <filter>

         <filter-name>encodingFilter</filter-name>

         <filter- class>org.springframework.web.filter.CharacterEncodingFilter</fi lter-class>

         <init-param>

             <param-name>encoding</param-name>

             <param-value>UTF-8</param-value>

         </init-param>

         <init-param>

             <param-name>forceEncoding</param-name>

             <param-value>true</param-value>

         </init-param>

     </filter>

     <!-- SpringSide's Hibernate Open Session In View filter-- >

     <filter>

         <filter-name>hibernateOpenSessionInViewFilterContent</filter -name>

         <filter- class>org.springside.modules.orm.hibernate.OpenSessionInViewFilter& lt;/filter-class>

         <init-param>

             <param-name>excludeSuffixs</param-name>

             <param-value>js,css,jpg,gif</param-value>

         </init-param>

         <init-param>

                <param-name>sessionFactoryBeanName</param-name>

             <param-value>sessionFactoryContent</param-value>

         </init-param>

     </filter>

     <filter>

         <filter-name>hibernateOpenSessionInViewFilterIndex</filter- name>

         <filter- class>org.springside.modules.orm.hibernate.OpenSessionInViewFilter& lt;/filter-class>

         <init-param>

             <param-name>excludeSuffixs</param-name>

             <param-value>js,css,jpg,gif</param-value>

         </init-param>

         <init-param>

                <param-name>sessionFactoryBeanName</param-name>

             <param-value>sessionFactoryIndex</param-value>

         </init-param>

     </filter>

     <!-- SpringSecurity filter-->

     <filter>

         <filter-name>springSecurityFilterChain</filter-name>

         <filter- class>org.springframework.web.filter.DelegatingFilterProxy</filt er-class>

     </filter>

     <!-- Struts2 filter -->

     <filter>

         <filter-name>struts2Filter</filter-name>

         <filter- class>org.apache.struts2.dispatcher.ng.filter.StrutsPrepareAndExecu teFilter</filter-class>

     </filter>

     <filter-mapping>

         <filter-name>encodingFilter</filter-name>

         <url-pattern>/*</url-pattern>

     </filter-mapping>

     <filter-mapping>

         <filter-name>hibernateOpenSessionInViewFilterContent</filter -name>

         <url-pattern>/*</url-pattern>

     </filter-mapping>

     <filter-mapping>

         <filter-name>hibernateOpenSessionInViewFilterIndex</filter- name>

         <url-pattern>/*</url-pattern>

     </filter-mapping>

     <filter-mapping>

         <filter-name>springSecurityFilterChain</filter-name>

         <url-pattern>/*</url-pattern>

     </filter-mapping>

     <filter-mapping>

         <filter-name>struts2Filter</filter-name>

         <url-pattern>/*</url-pattern>

     </filter-mapping>

     <!--Spring的ApplicationContext 載入 -->

     <listener>

         <listener- class>org.springframework.web.context.ContextLoaderListener</lis tener-class>

     </listener>

     <!-- Spring 刷新Introspector防止內存洩露 -->

     <listener>

         <listener- class>org.springframework.web.util.IntrospectorCleanupListener</ listener-class>

     </listener>

     <!-- session超時定義,單位為分鐘 -->

     <session-config>

         <session-timeout>20</session-timeout>

     </session-config>

     <!-- 出錯頁面定義 -->

     <error-page>

         <exception-type>java.lang.Throwable</exception-type>

         <location>/common/500.jsp</location>

     </error-page>

     <error-page>

         <error-code>500</error-code>

         <location>/common/500.jsp</location>

     </error-page>

     <error-page>

         <error-code>404</error-code>

         <location>/common/404.jsp</location>

     </error-page>

     <error-page>

         <error-code>403</error-code>

         <location>/common/403.jsp</location>

     </error-page>

</web-app>
在每一個Dao類裡面使用@Resource注解指定使用哪一個SessionFactory。代 碼我就不列出來了,運行項目進行測試,成功。
到此,我們的征途圓滿結束。但是SpringSide 3包含的特性遠遠不止這些, 在showcase中,江南白衣不斷在演示一些新的技術,這些技術如果用得恰當,會 有效提高我們項目的開發速度和項目的運行效率,在以後的日子裡,我會逐步為 大家揭開這些神秘的面紗。
這裡是該示例項目的源代碼MultiDatasourceExample.rar,歡迎大家點擊下 載,使用Eclipse 3.4導入後,即可以編輯和運行。由於jar文件太占空間,這個 源代碼裡面是不提供jar文件的,幸好我只給項目增加了mysql- connector.5.0.18.jar、 transaction-essential-all.jar兩個和 jta.properties一個,其余的都是標准的,大家可以從別的項目中拷貝過來。在 運行項目之前,大家一定要記得手動創建數據庫,並修改配置文件裡面的數據庫 名和密碼。