最近在 Ubuntu 14.04 LTS 安裝 LNMP 一鍵安裝包的時候出現了問題,PHP 5 服務沒有啟動,只好使用 Ubuntu 官方源進行安裝:
Nginx (讀音 “engine x”)免費、開源、高效的 HTTP 服務。Nginx 是以穩定著稱,功能豐富,結構簡單,低資源消耗。本教程將演示如何在ubuntu 14.04 服務器中安裝 nginx、PHP5(php-fpm)、MySQL。
本文采用的主機名稱: server1.example.com ,IP地址: 192.168.0.100。可能與你的主機有所不同,自行修改。
安裝中我們使用root賬戶,先進行用戶切換:
sudo su
安裝 MySQL 運行命令:
apt-get install mysql-server mysql-client
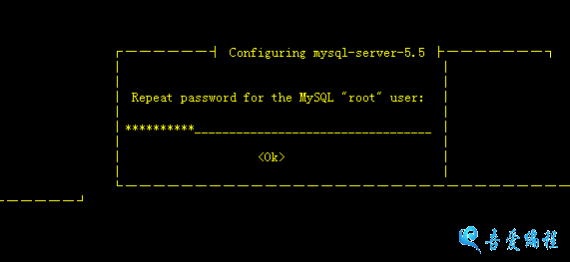
安裝過程中會詢問建立 Root 賬戶密碼,連續輸入兩次:
New password for the MySQL “root” user: <– 輸入你的密碼
Repeat password for the MySQL “root” user: <– 再輸入一次
在安裝 Nginx 之前,如果你已經安裝 Apache2 先刪除在安裝 nginx:
service apache2 stop
update-rc.d -f apache2 remove
apt-get remove apache2
apt-get install nginx
啟動 nginx 服務:
service nginx start
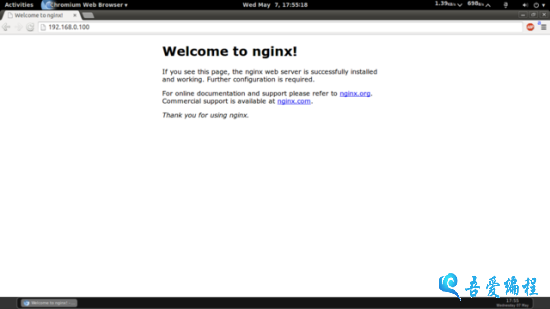
試試安裝是否成功,在浏覽器輸入IP或主機地址 (e.g. http://192.168.0.100),如下圖所示,說明安裝成功:
在 Ubuntu 14.04 中默認的根目錄為 /usr/share/nginx/html.
我們必須通過 PHP-FPM 才能讓PHP5正常工作,安裝命令:
apt-get install php5-fpm
php-fpm是一個守護進程。
使用Vi打開配置文件/etc/nginx/nginx.conf :
vi /etc/nginx/nginx.conf
配置不是很容易明白,可以參考: http://wiki.nginx.org/NginxFullExample和 http://wiki.nginx.org/NginxFullExample2
我們需要調整工作進程數設置,如下面的值設置:
[...]
worker_processes  4;
[...]
    keepalive_timeout   2;
[...]
默認虛擬主機設置文件 /etc/nginx/sites-available/default 按如下設置:
vi /etc/nginx/sites-available/default
[...]
server {
        listen 80;
        listen [::]:80 default_server ipv6only=on;

        root /usr/share/nginx/html;
        index index.php index.html index.htm;

        # Make site accessible from http://localhost/
        server_name _;

        location / {
                # First attempt to serve request as file, then
                # as directory, then fall back to displaying a 404.
                try_files $uri $uri/ /index.html;
                # Uncomment to enable naxsi on this location
                # include /etc/nginx/naxsi.rules
        }

        location /doc/ {
                alias /usr/share/doc/;
                autoindex on;
                allow 127.0.0.1;
                allow ::1;
                deny all;
        }

        # Only for nginx-naxsi used with nginx-naxsi-ui : process denied requests
        #location /RequestDenied {
        #       proxy_pass http://127.0.0.1:8080;
        #}

        #error_page 404 /404.html;

        # redirect server error pages to the static page /50x.html
        #
        error_page 500 502 503 504 /50x.html;
        location = /50x.html {
                root /usr/share/nginx/html;
        }

        # pass the PHP scripts to FastCGI server listening on 127.0.0.1:9000
        #
        location ~ .php$ {
                try_files $uri =404;
                fastcgi_split_path_info ^(.+.php)(/.+)$;
                # NOTE: You should have "cgi.fix_pathinfo = 0;" in php.ini

                # With php5-cgi alone:
                #fastcgi_pass 127.0.0.1:9000;
                # With php5-fpm:
                fastcgi_pass unix:/var/run/php5-fpm.sock;
                fastcgi_index index.php;
                include fastcgi_params;
        }

        # deny access to .htaccess files, if Apache's document root
        # concurs with nginx's one
        #
        location ~ /.ht {
                deny all;
        }
}
[...]
取消同時偵聽 IPv4 和 IPv6 的80端口。
server_name _; 默認主機名 (當然你可以修改,例如修改為: www.example.com).
index主頁這一行我們加入 index.php。
PHP 重要配置配置 location ~ .php$ {} 這幾行我們需要啟動,反注釋掉。另外再添加一行:try_files $uri =404。
(其他配置查看http://wiki.nginx.org/Pitfalls#Passing_Uncontrolled_Requests_to_PHP 和 http://forum.nginx.org/read.php?2,88845,page=3).
保存文件並重新加載 nginx 命令:
service nginx reload
如果加載失敗,直接用刪除所有配置內容,用上面的信息替換。
打開配置文件 /etc/php5/fpm/php.ini…
vi /etc/php5/fpm/php.ini
… 如下設置 cgi.fix_pathinfo=0:
[...]
; cgi.fix_pathinfo provides *real* PATH_INFO/PATH_TRANSLATED support for CGI.  PHP's
; previous behaviour was to set PATH_TRANSLATED to SCRIPT_FILENAME, and to not grok
; what PATH_INFO is.  For more information on PATH_INFO, see the cgi specs.  Setting
; this to 1 will cause PHP CGI to fix its paths to conform to the spec.  A setting
; of zero causes PHP to behave as before.  Default is 1.  You should fix your scripts
; to use SCRIPT_FILENAME rather than PATH_TRANSLATED.
; http://php.net/cgi.fix-pathinfo
cgi.fix_pathinfo=0
[...]
重新加載 PHP-FPM:
service php5-fpm reload
現在創建一個探針文件保存在 /usr/share/nginx/html目錄下
vi /usr/share/nginx/html/info.php
<?php
phpinfo();
?>
浏覽器下訪問探針文件 (e.g. http://192.168.0.100/info.php):
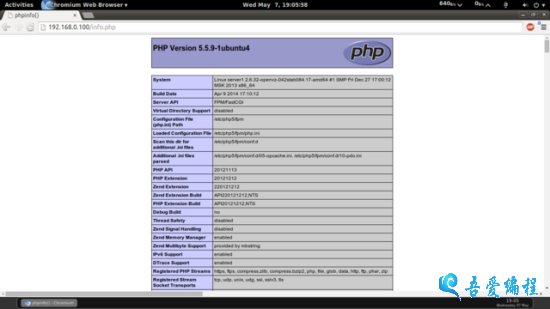
正如你看到的 PHP5 正在運行,並且是通過 FPM/FastCGI,向下滾動,我們看看那些模塊已經啟動,MySQL是沒有列出這意味著我們沒有MySQL支持PHP5。
先搜索一下,看看那些模塊支持:
apt-cache search php5
然後使用下面的命令安裝:
apt-get install php5-mysql php5-curl php5-gd php5-intl php-pear php5-imagick php5-imap php5-mcrypt php5-memcache php5-ming php5-ps php5-pspell php5-recode php5-snmp php5-sqlite php5-tidy php5-xmlrpc php5-xsl
APC是一個自由和開放的PHP操作碼緩存器緩存和優化PHP的中間代碼。這是類似於其他PHP操作碼cachers,如eAccelerator、XCache。這是強烈建議有一個安裝加速你的PHP頁面。
使用下面的命令安裝 APC:
apt-get install php-apc
現在重新加載 PHP-FPM:
service php5-fpm reload
刷新 http://192.168.0.100/info.php 向下滾動看看模塊是否支持:
默認情況下 PHP-FPM 偵聽的是 /var/run/php5-fpm.sock,要讓 PHP-FPM 使用 TCP 連接,需要打開編輯配置文件 /etc/php5/fpm/pool.d/www.conf…
vi /etc/php5/fpm/pool.d/www.conf
按照下面的修改信息
[...]
;listen = /var/run/php5-fpm.sock
listen = 127.0.0.1:9000
[...]
這將使php-fpm偵聽端口9000上的IP 127.0.0.1(localhost)。確保你使用的端口不在你的系統上使用。
重新加載 PHP-FPM:
service php5-fpm reload
下面通過配置 nginx 修改主機,更改這一行注釋掉 fastcgi_pass unix:/var/run/php5-fpm.sock; 這一行反注釋 fastcgi_pass 127.0.0.1:9000;,按照下面的設置:
vi /etc/nginx/sites-available/default
[...]
        location ~ .php$ {
                try_files $uri =404;
                fastcgi_split_path_info ^(.+.php)(/.+)$;
                # NOTE: You should have "cgi.fix_pathinfo = 0;" in php.ini

                # With php5-cgi alone:
                fastcgi_pass 127.0.0.1:9000;
                # With php5-fpm:
                #fastcgi_pass unix:/var/run/php5-fpm.sock;
                fastcgi_index index.php;
                include fastcgi_params;
        }
[...]
重新加載 nginx:
service nginx reload
如果你想 Nginx支持 CGI/Perl 腳本服務,可閱讀此教程 Serving CGI Scripts With Nginx On Debian Squeeze/Ubuntu 11.04
推薦的方法是使用fcgiwrap(4章)