<?php
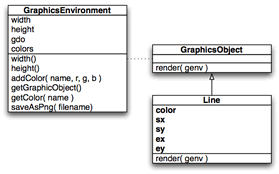
class GraphicsEnvironment
{
public $width;
public $height;
public $gdo;
public $colors = array();
public function __construct( $width, $height )
{
$this->width = $width;
$this->height = $height;
$this->gdo = imagecreatetruecolor( $width, $height );
$this->addColor( "white", 255, 255, 255 );
imagefilledrectangle( $this->gdo, 0, 0,
$width, $height,
$this->getColor( "white" ) );
}
public function width() { return $this->width; }
public function height() { return $this->height; }
public function addColor( $name, $r, $g, $b )
{
$this->colors[ $name ] = imagecolorallocate(
$this->gdo,
$r, $g, $b );
}
public function getGraphicObject()
{
return $this->gdo;
}
public function getColor( $name )
{
return $this->colors[ $name ];
}
public function saveAsPng( $filename )
{
imagepng( $this->gdo, $filename );
}
}
abstract class GraphicsObject
{
abstract public function render( $ge );
}
class Line extends GraphicsObject
{
private $color;
private $sx;
private $sy;
private $ex;
private $ey;
public function __construct( $color, $sx, $sy, $ex, $ey )
{
$this->color = $color;
$this->sx = $sx;
$this->sy = $sy;
$this->ex = $ex;
$this->ey = $ey;
}
public function render( $ge )
{
imageline( $ge->getGraphicObject(),
$this->sx, $this->sy,
$this->ex, $this->ey,
$ge->getColor( $this->color ) );
}
}
?>
<?php
require_once( "glib.php" );
$ge = new GraphicsEnvironment( 400, 400 );
$ge->addColor( "black", 0, 0, 0 );
$ge->addColor( "red", 255, 0, 0 );
$ge->addColor( "green", 0, 255, 0 );
$ge->addColor( "blue", 0, 0, 255 );
$gobjs = array();
$gobjs []= new Line( "black", 10, 5, 100, 200 );
$gobjs []= new Line( "blue", 200, 150, 390, 380 );
$gobjs []= new Line( "red", 60, 40, 10, 300 );
$gobjs []= new Line( "green", 5, 390, 390, 10 );
foreach( $gobjs as $gobj ) { $gobj->render( $ge ); }
$ge->saveAsPng( "test.png" );
?>
% php test.php
%
圖 2 顯示了所生成的 test.png 文件在 Firefox 中的樣子。
圖2. 簡單的圖形對象測試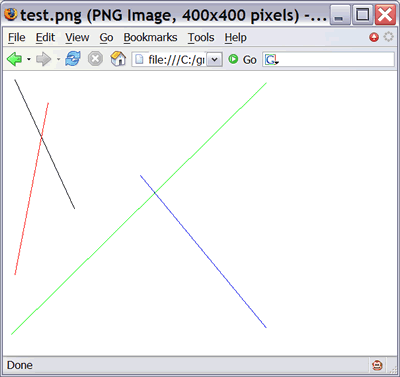
這當然不如蒙娜麗莎漂亮,但是可以滿足目前的工作需要。
[NextPage]
添加維數
我們的第一個需求 —— 提供圖形對象的能力 —— 已經滿足了,現在應該開始滿足第二個需求了:可以使用一個 z 值將一個對象放到其他對象的上面或下面。
我們可以將每個 z 值當作是原始圖像的一個面。所畫的元素是按照 z 值從最小到最大的順序來畫的。例如,讓我們畫兩個圖形元素:一個紅色的圓和一個黑色的方框。圓的 z 值是 100,而黑方框的 z 值是 200。這樣會將圓放到方框之後,如圖 3 所示:
圖3. 不同 z 值的面
我們只需要修改一下 z 值就可以將這個紅圓放到黑方框之上。要實現這種功能,我們需要讓每個 GraphicsObject 都具有一個 z() 方法,它返回一個數字,就是 z 值。由於您需要創建不同的圖形對象(Line、Oval 和 Rectangle),您還需要創建一個基本的類 BoxObject,其他 3 個類都使用它來維護起點和終點的坐標、z 值和這個對象的顏色(請參看圖 4)。
圖 4. 給系統添加另外一維:z 值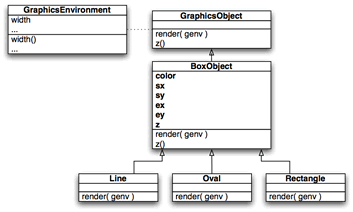
這個圖形庫的新代碼如清單 3 所示:
清單 3. 可以處理 z 信息的圖形庫
<?php
class GraphicsEnvironment
{
 public $width;
 public $height;
 public $gdo;
 public $colors = array();
 public function __construct( $width, $height )
 {
 $this->width = $width;
 $this->height = $height;
 $this->gdo = imagecreatetruecolor( $width, $height );
 $this->addColor( "white", 255, 255, 255 );
 imagefilledrectangle( $this->gdo, 0, 0,
  $width, $height,
  $this->getColor( "white" ) );
 }
 public function width() { return $this->width; }
 public function height() { return $this->height; }
 public function addColor( $name, $r, $g, $b )
 {
 $this->colors[ $name ] = imagecolorallocate(
  $this->gdo,
  $r, $g, $b );
 }
 public function getGraphicObject()
 {
 return $this->gdo;
 }
 public function getColor( $name )
 {
 return $this->colors[ $name ];
 }
 public function saveAsPng( $filename )
 {
 imagepng( $this->gdo, $filename );
 }
}
abstract class GraphicsObject
{
 abstract public function render( $ge );
 abstract public function z();
}
abstract class BoxObject extends GraphicsObject
{
 protected $color;
 protected $sx;
 protected $sy;
 protected $ex;
 protected $ey;
 protected $z;
 public function __construct( $z, $color, $sx, $sy, $ex, $ey )
 {
 $this->z = $z;
 $this->color = $color;
 $this->sx = $sx;
 $this->sy = $sy;
 $this->ex = $ex;
 $this->ey = $ey;
 }
 public function z() { return $this->z; }
}
class Line extends BoxObject
{
 public function render( $ge )
 {
 imageline( $ge->getGraphicObject(),
  $this->sx, $this->sy,
  $this->ex, $this->ey,
  $ge->getColor( $this->color ) );
 }
}
class Rectangle extends BoxObject
{
 public function render( $ge )
 {
 imagefilledrectangle( $ge->getGraphicObject(),
  $this->sx, $this->sy,
  $this->ex, $this->ey,
  $ge->getColor( $this->color ) );
 }
}
class Oval extends BoxObject
{
 public function render( $ge )
 {
 $w = $this->ex - $this->sx;
 $h = $this->ey - $this->sy;
 imagefilledellipse( $ge->getGraphicObject(),
  $this->sx + ( $w / 2 ),
  $this->sy + ( $h / 2 ),
  $w, $h,
  $ge->getColor( $this->color ) );
 }
}
?>
<?php
require_once( "glib.php" );
function zsort( $a, $b )
{
 if ( $a->z() < $b->z() ) return -1;
 if ( $a->z() > $b->z() ) return 1;
 return 0;
}
$ge = new GraphicsEnvironment( 400, 400 );
$ge->addColor( "black", 0, 0, 0 );
$ge->addColor( "red", 255, 0, 0 );
$ge->addColor( "green", 0, 255, 0 );
$ge->addColor( "blue", 0, 0, 255 );
$gobjs = array();
$gobjs []= new Oval( 100, "red", 50, 50, 150, 150 );
$gobjs []= new Rectangle( 200, "black", 100, 100, 300, 300 );
usort( $gobjs, "zsort" );
foreach( $gobjs as $gobj ) { $gobj->render( $ge ); }
$ge->saveAsPng( "test.png" );
?>